


Kit conversion tracking: 3 ways to do it
Learn three different ways to set up conversion tracking for Kit (formerly ConvertKit) forms, and how to work out which one is right for you.
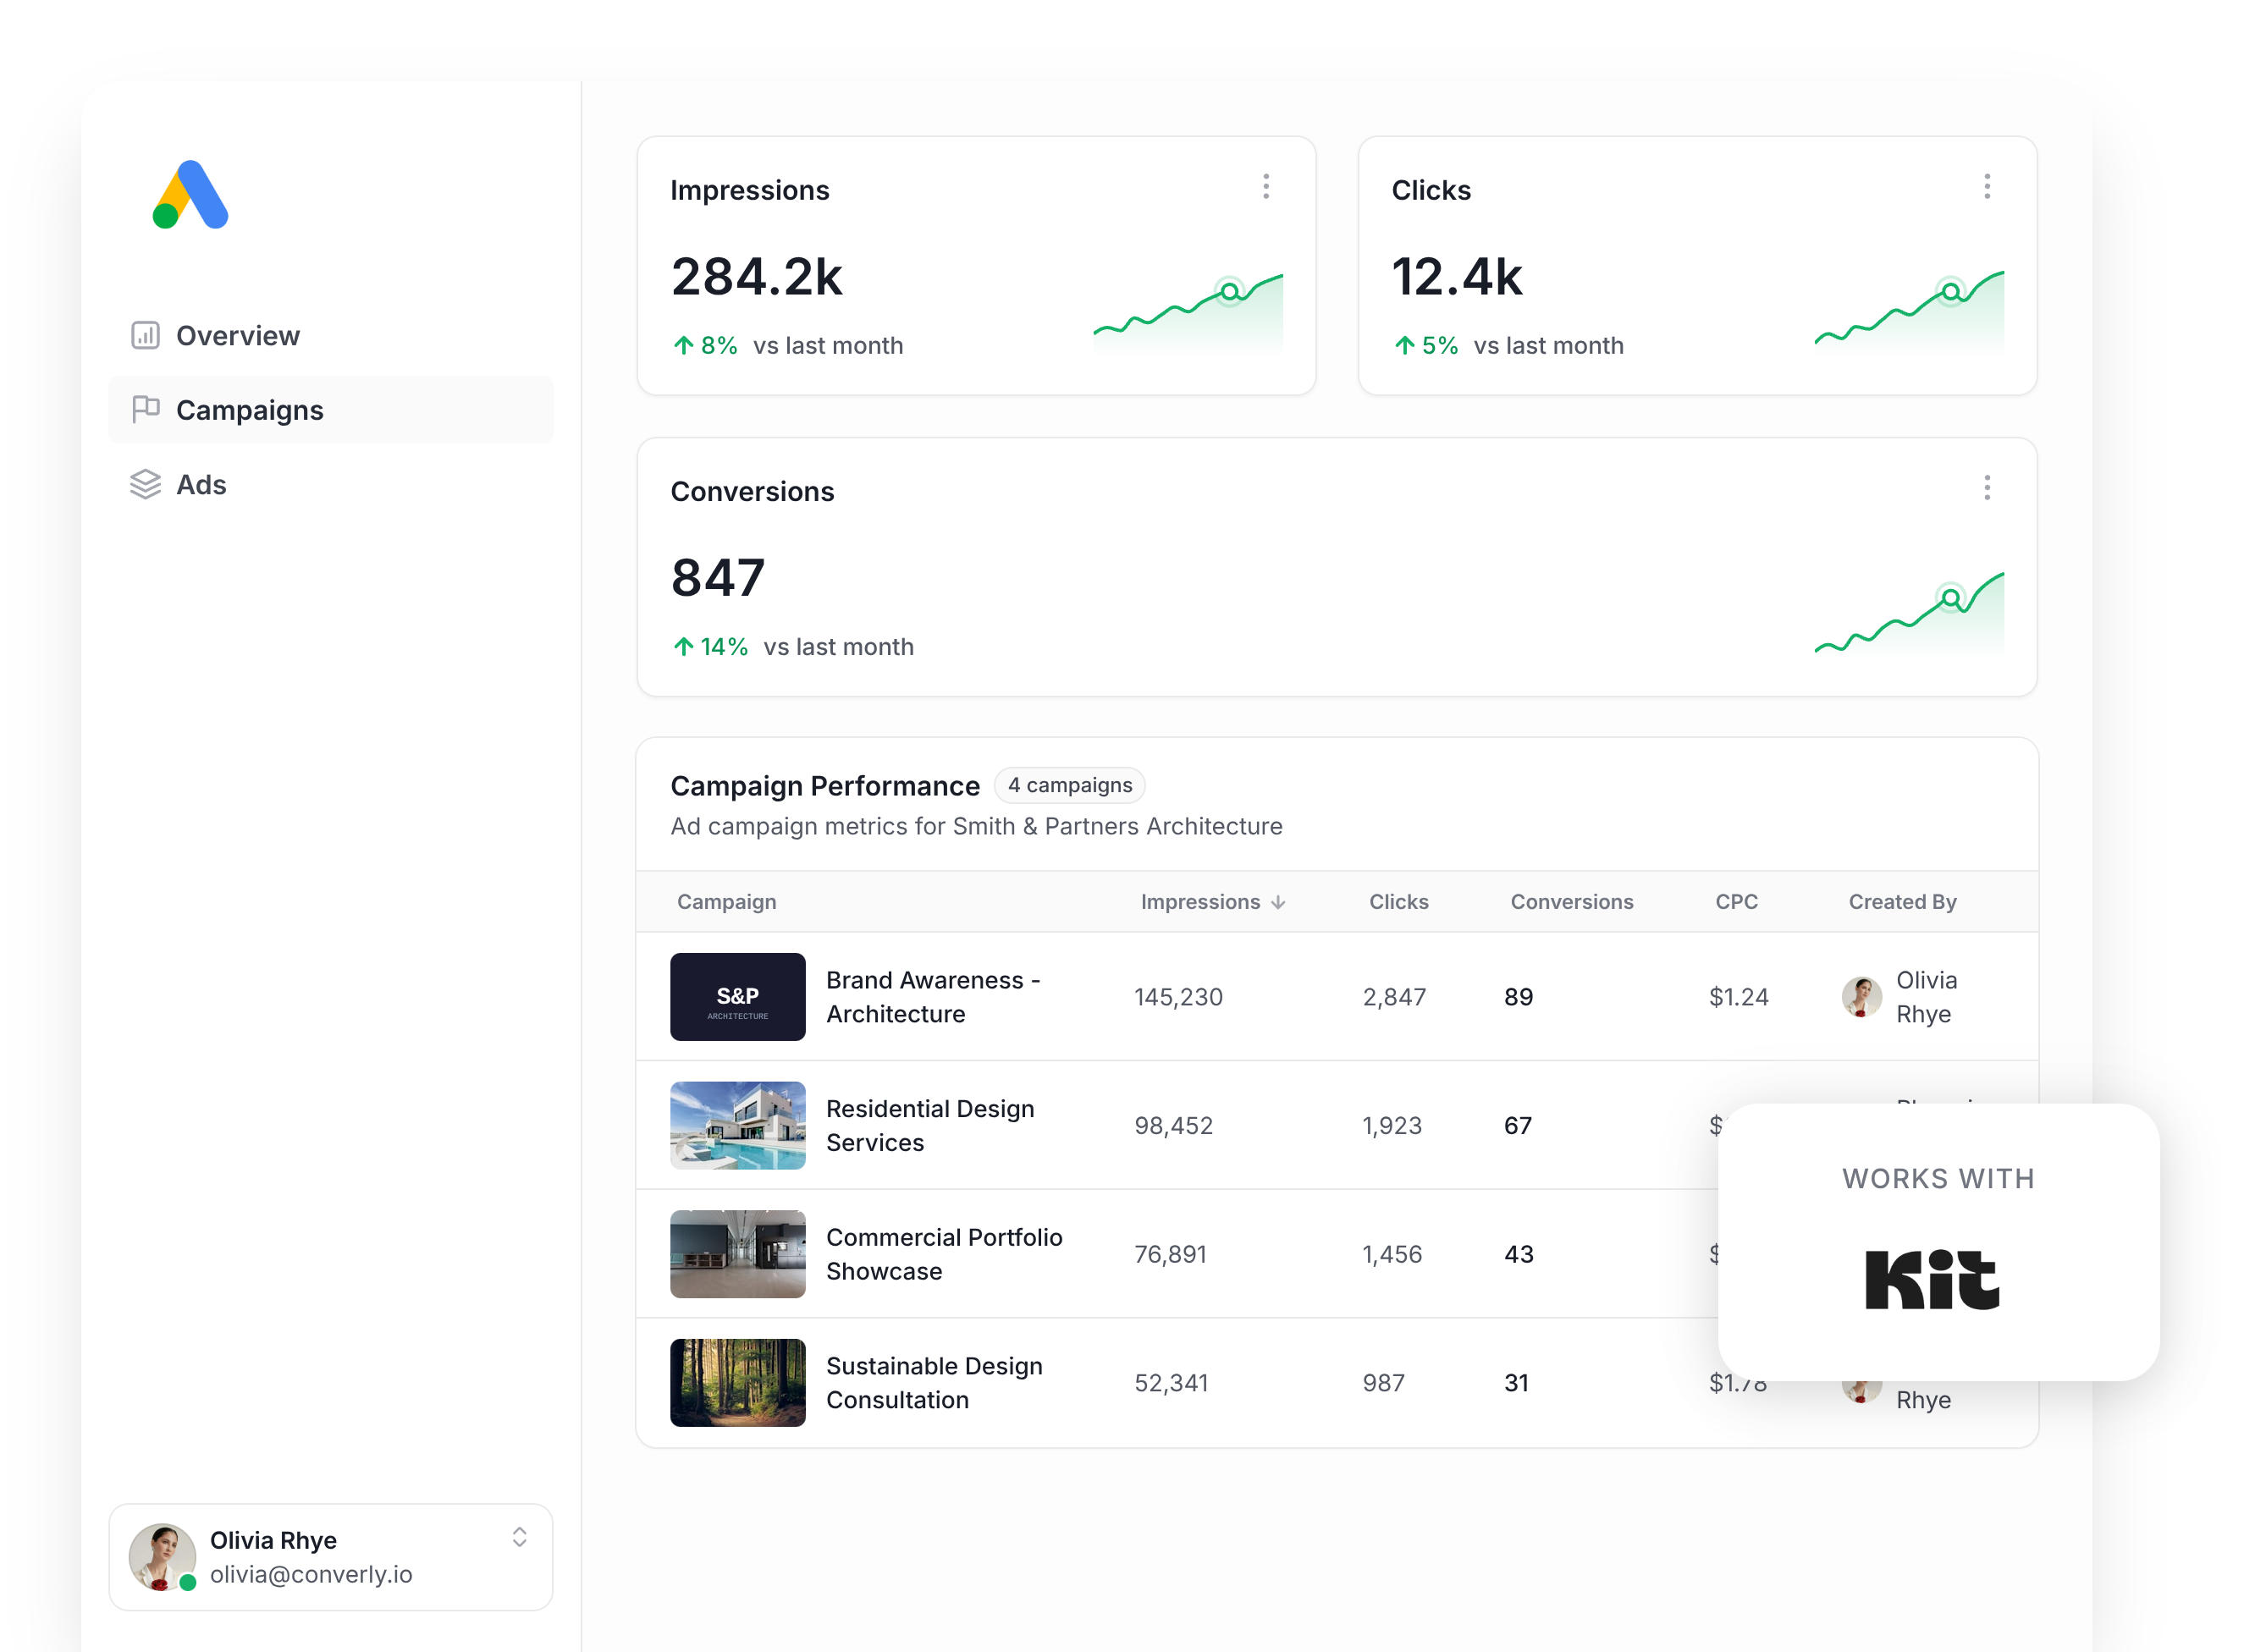
If you're running ads to grow your list, then you need to set up conversion tracking.
It's what lets you see which campaigns, ads and keywords are actually bringing in subscribers. And it gives the ad platforms (Google, Meta, etc) the data they need to learn who signs up and who doesn't, so they can put your ads in front of the right people moving forward.
The problem is that Kit forms are trickier to track than they look. Kit's own script handles the signup in the background, so the standard methods (like using Google Tag Manager's built-in form submission trigger) don't work.
So in this article, we'll walk you through three ways to set up conversion tracking for Kit forms, with full instructions and some resources (a code snippet, a Google Tag Manager recipe, etc) to make each one easier.
Method 1: Send a GA4 event via Google Tag Manager
Good for: Sending signup events to Google Analytics 4, for free.
If all you need to do is send an event to Google Analytics when someone subscribes through a Kit form on your website, this is the method to use. Google Analytics doesn't need to know who signed up (unlike Google Ads or Meta Ads), only that somebody did.
The catch is that Google Tag Manager's built-in form submission trigger doesn't work very well with Kit forms. Kit runs a spam check on every signup, and it often shows a "One more step" reCAPTCHA screen before it decides whether to accept the signup or not, and GTM can't detect any of this (which means your conversion tracking would be wildly inaccurate).
What you need instead is some custom code that waits for Kit to confirm the signup is complete and then pushes an event into the dataLayer (and then you build your Triggers and Tags in GTM on top of that).
Sound like a lot? Don't worry, because we've packaged it all into a free Google Tag Manager recipe you can download and use. Here's how it works:
Step 1: Download the Kit Conversion Tracking GTM Recipe
Start by grabbing the Kit GTM recipe from this page. Inside, you'll find:
- A Custom HTML Tag that waits for Kit to confirm a signup is complete and then pushes a
kit_form_submittedevent into Google Tag Manager. - A Variable holding the ID of the Kit form the visitor signed up through, which is handy if you want to fire different tags for different forms (i.e. you want to send a conversion when someone grabs your lead magnet, but not when they join your general newsletter).
- A Trigger tied to the
kit_form_submittedevent, which you use to fire whatever conversion tags you want (like a GA4 event).
Step 2: Import the GTM recipe into your account
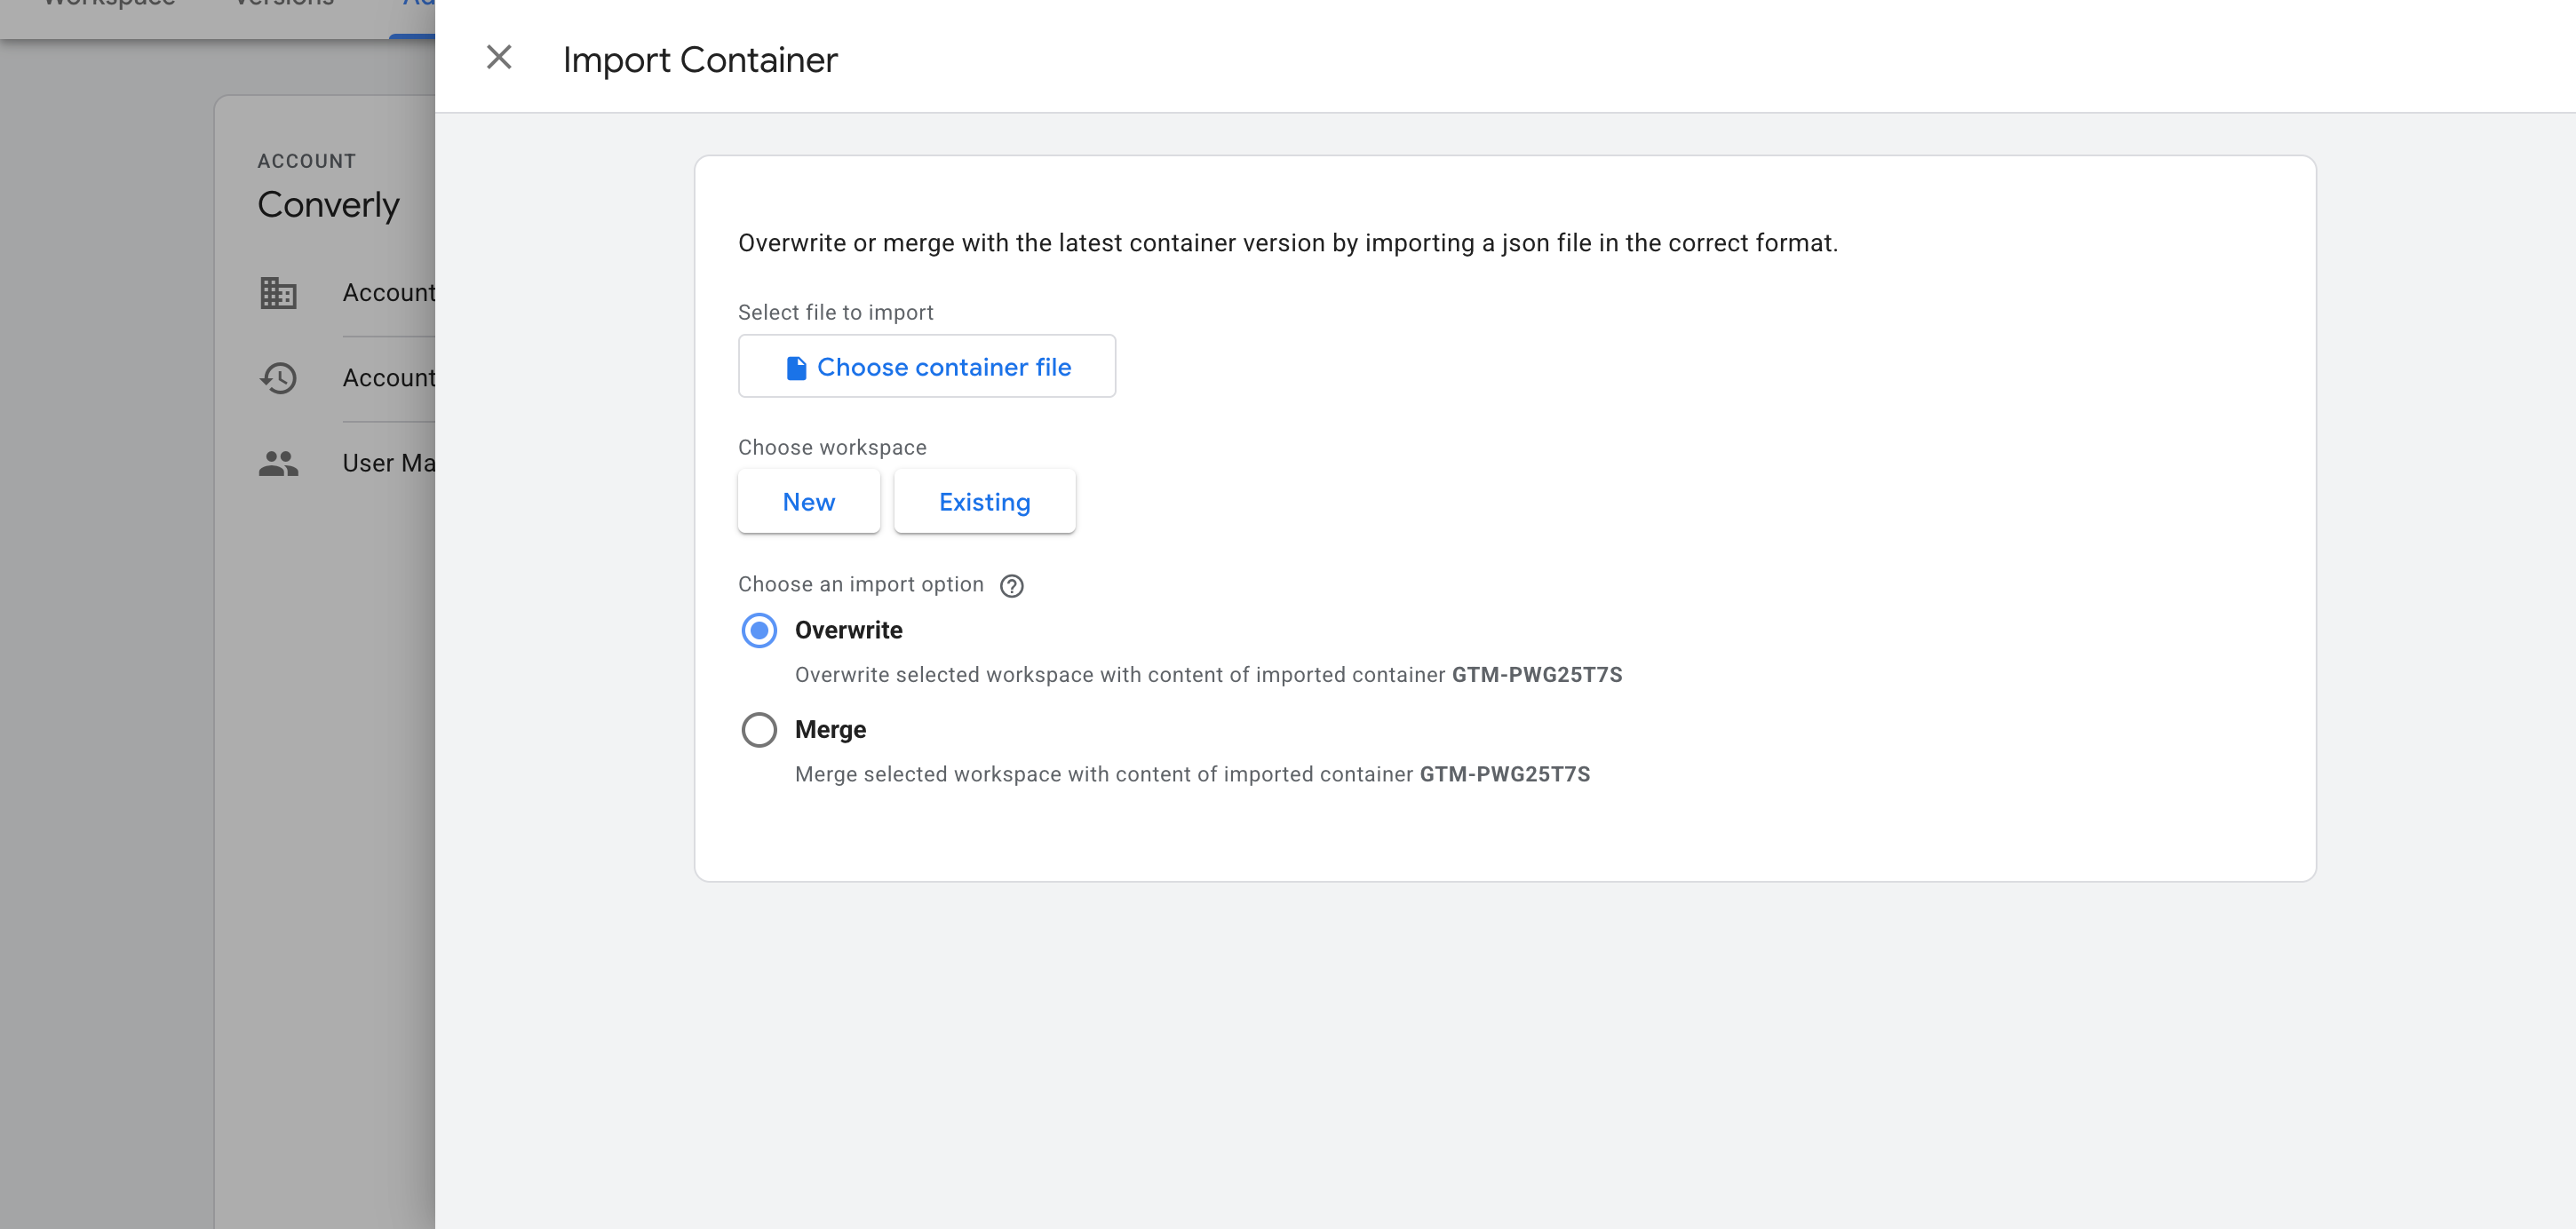
With the file downloaded, the next job is getting it into your Google Tag Manager account. Open Google Tag Manager, go to Admin, choose Import Container, select the file, and pick the Merge option so nothing already in your container gets overwritten. The listener, the variable and the trigger are all created for you.
Step 3: Build a GA4 event tag
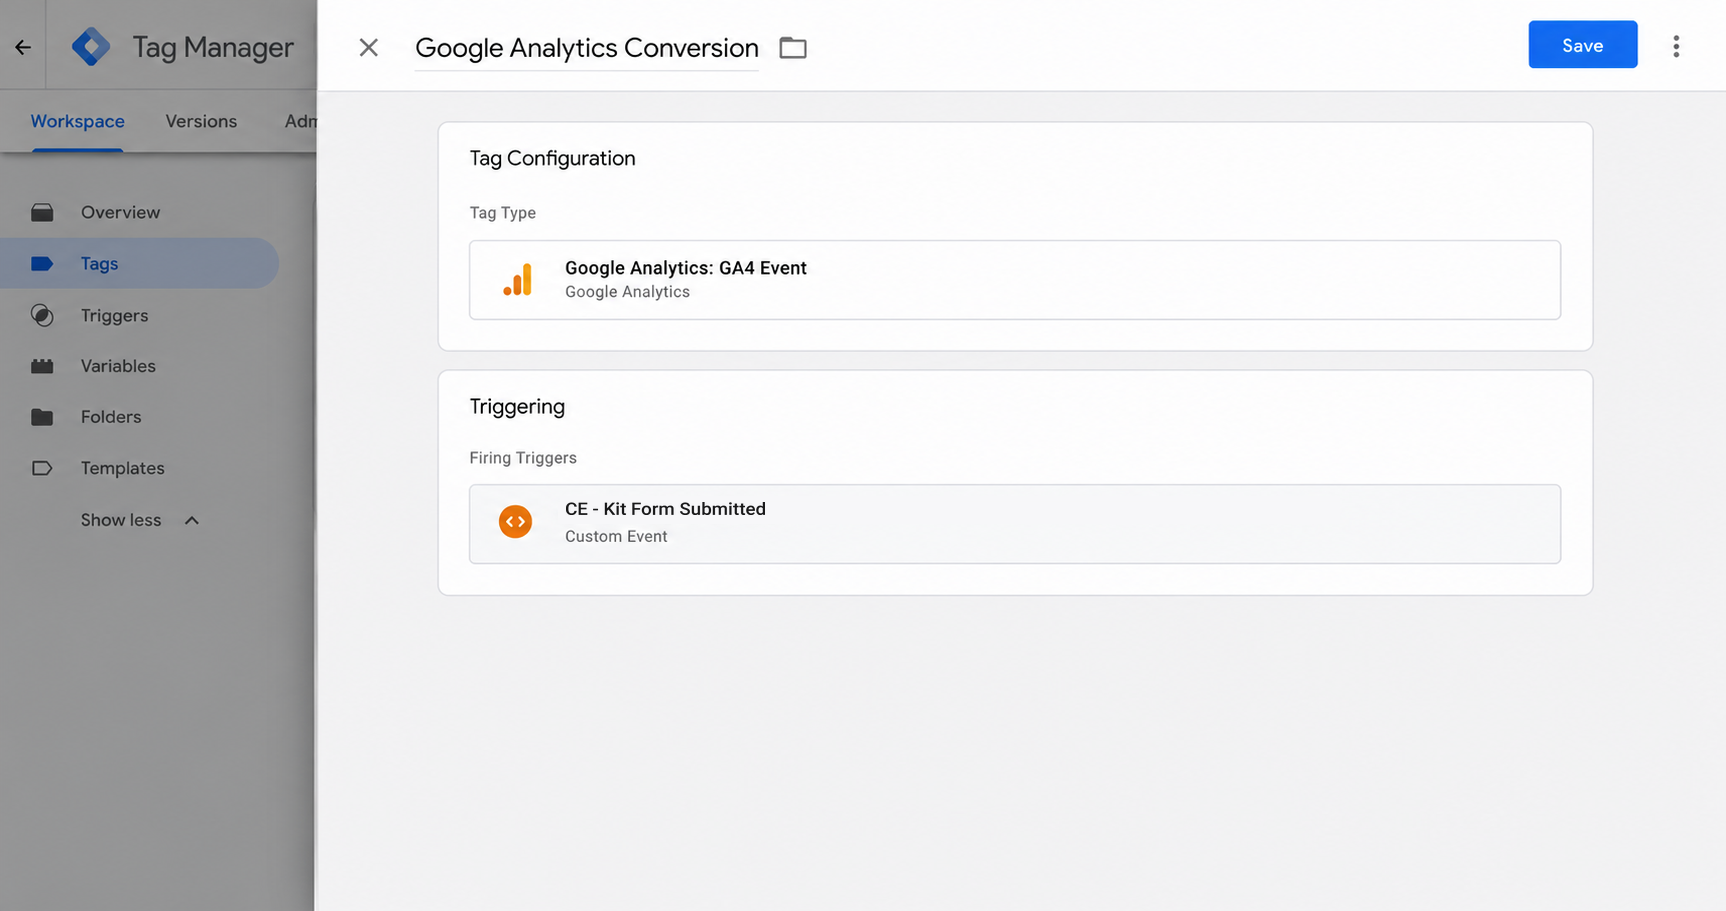
The recipe gives you the trigger, but you still need to create a Tag that sends the event to GA4. To do that, go to Tags in your GTM account, select New, and then create a GA4 event tag. When it asks you to set the trigger, set it to the one the recipe gives you (called CE - Kit Form Submitted).
Step 4: Test it, then mark it as a Key Event in GA4
With everything wired up, the last job is proving it works. Sign up through one of your Kit forms with a test email, open GA4's Realtime report, and check the event turns up in the Recent Events list.
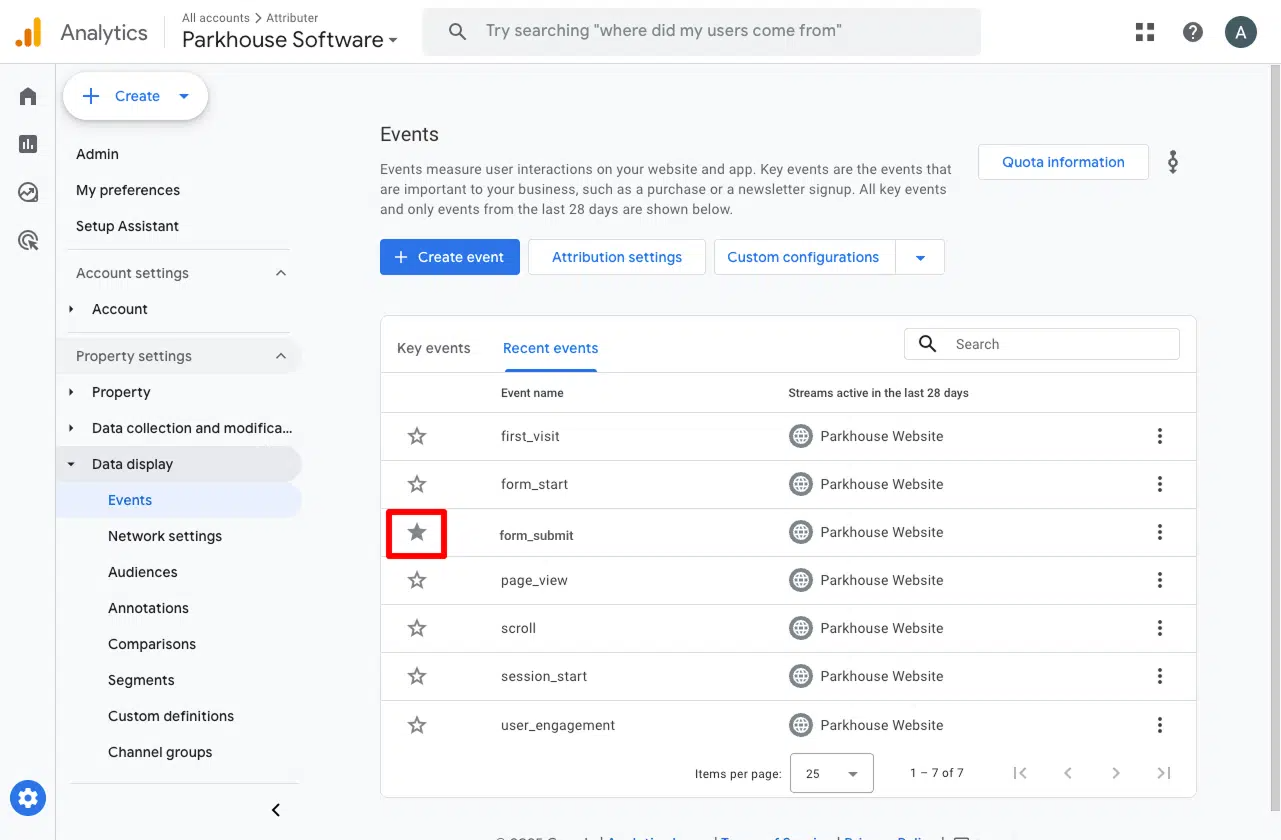
Once it's there, go to Admin, then Events, find the event in the list, and toggle it on as a Key Event (this is the step that tells GA4 to treat the event as a conversion in your acquisition and funnel reports).
Pros and cons
Pros:
- It's free. Google Tag Manager costs nothing and neither does the recipe.
- It only fires once Kit has successfully completed the signup. So if Kit's spam check holds someone on the "One more step" screen and they never get through, no conversion is counted.
Cons:
- There's still setup work. The recipe takes care of the hardest part (knowing when Kit has actually accepted a signup), but building the GA4 tag and checking it all works is on you. And if you get stuck, there's nobody to ask (Google doesn't provide support for Google Tag Manager).
- It only covers Kit forms embedded on your own website. Signups on Kit's hosted landing pages aren't tracked, because your GTM container isn't on those pages.
- Every Kit form on your site pushes the same event. The recipe does pass along the form's ID, but unless you build a separate trigger for each form, a signup to your general newsletter sends the same event to GA4 as a request for your free consultation guide (with no way to tell them apart in your reports).
- The event is sent to Google Analytics from the visitor's browser, so ad blockers and privacy-focused browsers like Safari can stop it from ever reaching GA4. You can expect to lose roughly 30% of conversions (according to industry studies).
- It stops at Google Analytics. Nothing here reaches Google Ads, Meta Ads, or any other ad platform (that's what Methods 2 and 3 are for).
Method 2: Use Google Tag Manager for Enhanced Conversions
Good for: Sending Enhanced Conversions to Google Ads.
Counting signups (the way Method 1 does) is fine for Google Analytics, but it won't get you very far in Google Ads.
That's because Google Ads only counts a conversion if it can match it back to the real person who clicked your ad, and to do that it needs details like their name, email and phone number sent along with the conversion.
The good news is that Kit's JavaScript embed puts the form straight into your page (rather than in an iframe), so a script running on your site can capture the subscriber's data and send it over. The tricky part is that when Kit confirms a signup, the only detail it passes back is the email address. So the name (and phone, if you ask for it) has to be read from the form when Subscribe is clicked, and then essentially stored until Kit confirms the signup.
Fortunately, the code snippet below takes care of that. Here's how to set it up:
Step 1: Set up a Custom HTML Tag with the form listening code
In GTM, create a new Custom HTML Tag, paste in the snippet below, and set it to fire on the All Pages trigger. If you're already using the Method 1 recipe, this replaces its listener tag, so only keep one of them.
The above code does a bunch of things:
- Detects a real signup on a Kit form. When someone clicks Subscribe, the snippet checks the form really is a Kit form (it carries a Kit form ID and sends signups to Kit's own address).
- Skips sensitive fields. Passwords, card numbers, one-time codes and anything labelled like a CVV or PIN are checked and dropped before the snippet ever looks at what's in them.
- Reads the subscriber's name and phone. It looks for the first name, last name, email, and phone fields in the form, then captures the data out of them (and stores it).
- Waits for Kit to complete the signup. Clicking Subscribe doesn't mean Kit has accepted the signup, so the snippet waits for Kit's own script to confirm the signup was successfully completed.
- Checks the confirmation belongs to that signup. The confirmation has to come from the same form the visitor submitted, and the email Kit confirms has to match the one they typed. If either doesn't match, nothing is sent.
- Sends all the data to the dataLayer. Finally, it pushes a
kit_form_submittedevent into the dataLayer with the subscriber's email, first name, last name and phone (if your form asks for them) as well as the Kit form ID.
This snippet has been extensively tested and deals with a number of issues that other scripts on the internet don't, including:
Issue 1: Kit decides whether to accept a signup after the click. Most scripts fire as soon as someone clicks Subscribe. But Kit runs a spam check first, and it often holds the signup behind a "One more step" reCAPTCHA screen until the user completes it. If you just counted a conversion whenever someone clicked the Subscribe button, you'd record signups Kit never accepted, and send Google Ads conversions for people who never actually converted.
Issue 2: Kit's completion message doesn't say which form it came from. If you have more than one Kit form on a page (say a newsletter box in the footer and a lead magnet popup), a script that simply listens for Kit's confirmation message can credit the wrong form. That's how you end up with conversions in Google Ads or Google Analytics that don't line up with the number of subscribers in Kit. This snippet only counts a confirmation that matches the form, and the email, the visitor actually submitted.
Issue 3: Kit only hands back the email address. A script that waits for Kit's confirmation and then goes looking for the subscriber's details won't work, because the first name, last name, etc. get removed from the form when it is submitted. This snippet reads the name and phone when Subscribe is clicked, stores them, and only sends them once Kit confirms the signup. Ultimately, this means the lead's name, email, phone, etc get sent to Google Ads with each conversion, and that enables things like Enhanced Conversions in Google Ads.
As you can probably tell from the above, this isn't a snippet we threw together for this article. It's the same logic our own conversion tracking software (Converly) uses to detect Kit signups, and it's been tested against a real Kit form many times (and used to detect thousands of submissions by our customers).
Step 2: Create Data Layer Variables for the captured data
The snippet puts the subscriber's details into the dataLayer, but Google Tag Manager won't use them until you tell it how to pull each one out. That's what a Data Layer Variable does. You'll create one each for the email, first name, last name and phone.
To do this, go to the Variables section in GTM, click New under User-Defined Variables, choose Data Layer Variable as the type, and give it a name.
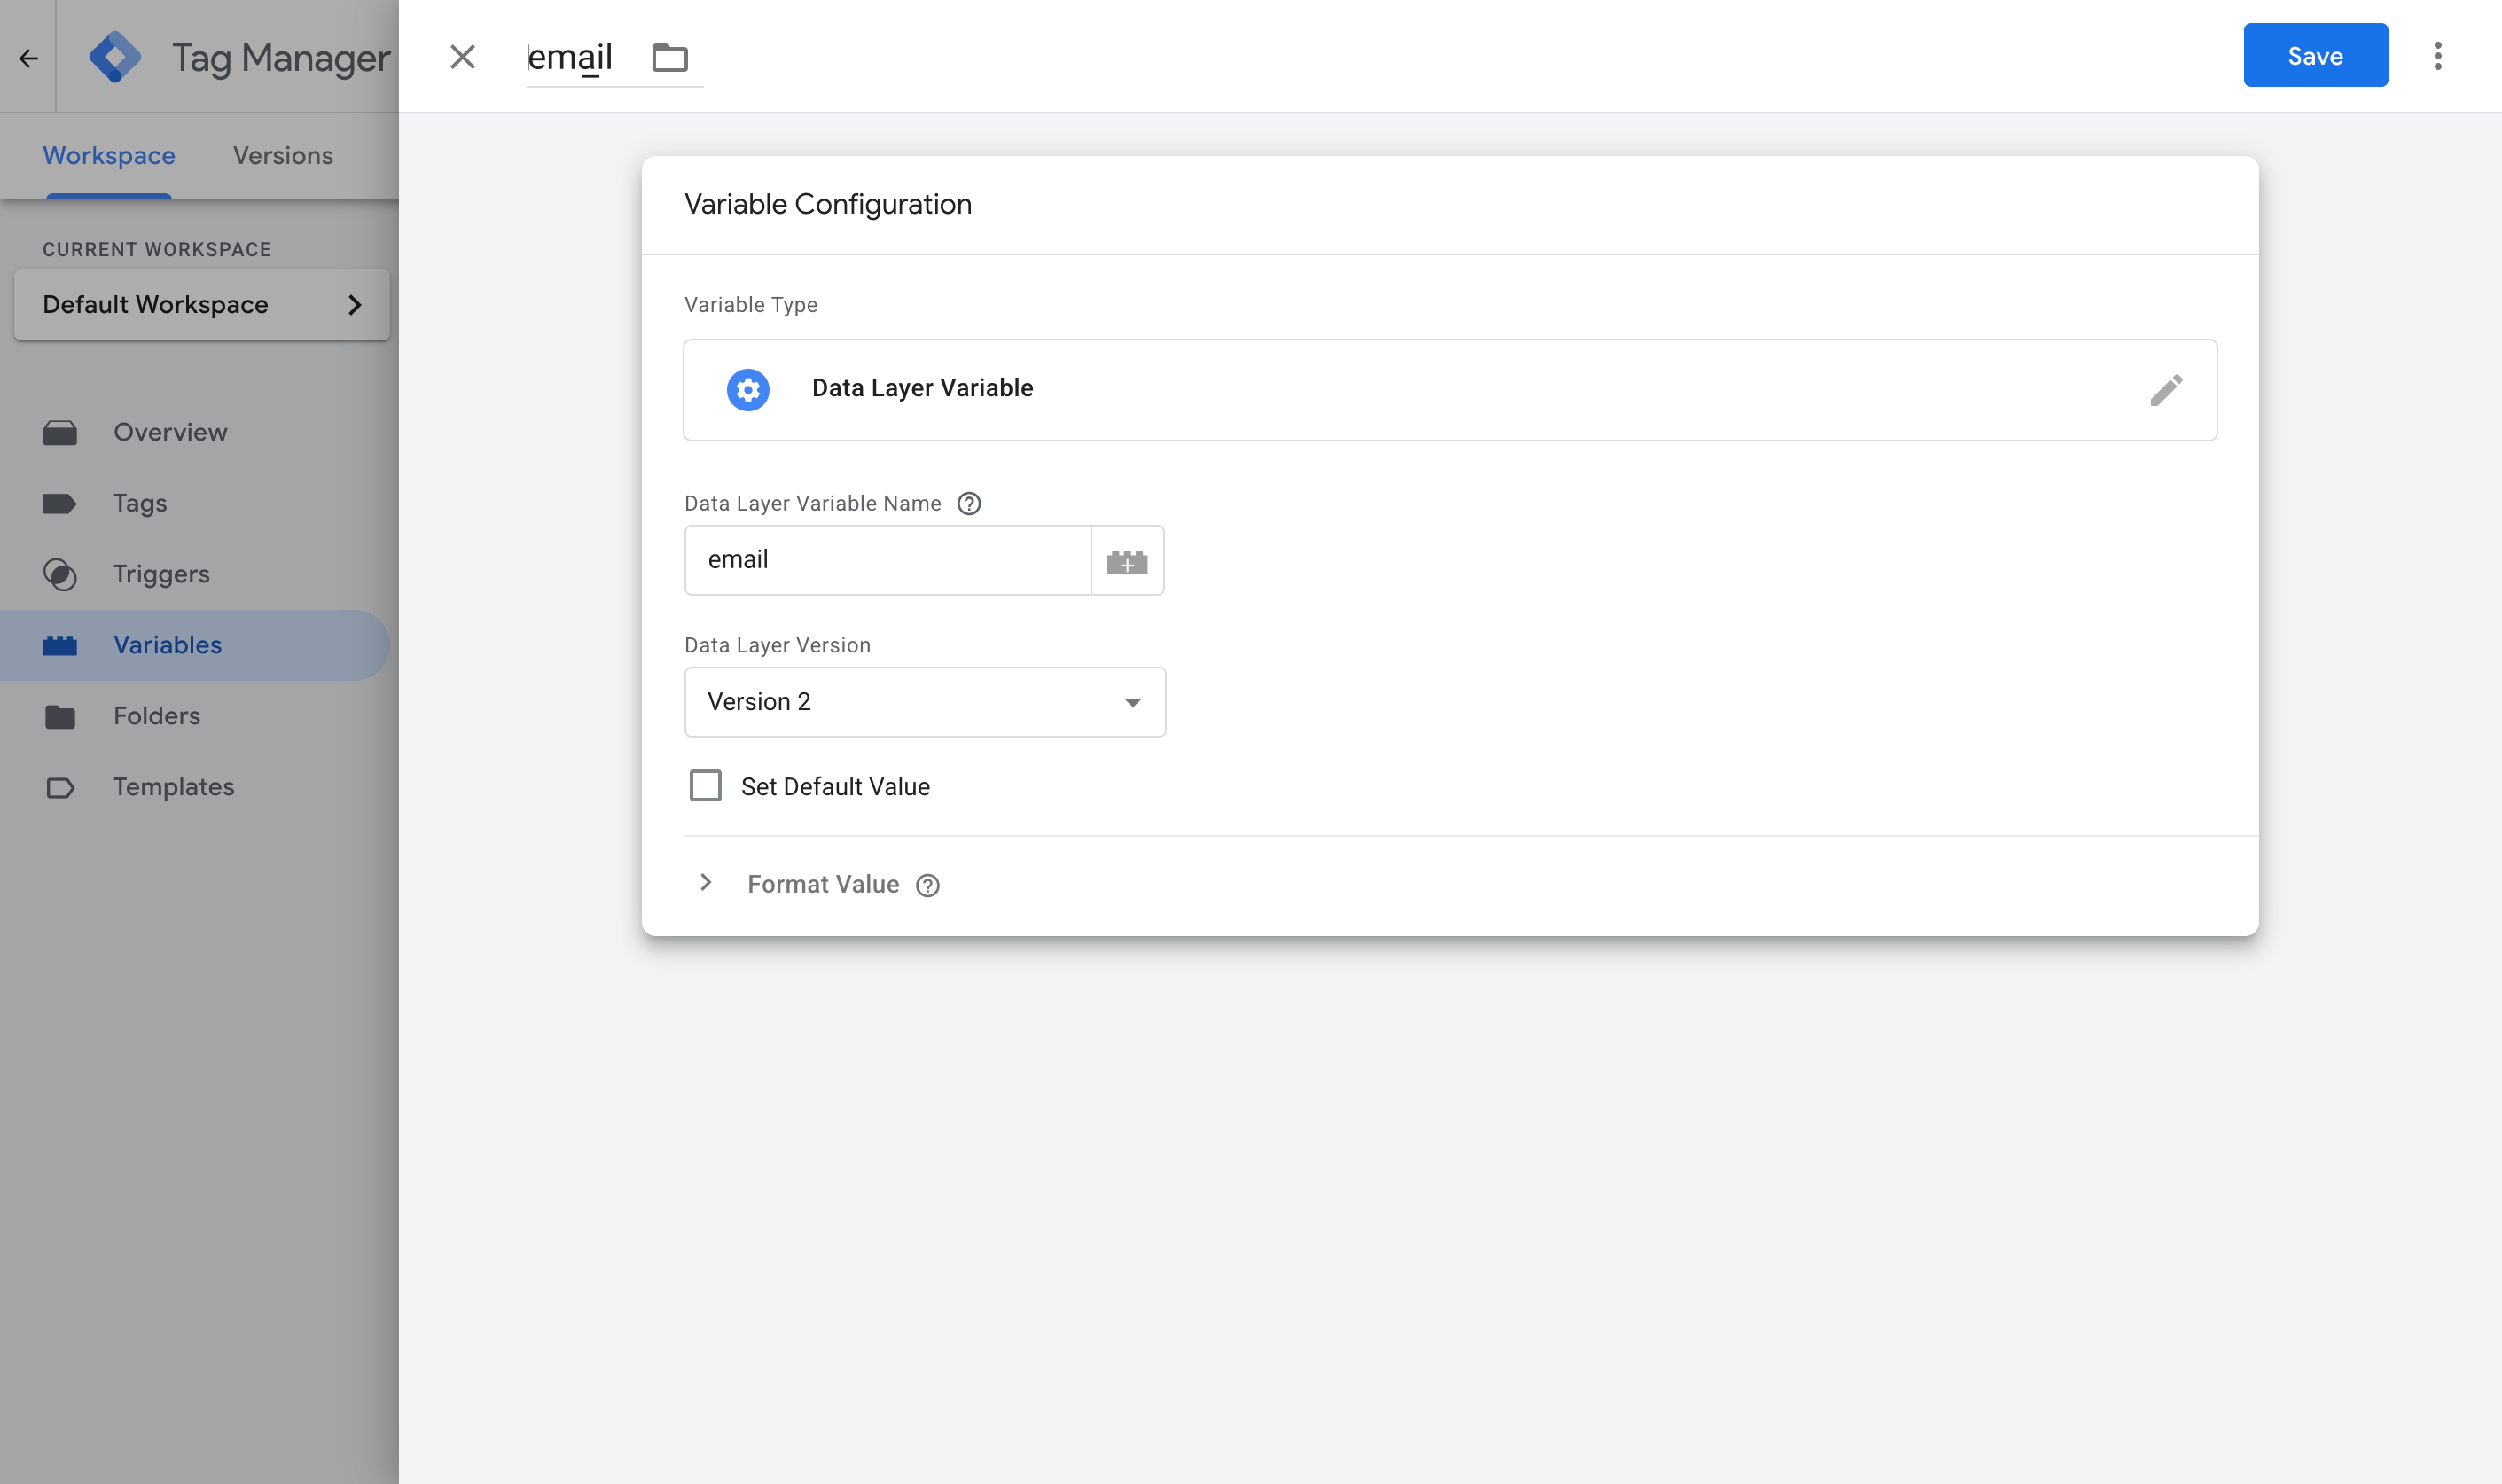
Here are the four you need.
Variable 1:
- Name: Email
- Variable Type: Data Layer Variable
- Data Layer Variable Name: email
Variable 2:
- Name: First Name
- Variable Type: Data Layer Variable
- Data Layer Variable Name: first_name
Variable 3:
- Name: Last Name
- Variable Type: Data Layer Variable
- Data Layer Variable Name: last_name
Variable 4:
- Name: Phone
- Variable Type: Data Layer Variable
- Data Layer Variable Name: phone
Kit's default forms only ask for an email address and a first name, so the last name and phone will come through empty unless you've added those fields to your form.
Step 3: Create a Custom Event trigger
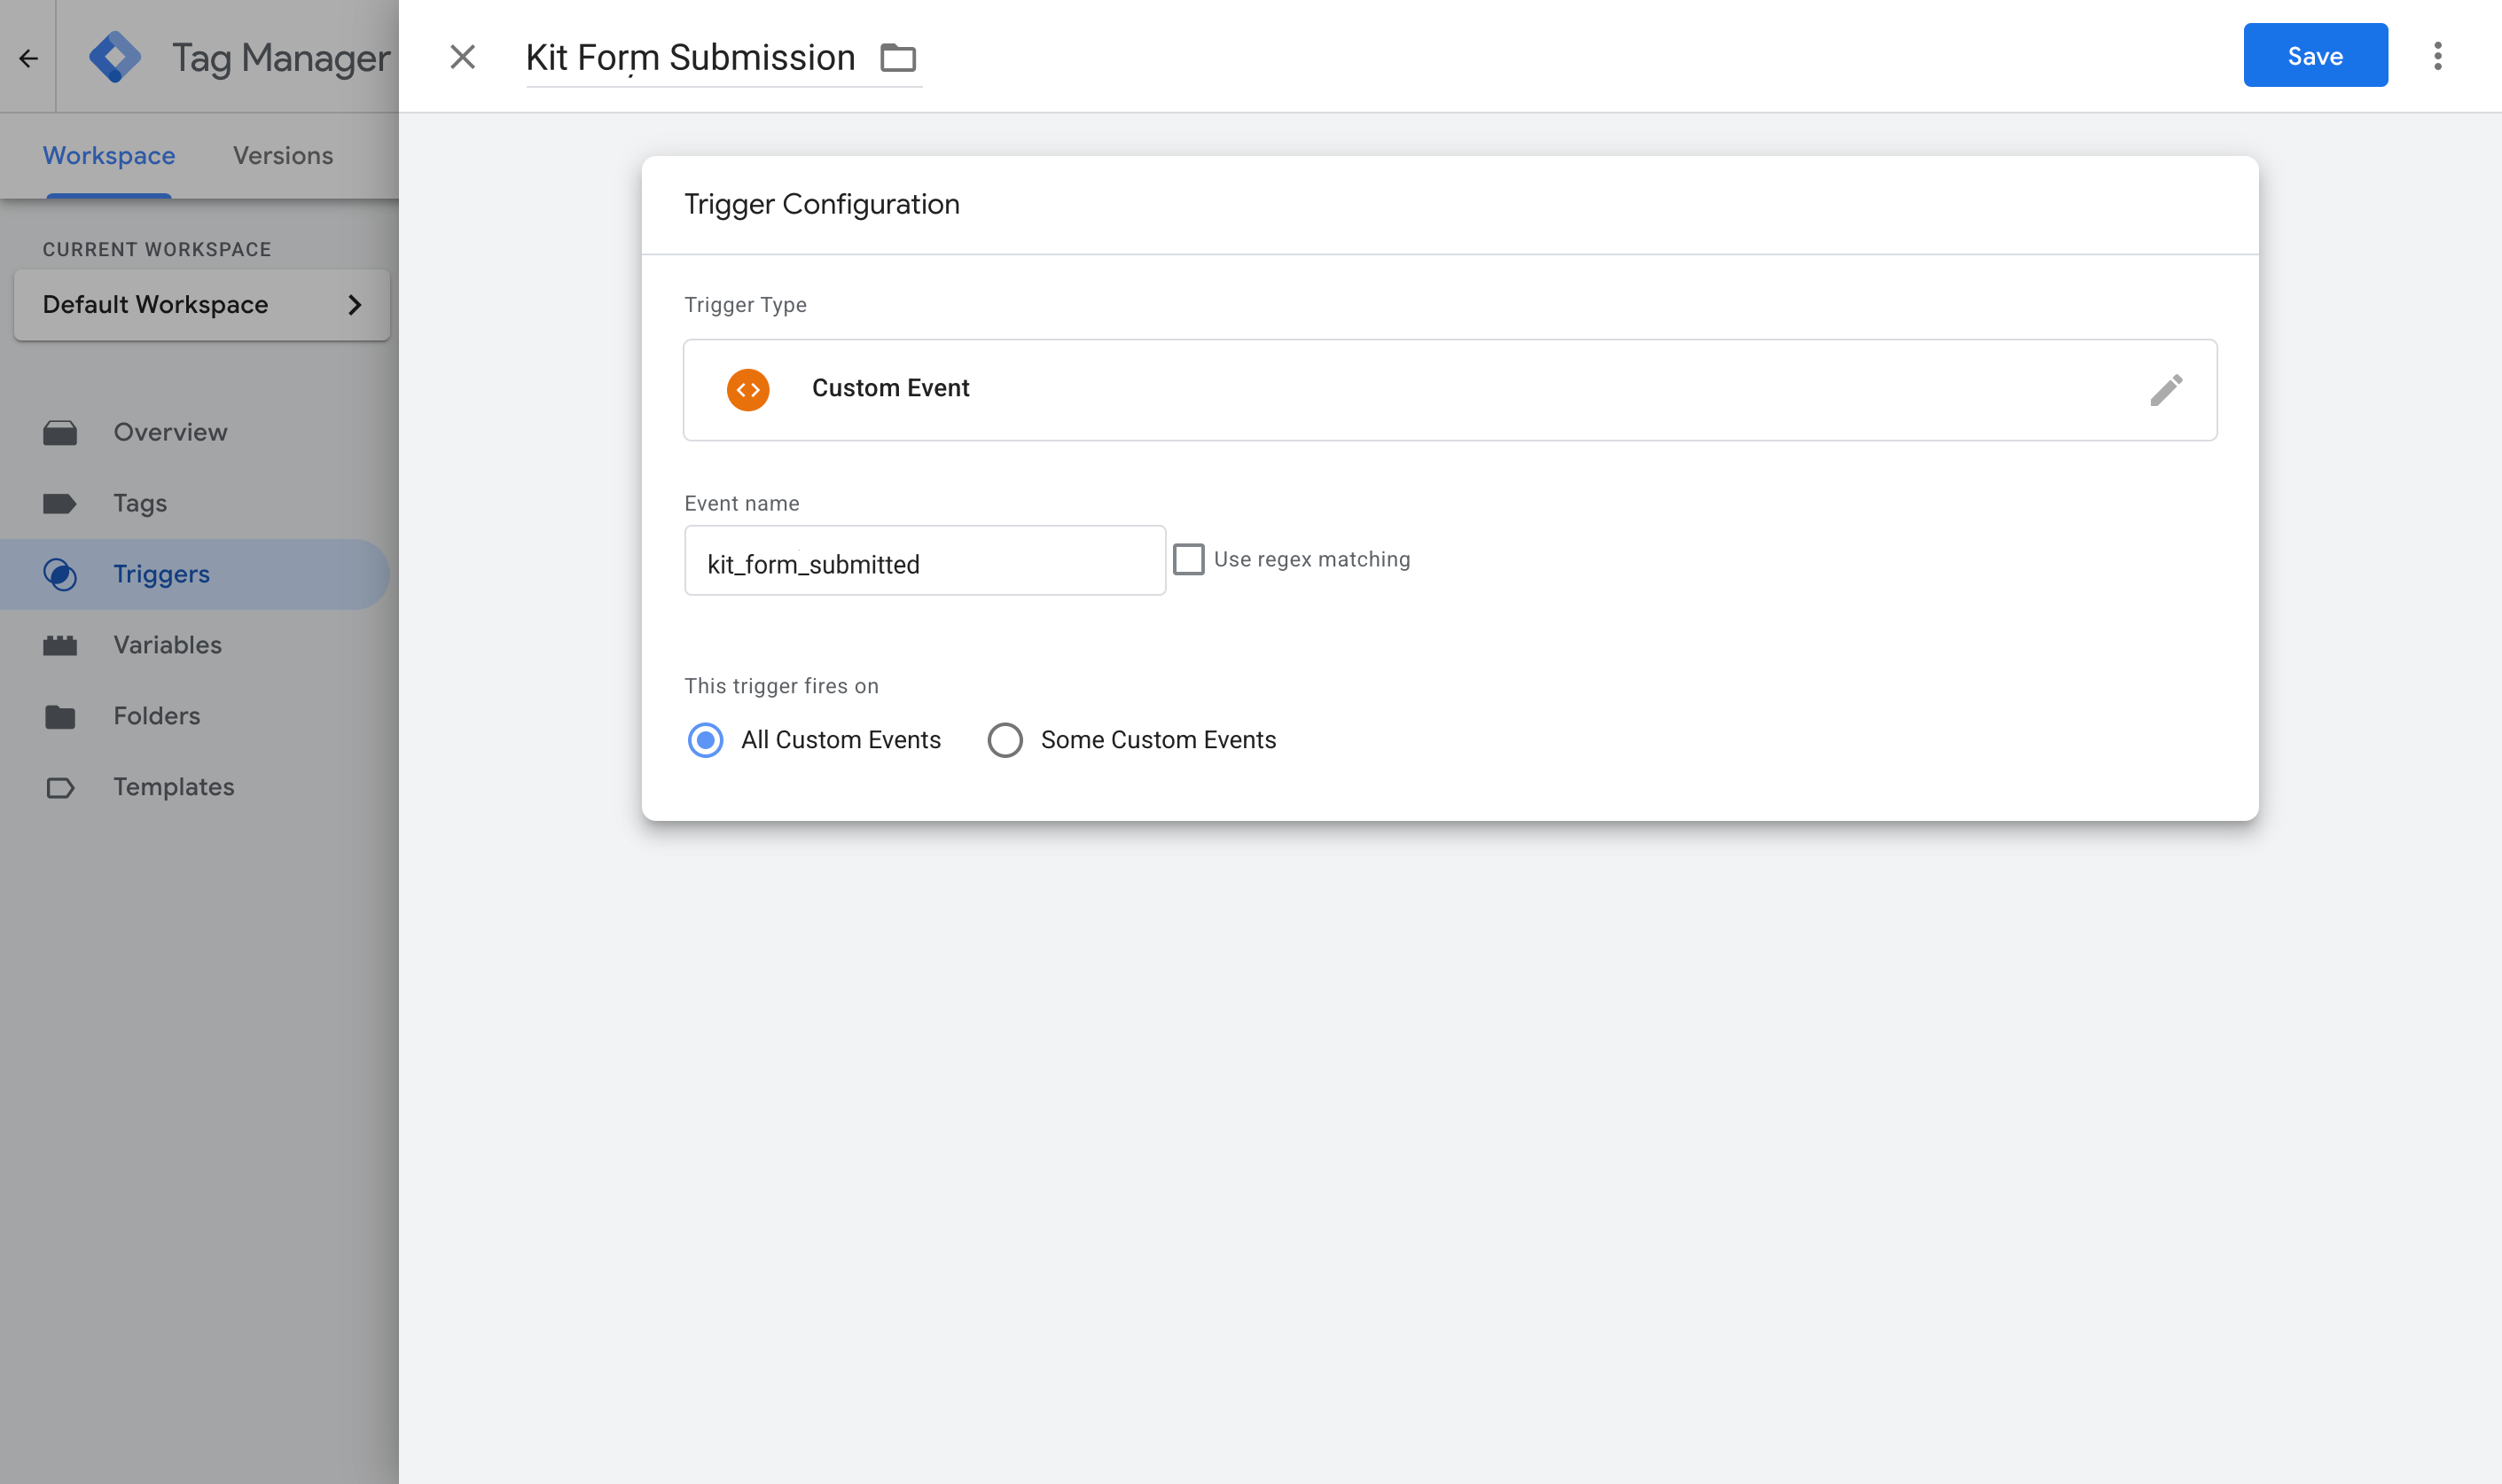
With the subscriber's details going into the dataLayer and variables set up to pull them out, the next step is telling Google Tag Manager when to use them. That's what a Trigger is for. It watches for the event the snippet sends into the dataLayer (called kit_form_submitted), and tells your conversion tags to fire when it arrives.
To set it up, go to the Triggers section, click New, choose the Custom Event type, name it Kit Form Submission, and set the event name to kit_form_submitted (it has to match what the code pushes exactly).
Step 4: Turn on Enhanced Conversions in Google Ads
Before any of this data can reach Google Ads, you have to turn on Enhanced Conversions in your account. To do that, head to your Google Ads account, go to Goals, then Conversions, then Settings, and turn on Enhanced Conversions.
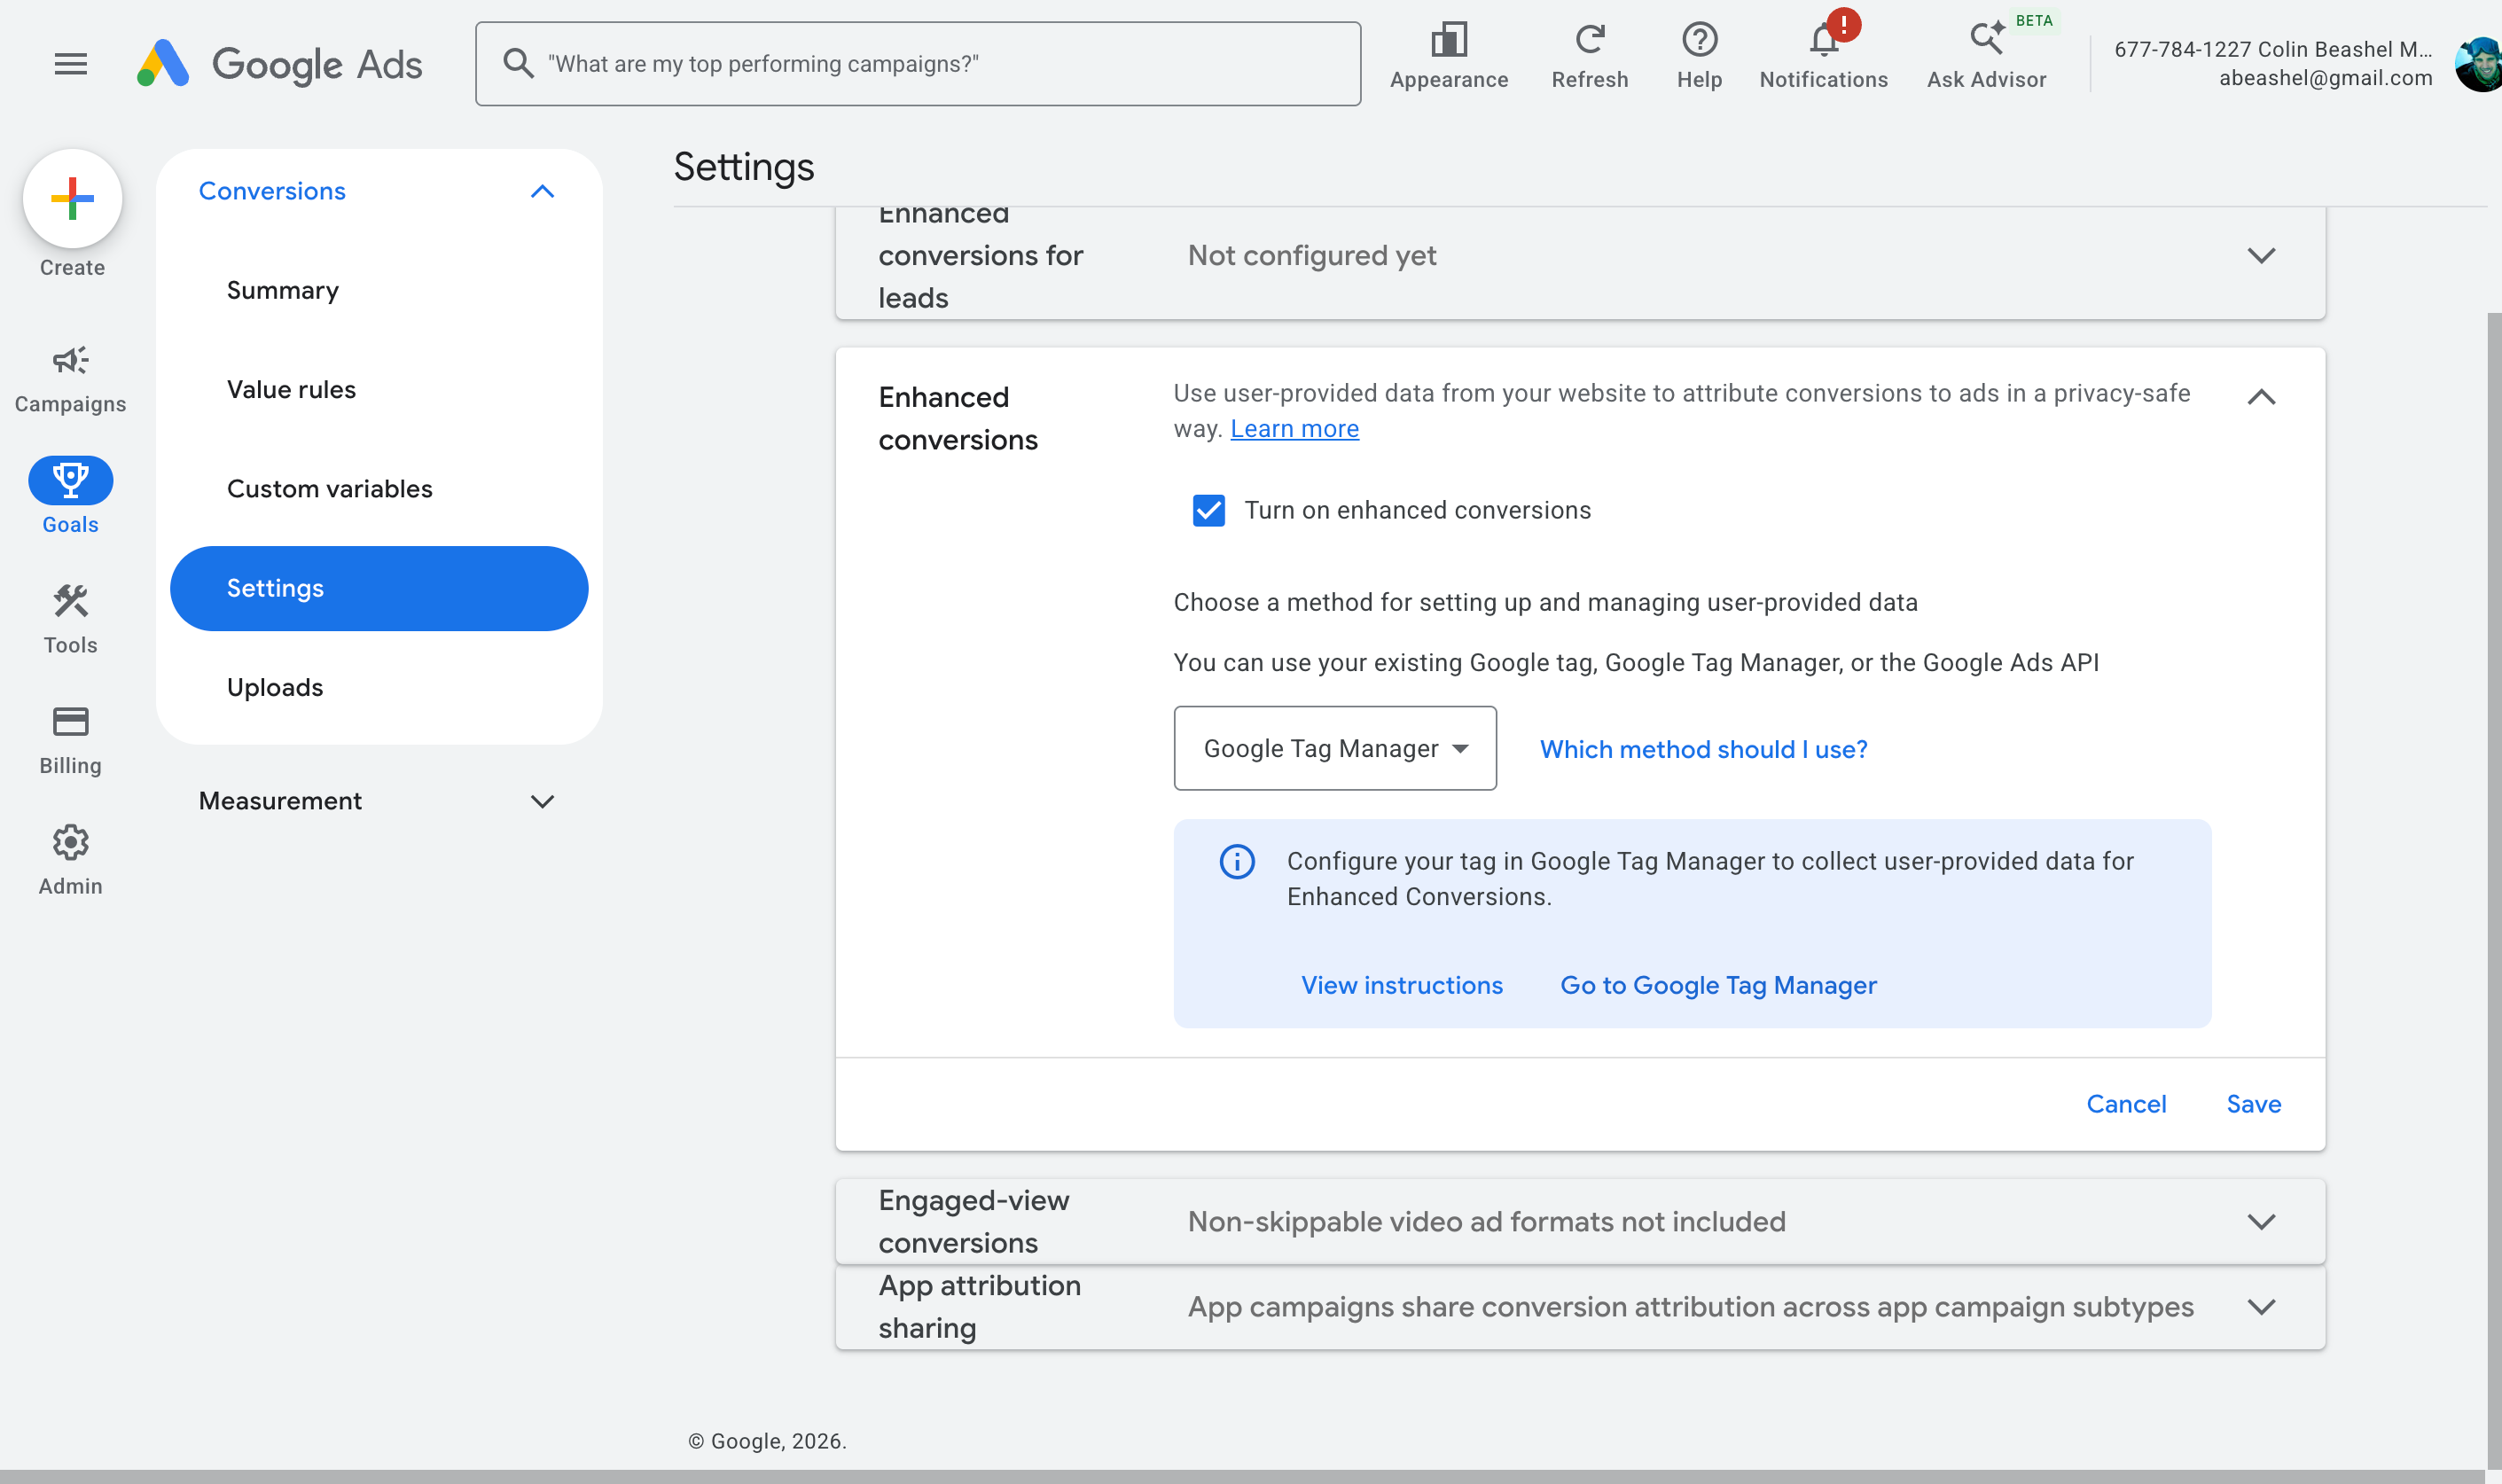
When it asks how you want to implement it, choose Google Tag Manager. That gives Google Ads permission to receive and use the customer data you're about to send.
Step 5: Create your Google Ads conversion tag and map the data
The final step is to create a Google Ads conversion tag in your account (this is what actually sends the conversion to Google Ads). You'll set it to fire on the Trigger you created in Step 3 and pass through the data from the Variables you set up in Step 2.
To build it, jump back into GTM, go to Tags, select New, choose Google Ads User Provided Data Event as the tag type, and map the variables from Step 2 to the fields it asks for.
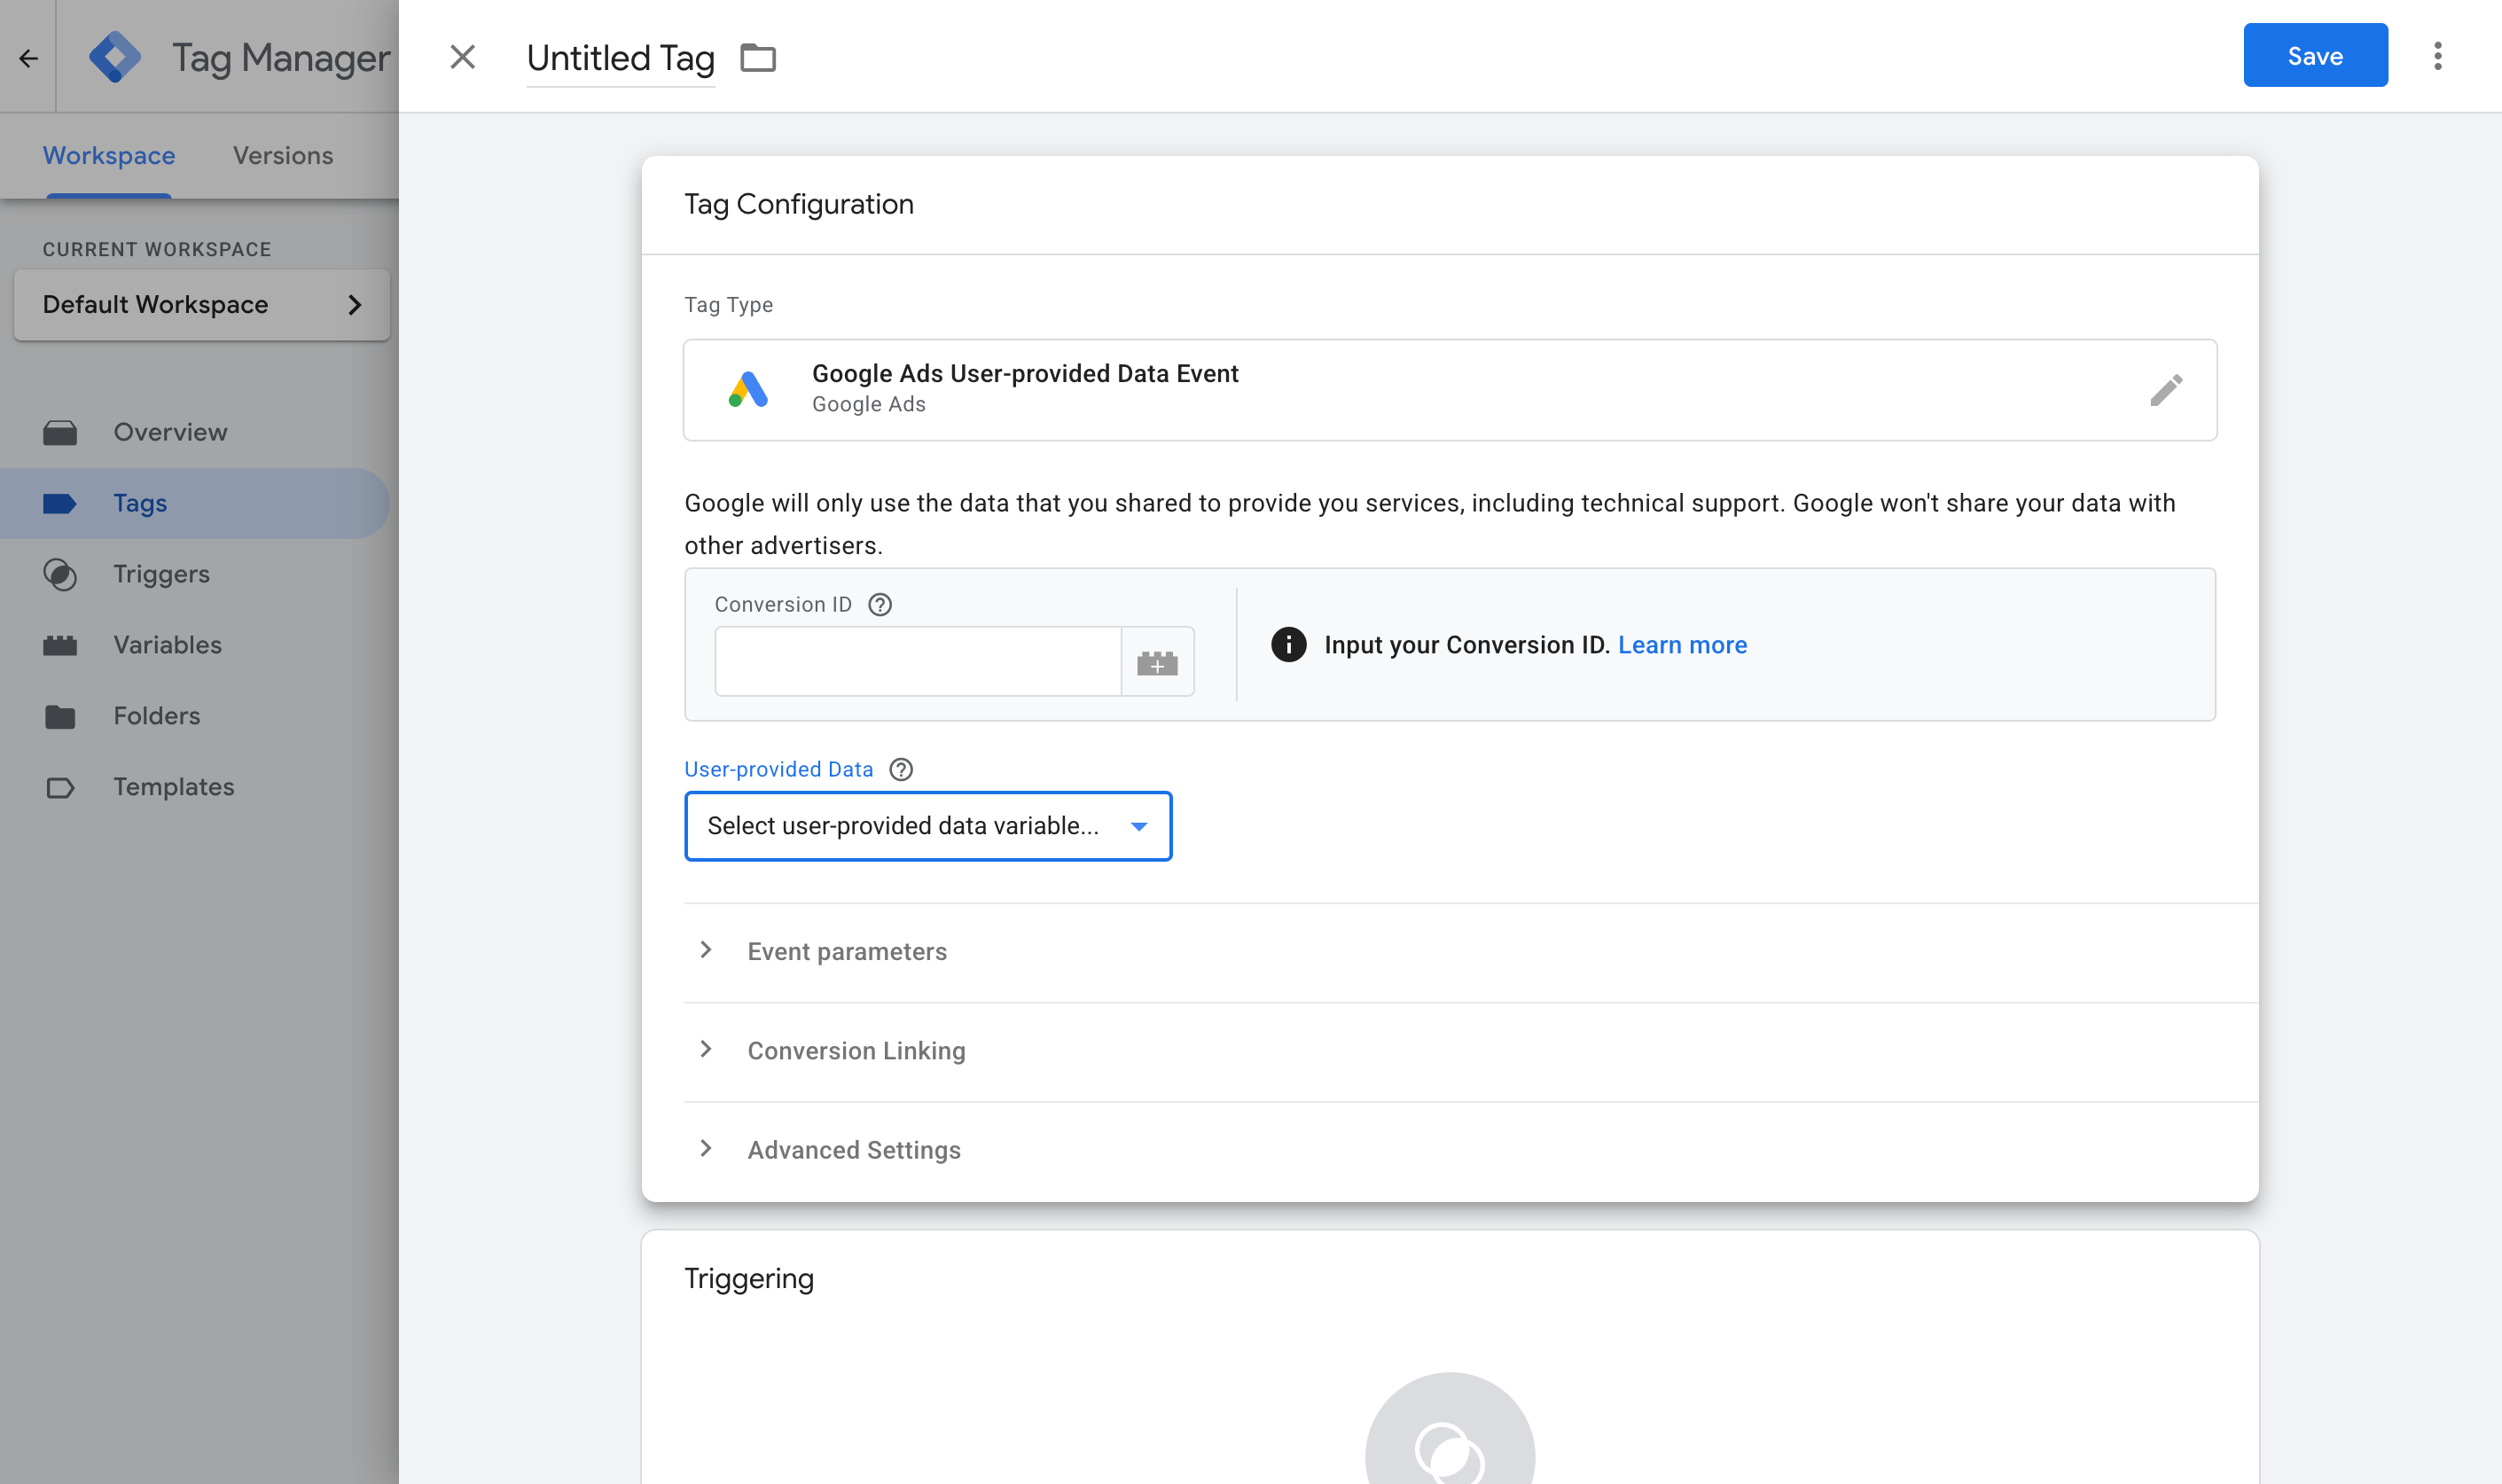
Then set it to fire on the Custom Event trigger you created in Step 3.
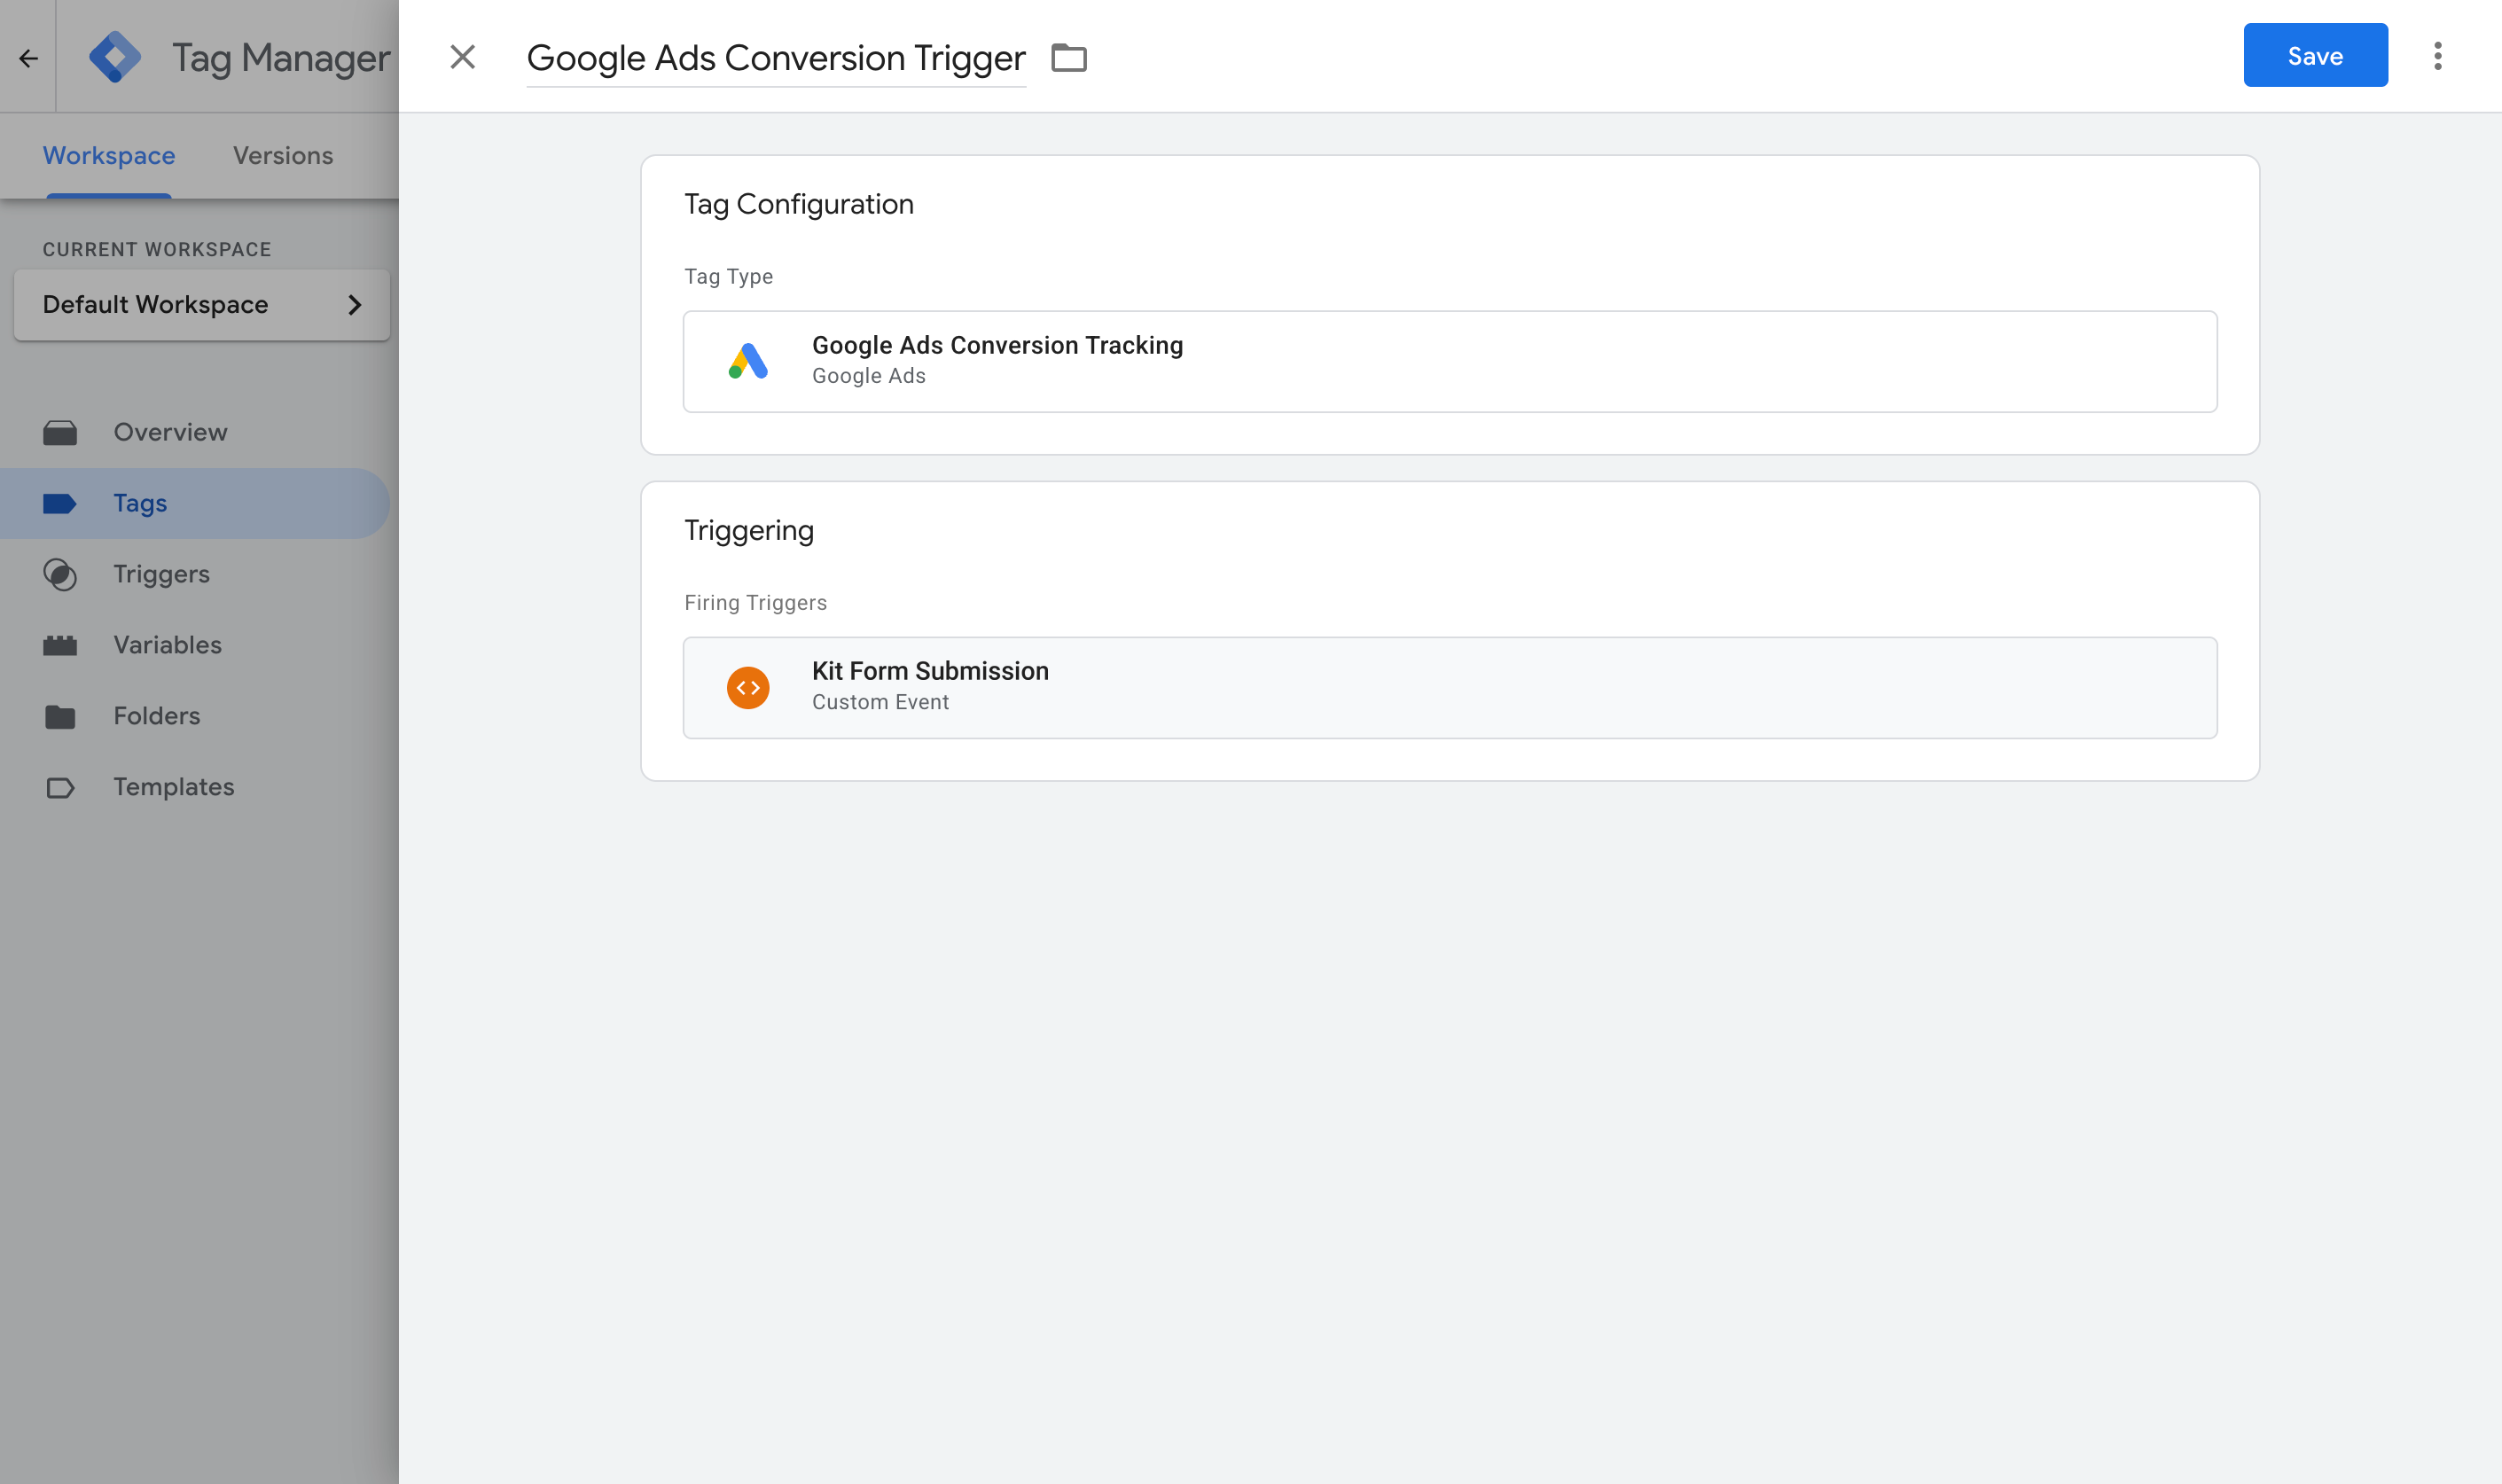
Once that's done, publish your GTM container.
With all of this complete, you should now have a Tag that listens for Kit signups and sends an event to the dataLayer, some Variables that pull the subscriber's details out of it, a Trigger that watches for the event, and another Tag that sends the conversion to Google Ads when the Trigger fires.
To check it's working, open GTM Preview mode, sign up through a Kit form on your site, and confirm the kit_form_submitted event arrives with the email and name filled in.
Pros and cons
Pros:
- It's free, and you may already have Google Tag Manager installed on your site, so that's a start.
- Unlike Method 1, it captures the name, email and phone and sends them to Google Ads (the minimum you need for Enhanced Conversions).
- It only fires once Kit confirms the signup, and it stores the subscriber's name, email and phone until that happens (and then sends it over once the confirmation has been received).
Cons:
- There are a lot of moving parts. Between the Custom HTML tag, four Variables, the Trigger, the Google Ads settings and the conversion Tag itself, there's plenty to get wrong. And when something does go wrong, nothing tells you where or why. It just doesn't work, and it's up to you to figure out what happened (Google doesn't provide support for Tag Manager, so you're on your own).
- Like Method 1, it only works for Kit forms embedded on your own website, not Kit's hosted landing pages.
- The conversion is still sent from the visitor's browser, so ad blockers and privacy browsers can stop it from firing. Expect to lose 30% or more of your conversions this way.
- It still misses the data Google Ads needs most in order to match a conversion back to the original ad click. The name and email are useful, but millions of people share the same name, and plenty of people have more than one email address (so the one they typed into your form may not be the one they were logged in to Google with when they clicked your ad). The only thing that ties a conversion back to the original ad click with 100% accuracy is the Google Click ID, and this method doesn't capture it.
That last point is what pushes a lot of people to Method 3.
Method 3: Use Converly
Best for: Sending proper, server-side conversions to Google Ads, Meta Ads, ChatGPT Ads, LinkedIn Ads, and more (without having to do complicated configuration in Google Tag Manager).
Converly is a tool built purely for conversion tracking. Each time someone signs up through a Kit form on your website, it sends a server-side conversion to Google Ads, Meta Ads, LinkedIn Ads and whichever other platforms you advertise on.
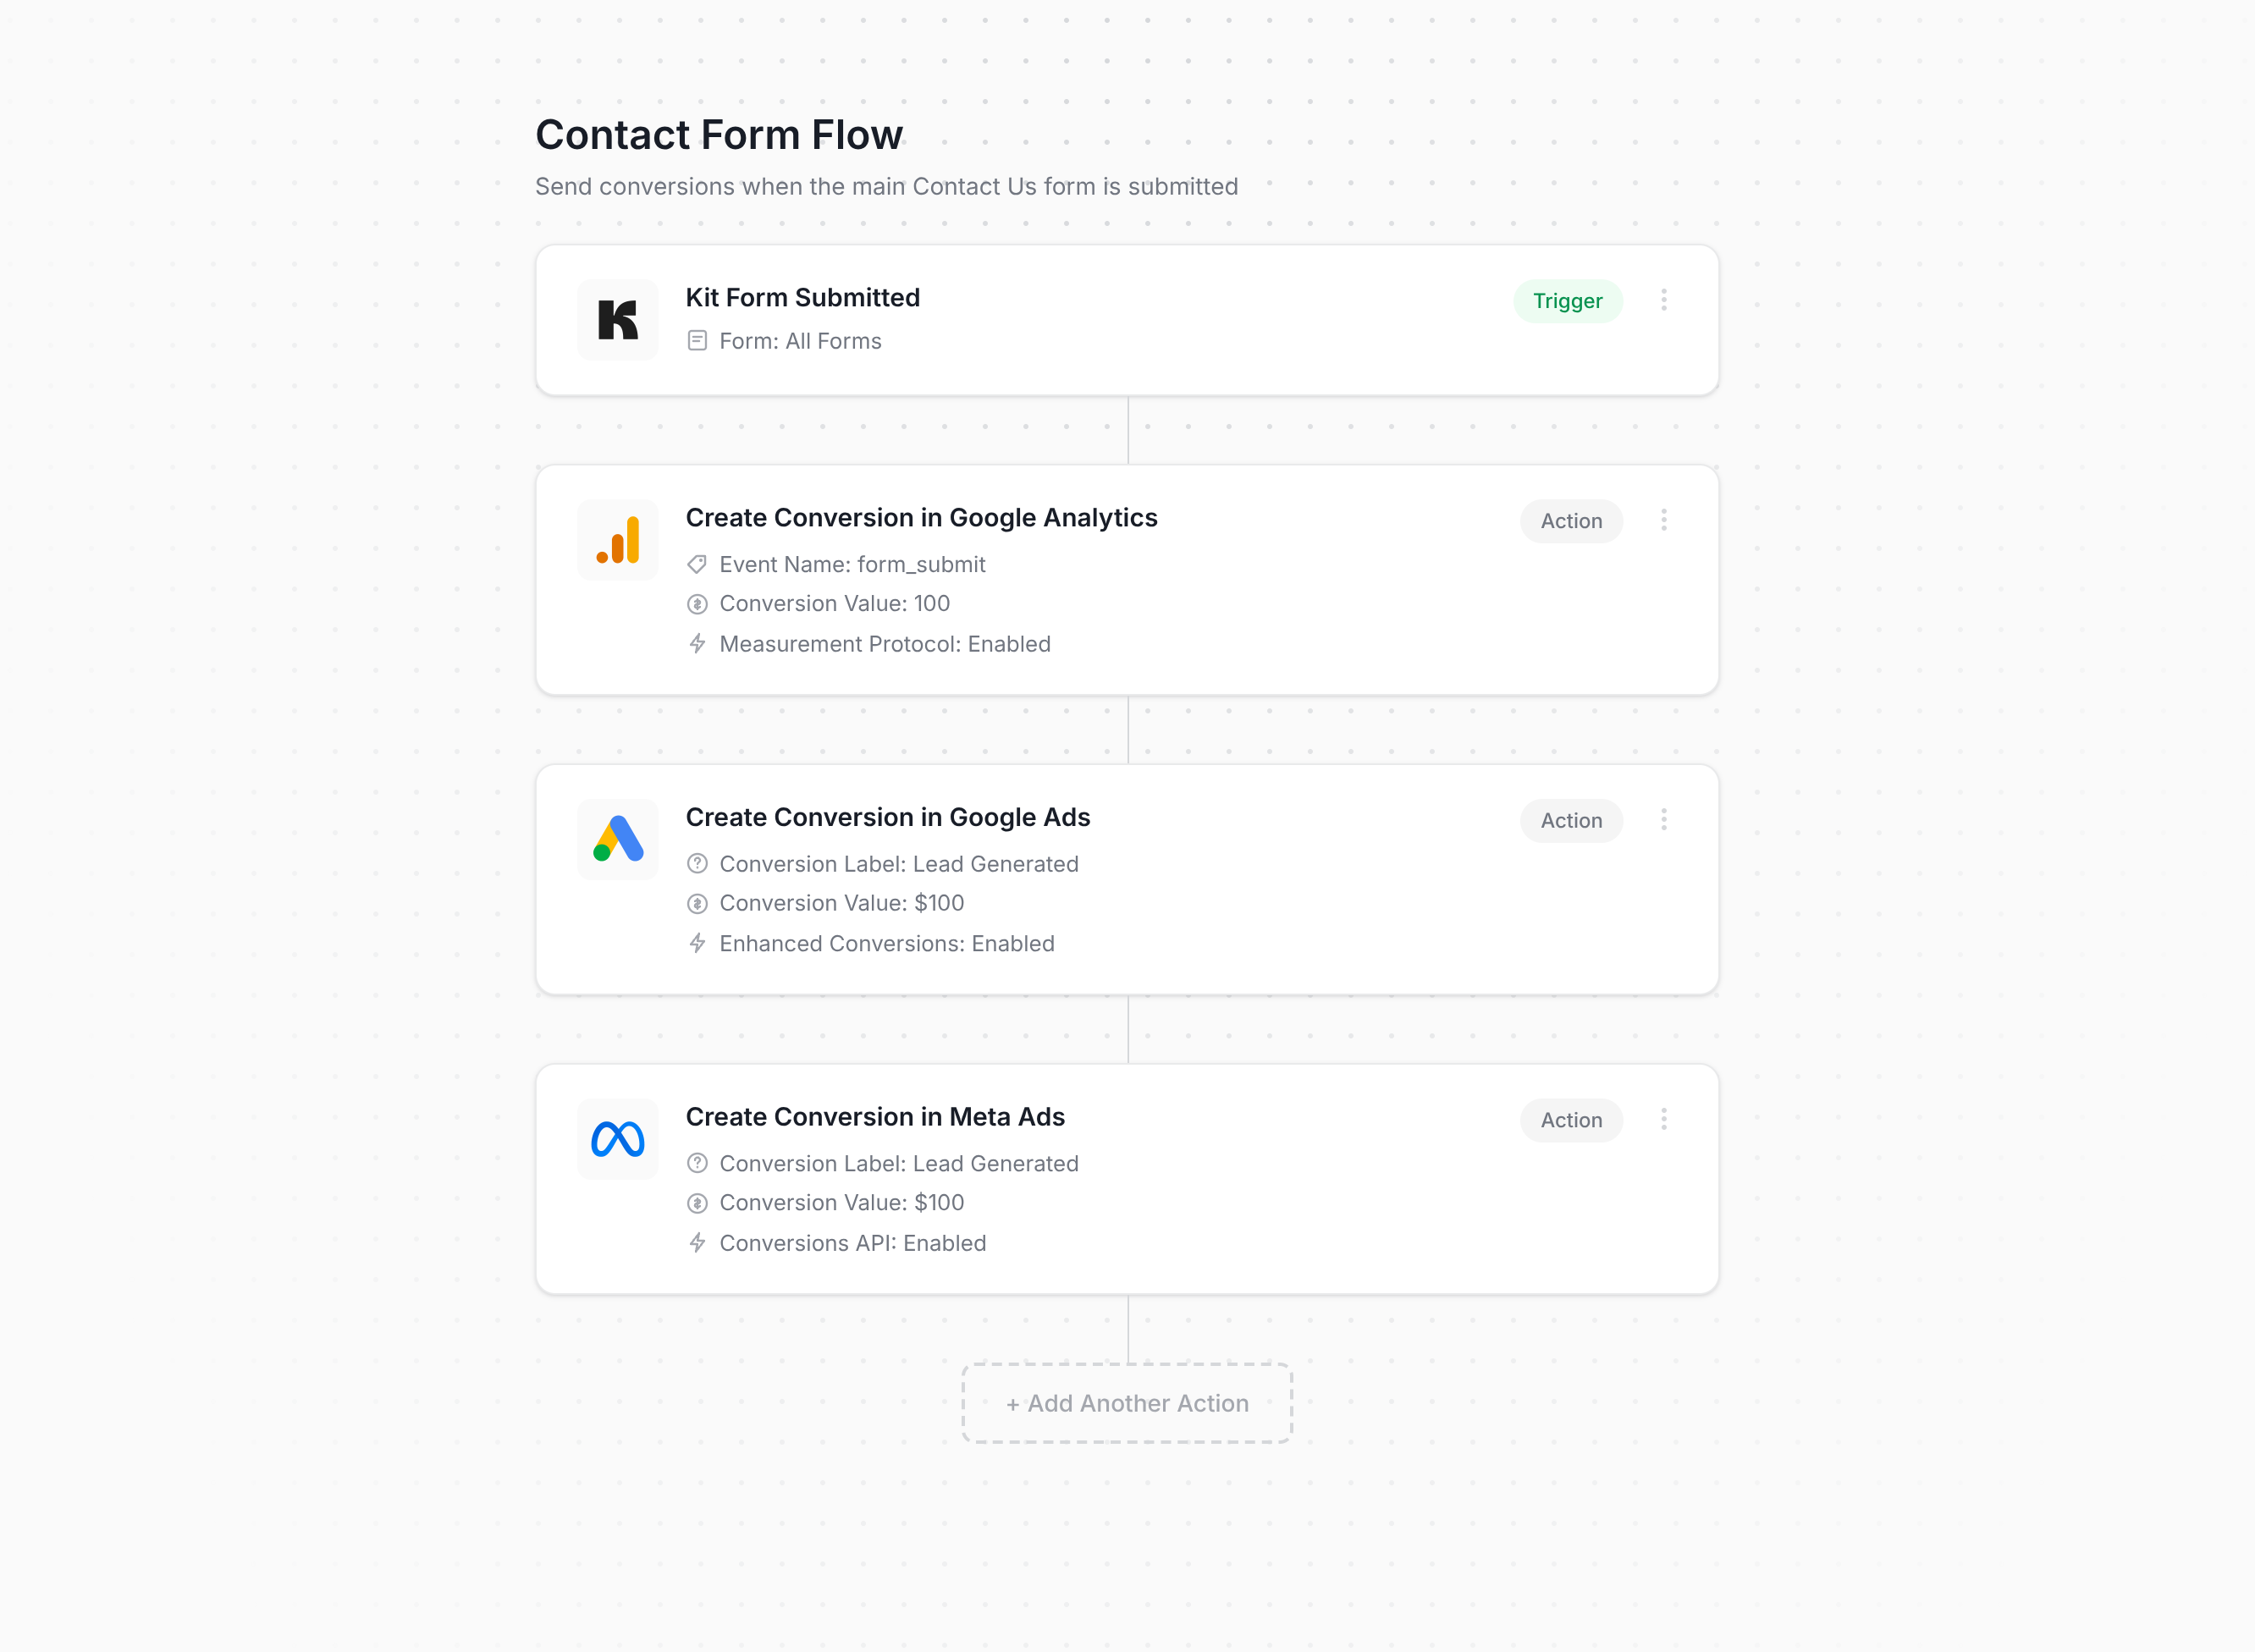
That screenshot is pretty much the whole setup. You just pick a trigger (like someone signing up through a Kit form), add one or more actions (like sending a conversion to Google Ads or Meta Ads), and that's it!
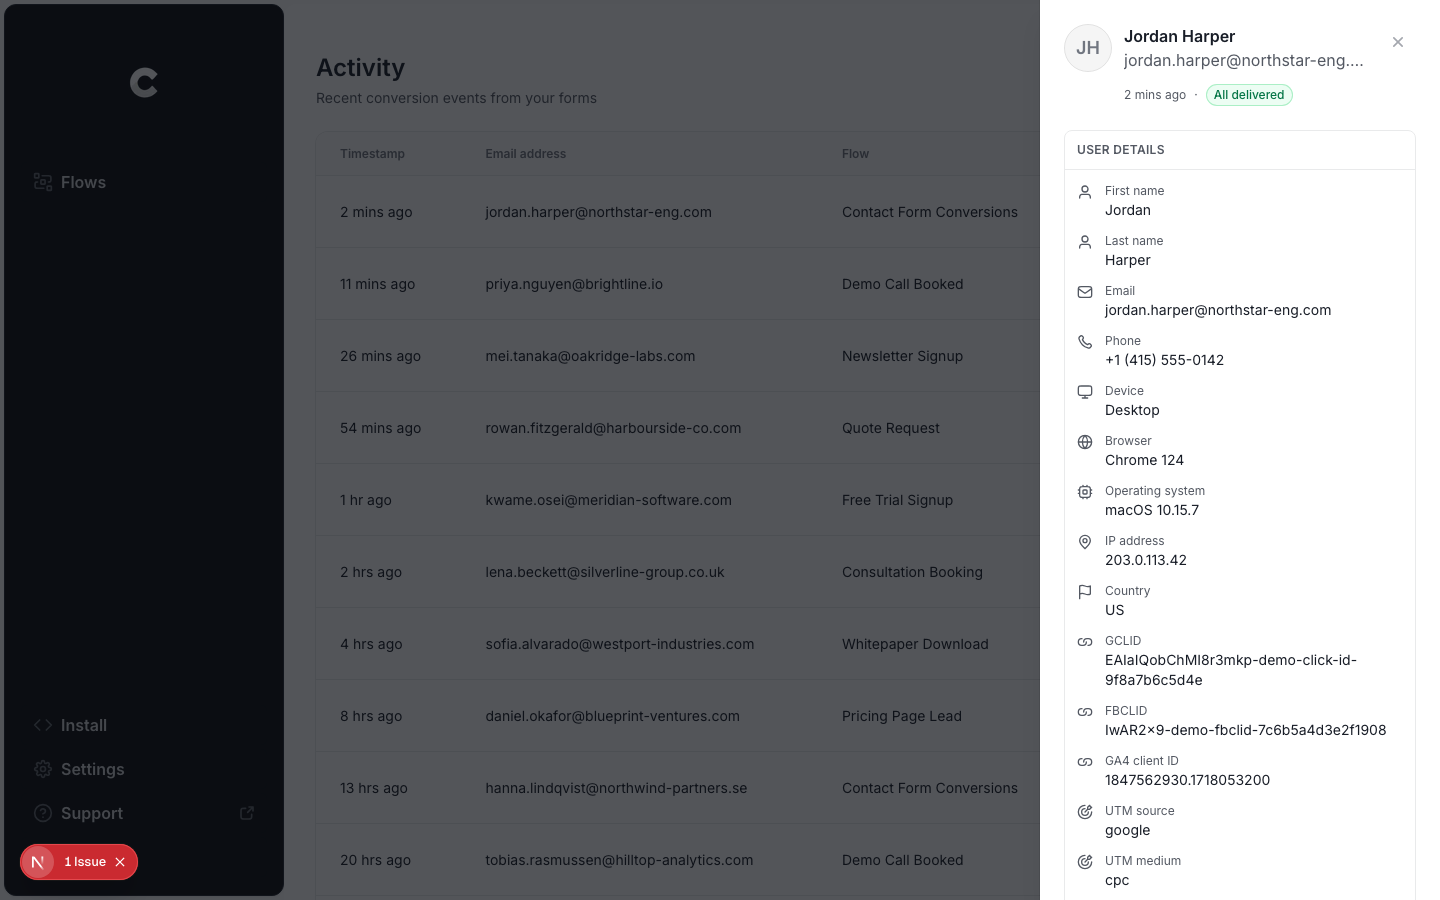
You then paste the snippet Converly gives you into your site (the same place you'd add any other tracking code), and it takes care of everything else. It detects successful Kit email signups, pulls out the name, email and phone, and passes them to Converly's servers. Converly then forwards them on to Google Ads, Meta Ads and any other destinations you've connected (and because it's delivered from Converly's servers rather than through the visitor's browser, ad blockers and privacy-centric browsers like Safari can't block it).
On top of sending the name, email and phone, Converly also picks up the click IDs (i.e. GCLID, fbclid, etc), the browser cookies the ad platforms set, the visitor's IP address and their user agent, and sends all of it with every conversion. That extra data is what lets ad platforms match the conversion back to a real person and the original ad they clicked with near 100% accuracy (Meta's Event Match Quality score, for example, typically climbs from around 3 to somewhere between 9 and 10 when you use Converly).
Pros and cons
Pros:
- Getting set up is genuinely quick. Pick a trigger, pick your actions, and you're finished. You don't need to write or maintain any code, there's nothing complicated to configure, and you never have to handle the quirks of Kit's form script yourself.
- Sends click IDs, cookies, IP address and user agent with every conversion, which gives your match quality in the ad platforms a real lift (with Converly, Meta's Event Match Quality score usually goes from a 3 or 4 up to a 9 or 10, for example).
- Sends conversions server-side, so ad blockers and privacy browsers can't stop them. You can expect around 30% more recorded conversions than a Google Tag Manager setup gives you.
- Supports conditional logic, so you decide which forms actually count as a conversion (like sending a conversion when someone grabs your lead magnet, but not when they join your general newsletter).
- Lets you connect Google Ads, Meta Ads, etc directly inside Converly and then simply pick which conversion should fire. No hunting around for account IDs or conversion IDs.
- Comes with its own MCP and CLI (and has plugins for Claude and ChatGPT). So you can connect an AI tool like Claude or ChatGPT, ask it to ‘Set up conversion tracking in Google Ads and Meta Ads when someone signs up through my Kit form’, and it handles the whole job for you.
- Includes a full conversion log covering every subscriber who signed up through a Kit form, what data was captured, whether it made it to your ad platforms, and more.
- Backed by a real support team who'll get you set up and fix any problems. Try getting that kind of help from Google when your GTM setup stops working.
Cons:
- It costs money once the free trial ends. Plans start at $19 a month.
What not to do
So far we've covered the three best ways to set up conversion tracking for Kit forms, and when each one makes sense. But it's just as useful to know which approaches to avoid, because several of the most common ways people try to track Kit signups don't work very well. Here are the ones to stay away from:
Tracking thank-you page visits
This is still the most popular DIY approach. Kit lets you send people to a page of your choosing after they sign up, so tracking thank-you page visits seems like the easy option. In reality though, it isn't a great approach. Here's why:
It counts people who never signed up. A thank-you page is just another page on your site, so people can land on it without ever filling in your form. They might bookmark it (especially if your freebie lives there), get taken back to it by their browser history or autocomplete, be sent the link by a friend, or find it in Google if it ever gets indexed. Every one of those visits is recorded as a conversion, even though nobody subscribed.
It can count the same subscriber more than once. If someone refreshes the thank-you page, that's a second conversion. If they leave, then hit the back button and land on it again, that's another one. One subscriber can be counted several times, which inflates your numbers and has Google and Meta optimising your ads against conversion data that isn't real.
You'd get terrible match rates. Your thank-you page doesn't contain the form, so it can't pass on the name, email, phone, GCLID, fbclid, etc. that ad platforms need to match everything up. So even though the conversions reach the ad platforms, many of them aren't counted, because they're missing the data needed to link them back to a real person and the ad they clicked.
Relying on the default form submit event in Google Tag Manager
When people set up tracking in Google Tag Manager, the natural first move is to use GTM's built-in Form Submission trigger, which listens for the browser's native form submit event.
With Kit forms, that doesn't work. When someone clicks Subscribe, Kit's own script takes over and sends the signup in the background, then runs its spam check (sometimes showing the "One more step" reCAPTCHA screen) before it decides whether to accept it. And when it does finally accept it, GTM's form submission trigger isn't fired.
What you need to do is listen for the signal Kit sends when a signup is successful, which is what Methods 1 through 3 above all do.
Using GA4's automatic form tracking (Enhanced Measurement)
GA4 has a built-in Enhanced Measurement feature that promises to track form submissions automatically, with no setup required.
The trouble is that it relies on the same browser submit event as GTM's default trigger, so it doesn't work properly either.
If you want Kit signups in GA4 reliably, use the free recipe from Method 1 above, or use Converly.
So which method should I use?
Here's how the three ways to track Kit conversions compare.
| Method | Best for | Sends conversions to | Data sent |
|---|---|---|---|
| Method 1. GA4 event built in Google Tag Manager | Sending signups to Google Analytics (use our free GTM recipe to make it easier) | Google Analytics 4 | The submission event only |
| Method 2. Enhanced Conversions through Google Tag Manager | Sending to Google Ads, if fiddly configuration doesn't put you off | Google Ads | Name, email and phone |
| Method 3. Converly | Sending to any ad platform, with the least setup work | Google Ads, Meta Ads, LinkedIn Ads, ChatGPT Ads, GA4 and more | Name, email and phone, plus the GCLID, the Meta click ID, IP address and user agent |
Wrap up
Proper, accurate conversion tracking is one of the biggest factors in determining how well your ad campaigns perform.
Set it up properly and the ad platforms' algorithms get the data they need to work out what your ideal subscriber looks like, so they can put your ads in front of more people just like them. Get it wrong though, and the ad platforms will just keep serving your ads to random people (and burn your budget in the process).
Converly gives you every benefit of server-side tracking with none of the hard work. You simply pick your trigger (someone signing up through a Kit form), choose the platforms the conversions should go to, and you're finished.
It's free to get started (no credit card is needed for the trial), and most people are fully up and running in under 10 minutes. Start your 14-day free trial today.
About the author

Aaron is the founder of Converly. With over 15 years of experience in digital marketing and SaaS, he's passionate about helping businesses track and optimise their ad conversions.