


Jotform Conversion Tracking: 2 ways to do it
Learn two different ways to set up conversion tracking for Jotform, and how to work out which one is right for you.
If you're running ads to generate leads for your business, then conversion tracking isn't optional.
It lets you see which campaigns, ads, and keywords are actually producing your leads, and it gives the ad platforms (Google, Meta, etc.) the data they need to learn who converts and who doesn't (so they can show your ads to more people likely to convert).
The catch is that setting it up with Jotform is surprisingly hard.
That's because when you add a Jotform form to your website with Jotform's standard embed code, the form loads inside an iFrame rather than actually being part of your page. Nothing on your page can see inside that window, so tracking when someone submits the form is difficult.
Fortunately though, there are a few options.
In this article, we'll show you two different ways to set up conversion tracking for Jotform, and help you decide which one is best based on where you are trying to send conversions.
Method 1: Use Google Tag Manager (with a free recipe)
Good for: Counting Jotform submissions in Google Analytics
If all you want to do is send a conversion event to Google Analytics when someone submits a Jotform form on your website, then using Google Tag Manager is free (and not too difficult to set up if you use a pre-built recipe).
Jotform's own Google Analytics widget was built for the old Universal Analytics, and it doesn't send GA4 an event when a form is submitted. Jotform's help docs point you towards Google Tag Manager instead, so that's what we're going to use here.
Google Tag Manager has a built-in form submission trigger that is supposed to watch for form submissions and then fire your conversion tags (i.e. the things that send conversions to Google Analytics, Google Ads, etc) when a form is submitted. Unfortunately though, it doesn't work with Jotform's standard embeds. GTM's built-in trigger listens for the browser's native form submit event, but because the form loads in an iFrame, that event never fires. So if you took this approach, no conversions would ever be tracked.
What you need to do instead is write some custom code that listens for the message Jotform sends when a submission goes through, fire an event into the dataLayer, and then create triggers, tags and variables from that. Sounds complicated right?
Fortunately, there are these things called recipes in Google Tag Manager, which are basically just a set of pre-built assets you can upload into your account and use (as opposed to having to write all the code and everything yourself). Here's how to do it:
Step 1: Download the Jotform Conversion Tracking GTM Recipe
Start by grabbing the Jotform GTM recipe from this page. This recipe includes the following Google Tag Manager assets:
- A Custom HTML Tag that listens for the message Jotform sends your page when a form is successfully submitted, and pushes an event called
jotform_form_submittedinto Google Tag Manager. - A Variable that captures the ID of the form that was submitted, which is handy if you later want to fire different tags for different forms (i.e. you want to send a conversion when someone submits your Request A Quote form, but not your Newsletter Signup form).
- A Trigger, called
CE - Jotform Submitted, which you use to fire whatever conversion tags you build (a GA4 event, a Google Ads conversion, and so on).
Step 2: Import the GTM recipe into your account
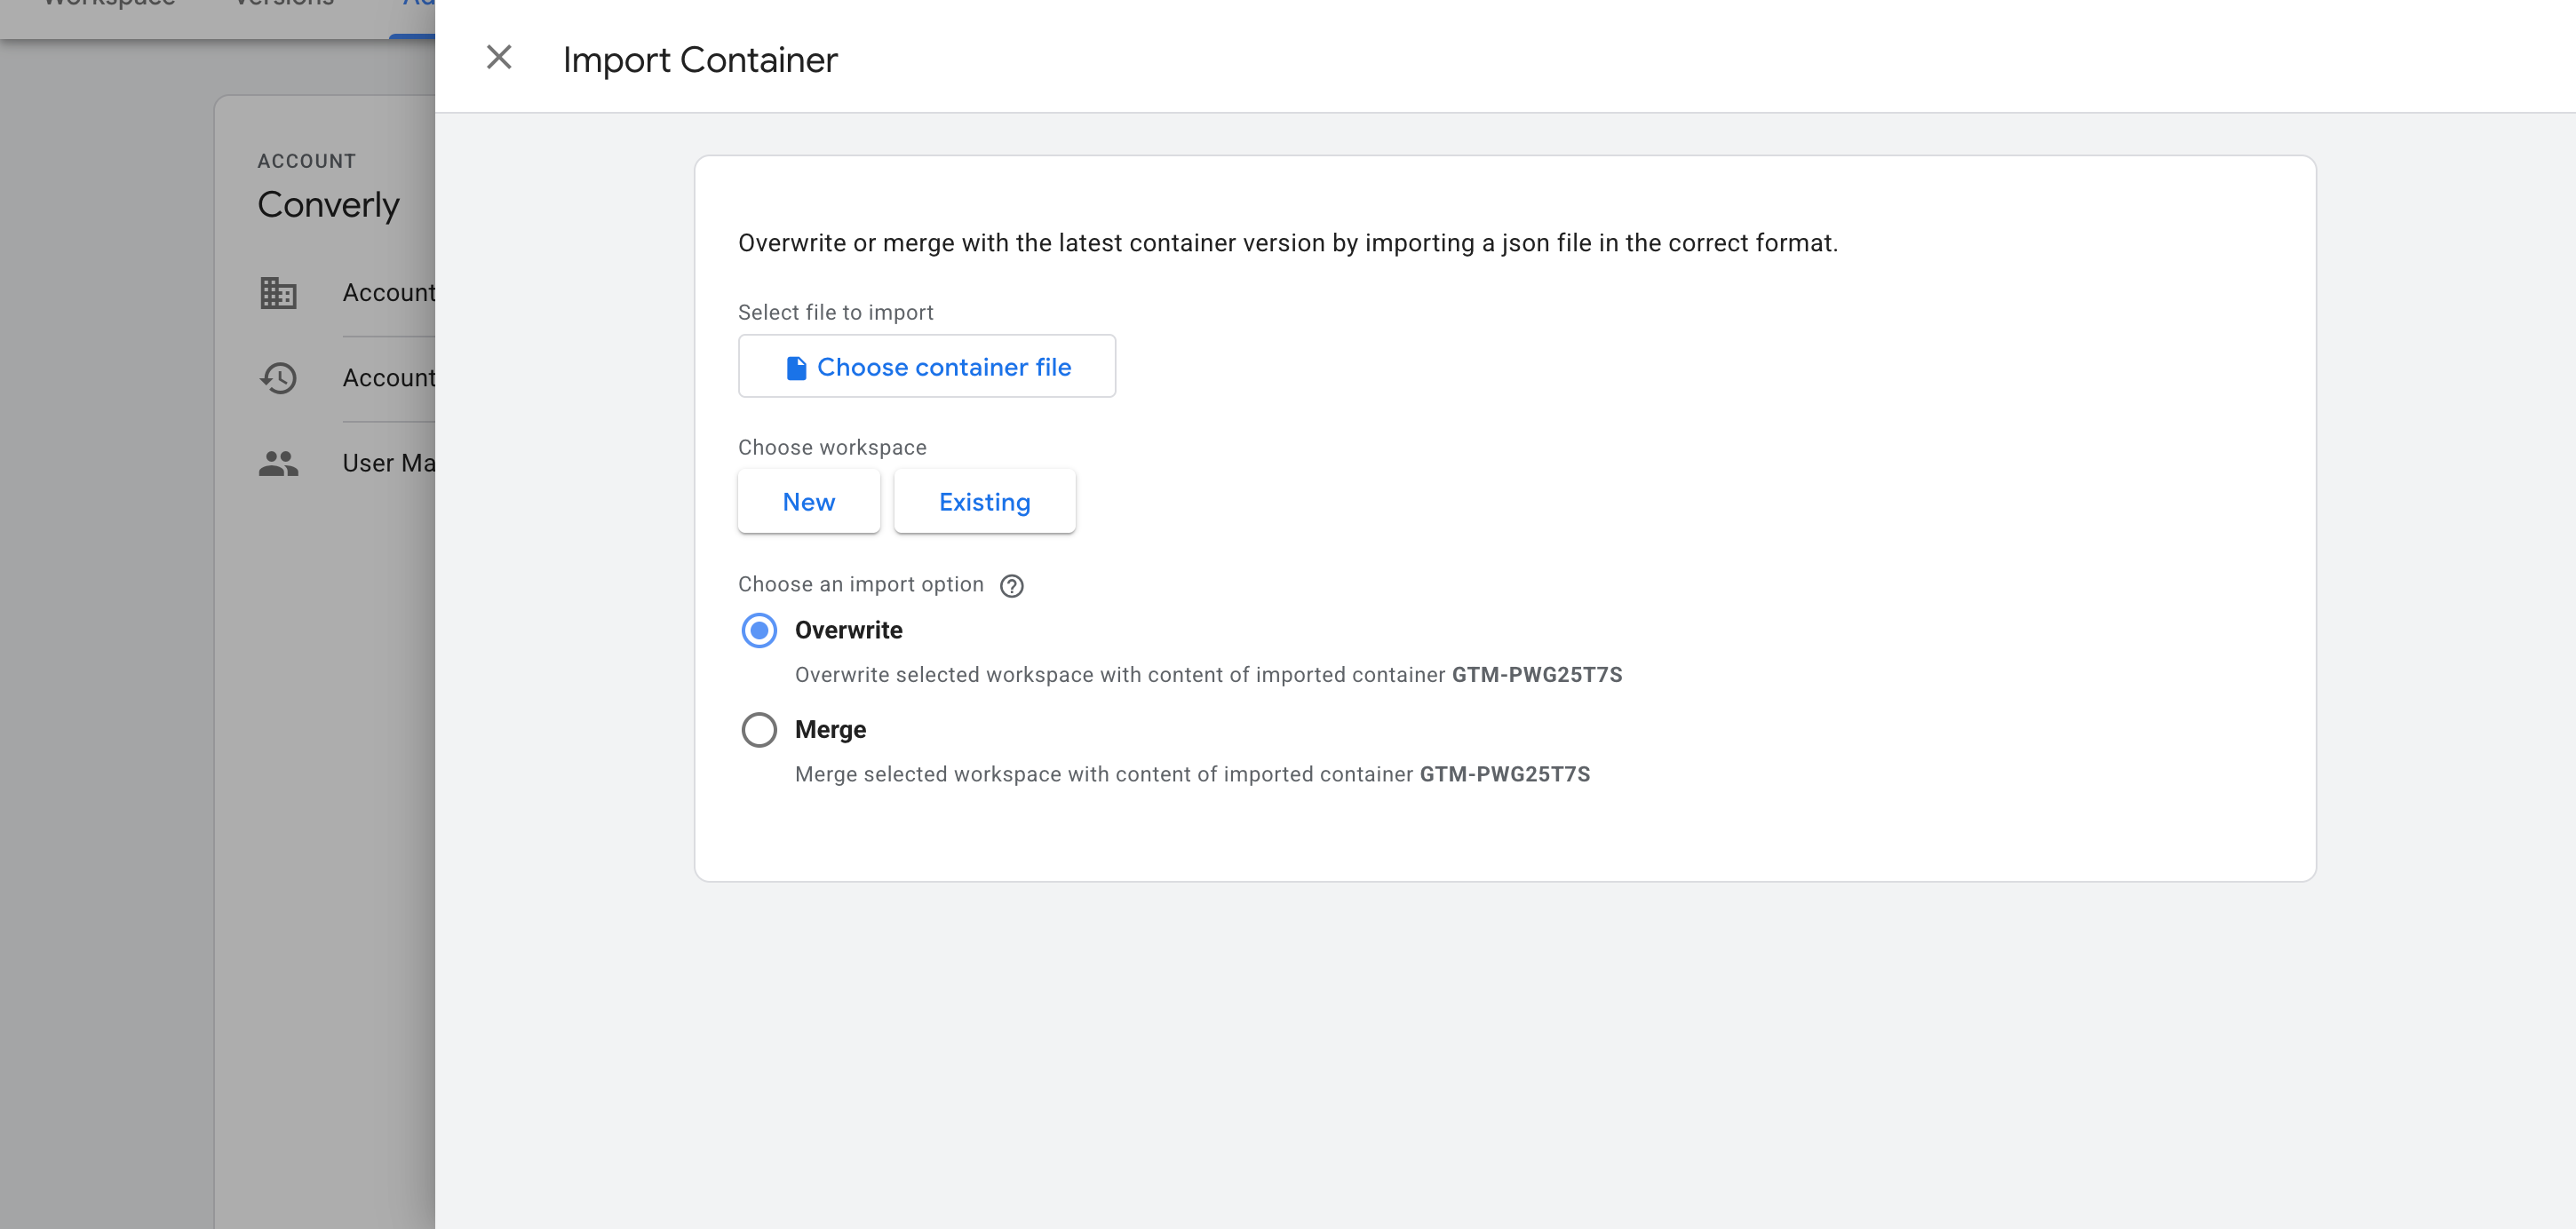
With the file downloaded, the next job is getting it into your Google Tag Manager container. Open Google Tag Manager, go to Admin, choose Import Container, select the file, and pick the Merge option so nothing already in your container gets overwritten. The listener, the variable and the trigger are all created for you.
Step 3: Build a GA4 event tag
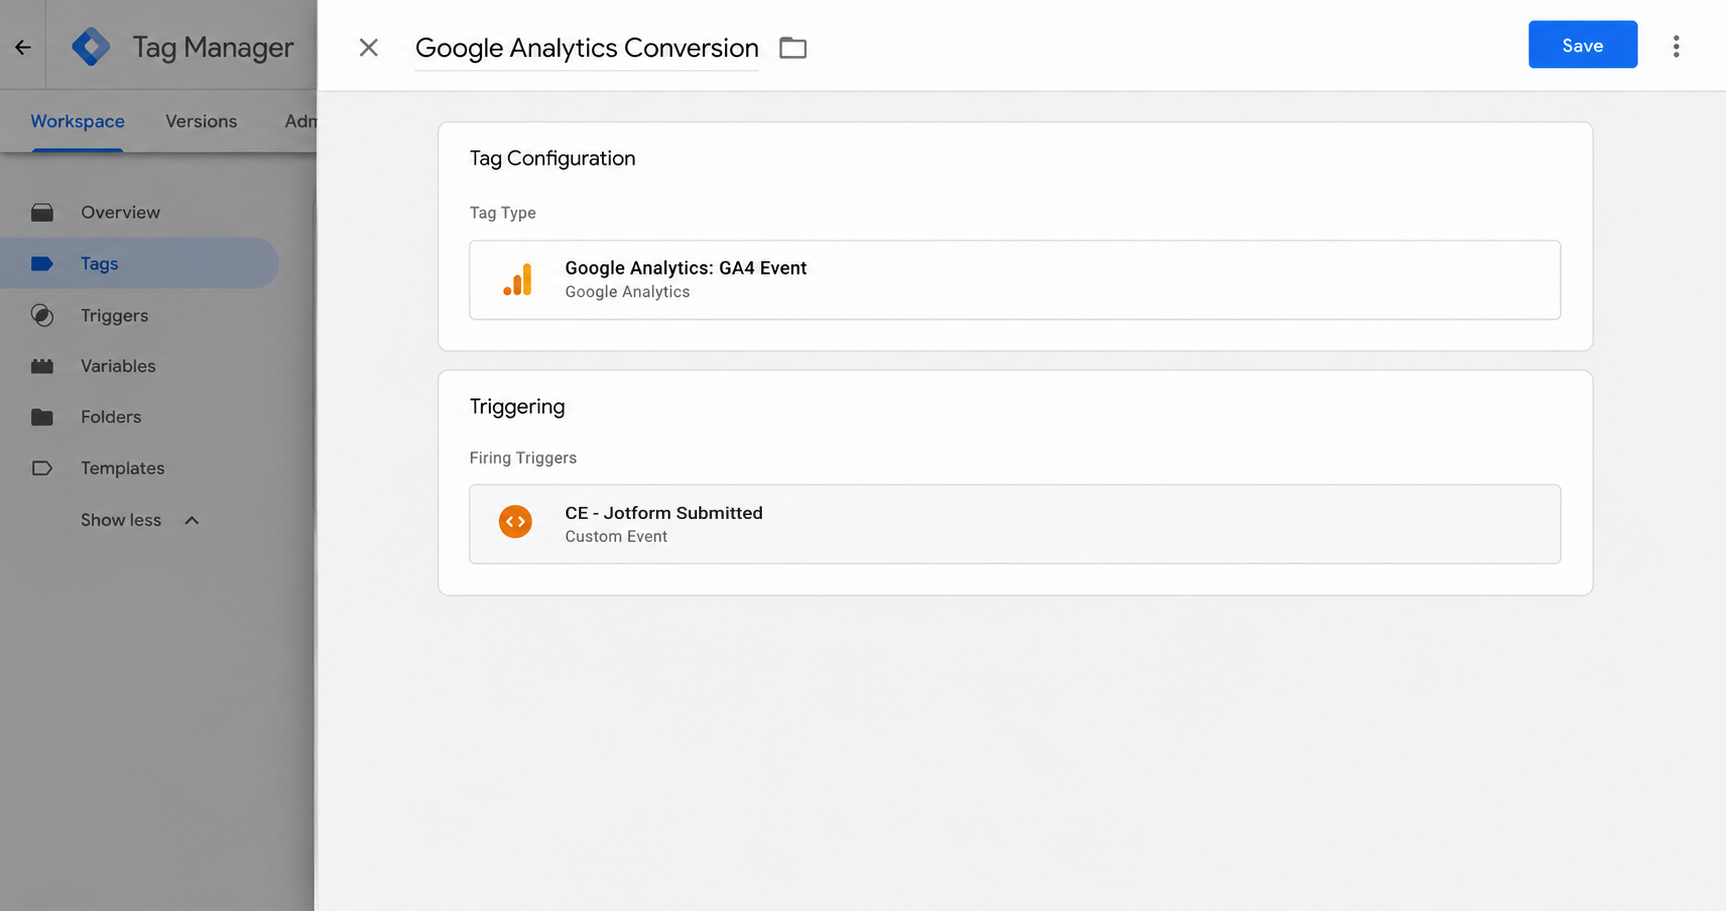
The recipe gives you the trigger that fires when a Jotform form is successfully submitted, but you still need to set up the tag that sends the conversion to GA4. To do that, create a GA4 event tag and set its firing trigger to the one the recipe installed (called CE - Jotform Submitted).
Step 4: Test it, then mark it as a Key Event in GA4
With everything wired up, the last job is proving it works. Submit a test entry on a page with your Jotform form on it, open GA4's Realtime report, and check the event turns up in the Recent Events list.
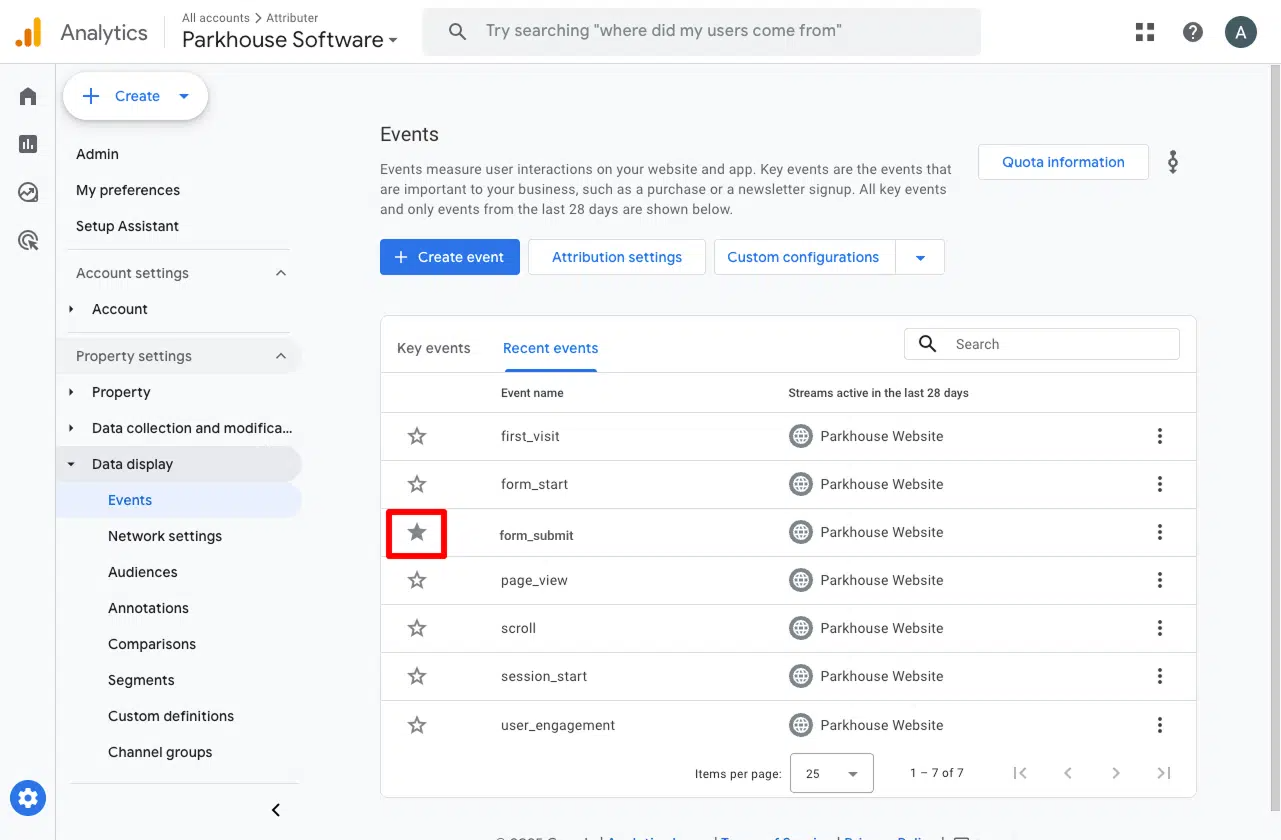
Once it's arriving, go to Admin, then Events, find the event in the list, and toggle it on as a Key Event. This is what tells GA4 to treat the event as a conversion in your acquisition and funnel reports rather than leaving it sitting there as an ordinary event.
Why use this rather than another script you found online
There are plenty of Jotform tracking scripts floating around on blogs and in forums. Most of them are a few lines long, and most of them share the same handful of problems. Here's what this recipe does differently:
- It only counts a real submission. It's built around the message Jotform sends when a form is successfully submitted. So if Jotform refuses a submission (because a required field was left blank, or an email was typed in the wrong format), no conversion is sent.
- It checks the message really came from Jotform. Any script running on the page can send a message that looks like Jotform's, so the recipe only accepts it from a Jotform form embedded on your page.
- It only counts once. If a user does something like double click the Submit button, this recipe still sends a single conversion.
It's built on the same code that Converly's own Jotform detection uses (just modified to work in Google Tag Manager), which means it's regularly tested and has been used to detect thousands of form submissions by our customers.
Pros and cons
Pros:
- It's free. Google Tag Manager costs nothing, and neither does the recipe.
- It works with Jotform's iFrame embed and JavaScript embed options, which is how most sites add a Jotform form.
- It only fires once Jotform confirms the submission went through, so a submission Jotform refuses (because a required field was left blank, or an email was typed in the wrong format) doesn't fire anything. That matters, because most people fix the problem and submit again, which would then count as 2 conversions for 1 lead.
- Most of the fiddly work is already done. The tag, the trigger and the variable come pre-built, so the conversion tag itself is the only piece you build by hand.
- The variable tells you which form was submitted, so you can set Google Tag Manager to only send conversions for specific forms on your site (i.e. your Request A Quote form but not your Job Application form). It is a bit more complicated to set this up, but it's doable.
Cons:
- It doesn't send through the lead's name, email, phone, etc. The embedded form never gives your page the details the person typed in, so this isn't a limitation of the recipe, it's how Jotform's embeds work. That's fine for Google Analytics, but ad platforms like Google Ads, Meta Ads, ChatGPT Ads, etc. want the lead's details so they can match the conversion back to a real person and the original ad they clicked. Without them, they'll struggle to match conversions back to your campaigns and you'll end up significantly undercounting conversions.
- It doesn't capture the click IDs either. The Google Click ID, Facebook Click ID, etc are what tie a conversion back to a specific ad click with complete certainty, and the recipe doesn't send them. Again, this is fine for Google Analytics, but far from ideal for Google Ads, Meta Ads, etc.
- Everything fires through the visitor's browser, so ad blockers and privacy-focused browsers like Safari can stop the conversion reaching Google Analytics. Industry studies suggest you'll lose roughly 30% of your conversions doing it this way.
- It doesn't work with Jotform's full source code embed, because that embed doesn't send the completion message. If that's how your form is added to your site, use Method 2.
- There's still setup to do and nobody to call when it breaks. Google doesn't offer support for Google Tag Manager, so if it doesn't work then working out why is your problem.
Method 2: Use Converly
Best for: Sending proper, server-side conversions to Google Ads, Meta Ads, ChatGPT Ads, LinkedIn Ads, and more.
Converly is a dedicated conversion tracking tool, built to send server-side conversions to Google Ads, Meta Ads, LinkedIn Ads, and more, whenever a Jotform form is submitted on your site.
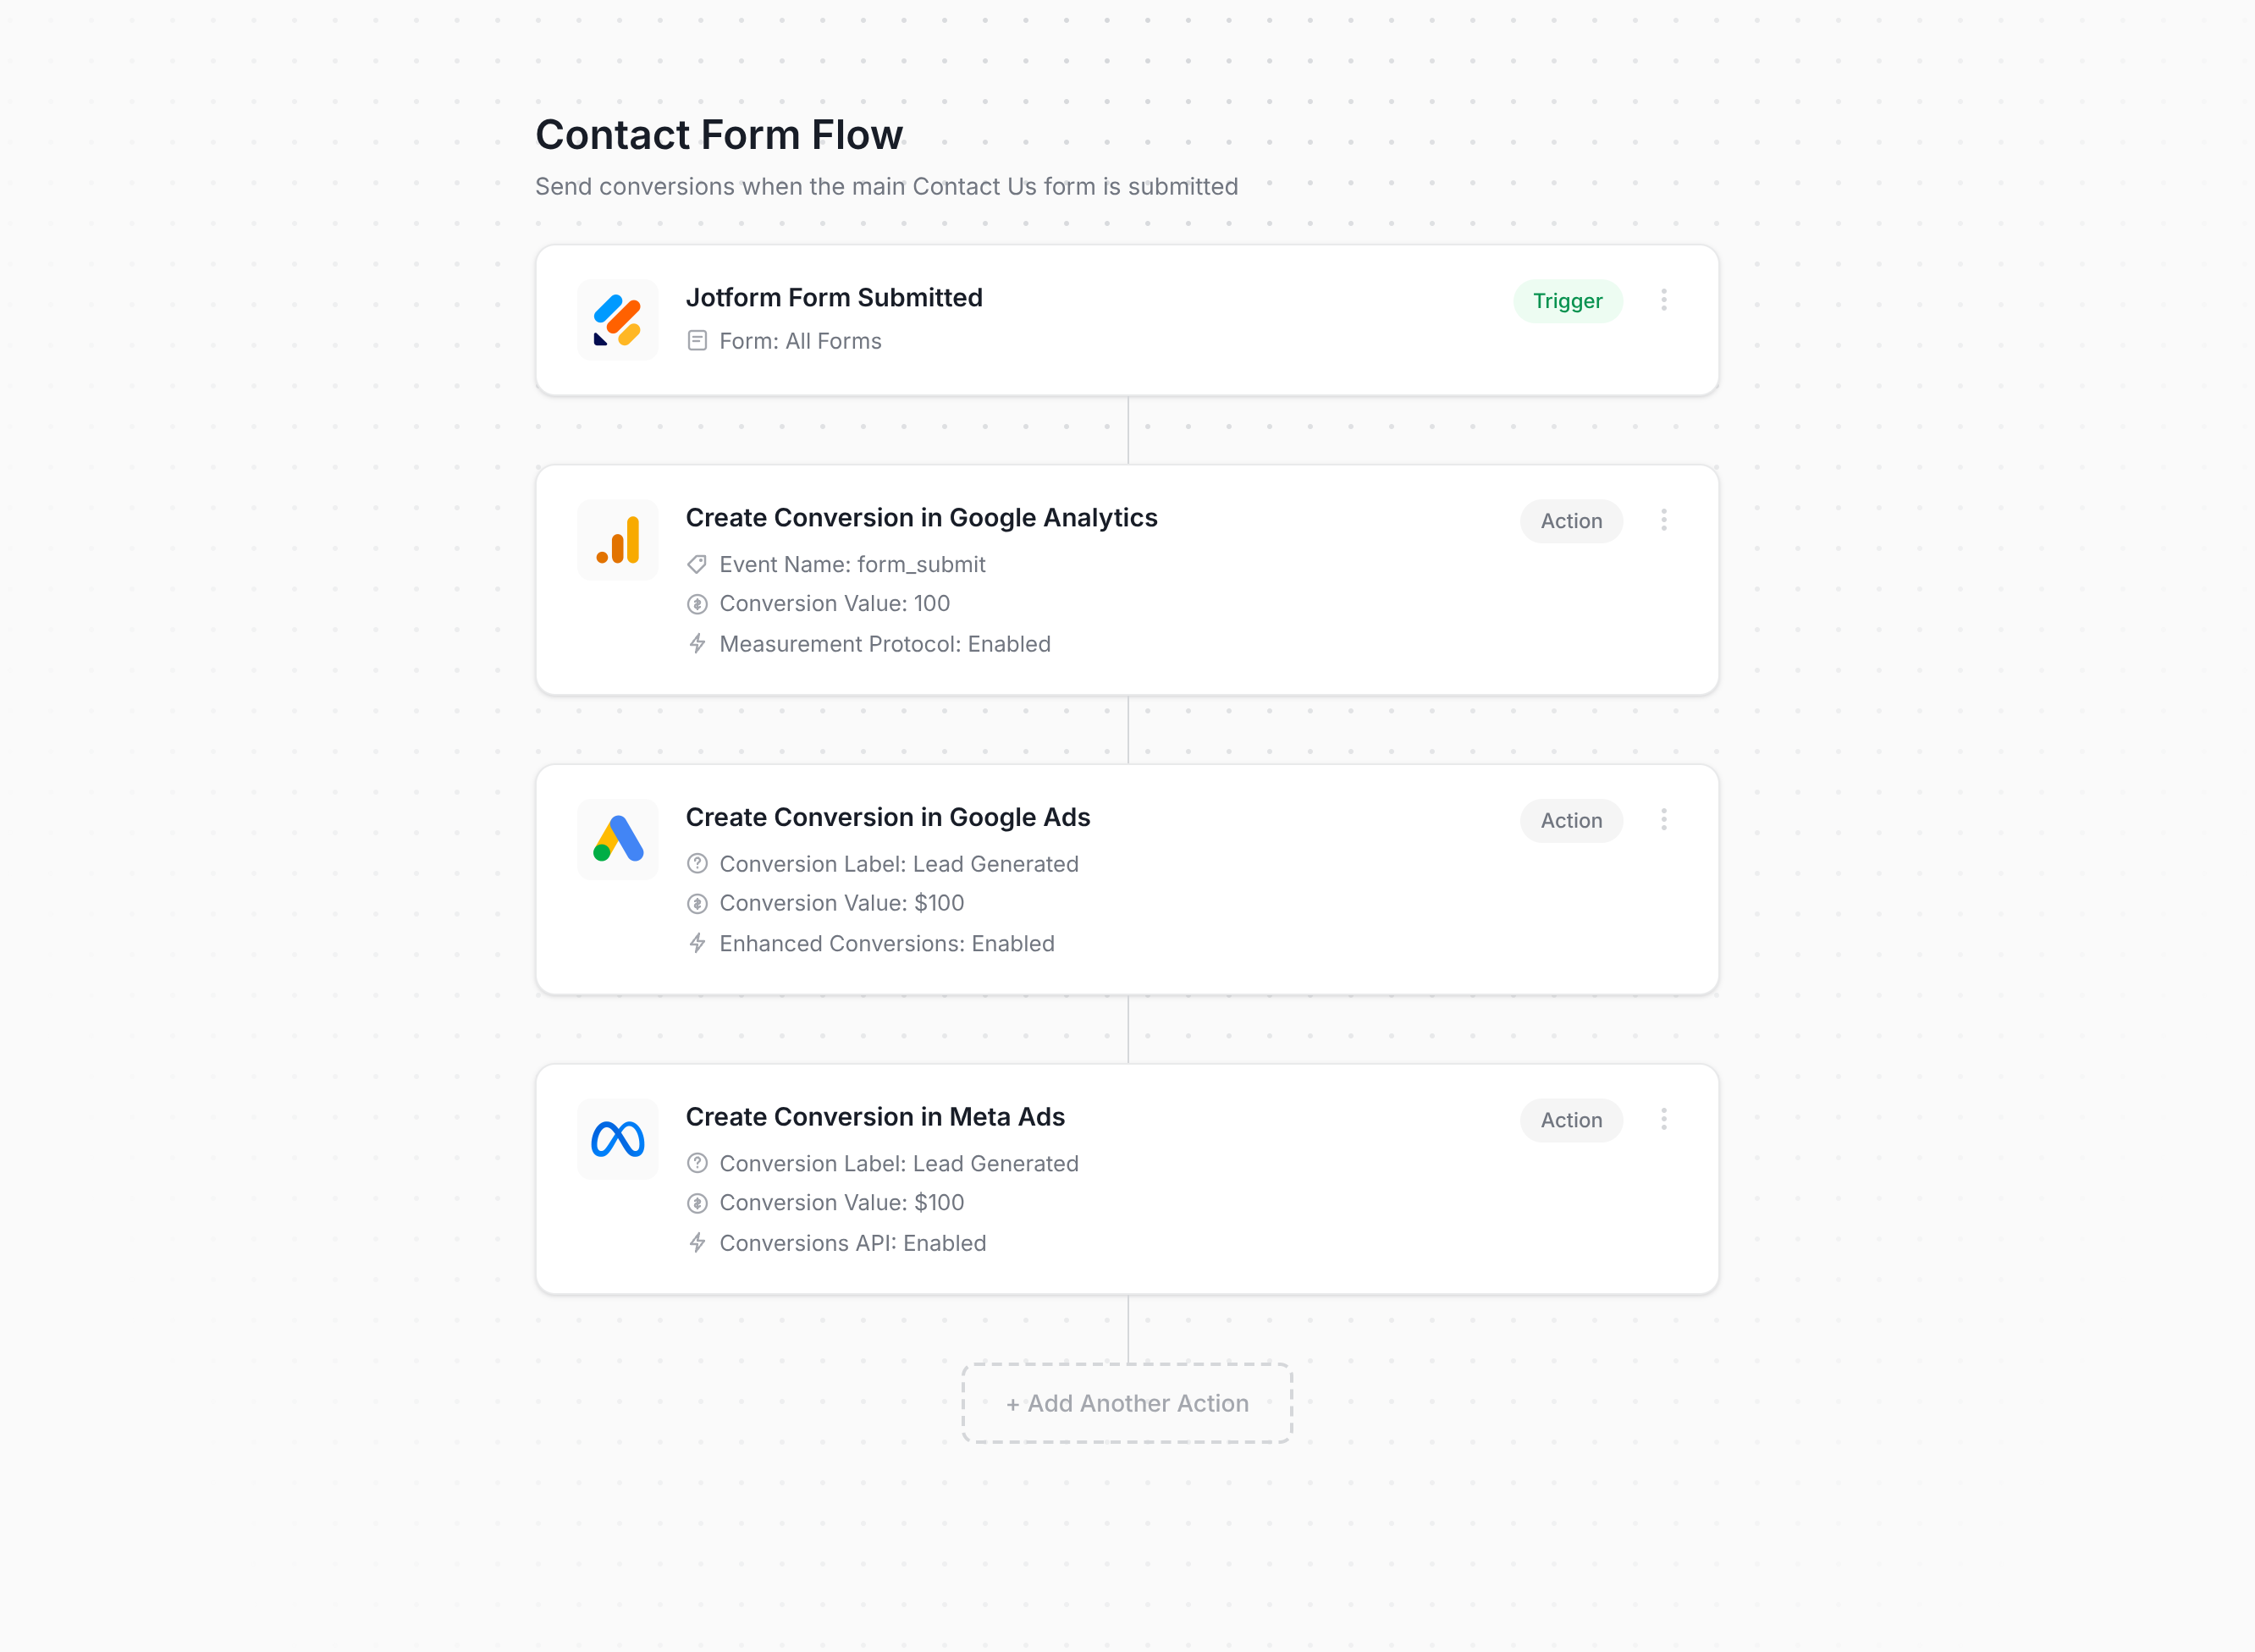
The screenshot above is basically the whole setup process. You choose a trigger (in this case, a Jotform form being submitted), add one or more actions (such as sending a conversion to Google Ads or Meta Ads), and you're done. There's no code to write and nothing to wire together manually in Tag Manager.
Converly takes care of everything else from there. Converly detects when a Jotform is submitted on your site, gets the name, email and phone from Jotform's API, joins it with the visitor's Click ID, IP address, User Agent, and more, and then sends it directly to your ad platform's servers. This means that ad blockers and browser-privacy restrictions can't get in the way, and the ad platforms have all the data they need to match the conversion back to a real person and the original ad they clicked.
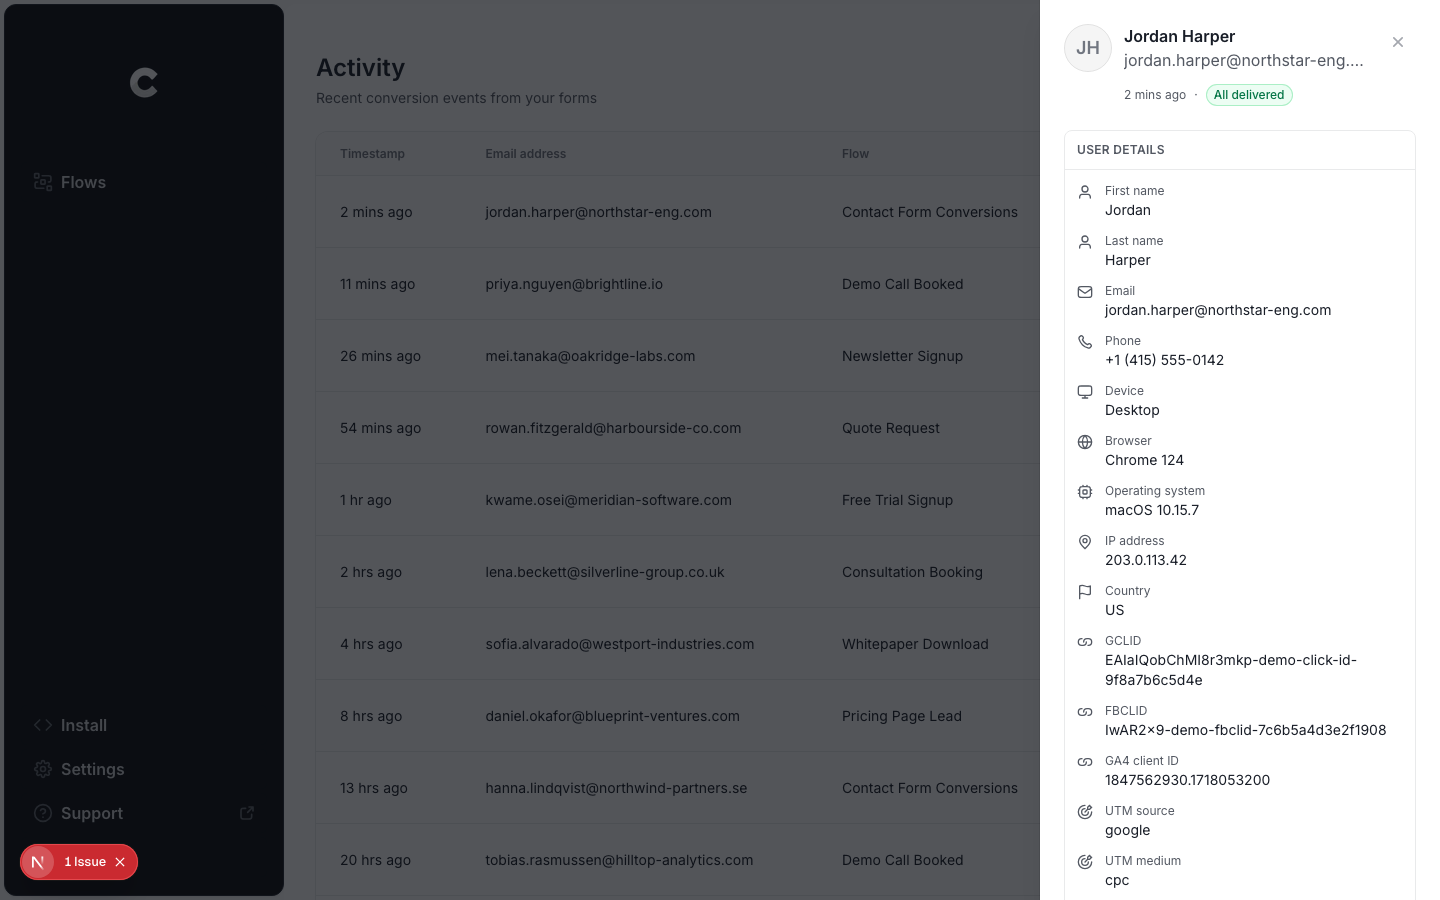
There's also a full conversion log built in, showing every lead who submitted your Jotform form, exactly what data Converly captured, what got forwarded to each platform, and whether it made it through successfully.
Pros and cons
Pros:
- Setup is genuinely quick and easy. Pick a trigger, pick your actions, and you're done. There's no code to write or maintain, nothing complicated to configure, and no need to change how your Jotform form is embedded.
- Sends conversions server-side, so ad blockers and privacy browsers can't block them. Expect about 30% more recorded conversions than a Google Tag Manager setup.
- It gets the lead's name, email and phone from the Jotform API and sends them to your ad platforms, which gives them the data they need to match the conversion back to a real person and the original ad they clicked.
- Sends click IDs, cookies, IP address and user agent with every conversion, which noticeably lifts match quality in the ad platform (as one example, Meta's Event Match Quality typically goes from a 3 or 4 up to a 9 or 10 with Converly).
- Makes it easy to add conditional logic, so you can choose which forms count as a conversion and which ones don't (like when someone submits your Quote Request form, but not when they fill in your Contact Support form).
- Lets you connect Google Ads, Meta Ads and the rest directly inside Converly and just choose which conversion to fire. No digging around for account IDs or conversion IDs.
- Has dedicated plugins for AI tools like Claude and ChatGPT, so you simply tell your AI assistant to 'Set up conversion tracking in Google Ads and Meta Ads when someone submits my Jotform form', and it'll do the whole thing for you.
- Comes with a complete conversion log covering every lead who submitted a Jotform form, what data was captured, whether it reached your ad platforms, and more.
- Comes with a real support team who'll help you get set up and fix any problems. Good luck getting that kind of help from Google when your GTM setup breaks.
Cons:
- It costs money once the free trial ends. Plans start at $19 a month.
What not to do
We've now covered the two best ways to set up conversion tracking for Jotform and when each one makes sense. But it's just as useful to know which approaches to avoid, because several of the most common ways people track Jotform submissions don't work as well as they seem. Here are the ones to steer clear of:
Tracking thank-you page visits
This is still the most popular DIY approach, largely because Jotform allows you to send people to a page on your own site after a successful submission, so it seems like the easiest way to do it. The problem is your conversion tracking won't be very accurate. Here's why:
It fires for people who never submitted anything. A thank-you page is just a URL, and anyone can reach a URL without submitting your form. People bookmark it, accidentally pull it up from their browser history or autocomplete, get sent the link by a colleague, or find it in Google if it ever gets indexed. Each of those counts as a conversion, even though nobody filled anything in.
It can double count real submissions. Refresh the thank-you page and that's a second conversion. Hit back and then forward again, or reopen it from your history a few days later, and that's more. One lead can end up recorded several times, which inflates your numbers and leaves Google and Meta optimising your ads against conversions that never happened.
You'd get terrible match rates. A page visit has no idea who filled in the form, so it can't send the name, email, phone, GCLID, fbclid and so on that ad platforms need for matching. So even though conversions are reaching your ad platforms, they do very little, because they're missing the details the platforms need to link each conversion to a real person and the original ad they clicked.
Both methods above fire when Jotform confirms a submission went through, so they stay tied to what really happened.
Relying on the default form submit event in Google Tag Manager
If you are using Google Tag Manager, one option is to use GTM's built-in Form Submission trigger, which listens for the browser's own form submit event.
With Jotform, it goes wrong in two different ways, depending on how your form is embedded:
- With the standard iFrame or JavaScript embed, the form is hosted on Jotform's domain and iFramed into your website (the JavaScript embed method just creates an iFrame). This means the form isn't technically on your page, so GTM's built-in form submission trigger won't work. You'd set everything up, assume it's working, and your conversion count in Google Ads would sit at zero with nothing telling you why.
- With the full source code embed, the trigger does fire, but too often. Jotform switches off the browser's own form checks and runs its own, so the browser reports a submission on every click of the Submit button, even if Jotform rejects the form submission (because a required field was missing for example). So a person could click the Submit button, get rejected, and a conversion would still be sent. Then when they fix the error and click Submit again, a second conversion is counted for the same lead.
You need to listen for the message that Jotform sends to your page when a form is successfully submitted (just like methods 1 and 2 in this article do). It's the only reliable way to set up conversion tracking for Jotform forms.
Using GA4's automatic form tracking (Enhanced Measurement)
GA4 has a built-in Enhanced Measurement feature that promises to track form submissions automatically, with no setup at all.
It works by listening for that same browser submit event that Google Tag Manager's form submission trigger uses, so it inherits the same two problems as mentioned above. With Jotform's standard iFrame embed it can't see the form at all, and with the source code embed it has no way of telling a rejected submission from a real one (so you end up overcounting conversions).
If you want Jotform submissions recorded reliably in GA4, use the free recipe from Method 1 above, or use Converly.
So which method should I use?
Here's how the two ways to track Jotform conversions compare.
| Method | Best for | Data sent |
|---|---|---|
| Method 1. Google Tag Manager | Sending conversions to Google Analytics | The submission event only, with no name, email or phone |
| Method 2. Converly | Sending conversions to Google Ads, Meta Ads, LinkedIn Ads, ChatGPT Ads, and more | Name, email and phone, plus the GCLID, the Meta click ID, IP address and user agent |
Wrap up
Conversion tracking doesn't get much attention, but it's actually one of the biggest factors in how well your advertising performs.
If you take the time to set it up properly, Google's and Meta's algorithms get the data they need to learn what your ideal customer looks like, and can then put your ads in front of more people like them. And according to Google, businesses that switch to proper server-side conversion tracking see around 19% more conversions on average, while Meta puts the lift from the same change at 23%.
With Converly, you get all the benefits of server-side tracking without any of the hard parts. You simply choose your trigger (someone submitting a Jotform form), pick which platforms should receive the conversions, and you're done!
Converly is free to start with (you don't even need to enter a credit card for the trial), and most people have it fully running in under 10 minutes. Start your 14-day free trial today.
About the author

Aaron is the founder of Converly. With over 15 years of experience in digital marketing and SaaS, he's passionate about helping businesses track and optimise their ad conversions.