


WS Form conversion tracking: 3 ways to do it
Learn three different ways to set up conversion tracking in WS Form, and how to work out which one is right for you.
Are you struggling to set up proper conversion tracking in WS Form?
It's understandable. Most guides point you to Google Tag Manager, but that means writing custom code to detect the submission, then wiring up Triggers, Tags, and Variables to send the data wherever it needs to go. It's complicated to set up, requires you to understand a whole language (tags, triggers, variables, etc), and one small mistake anywhere in that chain and the whole thing stops working (and doesn't tell you why).
So in this article, we'll walk you through three different ways to set up conversion tracking for WS Form and show you which one is the best for you based on what you're trying to achieve.
Method 1: Use WS Form's own Conversion Tracking action
Good for: Sending form submission events to Google Analytics, no code required.
If all you need is for WS Form submissions to show up in Google Analytics so you can see your conversion rate and work out which pages and channels are actually producing leads, this is genuinely all you need.
Unlike some other WordPress form plugins, WS Form does not need you to build anything in Google Tag Manager for this. It ships its own Conversion Tracking action right inside the form editor, which can fire events to Google Analytics, Google Tag Manager's data layer, Facebook Pixel, LinkedIn's Insight Tag, and Fathom Analytics, all without writing a line of code. The catch is that the Conversion Tracking action is a WS Form PRO feature, so it isn't available on the free WordPress.org version of the plugin.
Step 1: Add a Conversion Tracking action to your form
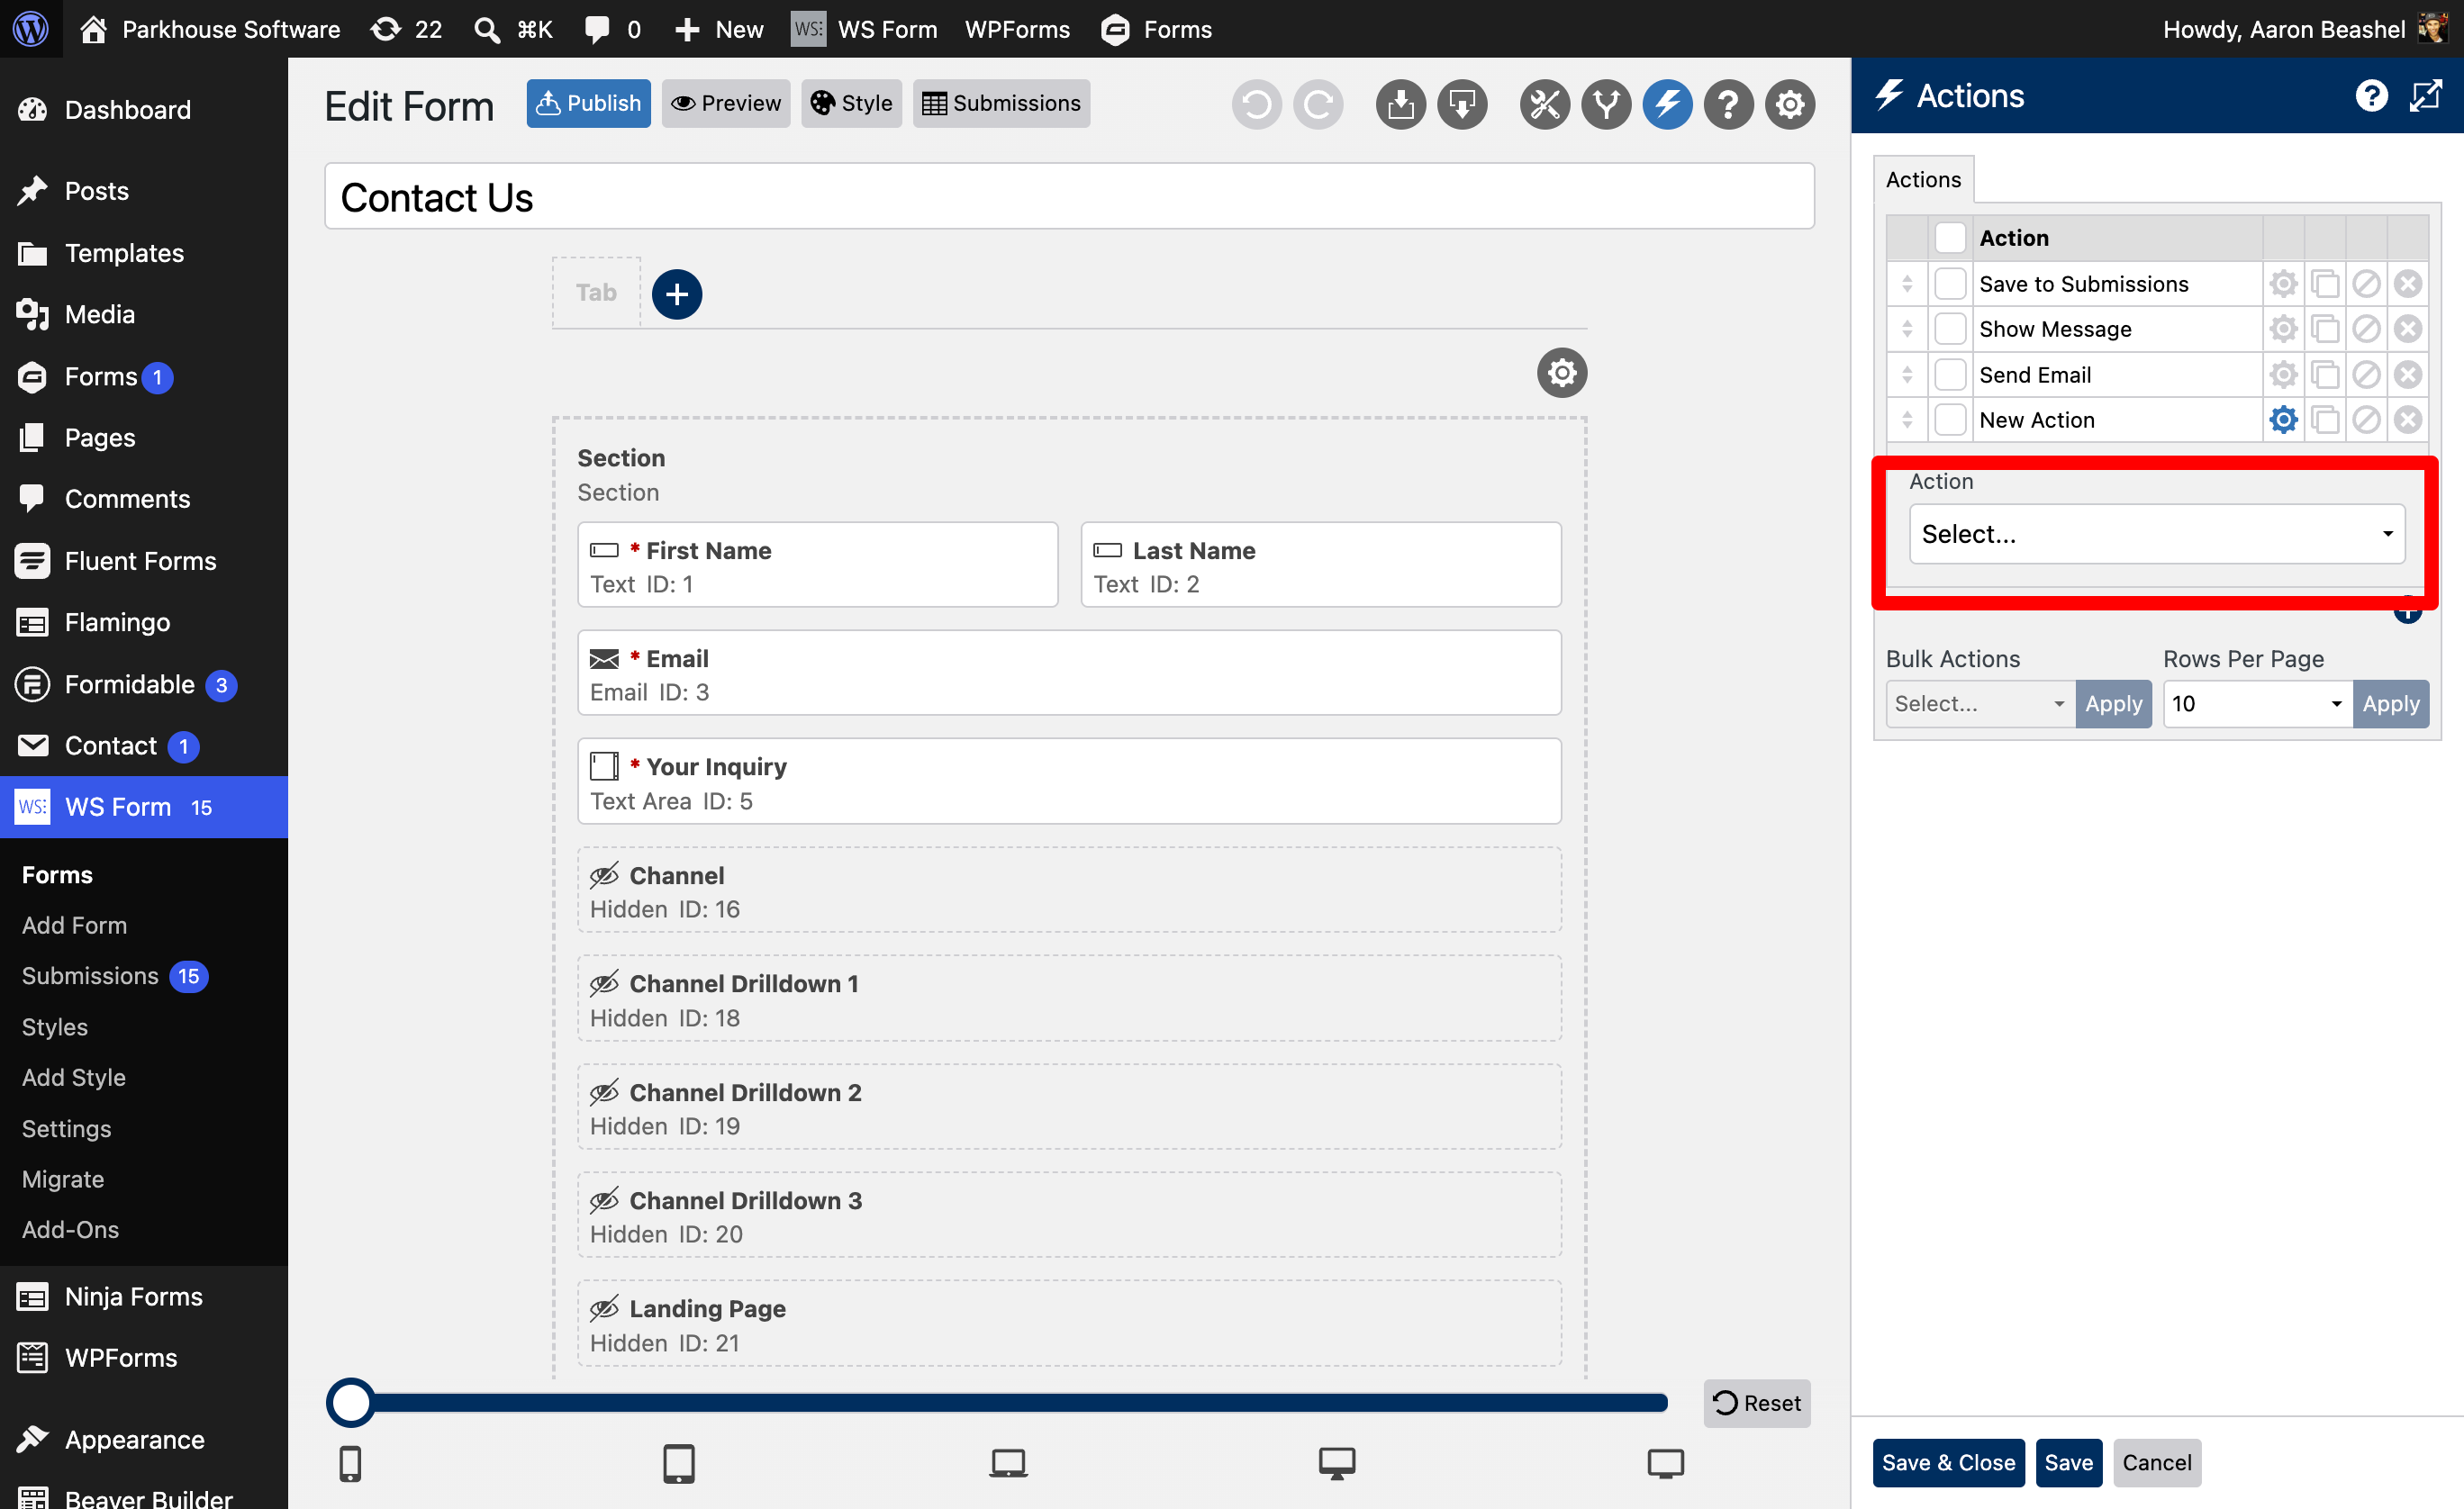
Open your form in the WS Form editor and click Actions in the toolbar. This opens the Actions sidebar where every action for the form lives, including the ones that save the submission and send you an email notification. Click the plus icon and choose ‘Conversion Tracking’ as the Action.
Step 2: Set the action to run on submit
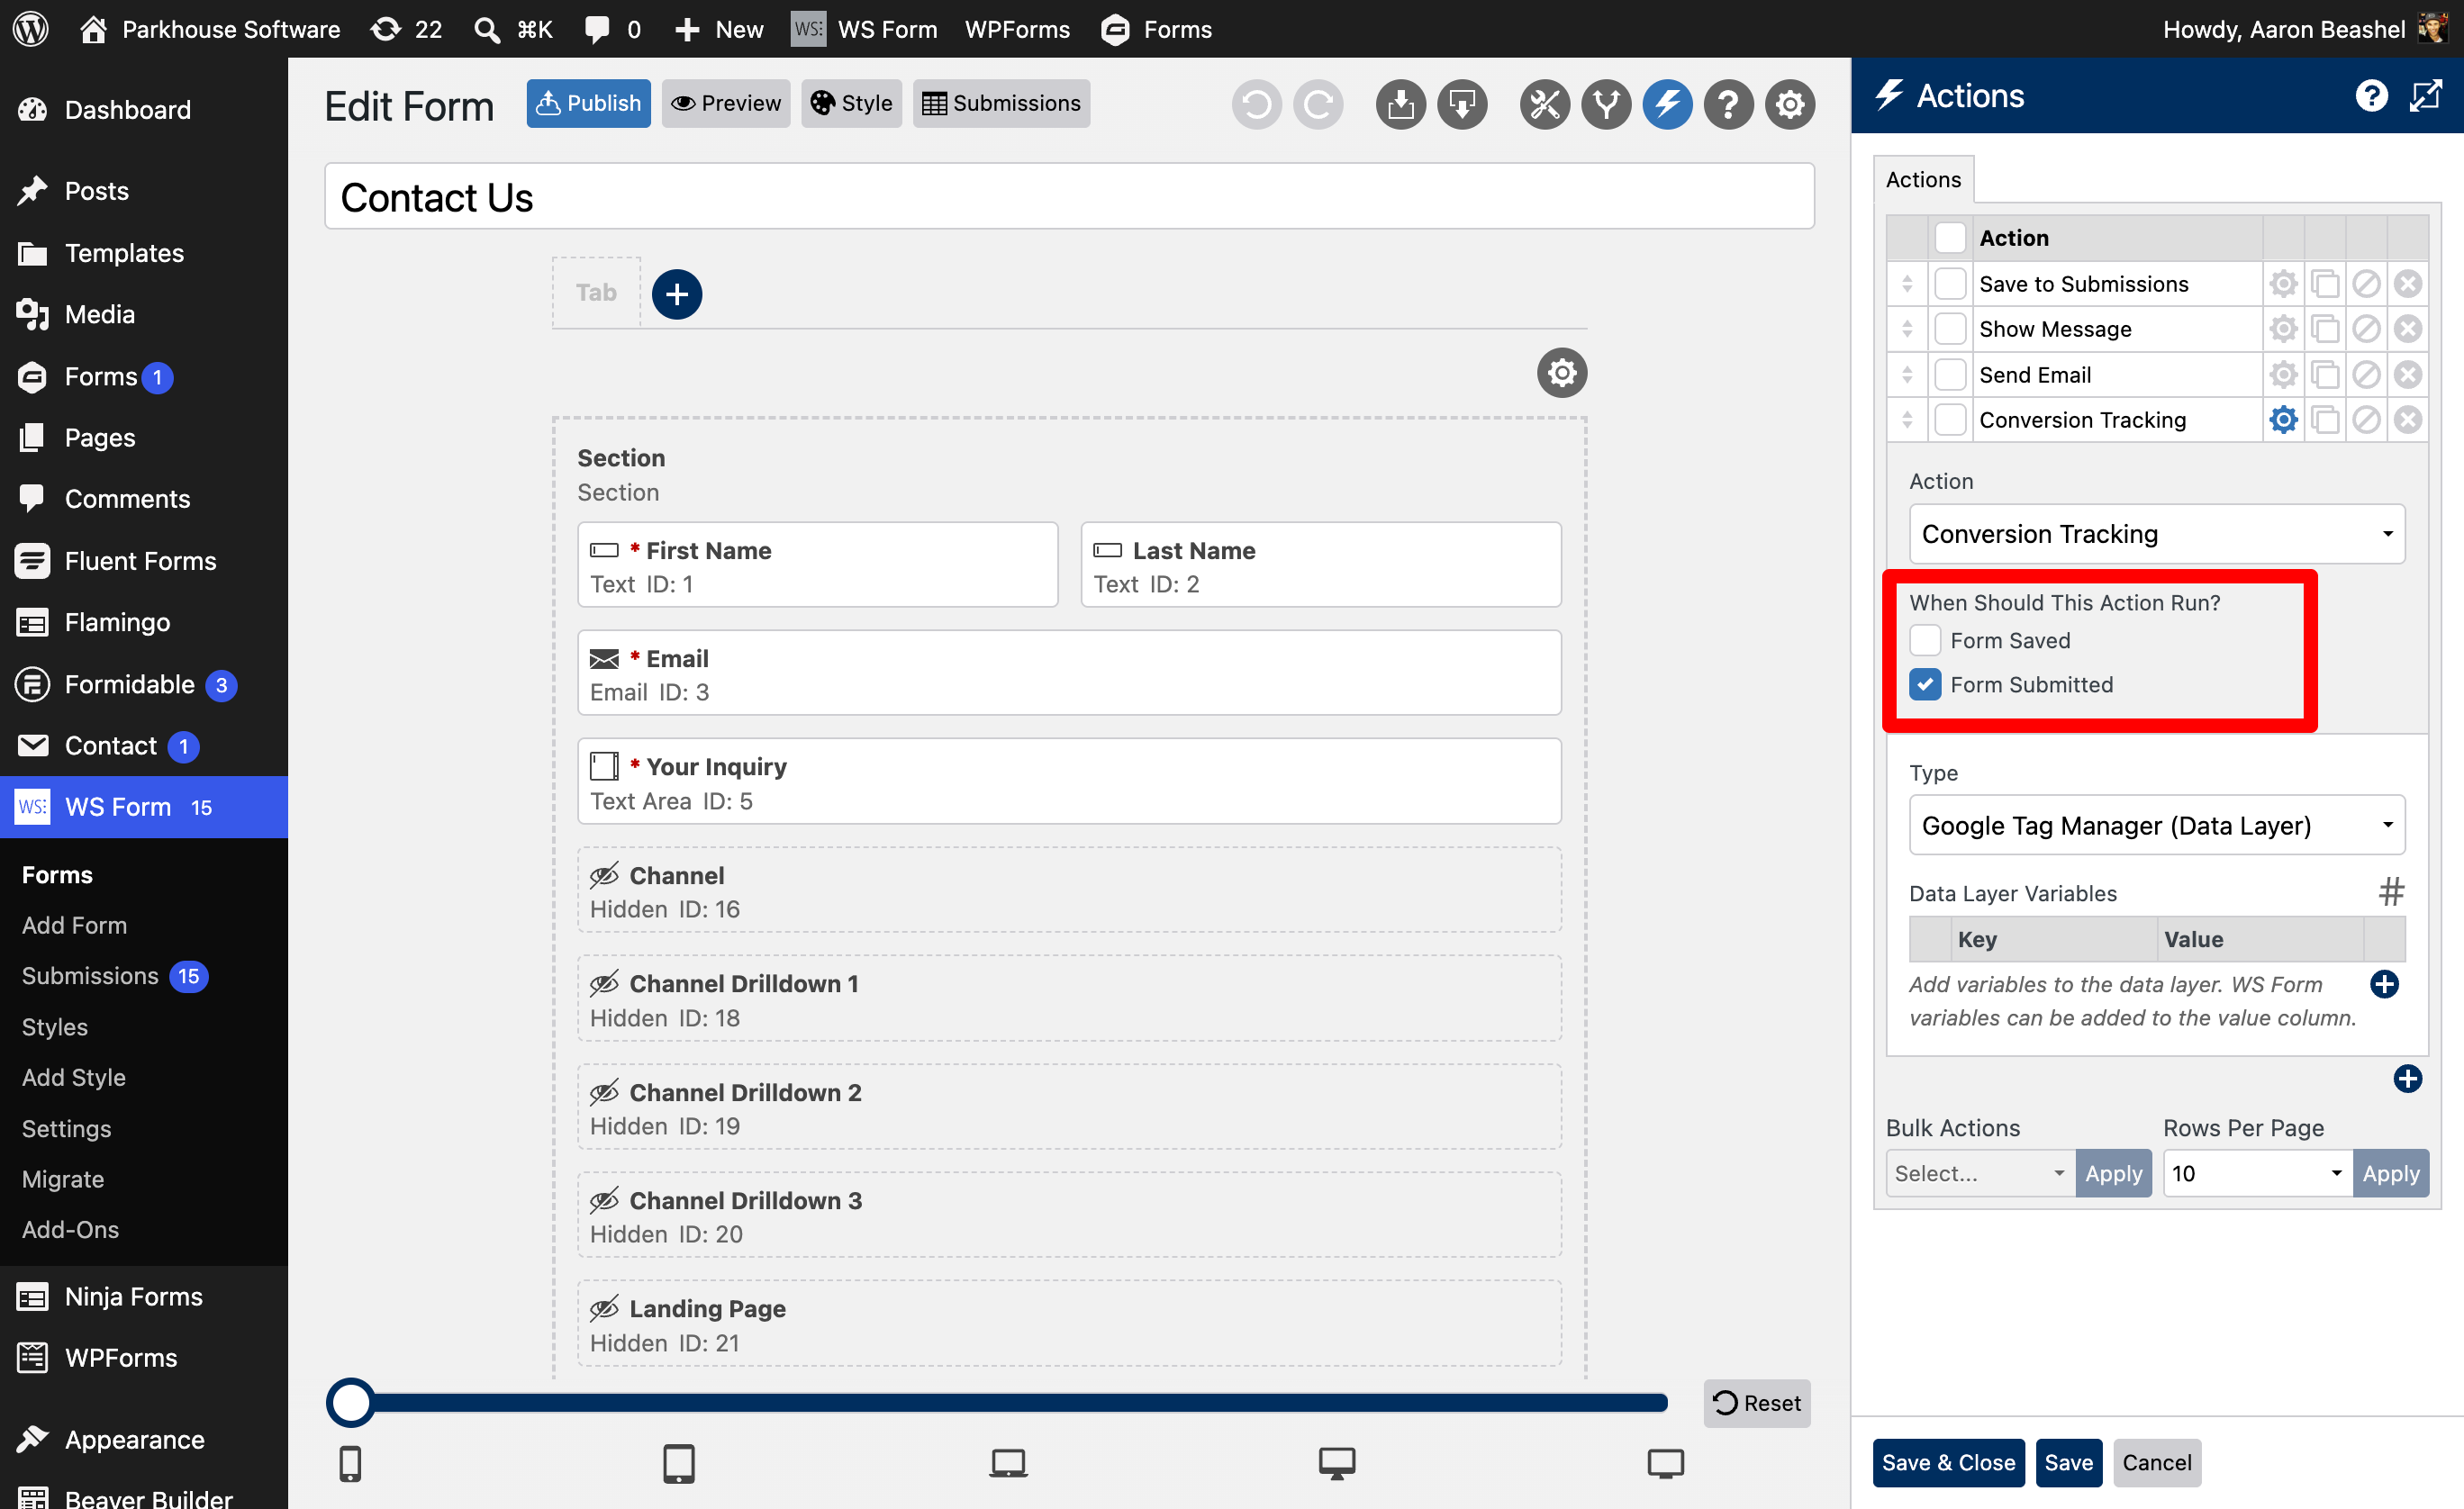
Every WS Form action, including Conversion Tracking, can be configured to run when the form is saved, submitted, or both. For conversion tracking, you want Submit selected, so the event only fires once someone actually completes and submits the form rather than every time a partial entry gets saved.
Step 3: Configure the event details
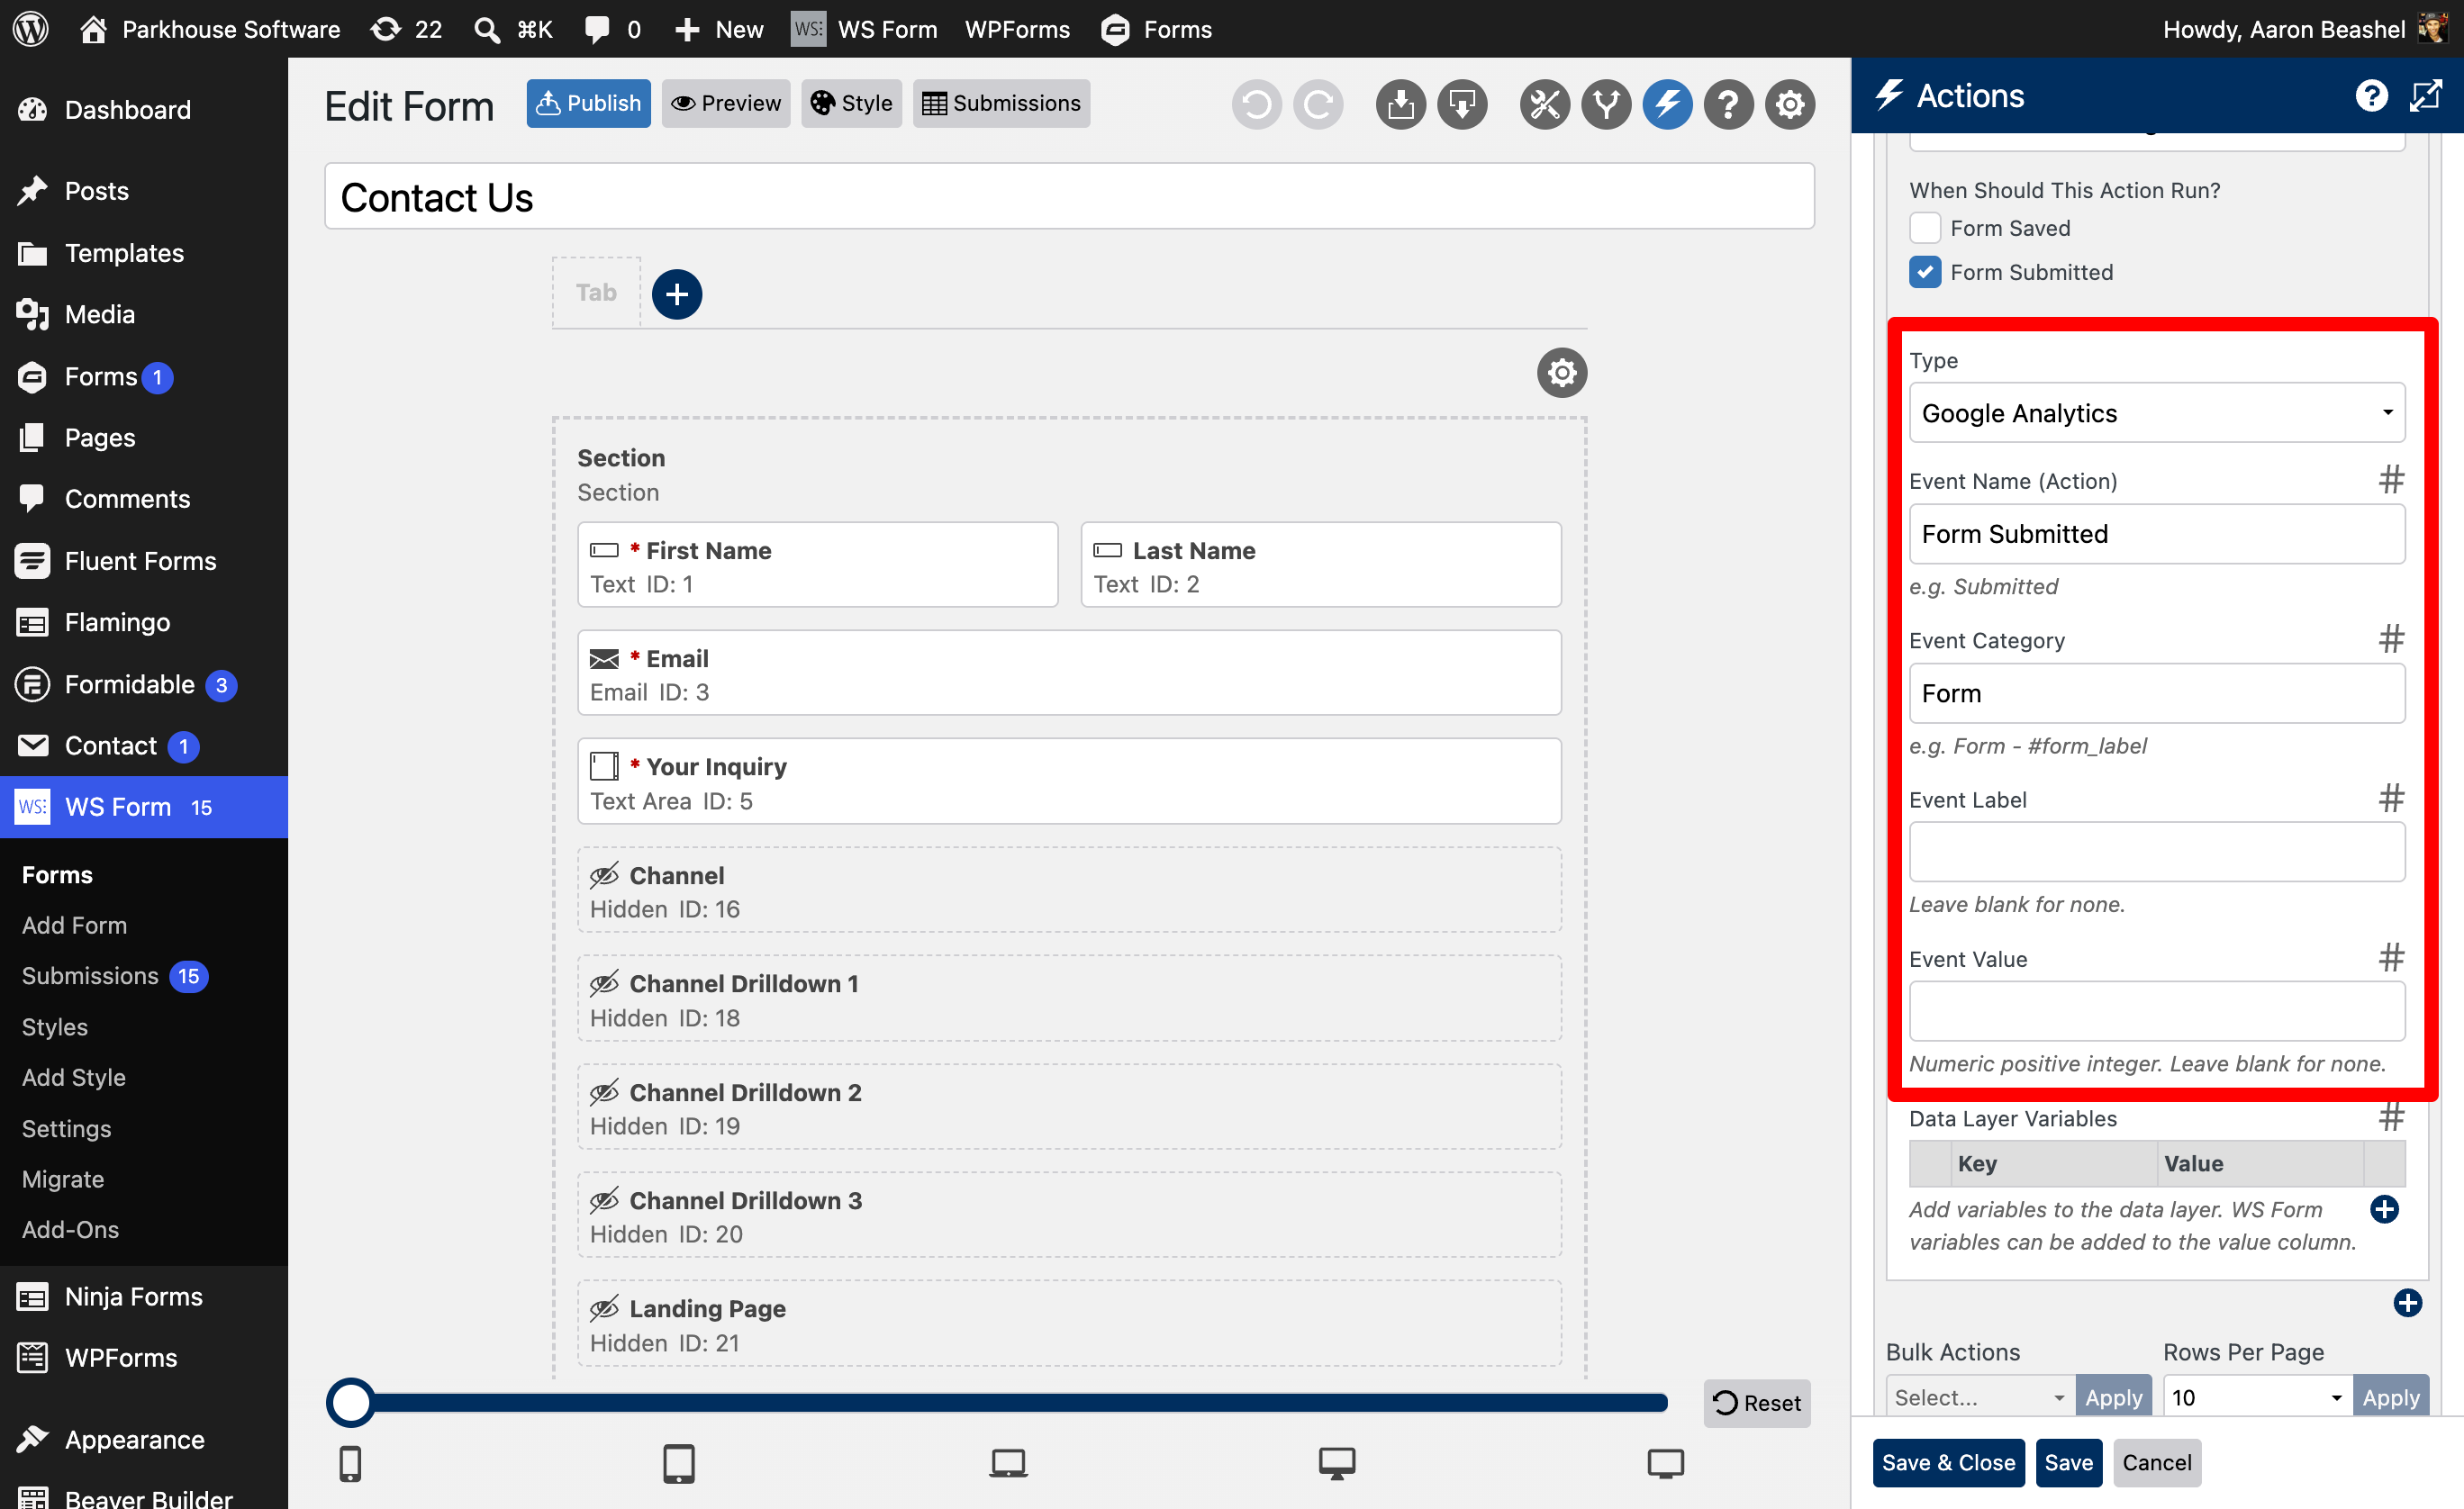
Now you need to tell WS Form what to actually send when someone submits. First, select Google Analytics as the Type and then select your desired Event Name and Event Category (this is required) and, if you want more detail in your reports, an Event Action and Event Label as well. You can type static text or pull in a WS Form variable, so a field like the form's own name can flow straight into the event without you typing it twice.
Step 4: Confirm Google Analytics is receiving the events
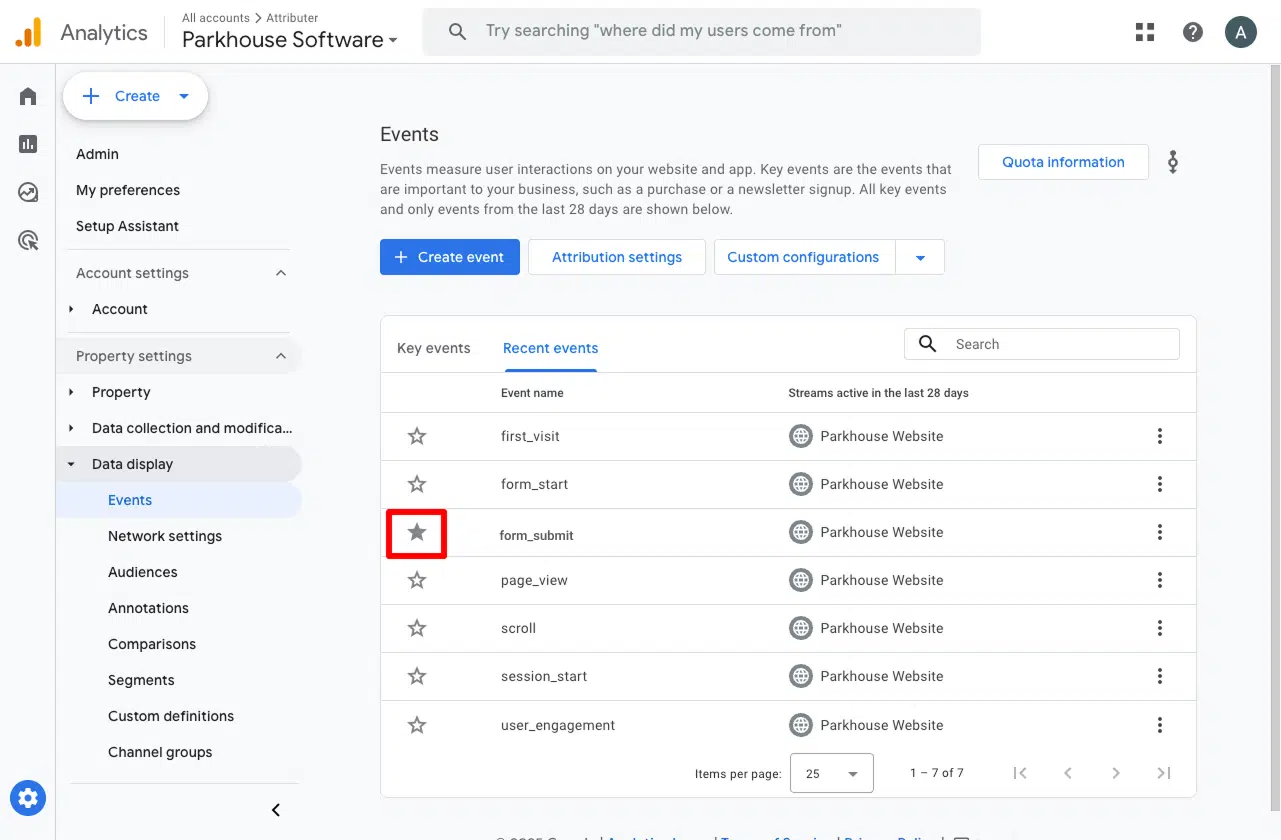
Publish your changes, submit a test entry on the live form, then open Google Analytics and check the Realtime report for the event. Once you can see it landing, mark it as a Key Event so it counts as a conversion in your reports instead of sitting there as an ordinary event.
Pros and cons
Pros:
- It's built into WS Form PRO. There's no Google Tag Manager container to configure, no custom code to write, and no separate Triggers and Variables to piece together.
- It fires when the form is actually submitted, which makes it much more accurate than other options like tracking thank you page visits.
- Beyond Google Analytics, the same action type covers Facebook Pixel, LinkedIn's Insight Tag, and Google Tag Manager's data layer, so you have some room to grow before you need Method 2 or 3.
Cons:
- It requires WS Form PRO. The Lite version that ships free on WordPress.org doesn't include the Actions system at all, so if you're on Lite this method isn't available to you until you upgrade.
- It's still browser-side tracking, which means ad blockers and privacy settings in browsers will stop the conversion from making it to Google Analytics regardless. According to studies, you can expect about 30% of your conversions to not be recorded.
- Every WS Form on your site that has the action added pushes to the same Event Category unless you deliberately vary it per form. A Quote Request form and a Contact Support form can end up reported as one blended total unless you're careful to configure a distinct category or label for each.
Method 2: Use Google Tag Manager for Enhanced Conversions
Good for: Sending Enhanced Conversions to Google Ads.
Simply firing an event when a form submission happens is good enough for counting conversions in Google Analytics, but Google Ads needs more than that to do its job properly.
Google Ads wants to tie every conversion back to the specific person who clicked your ad, and it can only do that if you send identifying details like their name, email, and phone with each conversion. Google calls this Enhanced Conversions, and without it your Google Ads reporting has almost no way to confirm which clicks actually turned into leads.
Below is how you capture that data yourself and pipe it through Google Tag Manager.
Step 1: Set up a Custom HTML Tag with the form listening code
In GTM, create a new Custom HTML Tag, paste in the snippet below, and set it to fire on the All Pages trigger, with the tag firing option set to Once per event.
Here's what the above code is actually doing, step by step:
- It sits and waits for WS Form's own confirmation of success. WS Form runs on jQuery under the hood, and it broadcasts a real submission through its own
wsf-successevent only after the server has validated it, so the snippet hooks into that instead of trying to infer success from a click. - It pulls the lead's details straight off the live fields. WS Form leaves the field values sitting in the form even after a successful submission (many other plugins wipe them), which means the snippet can read the email, name, and phone right off the DOM as soon as
wsf-successfires, with no need to pre-capture anything earlier. - It leaves sensitive fields alone. Before any value gets touched, the code checks each field's type, autocomplete hint, and name against a list of sensitive patterns, passwords, card numbers, CVV codes, one time codes, and drops anything that matches.
- It writes the result to the dataLayer. Once WS Form confirms a real submission, the snippet pushes a
ws_form_submittedevent onto the dataLayer carrying the lead's name, email, and phone, which is what your conversion tags will key off in the next steps.
We didn't write this from scratch for the article. It has been tested thoroughly and closes a few gaps that most homemade scripts leave open, including:
Gap 1: WS Form's field names tell you almost nothing. Fields typically come through as field_1, field_2, and so on, so any script relying on the name attribute to spot the email field is guessing. Instead, this snippet grades every field against its type, its autocomplete hint, and the label text sitting next to it, and trusts whichever of those signals is the strongest, so the right values end up in the right places regardless of how the underlying fields are named.
Gap 2: nothing gets counted until WS Form itself confirms success. A script wired to the button click rather than wsf-success will count a conversion when someone clicks Submit, before WS Form has even checked whether the required fields were filled in or the spam filter passed. Waiting for wsf-success means a blank required field, a badly formatted email, or a submission WS Form's spam protection blocks never shows up in Google Ads as a conversion.
Gap 3: a combined name field doesn't break the mapping. Plenty of WS Forms use a single Name field rather than separate First Name and Last Name fields. The snippet catches that case and splits the value at the first space, so Enhanced Conversions still gets a proper first and last name instead of one blank field.
This is the same detection logic that runs inside our own conversion tracking product to catch WS Form submissions for ad platforms and analytics tools, not something knocked together for this post. We keep it under active testing against real WS Form installs, and it has processed thousands of real customer submissions in production, so you're not the first one relying on it.
Step 2: Create Data Layer Variables for the captured data
The snippet from Step 1 is now writing the lead's details onto the dataLayer, but Google Tag Manager still needs to be told how to pull each individual value (the email, first name, last name, and phone) back out so they can be handed to Google Ads, Meta Ads, or wherever else you're sending them. That's what a Data Layer Variable does.
To set them up, head to the Variables section in GTM, click New under User-Defined Variables, set the type to Data Layer Variable, and name it.
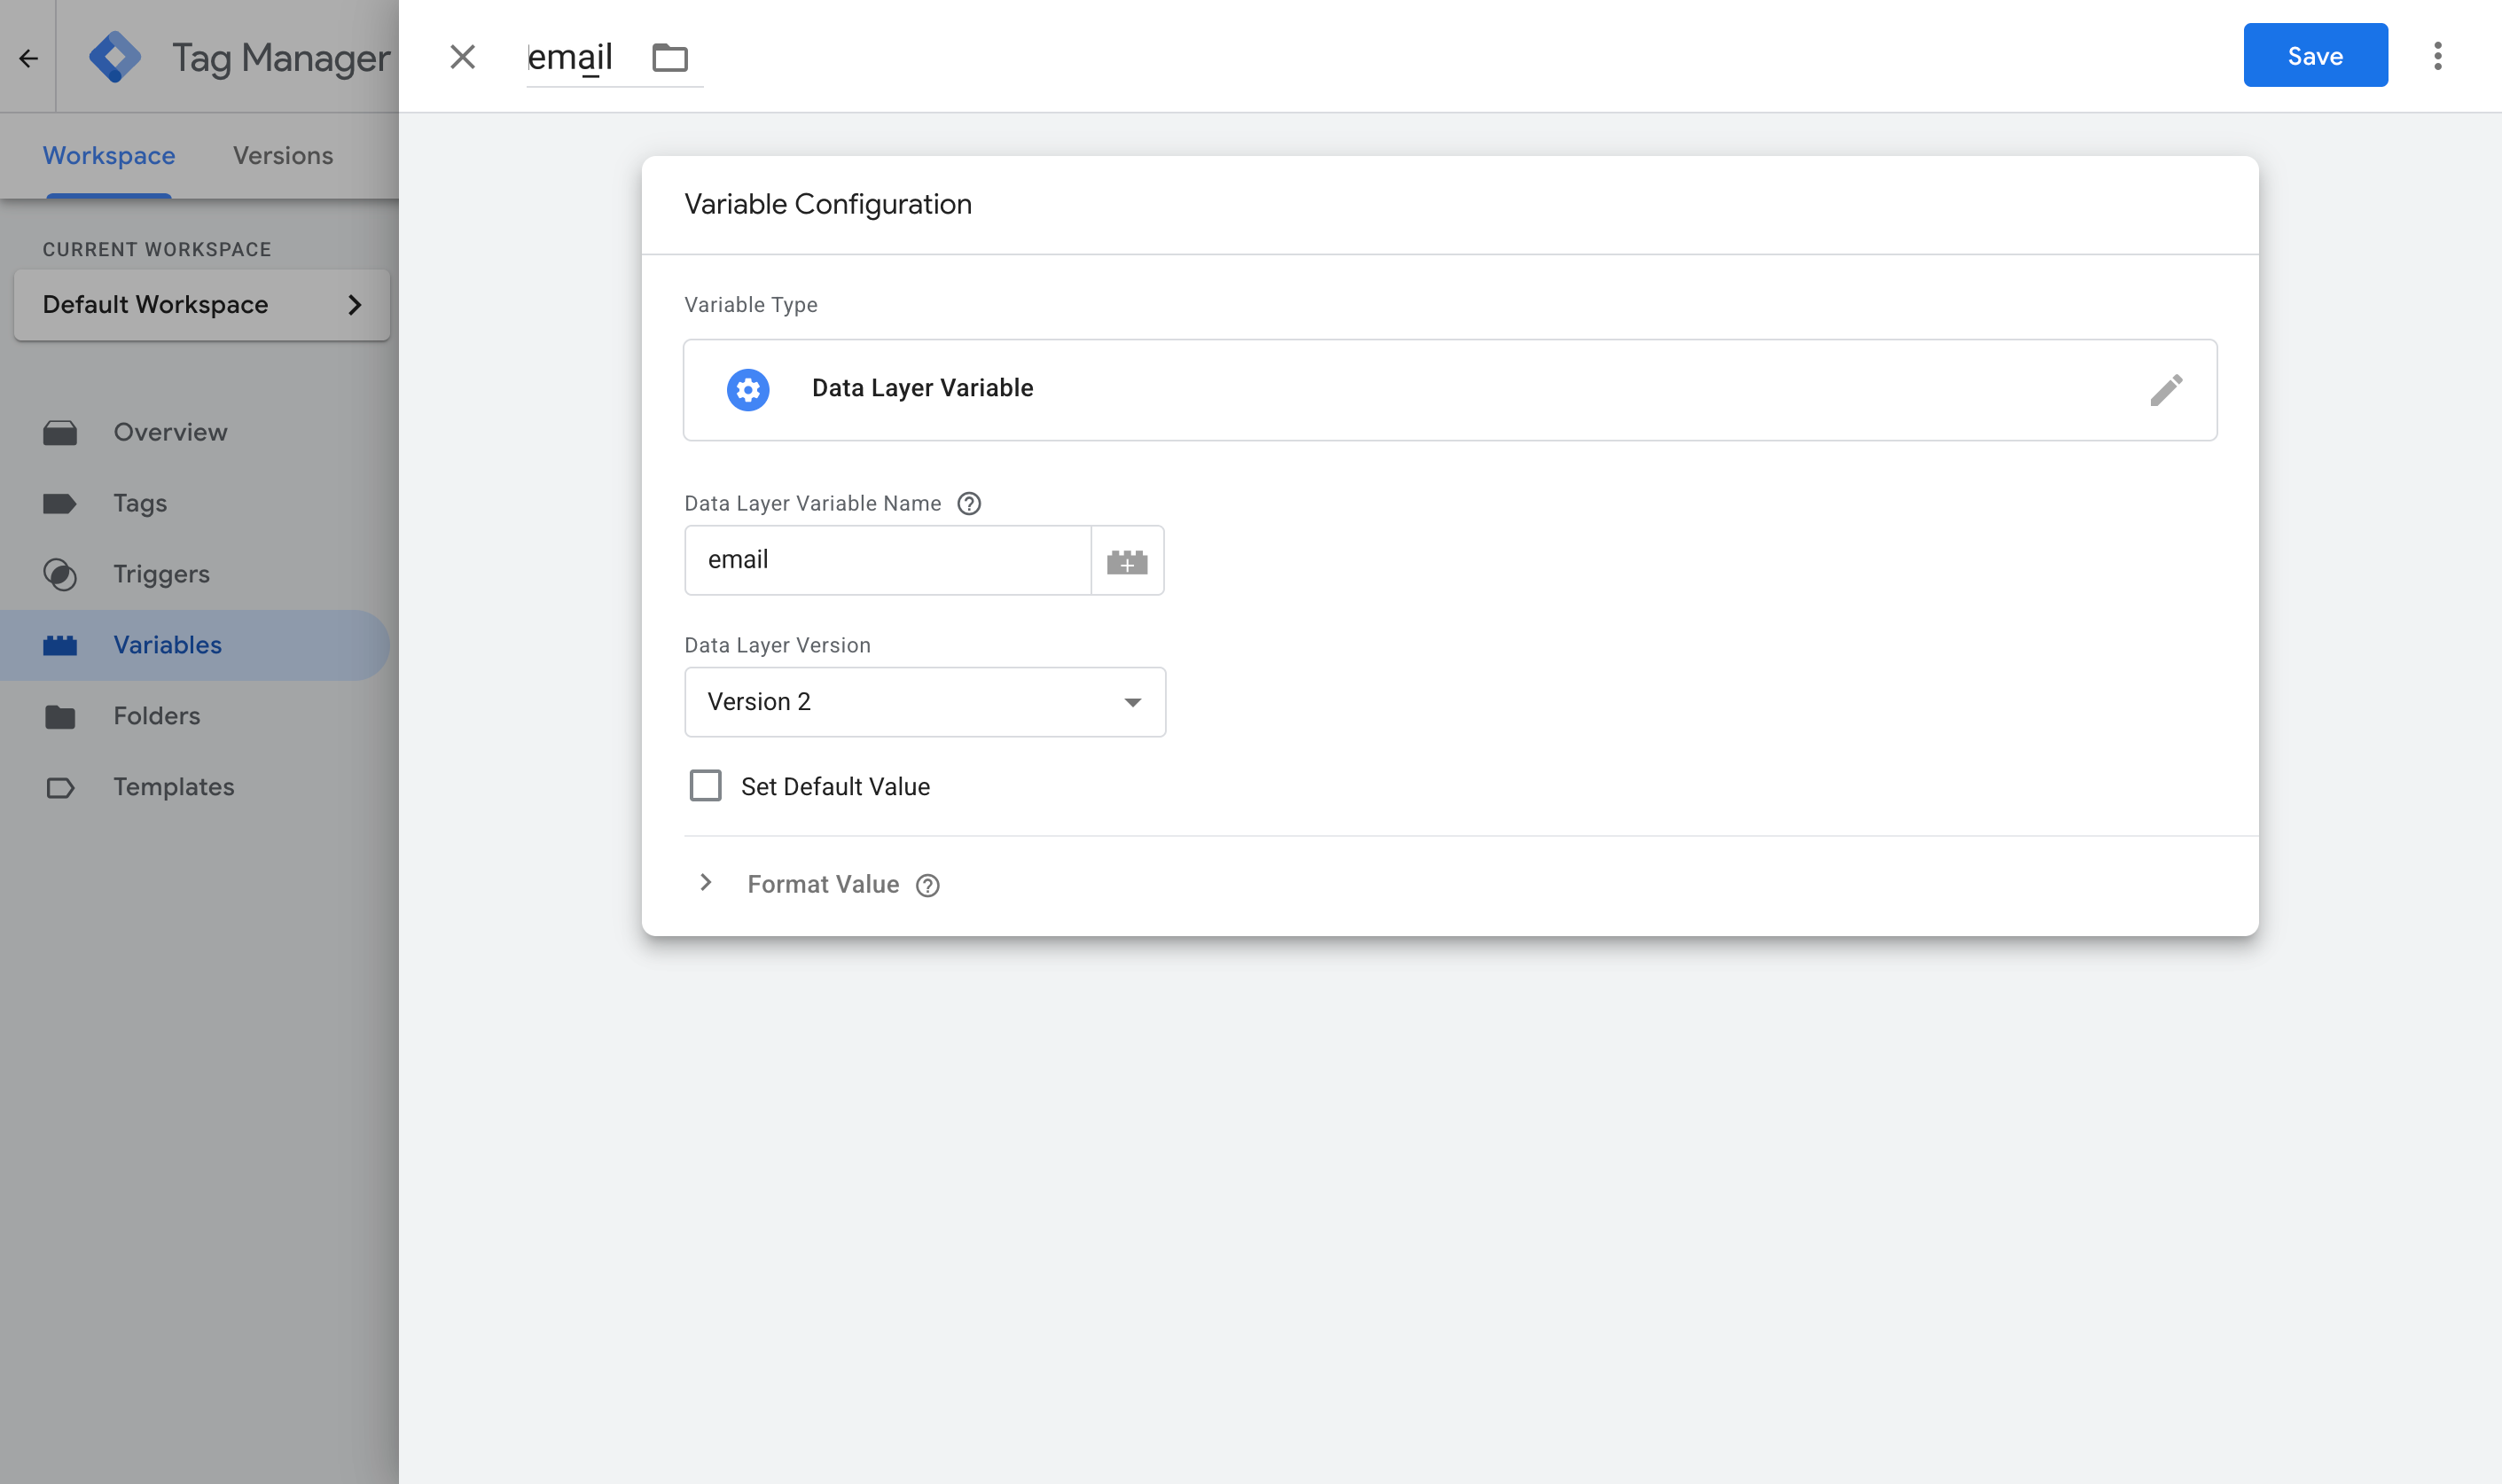
Here are the four you need.
Variable 1:
- Name: Email
- Variable Type: Data Layer Variable
- Data Layer Variable Name: email
Variable 2:
- Name: First Name
- Variable Type: Data Layer Variable
- Data Layer Variable Name: first_name
Variable 3:
- Name: Last Name
- Variable Type: Data Layer Variable
- Data Layer Variable Name: last_name
Variable 4:
- Name: Phone
- Variable Type: Data Layer Variable
- Data Layer Variable Name: phone
Step 3: Create a Custom Event trigger
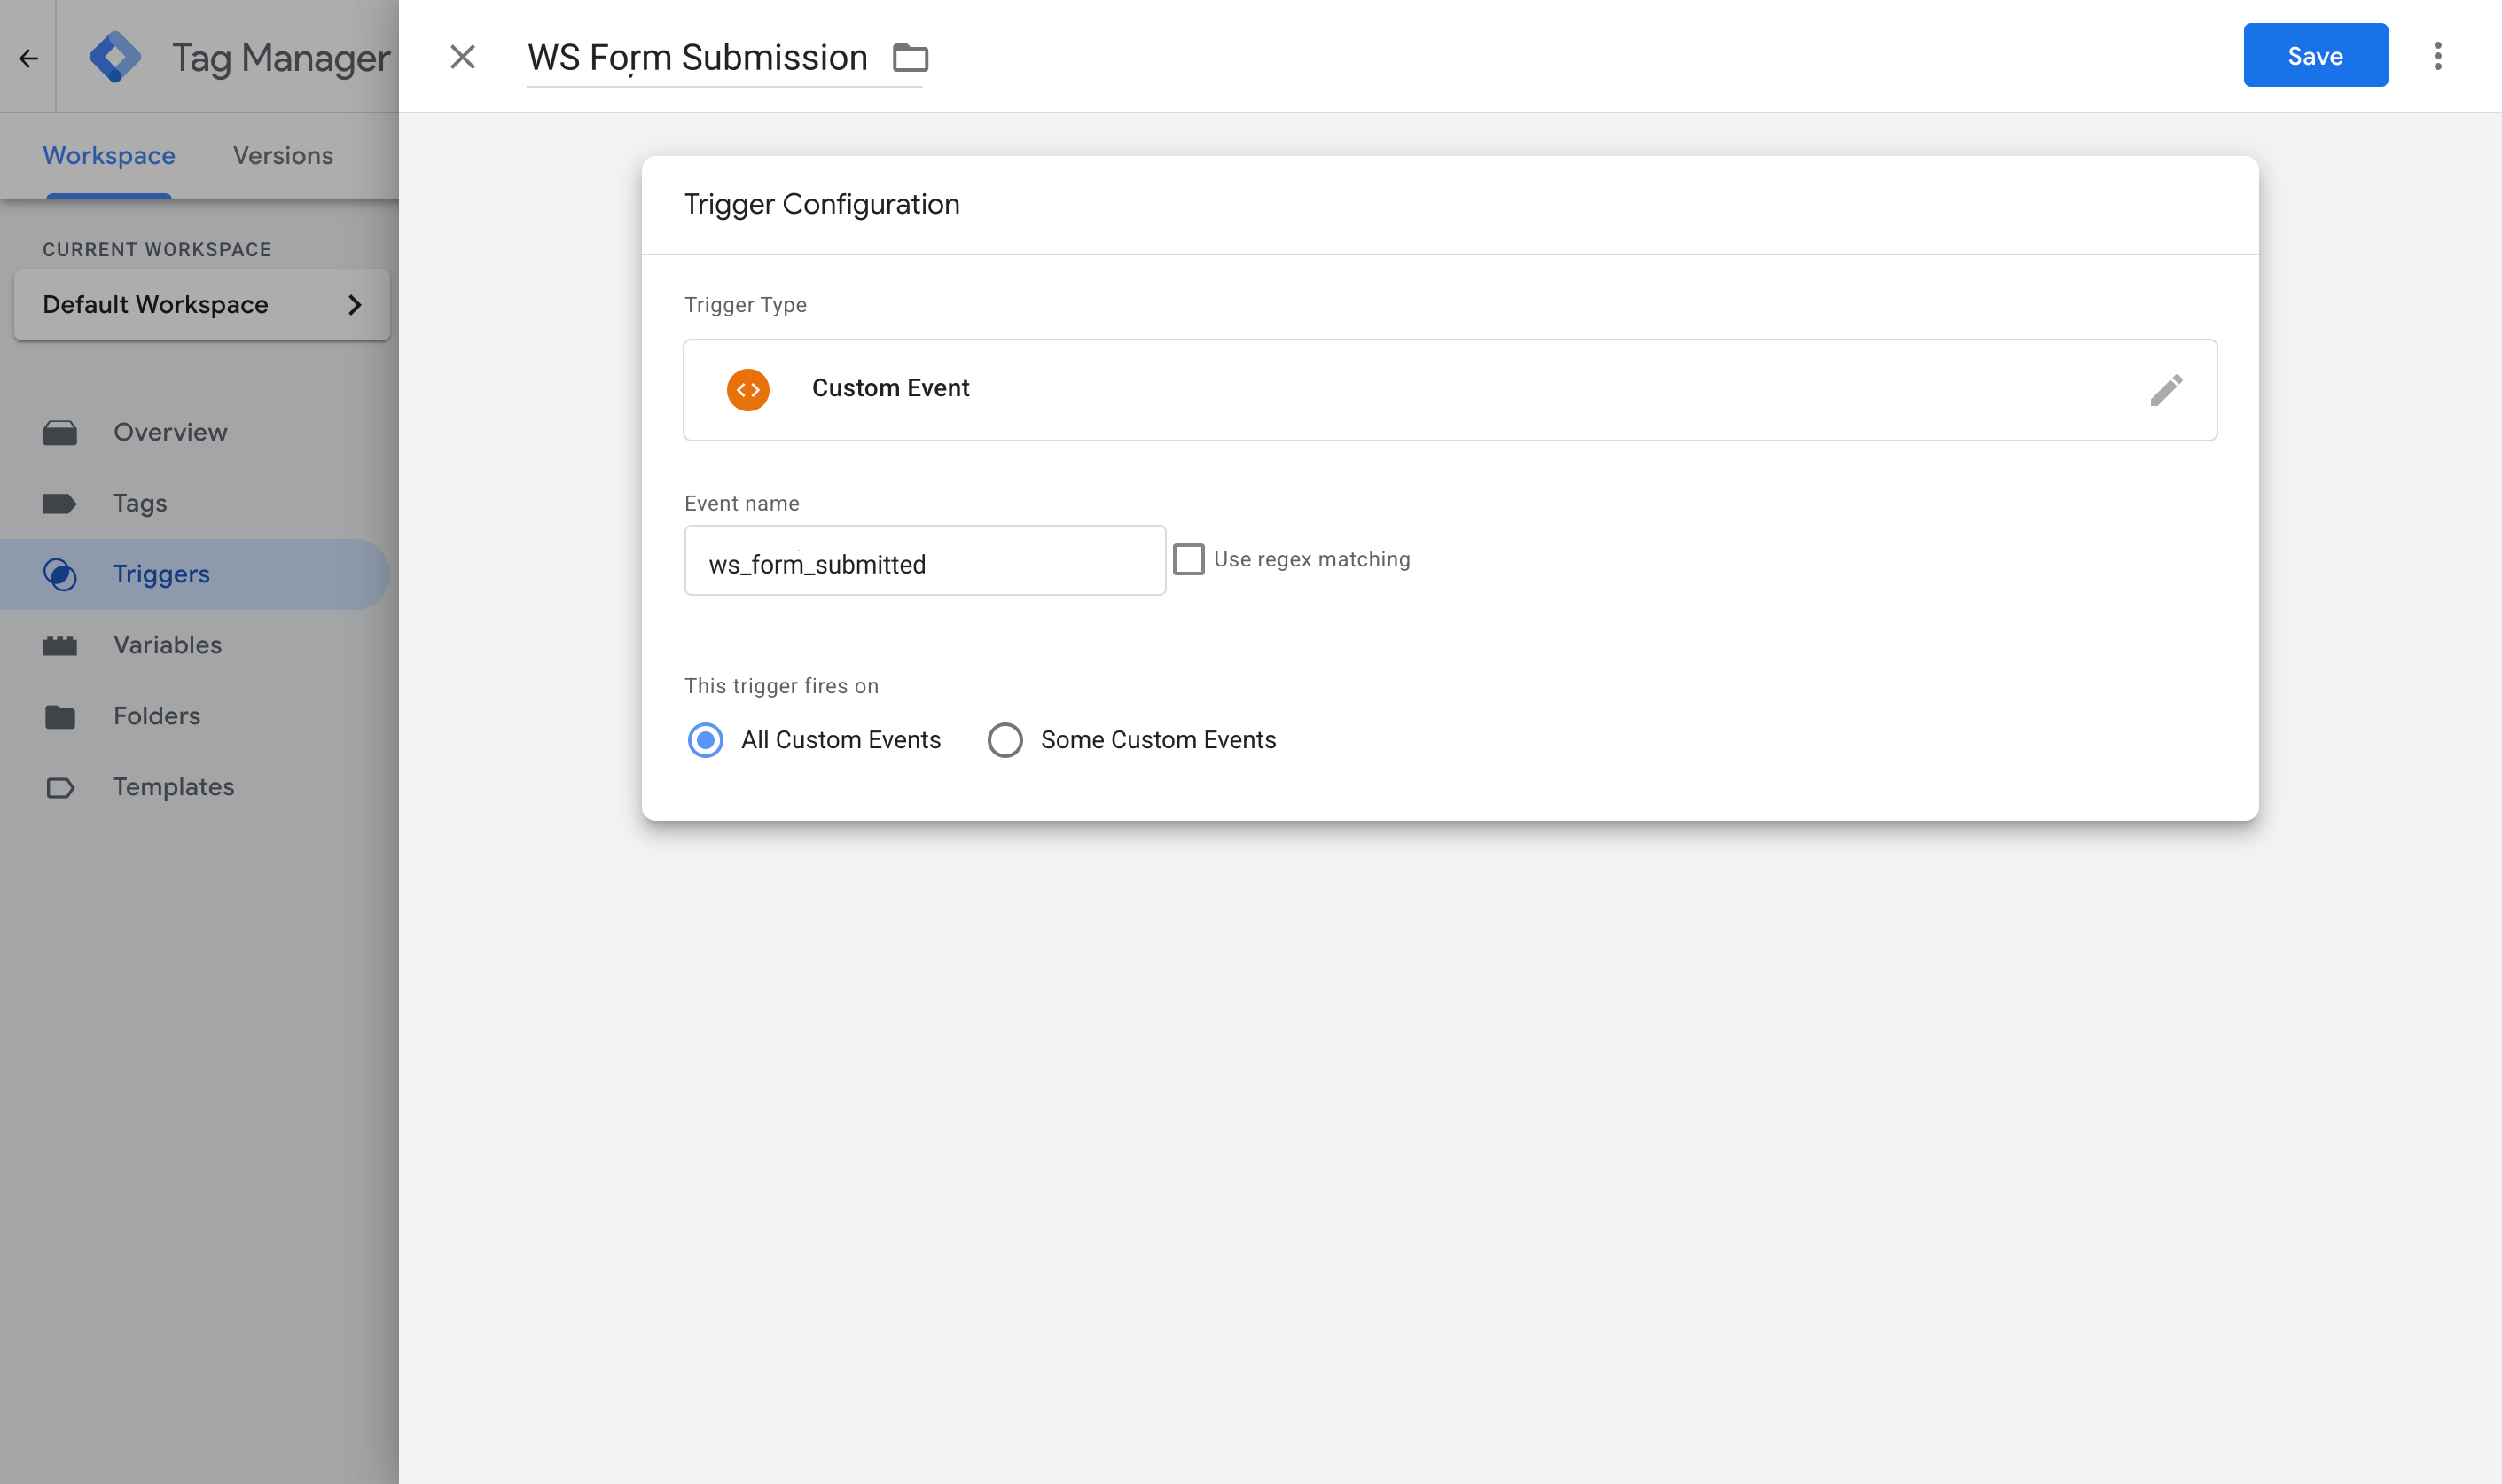
With the Variables in place to extract the data, you then need to tell Google Tag Manager when it should use them. That's what a Trigger is for. It watches the dataLayer for the message the snippet pushes when a WS Form is submitted, then fires the conversion tags you'll set up later in Step 5.
To create Triggers, go to the Triggers section in Google Tag Manager, click New, pick the Custom Event type, and enter ws_form_submitted as the event name. This needs to match the code's payload exactly or the trigger will never fire.
Step 4: Turn on Enhanced Conversions in Google Ads
None of the data you've wired up so far reaches Google Ads until Google Ads is told to accept it. So in your Google Ads account, open Goals, then Conversions, then Settings, and switch Enhanced Conversions on.
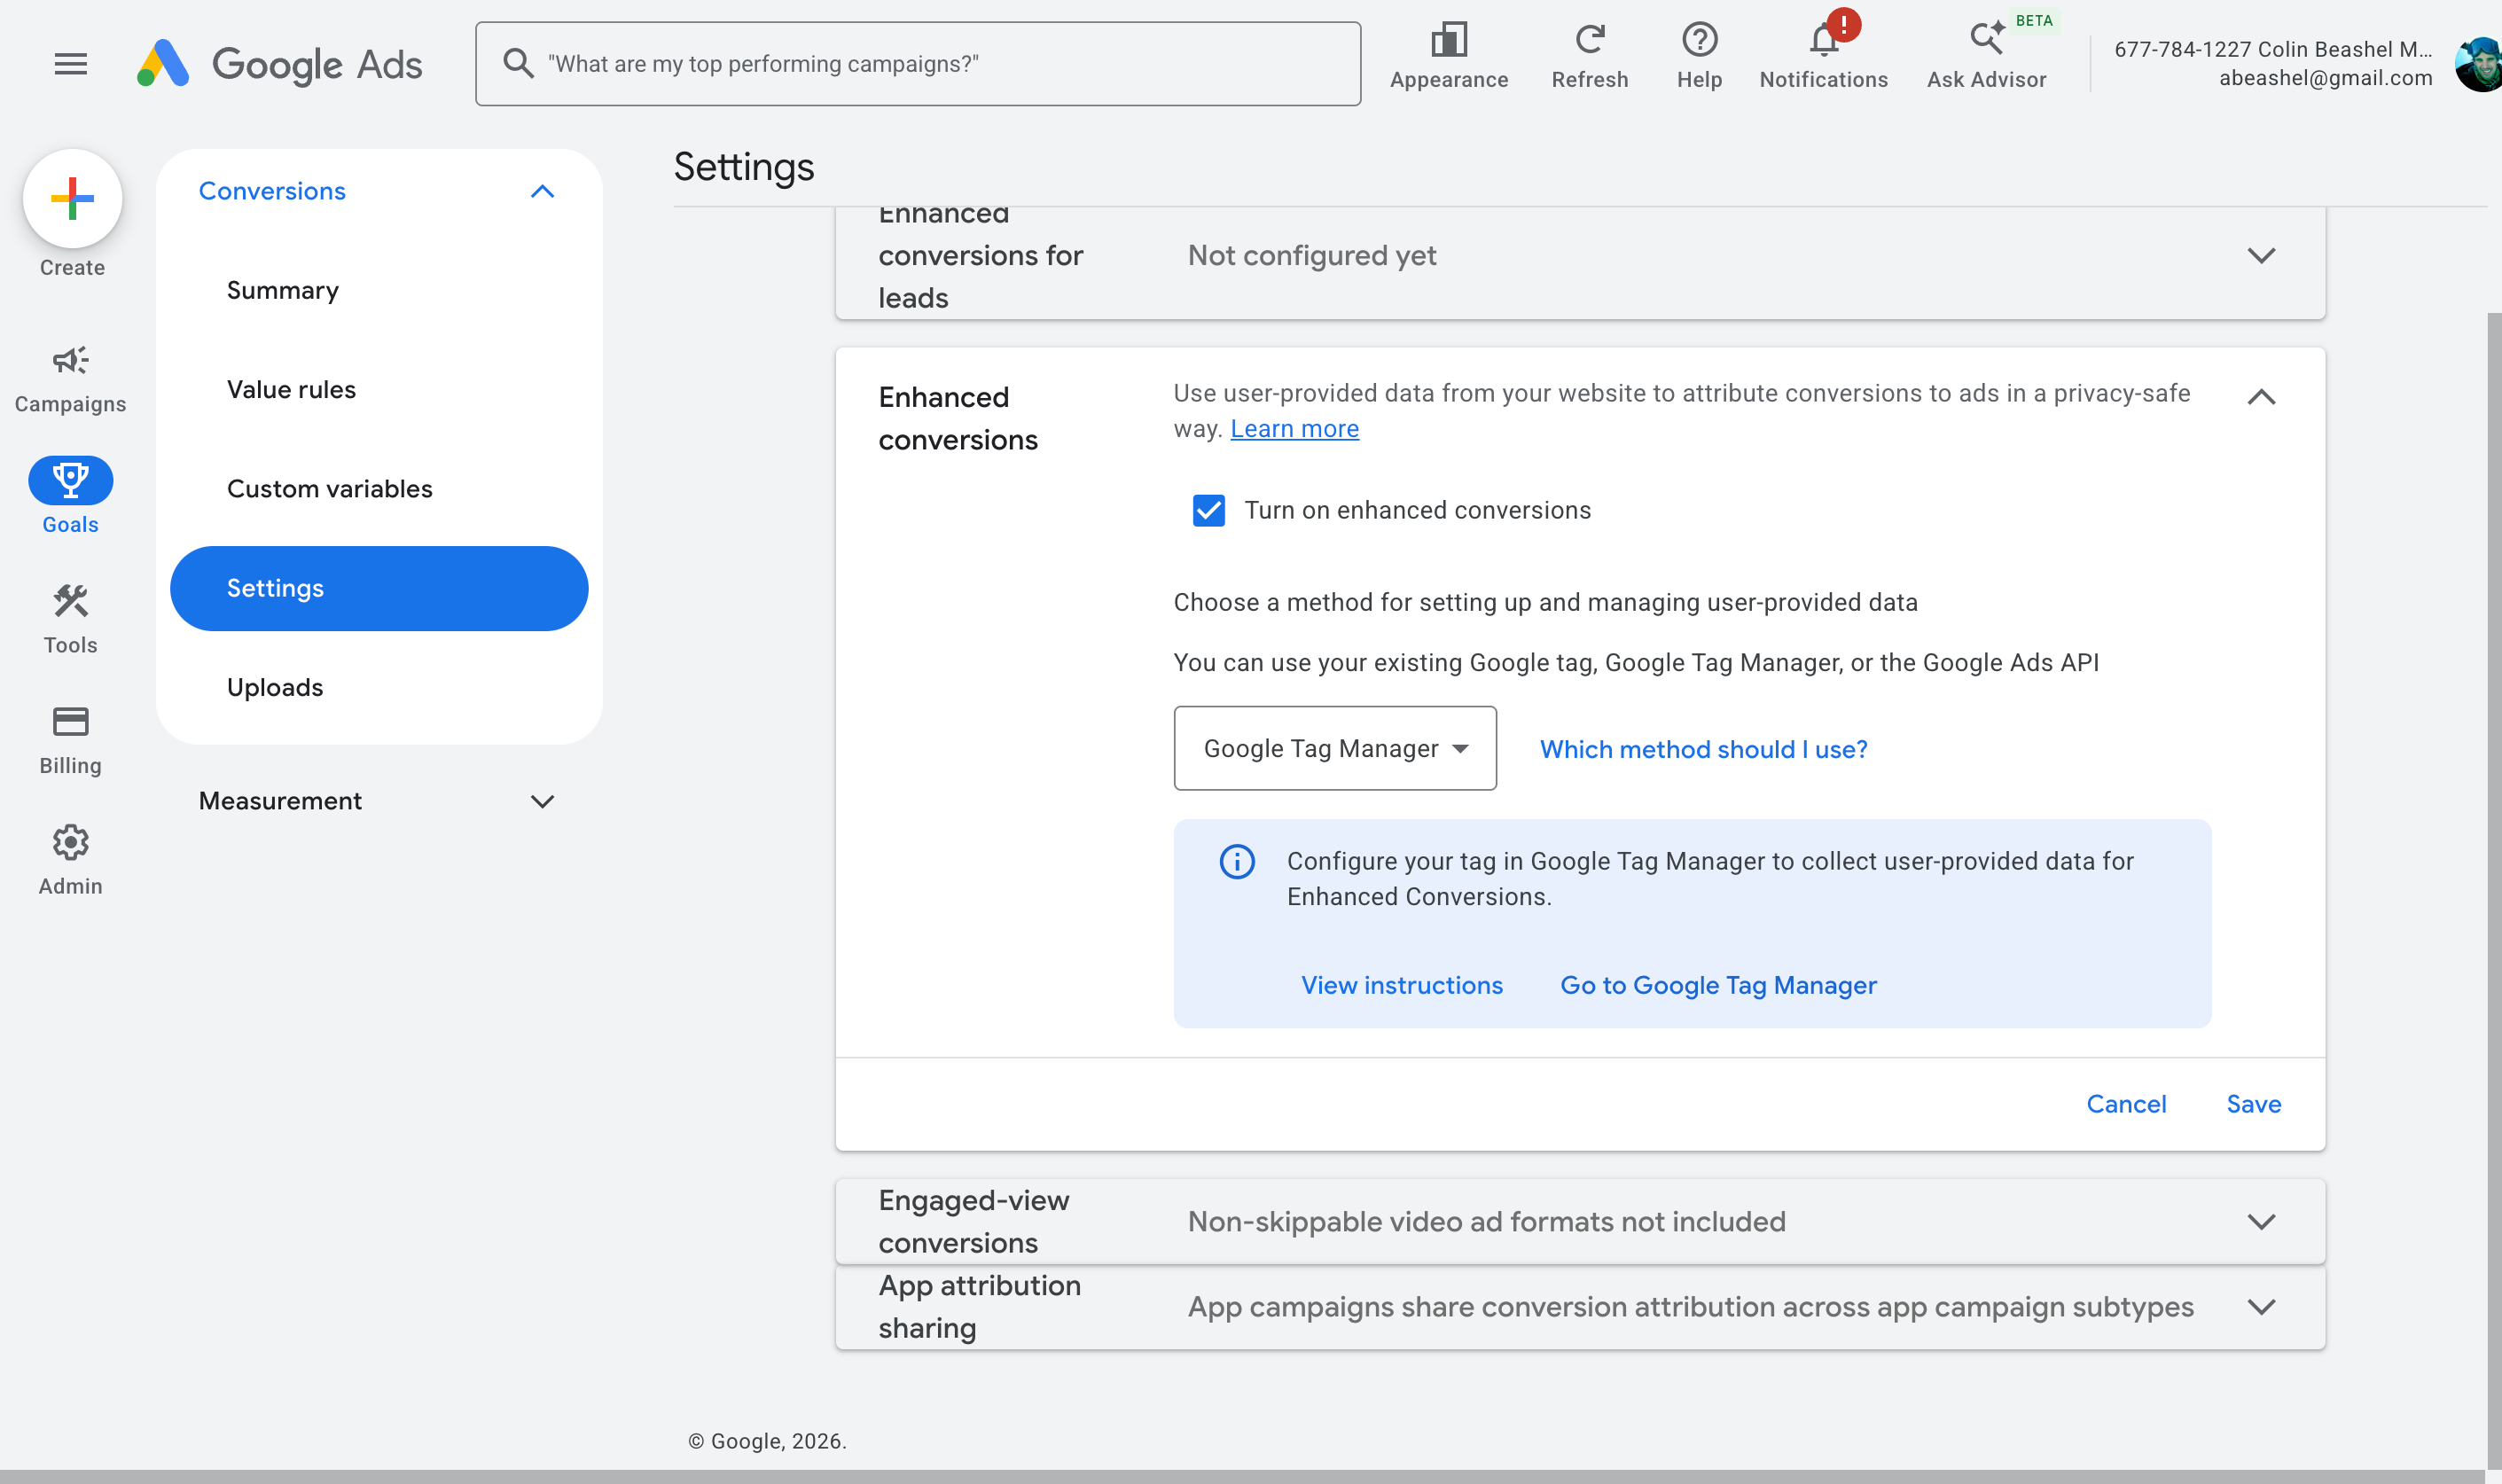
When it asks how you want to implement it, choose Google Tag Manager. This gives Google Ads permission to receive and use the customer data you're about to send.
Step 5: Create your Google Ads conversion tag and map the data
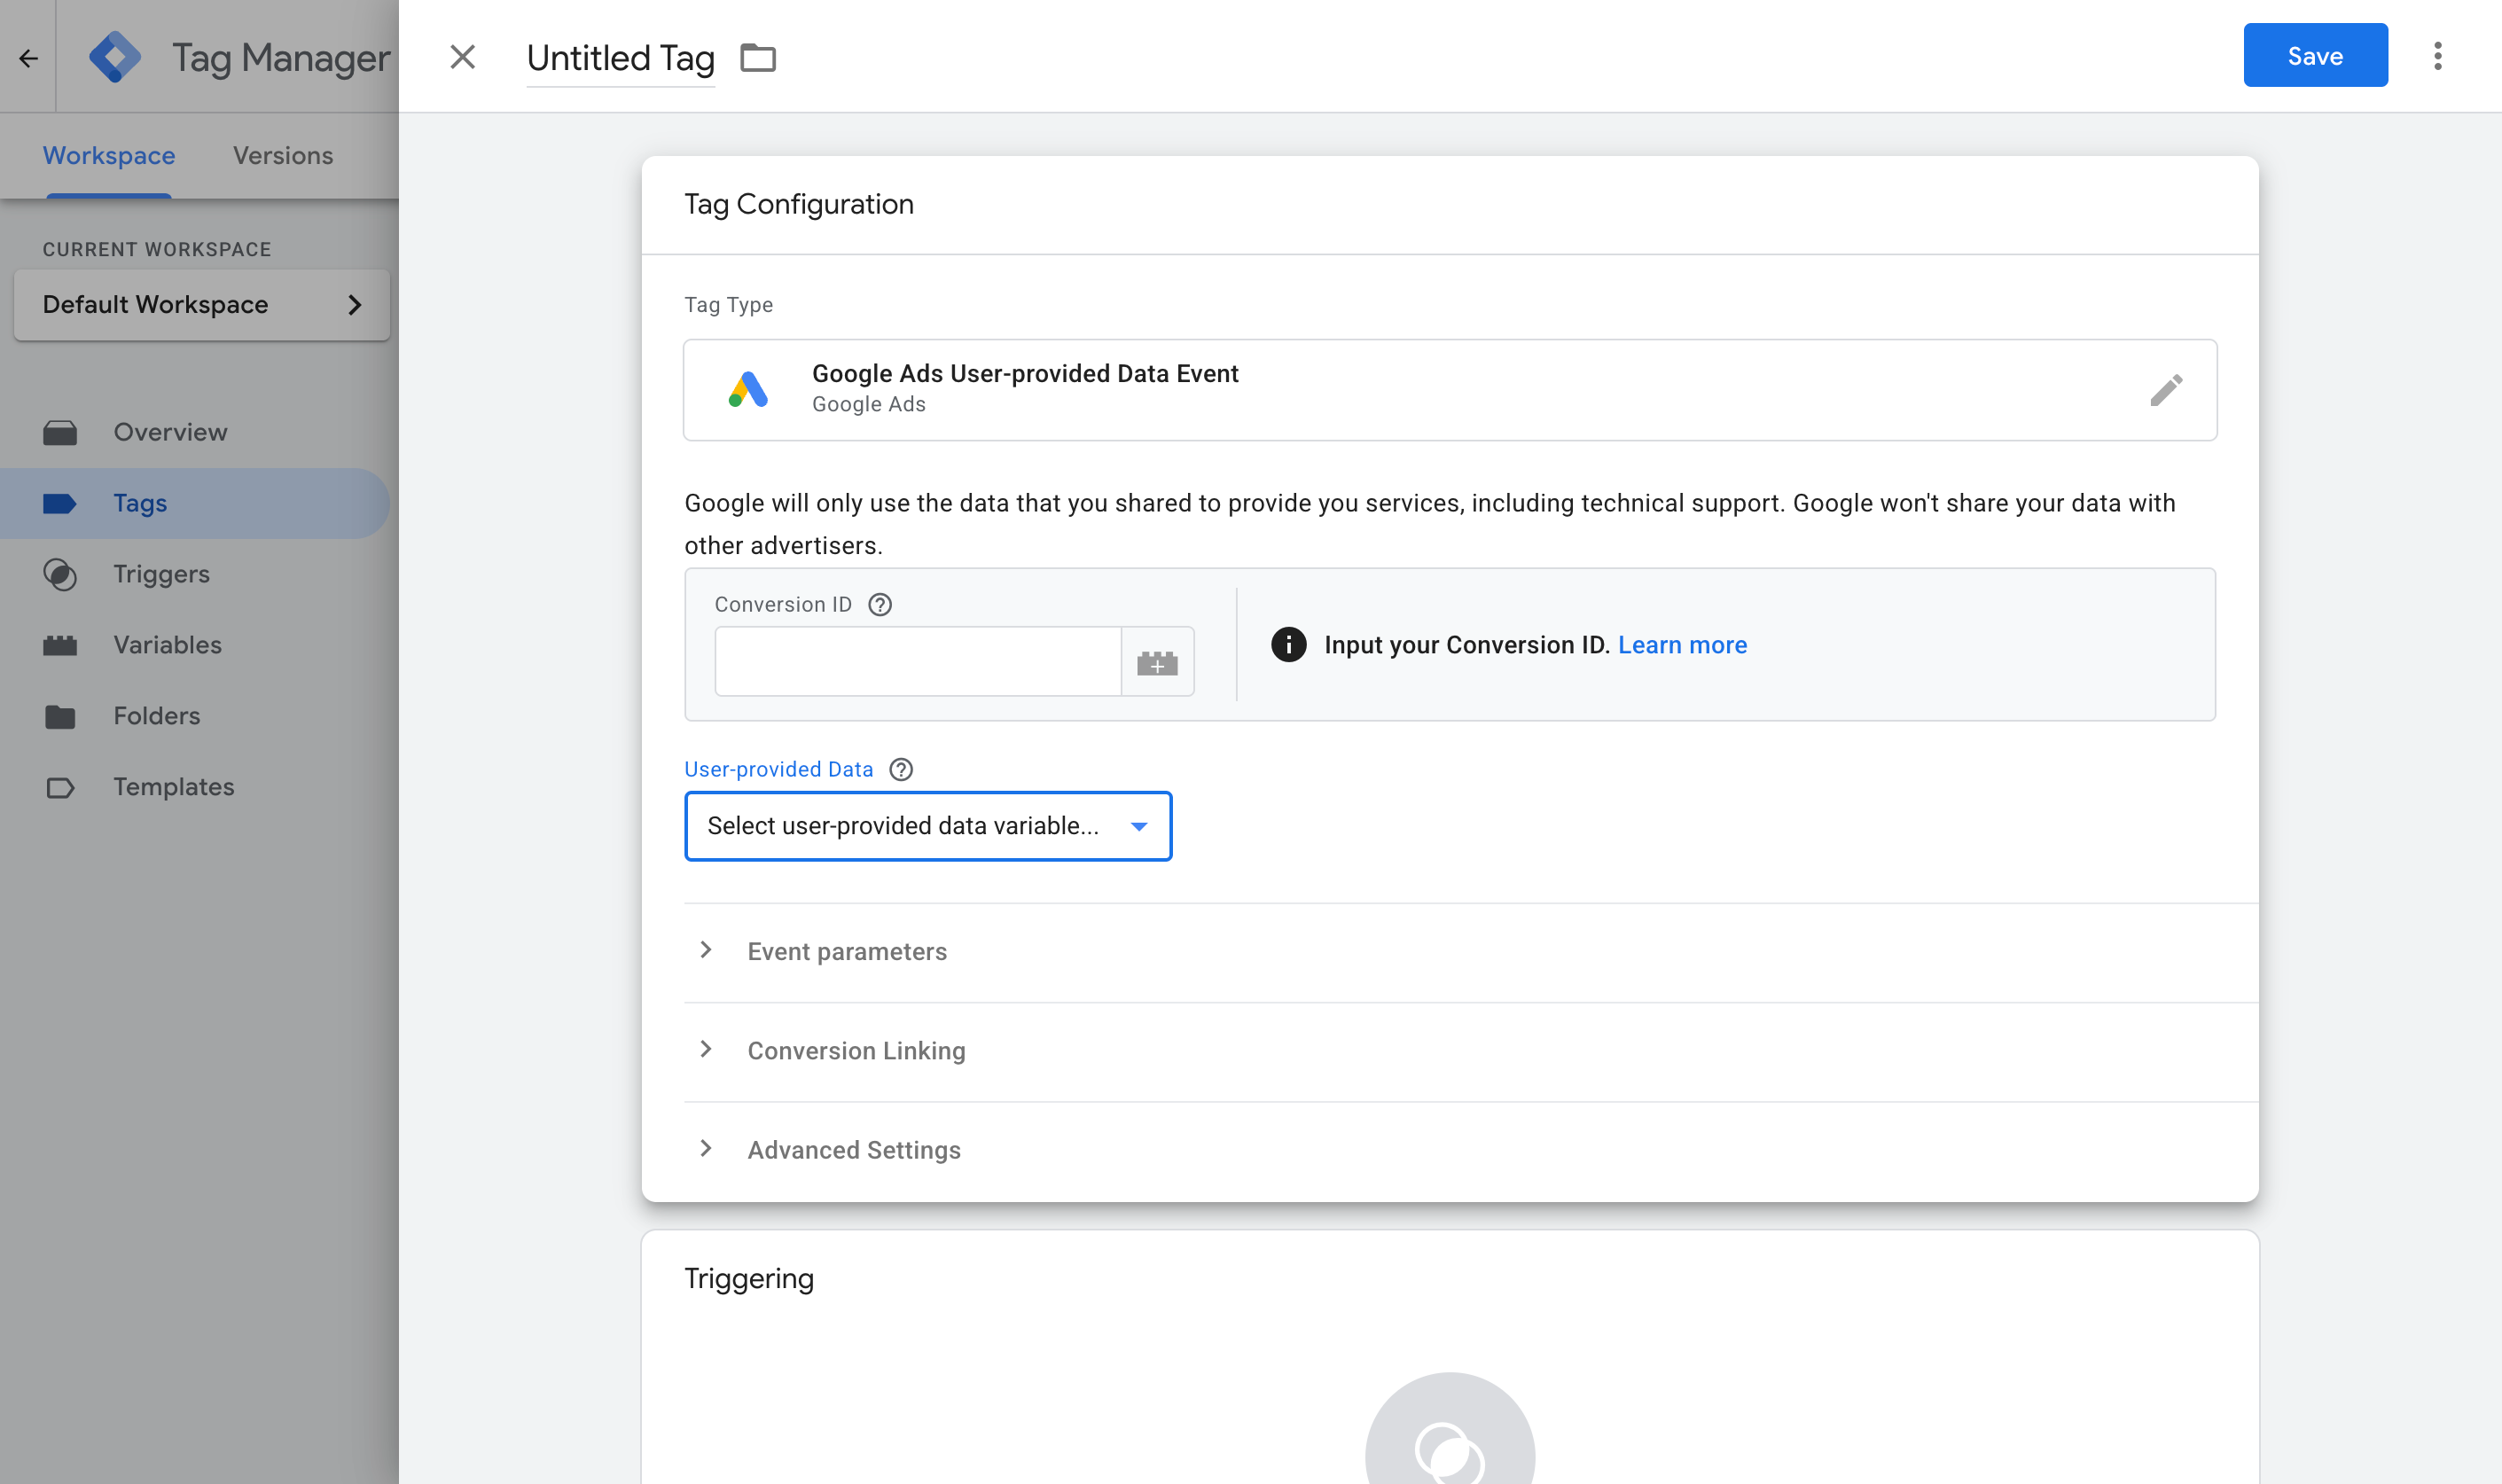
This is where everything you've built comes together. Back in Google Tag Manager, open Tags, click New, set the tag type to Google Ads User Provided Data Event, and map each Variable from Step 2 onto the matching field.
Then set it to fire on the Custom Event trigger you created in Step 3.
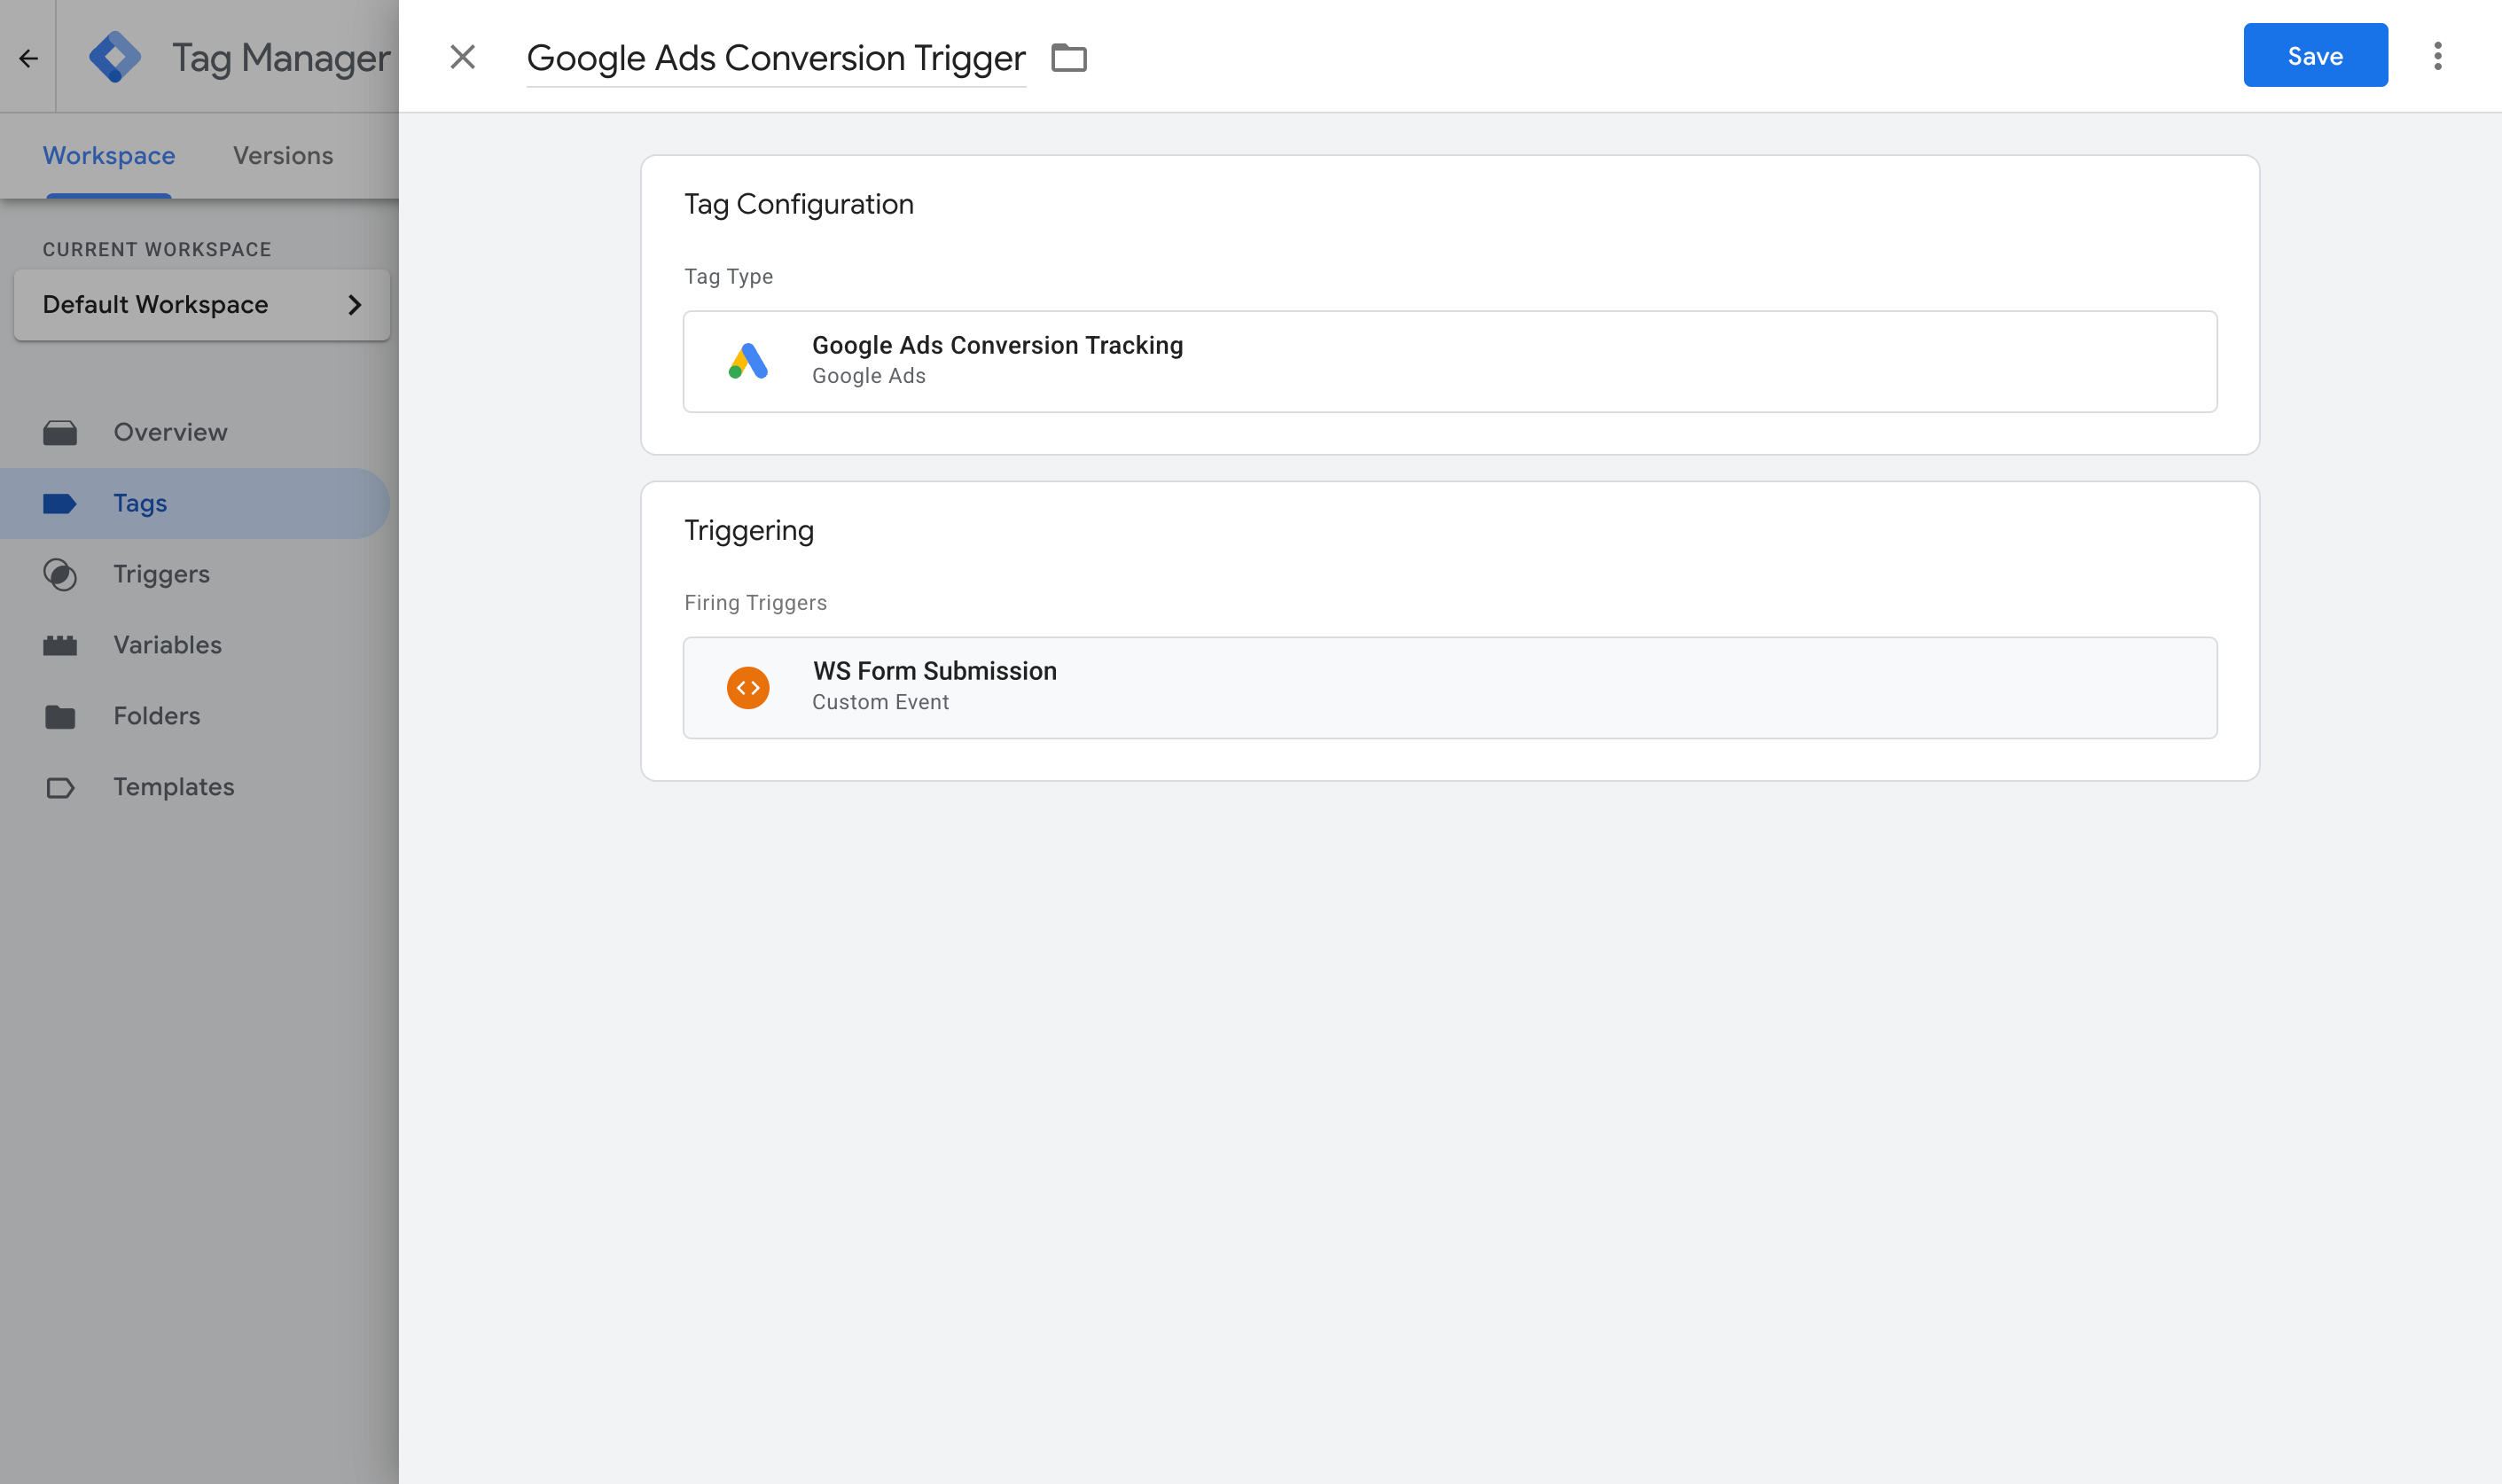
Publish the GTM container and, assuming each piece was wired up correctly, you'll have a Tag that catches WS Form submissions and writes to the dataLayer, Variables pulling the individual values back out, a Trigger watching for the event, and a Tag firing a conversion when it sees it.
You can confirm it actually works by opening GTM's Preview mode, submitting a real entry on the WS Form on your site, and checking that ws_form_submitted shows up carrying the email and name.
Pros and cons
Pros:
- Google Tag Manager is free and you may well already have it installed on your site.
- It goes further than Method 1 by capturing name, email, and phone and forwarding them to Google Ads or any other destination you set up, which is exactly what Enhanced Conversions needs and what improves your match rate on Meta Ads and LinkedIn Ads too (match rate being how many conversions can actually be tied back to a real person and the ad they clicked).
- It only fires on a confirmed form submission, so if a visitor leaves a required field empty or types their email address wrong (the two most common rejection reasons) a conversion won't be fired.
Cons:
- The setup has a lot of moving pieces. The GTM tag, the Trigger, four separate Variables, the Google Ads settings, and the conversion Tag itself all have to line up correctly, and if one of them is wrong, nothing tells you which.
- The conversion still has to travel through the visitor's browser to reach Google Ads, which means ad blockers and privacy-focused browsers can block it outright. You can expect about 30-40% of your conversions to be lost because of this (there have been numerous studies on it).
- Even done correctly, it doesn't give the data Google wants the most. Name, email, and phone unlock Enhanced Conversions, but you're still not sending critical data like the Google Click ID, the visitor's IP address, or their user agent. Millions of people have the same name and plenty of people have multiple email addresses (which means the one they enter in your form might not be the same one they are logged in to Google with). But the Google Click ID is unique to every ad click, so if you can send it back to Google, then it can match the conversion back to the ad they clicked with 100% accuracy (which is what Method 3 does).
Method 3: Use Converly
Best for: Sending proper, server-side conversions to Google Ads, Meta Ads, ChatGPT Ads, LinkedIn Ads, and more, without having to do complicated configuration in Google Tag Manager.
Converly is a dedicated conversion tracking tool built to send server-side conversions to Google Ads, Meta Ads, ChatGPT Ads, LinkedIn Ads, and more whenever a visitor submits a WS Form on your site.
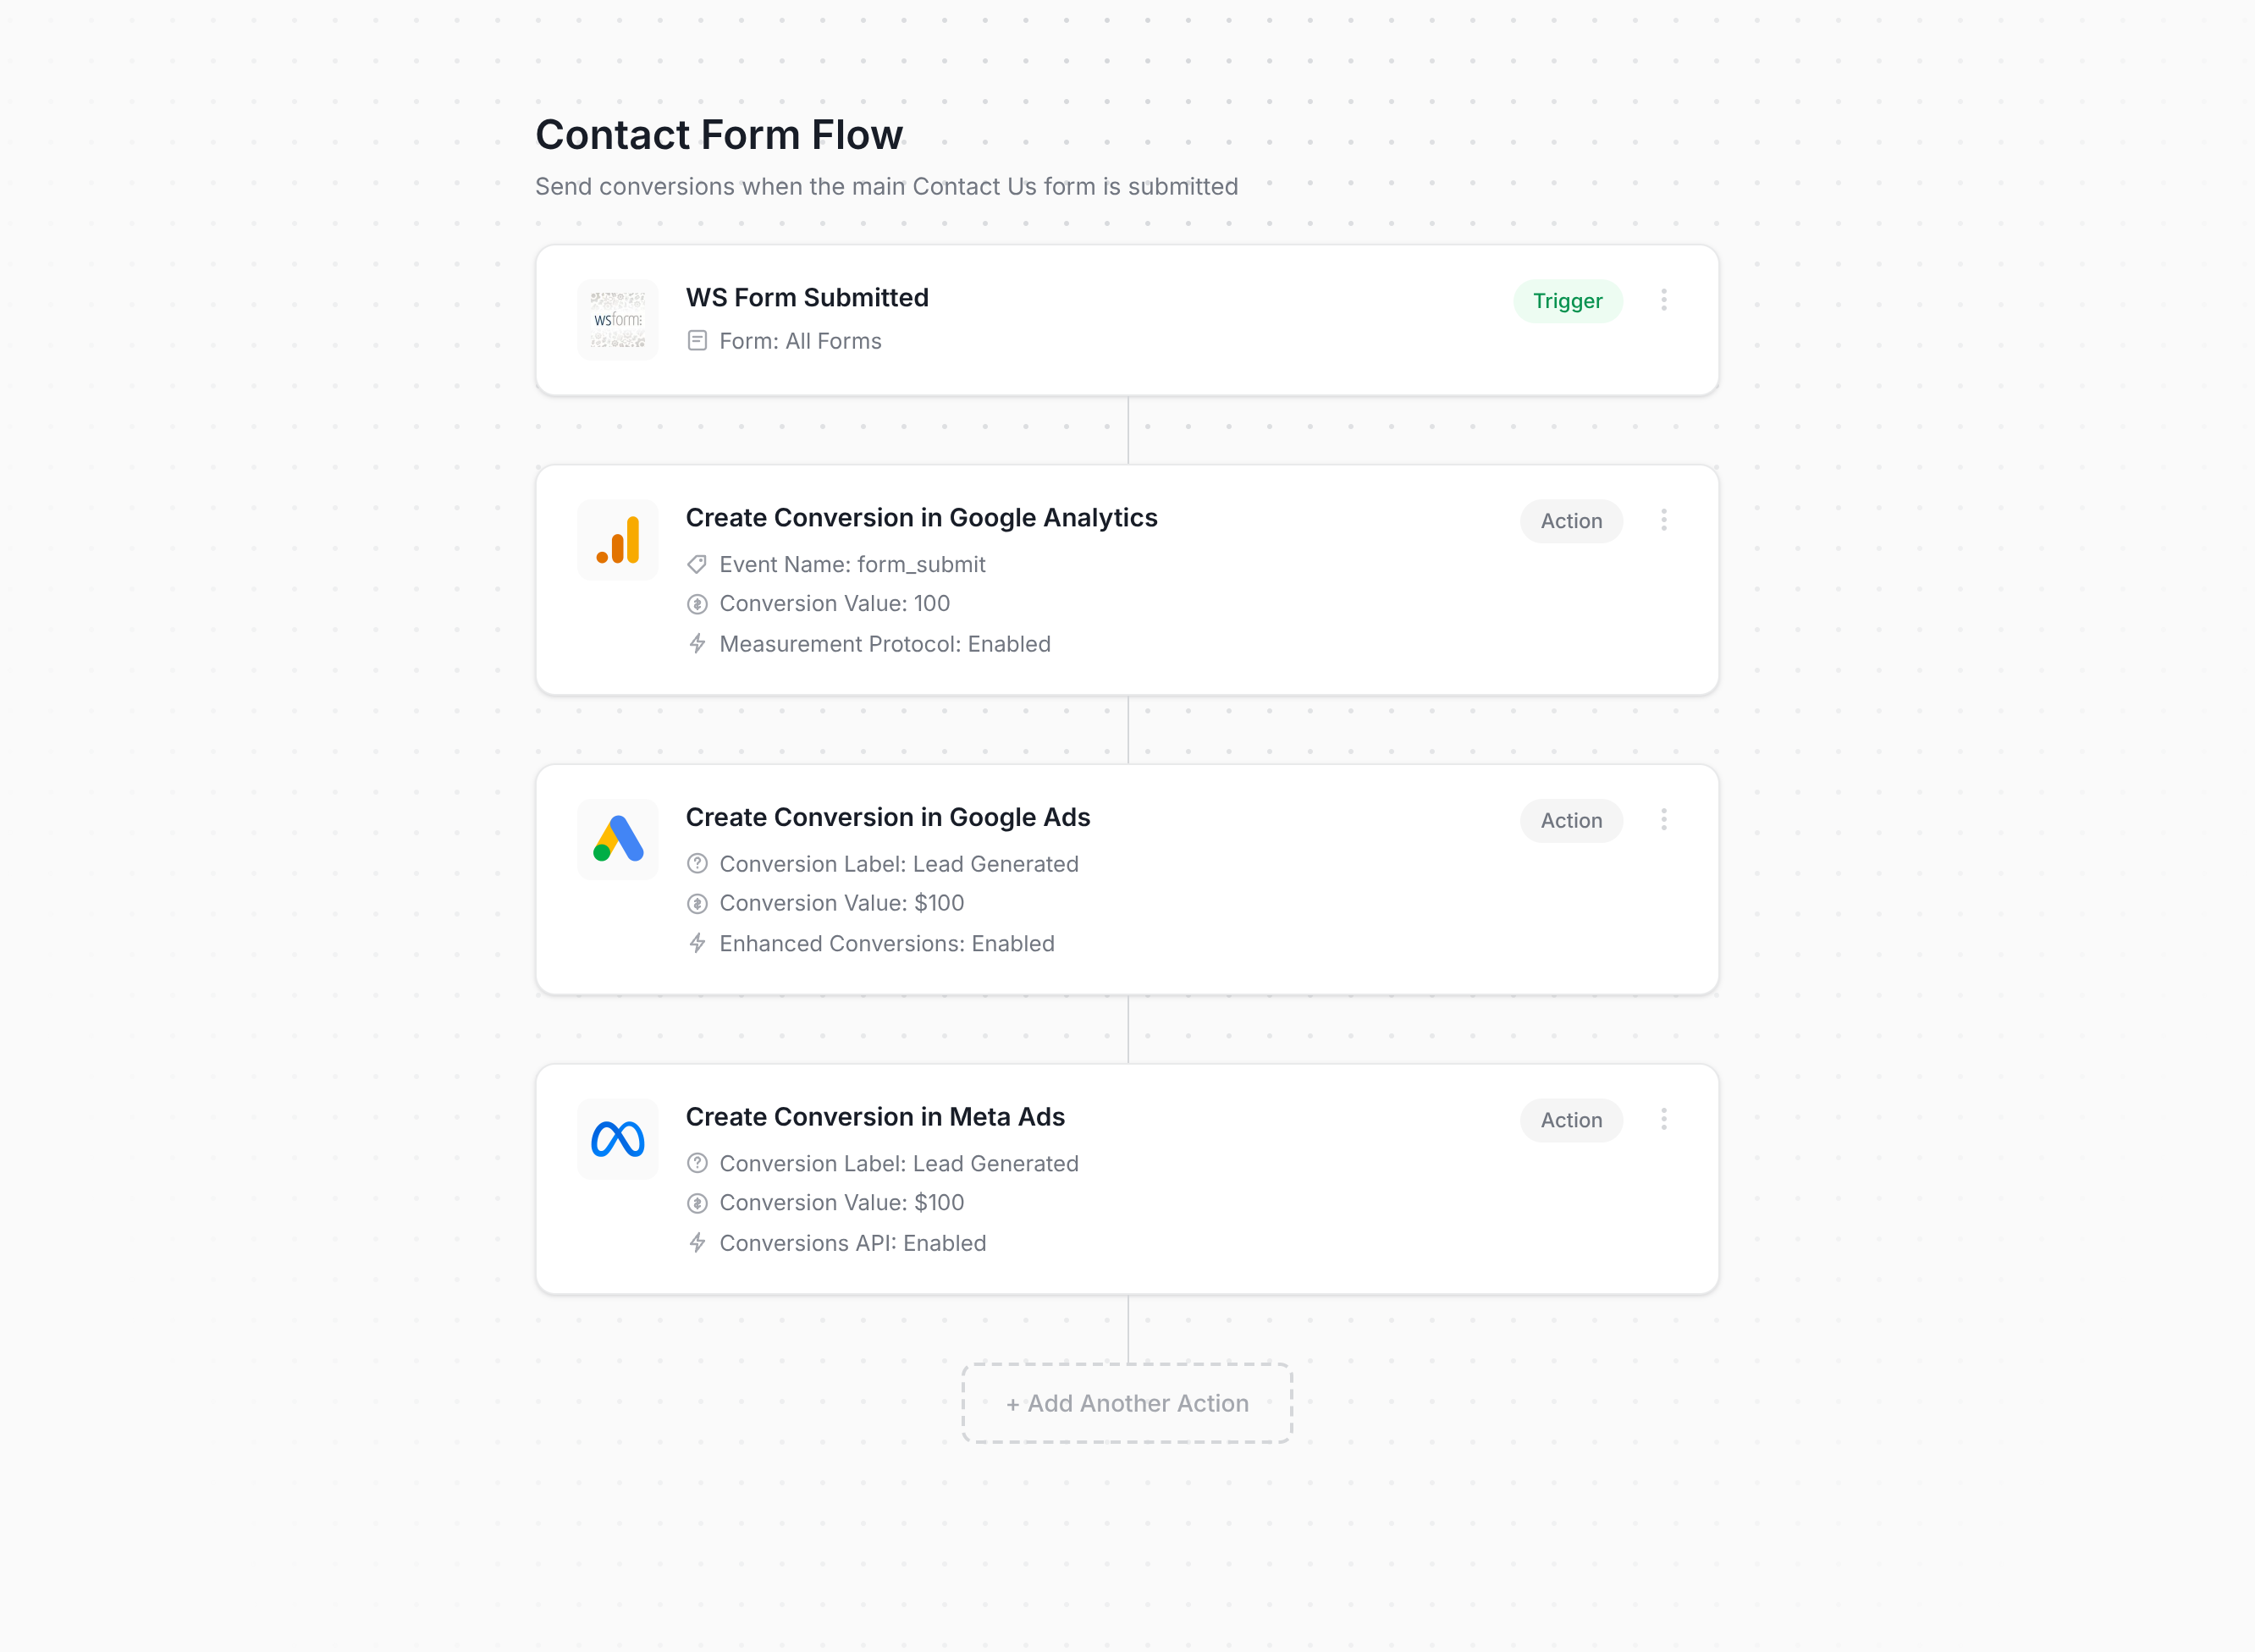
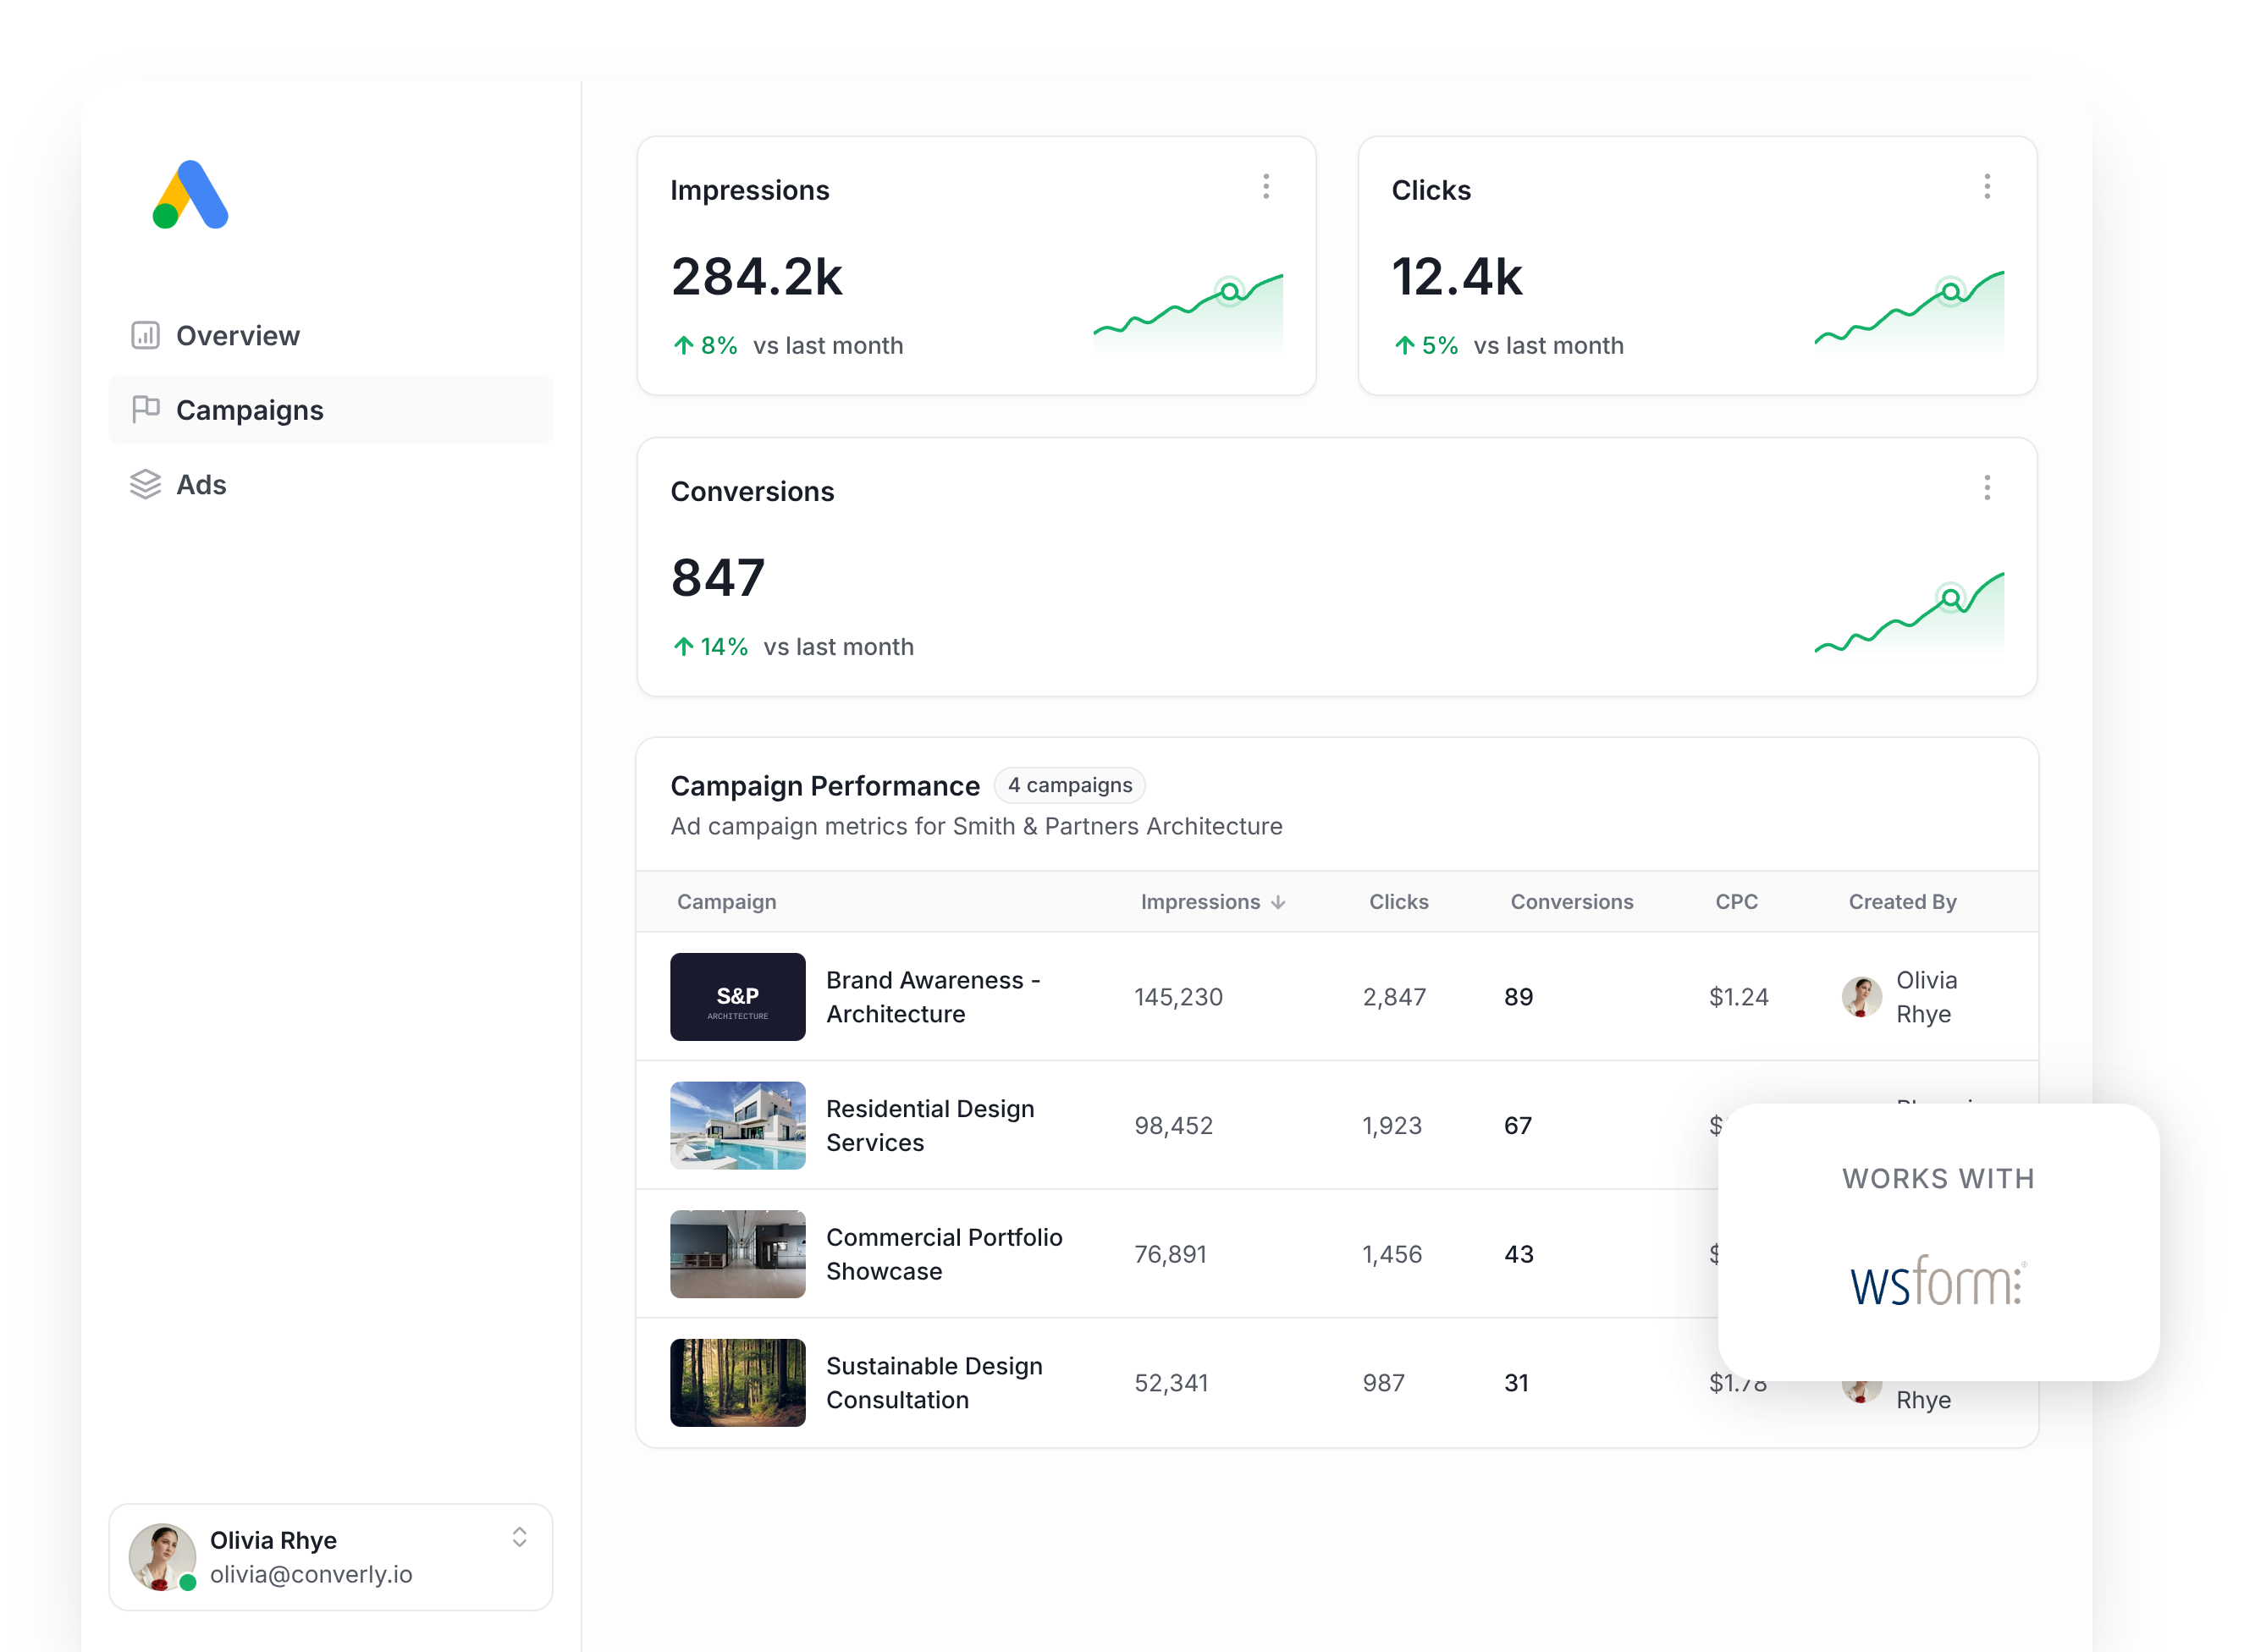
As the screenshot shows, setup is genuinely simple. Pick a trigger, in this case a WS Form submission, then pick one or more actions, such as sending a conversion to Google Ads or Meta Ads. That's the entire process, no custom code and no GTM triggers or variables to assemble.
From there, you just paste the bit of code Converly gives you on your site, and it does the rest. It watches for WS Form submissions, extracts the name, email, and phone, sends them to Converly's servers (which forward them to Google Ads, Meta Ads, and any other destination you've connected). Because we send the conversion directly to the ad platforms' servers, ad blockers and privacy-focused browsers like Safari have no way to interfere.
Here's the part that matters most if you're running ads on Google, Meta, ChatGPT, and so on. On top of the name, email, and phone, Converly also captures the Google and Meta click IDs (GCLID and fbclid), Meta's browser cookies, the visitor's IP address, their user agent, and more, and sends all of that along with the conversion. These are the data points that Google and Meta want most, and having the full set is what pushes your match quality from weak to strong (on Meta, expect your Event Match Quality score to climb from around 3 up to a 9 or 10).
Converly also gives you a full conversion log, letting you see every lead that submitted one of your WS Forms, what data was captured, what was sent to each ad platform, and whether it landed.
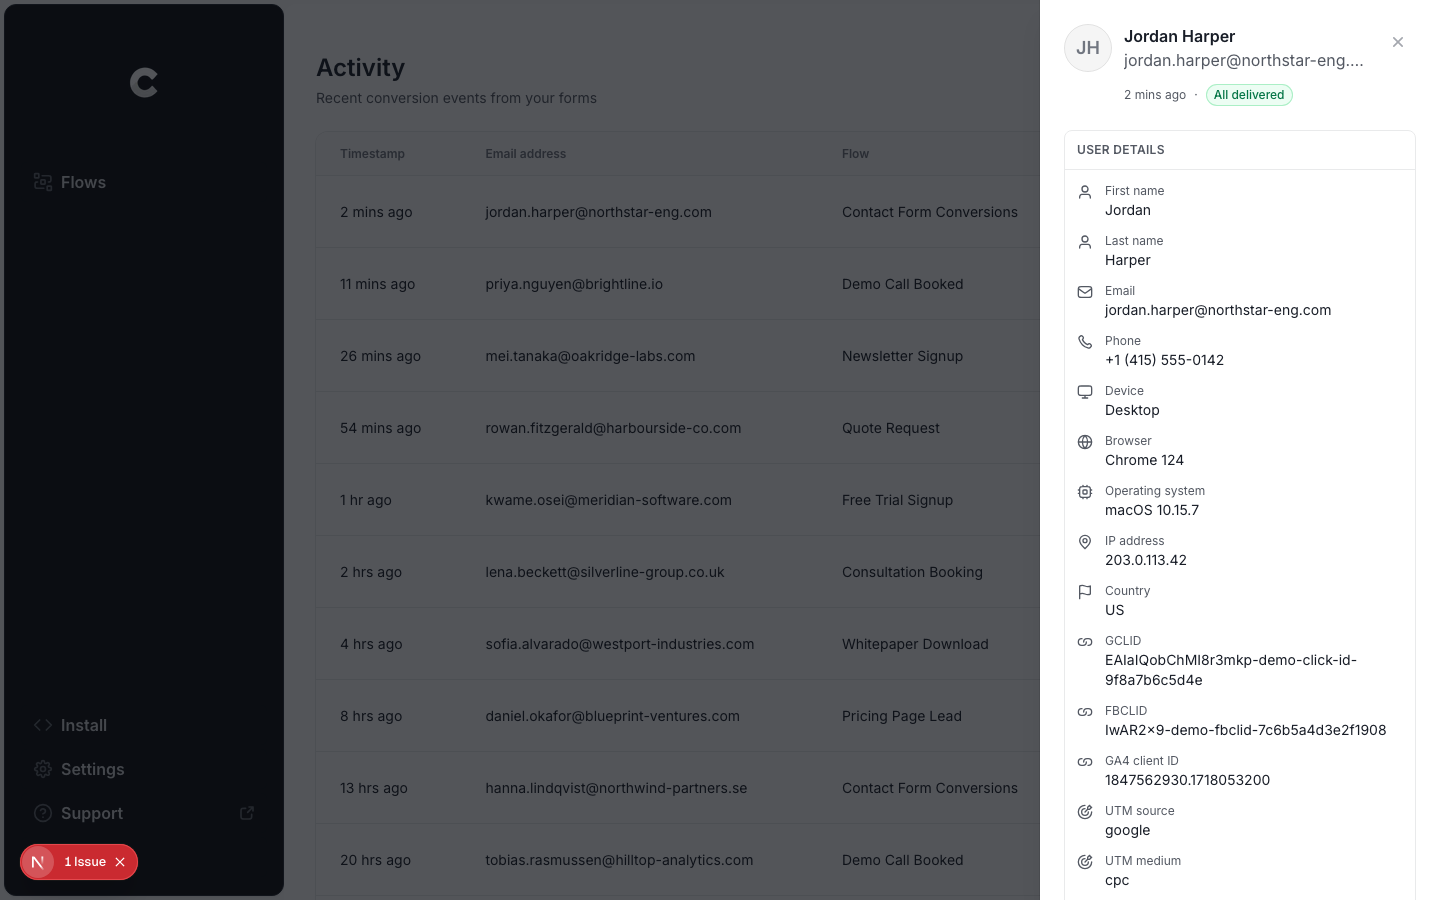
The other advantage of Converly is that you can send the same conversion to Google Ads, Meta Ads, ChatGPT Ads, LinkedIn Ads, GA4, and 15 other destinations in one go. So if you start advertising somewhere new next month, you just add it as another action on the flow you've already built, and you're done.
Pros and cons
Pros:
- It's genuinely easy to set up. No code to write or maintain, and no complex configuration.
- It captures click IDs, cookies, IP, and user agent and sends them with every conversion. This dramatically lifts match quality in the ad platform (in Meta for example, you'd typically go from an Event Match Quality score of 3 or 4 up to a 9 or 10).
- Sends the conversion server-side, so ad blockers and privacy browsers don't stop them from reaching your ad platforms. You'll likely record 30% more conversions using Converly than using Google Tag Manager.
- Supports conditional logic, so you can send specific conversions when certain forms are completed on your site (for example, only firing a conversion when the Quote Request form is submitted, not the Contact Support form).
- Lets you log in to Google Ads, Meta Ads, and so on within the platform and just pick the conversion you want to fire, no hunting around for account IDs or conversion IDs.
- Gives you a full conversion log where you can see every lead that submitted your WS Form, what data was captured, whether it made it to your ad platforms, and more.
- You get support from a team of experts who will happily help you get set up and troubleshoot issues, unlike GTM where you're on your own.
Cons:
- It's a paid tool after the free trial. Plans start at $19 per month.
What not to do
We've now walked through the three approaches worth using for WS Form conversion tracking. It's just as important to flag the DIY approaches that look reasonable on the surface but actually wreck your data. Steer clear of the following approaches:
Tracking thank you page visits
This is probably the single most common DIY approach out there, and also one of the least reliable. The idea is that you redirect people to a thank you page after they submit your form, then treat every visit to that page as a conversion. In practice, it falls apart for a handful of reasons.
People reach it without submitting anything. Any URL, including your thank you page, can be visited directly. A visitor might land on it because their browser autocompleted it, or land on it through a Google search if the page ever got indexed. None of those visits were an actual conversion, yet all of them would count as one.
A single lead can register as several conversions. Refresh the thank you page and you've logged a second conversion for the same submission. Hit back and land on it again and that's a third. What was genuinely one lead can easily be recorded as two or three.
You'd have nothing to send the ad platforms. A thank-you page doesn't have the lead's name, email, etc., so it's impossible to send along with the conversion. And sending a conversion with no identifying data makes it impossible for Google and Meta to match it to a real person and the original ad they clicked, which makes the whole exercise pretty pointless.
And it can just as easily miss real conversions. By default, a completed WS Form submission triggers the Show Message action, which shows a confirmation right there on the page instead of redirecting the lead to a thank you page. So if you ever set up a new form and forget to set up the redirect, you'll miss all of those conversions (and have no way to get them back).
What all of this comes down to is that a thank you page visit isn't a conversion. Each of the three methods covered earlier fires on WS Form's own confirmed submission instead, which is why they are so much better.
Relying on the default form submit trigger in Google Tag Manager
If you are using Google Tag Manager, then the natural starting point is to use its built in Form Submission trigger to fire conversions to ad platforms and analytics tools.
The problem is that WS Form submits entirely over AJAX and never fires the browser's native form submission event. So if you try to use that, you'll have a setup that all looks correct but actually records zero conversions (and nothing in GTM will tell you why it isn't working).
The moral of the story is to skip the form submit trigger in GTM and instead listen for a genuine WS Form success signal, the way Converly and the Method 2 snippet above both do.
Using GA4's automatic form tracking (Enhanced Measurement)
GA4's Enhanced Measurement claims it can pick up form submissions automatically, with nothing for you to configure.
The catch is that it relies on the same browser native form submission behaviour GTM's trigger does, and Google's own guidance says it only works reliably on traditional forms that reload the page after submitting. WS Form doesn't do that; it submits over AJAX with no reload, so Enhanced Measurement hits the same blind spot as GTM's built-in trigger and can't be trusted to catch WS Form submissions.
Stick with one of the three methods above instead if accuracy matters to you.
Firing the conversion on the submit button click
A pattern we see fairly often is firing the conversion when someone clicks the submit button (usually via a GTM click trigger on the form's submit button).
The problem with this approach is that a click is not the same thing as a completed submission. But if the visitor left a required field empty or entered their email in the wrong format, the form submission would get rejected but it will still count as a conversion. And once they correct the mistake and hit submit again, that's a second conversion recorded for what is still just one lead.
Again, you need to be triggering the conversion on a successful form submission, not something like a button click.
So which method should I use?
Here's how the three ways to track WS Form conversions compare.
| Method | Best for | Sends conversions to | Data sent |
|---|---|---|---|
| Method 1. WS Form's own Conversion Tracking action | Sending submissions to Google Analytics with no code | Google Analytics 4 | The submission event only |
| Method 2. Enhanced Conversions through Google Tag Manager | Sending to Google Ads, if the difficult configuration doesn't put you off | Google Ads | Name, email and phone |
| Method 3. Converly | Sending to any ad platform, with the least setup work | Google Ads, Meta Ads, LinkedIn Ads, ChatGPT Ads, GA4 and more | Name, email and phone, plus the GCLID, the Meta click ID, IP address, user agent, and more. |
Wrap up
It's easy to treat conversion tracking as an afterthought, but it's genuinely one of the biggest factors in how well your advertising performs.
If you set it up properly, the algorithms in the ad platforms learn what your ideal customer looks like and will serve your ads to people like them. If you set it up badly, you'll end up spending a lot of money showing your ads to people who were never going to convert.
There's real data backing this up too (multiple platforms have published figures backing it). Google says businesses that move to proper server-side conversion tracking see conversions climb by 19% on average, and Meta reports a 23% increase from doing the same.
Converly gets you all the benefits of server-side tracking without the hard parts. You simply pick your trigger (a WS Form submission), pick which platforms should receive the conversion, and the setup is done.
Best of all, Converly is free to start with, and most people are up and running in under 10 minutes. Start your 14-day free trial today.
About the author

Aaron is the founder of Converly. With over 15 years of experience in digital marketing and SaaS, he's passionate about helping businesses track and optimise their ad conversions.