


Webflow Forms conversion tracking: 3 ways to do it
Learn three different ways to set up conversion tracking for Webflow Forms, and how to work out which one is right for you.
Webflow is a great tool to build your business website, and it comes with a built-in form builder that makes it super easy to build contact form on your site.
But for some reason, setting up conversion tracking when someone submits a form on your site is quite difficult. Webflow forms doesn't have a built-in integration with Google Analytics, Google Ads, Meta Ads, etc., and the default ‘form submission’ trigger in Google Tag Manager (or the Enhanced Measurement feature in Google Analytics) doesn't work with Webflow forms.
So how are you supposed to get conversion tracking set up then?
In this article, we'll walk you through 3 different ways to set up conversion tracking on Webflow and help you work out which one fits your situation. Conversion tracking is what we build for a living here at Converly, and Webflow has a couple of quirks of its own that catch people out, so we'll call them out along the way.
Method 1: Send a plain event to Google Analytics with Google Tag Manager
Good for: Sending form submission events to Google Analytics 4.
GA4's own Enhanced Measurement feature claims to automatically pick up form submissions without any complicated setup. In reality though, it doesn't work well with Webflow forms.
Enhanced Measurement only works if the form submission causes a page reload, or a browser-level submit signal gets sent. Webflow forms submits over AJAX though, with no reload and no URL change, so Enhanced Measurement regularly misses form submissions.
Since you can't rely on it, the free path here is to build a small Google Tag Manager tag that waits for the signal that Webflow forms sends when the form is successfully submitted, and turns that into a proper, purpose-built GA4 event.
Step 1: Add a Custom HTML tag with a capture script
In GTM, create a new Custom HTML tag, paste in the snippet below, and set it to fire on 'All Pages'.
Here's what the snippet does:
- Watches for a real submit attempt, not just a click. It listens on the native browser
submitevent, which only fires once Webflow's own required field validation has passed, so a blank required field never even reaches this code. - Waits for Webflow's own proof that the submission worked. Webflow hides the form and reveals a success box (with the CSS class
.w-form-done) only once its servers have actually accepted the submission. This snippet waits for that to appear to confirm the form submission was successful and never fires on a rejected form submission. - Sends an event to the dataLayer. It sends an event to the dataLayer called
webflow_form_submittedwhich you will use in the later steps to trigger the conversion event to be sent to GA4. - Keeps multiple forms on one page separate. Each watcher is scoped to the specific form it was armed on, so a page with a contact form and a newsletter signup can't have one form's success accidentally count as a conversion for the other.
Step 2: Create a Data Layer Variable
Before going further here, it helps to understand what the dataLayer actually is, since every remaining step depends on it.
The dataLayer is essentially a messageboard that sits between your website and Google Tag Manager. Your site sends messages to it (i.e. a form was submitted), and GTM watches for those messages as they arrive.
That's exactly what the Step 1 script does. When a form is successfully submitted, it sends a message called webflow_form_submitted to the dataLayer. The problem is that GTM can see the message come in, but it won't automatically pull the individual values out for you. You have to tell it which ones to grab, and that's exactly what a Data Layer Variable does.
To set it up, head to the Variables section in Google Tag Manager, click New under User-Defined Variables, choose Data Layer Variable as the type, and give it a name.
- Name: Webflow Form Name
- Variable Type: Data Layer Variable
- Data Layer Variable Name: form_name
Step 3: Create a Custom Event trigger
Go to the Triggers section, click New, choose the Custom Event type, and set the event name to webflow_form_submitted, exactly matching what the script pushes.
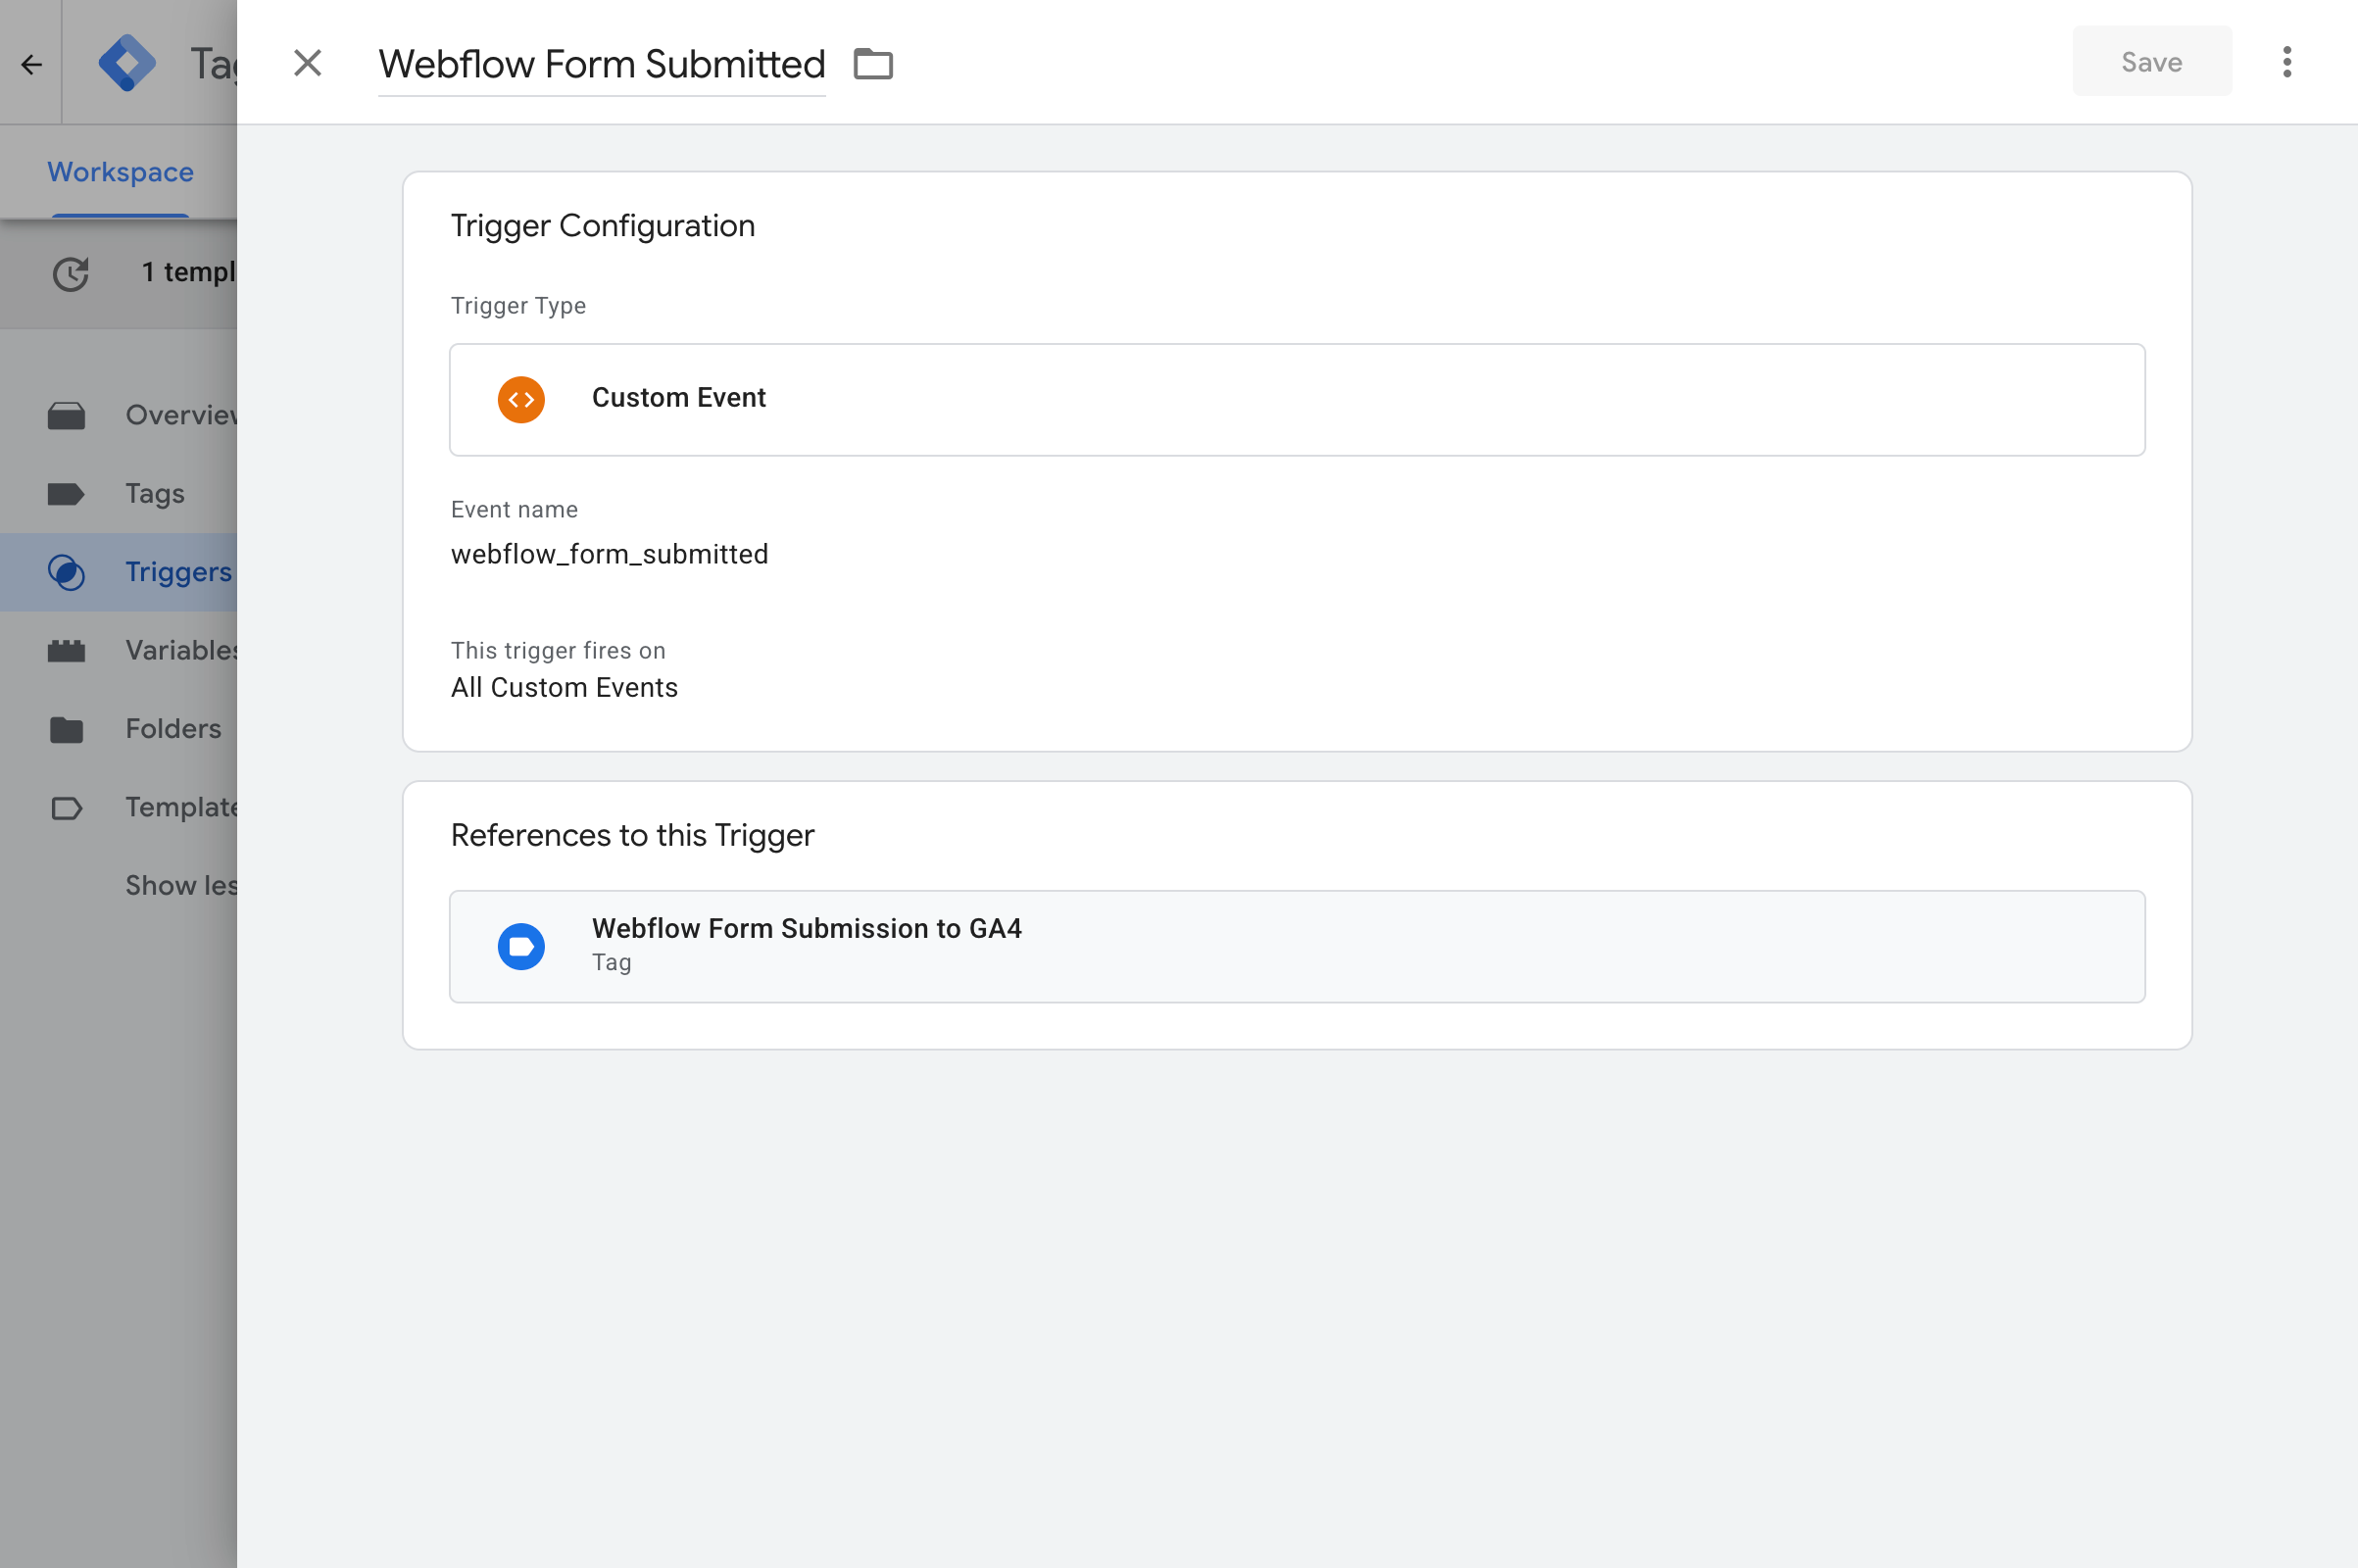
Step 4: Create your GA4 event tag
Open the Tags section, click New, choose Google Analytics: GA4 Event as the tag type, connect it to your existing GA4 configuration tag, and give the event a clear name like Form Submitted. Set it to fire on the trigger you built in Step 3.
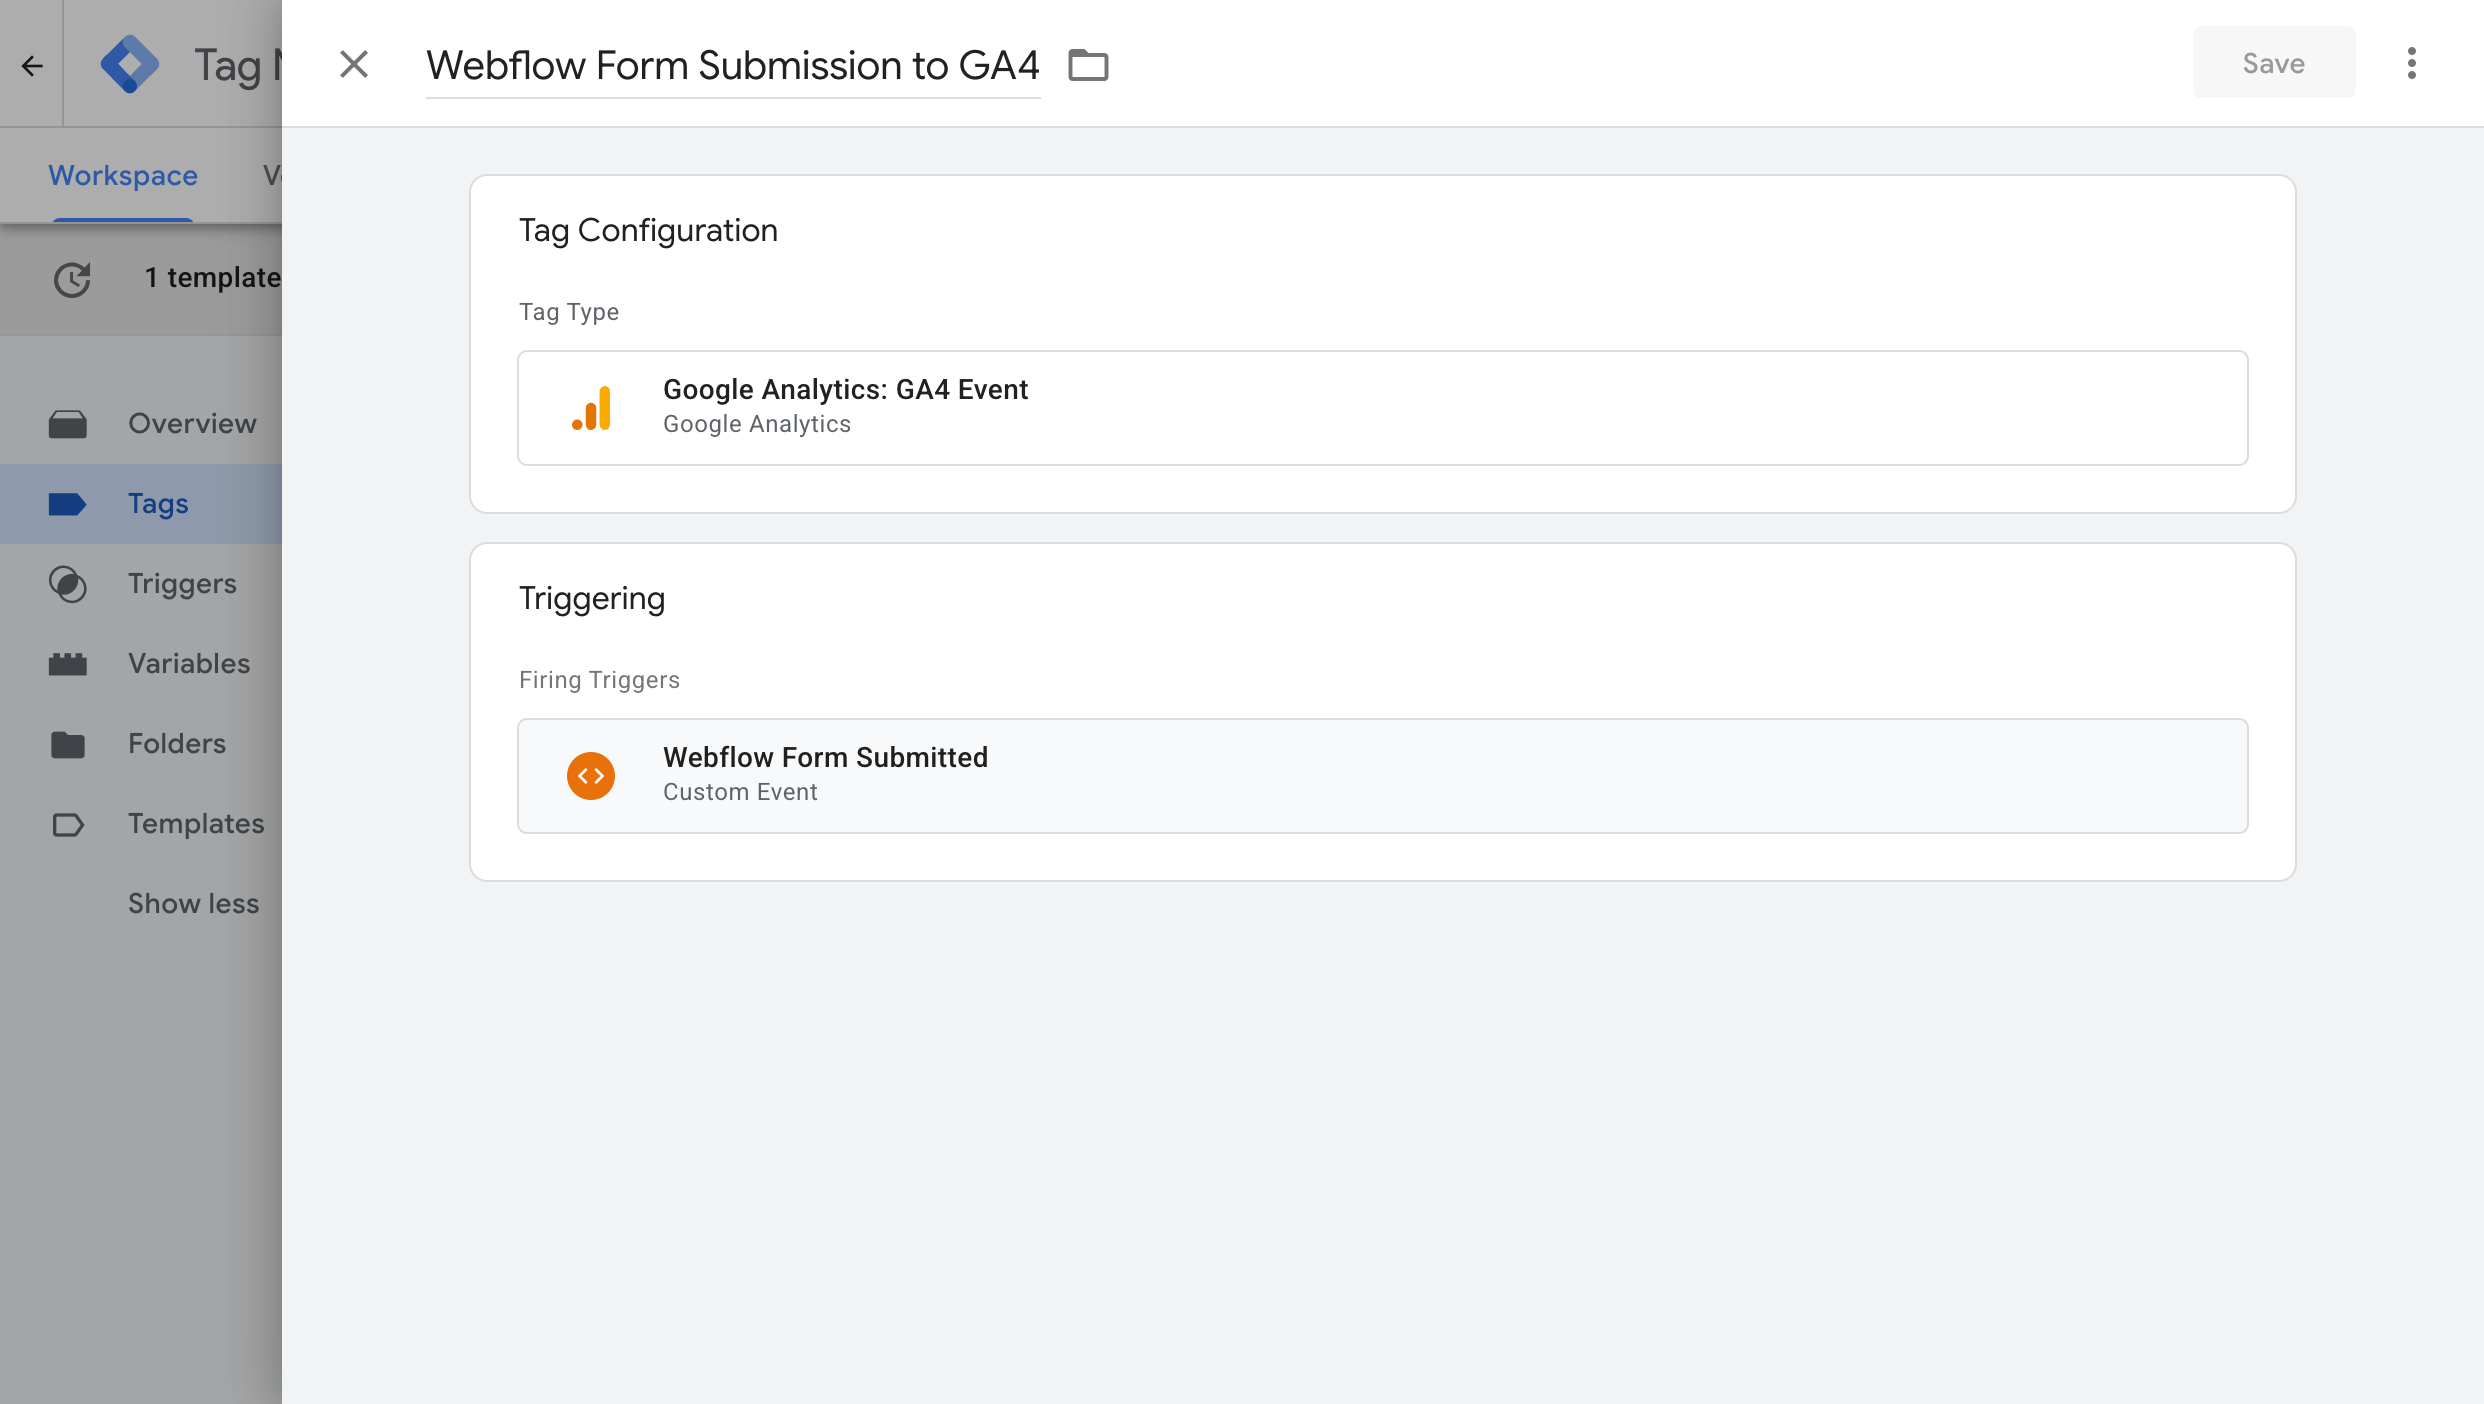
Step 5: Test it, then mark it as a Key Event in GA4
Submit a test entry on your form, then open GA4's Realtime report and look for your event showing up in the recent events list. Once you can see it arriving, head to Admin, then Events (or Key Events) in GA4, find it, and toggle it on as a Key Event. That tells GA4 to treat it as a conversion, so it shows up in your acquisition and funnel reports instead of sitting there as a regular event.
.png)
Pros and cons
Pros:
- It's free. All it costs is a bit of setup time in Google Tag Manager.
- It only counts genuine, confirmed submissions, since it's tied to Webflow's own success signal rather than a click or a guess.
- Unlike GA4's Enhanced Measurement, it's built specifically around how Webflow submits forms, so it doesn't miss submissions or double count them.
Cons:
- There's quite a bit of set up involved, and it's complicated if you don't understand how Google Tag Manager works. And if you get one part wrong, the whole thing won't work (and it won't really tell you which part you got wrong and why it isn't working either).
- It only sends conversions to Google Analytics. It can't push a conversion to Google Ads, Meta Ads, or anywhere else, so Methods 2 and 3 below are what you need if you're running paid ads.
- It still runs in the browser, so ad blockers and privacy-focused browsers like Safari can prevent the event from ever reaching Google Analytics.
- If a form is set in the Webflow Designer to redirect to a separate thank you page rather than showing the inline success message, this method won't fire at all. You'd need a separate GTM page view trigger on that thank you URL instead.
Method 2: Use Google Tag Manager for Enhanced Conversions
Good for: Sending Enhanced Conversions to Google Ads.
If you're spending money on Google Ads, simply telling Google Ads ‘a form submission happened’ won't really do much. Google Ads wants to match every conversion back to the specific person who clicked your ad, and it can only do that when you send the lead's details, like their name, email, and phone number, along with every conversion. Google calls this Enhanced Conversions.
That means a bare "a conversion happened" event isn't enough. You need to capture the visitor's details when they submit the form, hash them with SHA256 (Google Ads requires it), and pass them along.
Google Tag Manager is one way to build that, and here are the steps.
Step 1: Add a Custom HTML tag with a capture script
In GTM, create a new Custom HTML tag, paste in the snippet below, and set it to fire on 'All Pages'.
Here's what the snippet does:
- Confirms the submission the same way Method 1 does. It arms on the native
submitevent and only fires once Webflow's own.w-form-donesuccess box actually appears, so a failed or rejected submission is never counted. - Snapshots the lead's details before Webflow wipes them. This is the quirk that trips up most homemade Webflow scripts. Webflow's own submit handler clears the text fields as soon as it starts processing the submission, so by the time the success box shows up, you can't read the data in the form because it's gone. This snippet gets around it by grabbing each field and storing it before Webflow's own handler has a chance to wipe them clean.
- Works out which field is which, without trusting the field names. Webflow's own field names are unpredictable, which makes it difficult to know where to grab the name, email, phone numbers, etc from. Rather than guessing off the field name alone, the code checks the input type first (a genuine
type="email"field is the strongest signal), then theautocompleteattribute, then the field's visible label, and only falls back to the field name or id as a last resort. It's the most reliable way possible to grab the data. - Sends the data only once, and only on a genuine success. The moment
.w-form-doneappears, it takes the lead's details that it stored earlier and pushes them to the dataLayer with thewebflow_form_submittedevent (along with the name of the form).
There are a bunch of other websites on the internet that will give you similar scripts, but many of them get little things wrong that will make your conversion tracking inaccurate. Here's why this one is the best:
It fires on the correct event
A lot of scripts just listen for the plain browser submit event and will trigger the conversion then. But this fires when the lead clicks the submit button, before Webflow has actually validated the form submission. So if someone clickls submit but forgot to fill out a required field, or inputted an invalid email address, then Webflow will reject the form submission but your conversion will fire. And then when they correct the problem and click submit again, your conversion fires for a second time. This snippet waits for .w-form-done, the box Webflow only shows after a genuine, server-confirmed success and only fires when it sees it.
It captures the data Webflow actively clears
Most scripts try to read the email and name fields when the success message shows up, but because Webflow has cleared the fields by then they get nothing. This script solves that by capturing the values at submit time, storing them, and then pulling them out of storage once the success box confirms the submission actually worked.
It handles the real world edge cases
There are a number of real edge cases most homemade scripts miss entirely. This one handles the following out of the box.
- Multiple Webflow forms on a single page, each tracked independently.
- Leftover error messages from a failed attempt are ignored. So say someone submits your form, and it fails. They fix the problem, submit again, and this time it works. Trouble is, that first error message is often still sitting on the page and a lesser script will see it, assume the second attempt failed too, and never send the conversion. This script checks when the error message actually showed up, so it only ever pays attention to errors from the submission that just happened.
- Sensitive fields like passwords, card numbers, CVV, one time codes, SSNs and PINs are dropped before anything reaches the data layer, both the value and the field name, so you don't run into privacy trouble.
It has been battle tested
This isn't a snippet thrown together for this article. It's a version of the code we run inside Converly to detect Webflow submissions and capture the data. It's been tested on a real Webflow site, in a real browser, going through every scenario that matters (a valid submission, an invalid one, a failed attempt followed by a successful retry, and two failed attempts in a row), and it passes every one of them (now anyway. The earlier versions didn't, but that's the point of testing)
Step 2: Create Data Layer Variables for the captured data
To set this up, go to the Variables section in Google Tag Manager, click New under User-Defined Variables, choose Data Layer Variable as the type, and give it a name.
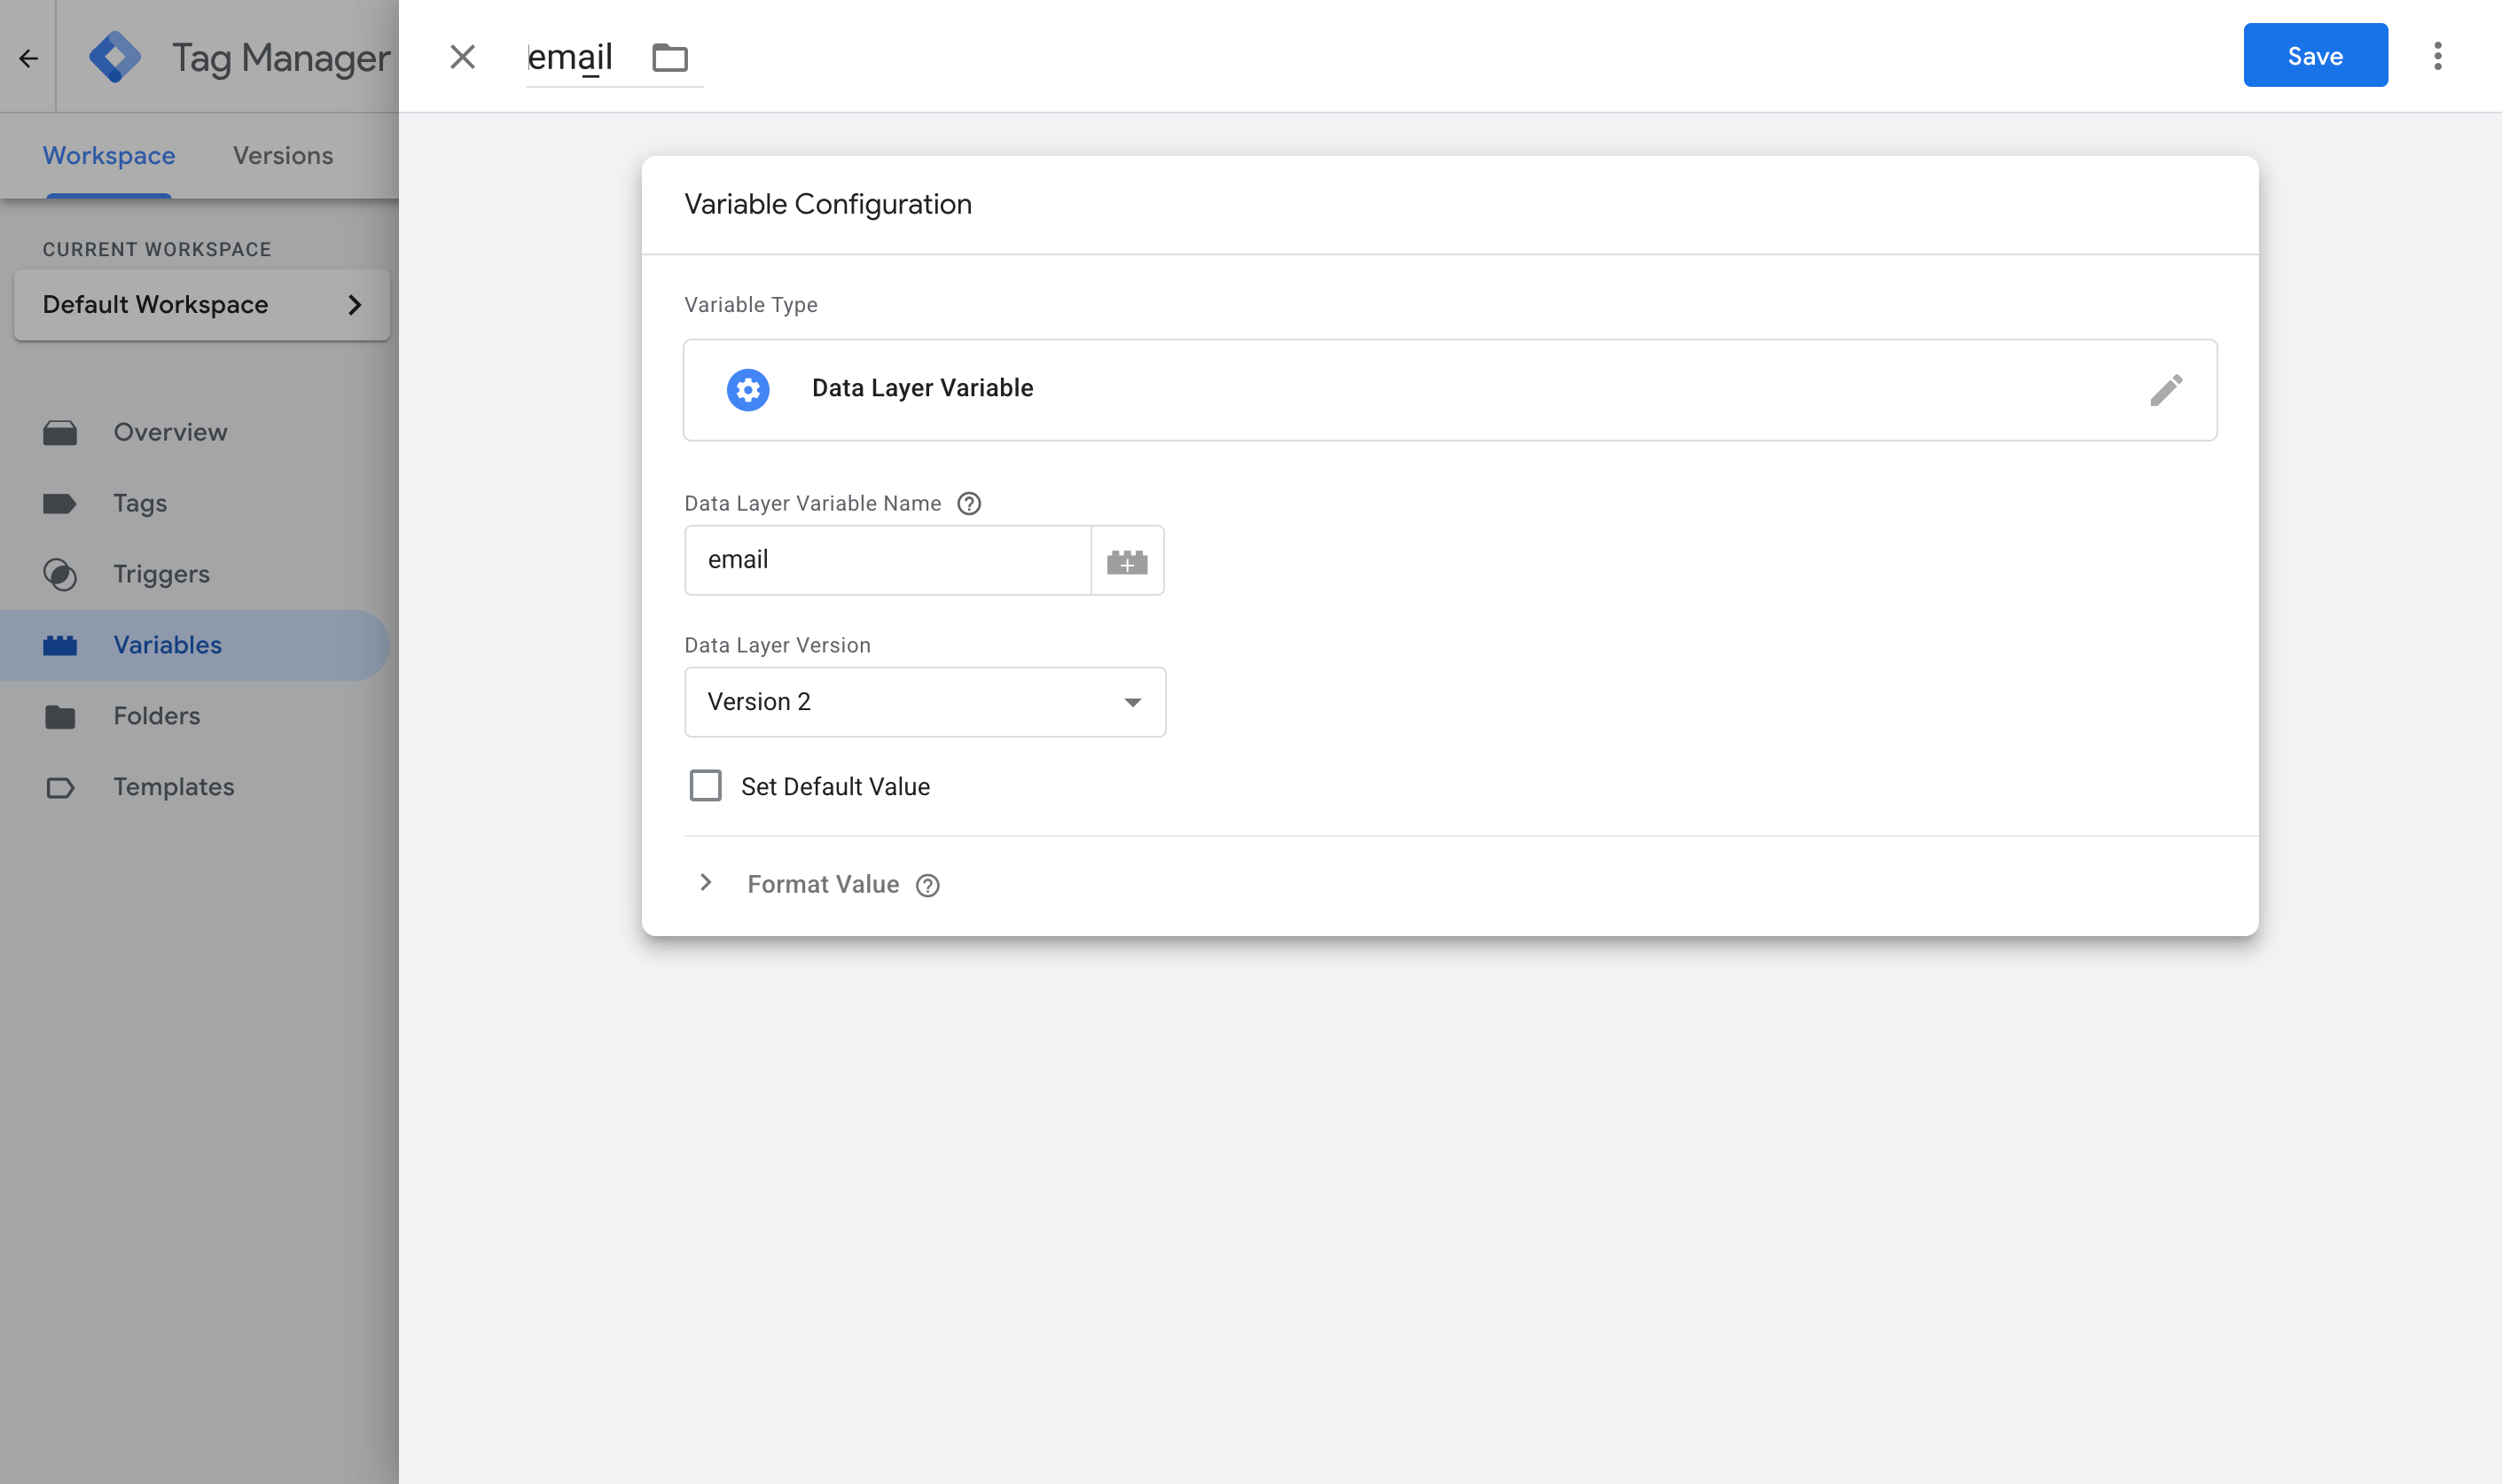
You'll need four of these in total.
Variable 1:
- Name: Email
- Variable Type: Data Layer Variable
- Data Layer Variable Name: email
Variable 2:
- Name: First Name
- Variable Type: Data Layer Variable
- Data Layer Variable Name: first_name
Variable 3:
- Name: Last Name
- Variable Type: Data Layer Variable
- Data Layer Variable Name: last_name
Variable 4:
- Name: Phone
- Variable Type: Data Layer Variable
- Data Layer Variable Name: phone
Step 3: Create a Custom Event trigger
Weirdly enough, getting the event and the lead data into the dataLayer doesn't do anything on its own. GTM needs to be told to watch for it and treat it as the signal to fire your conversion tag. That's where ‘Triggers’ come in.
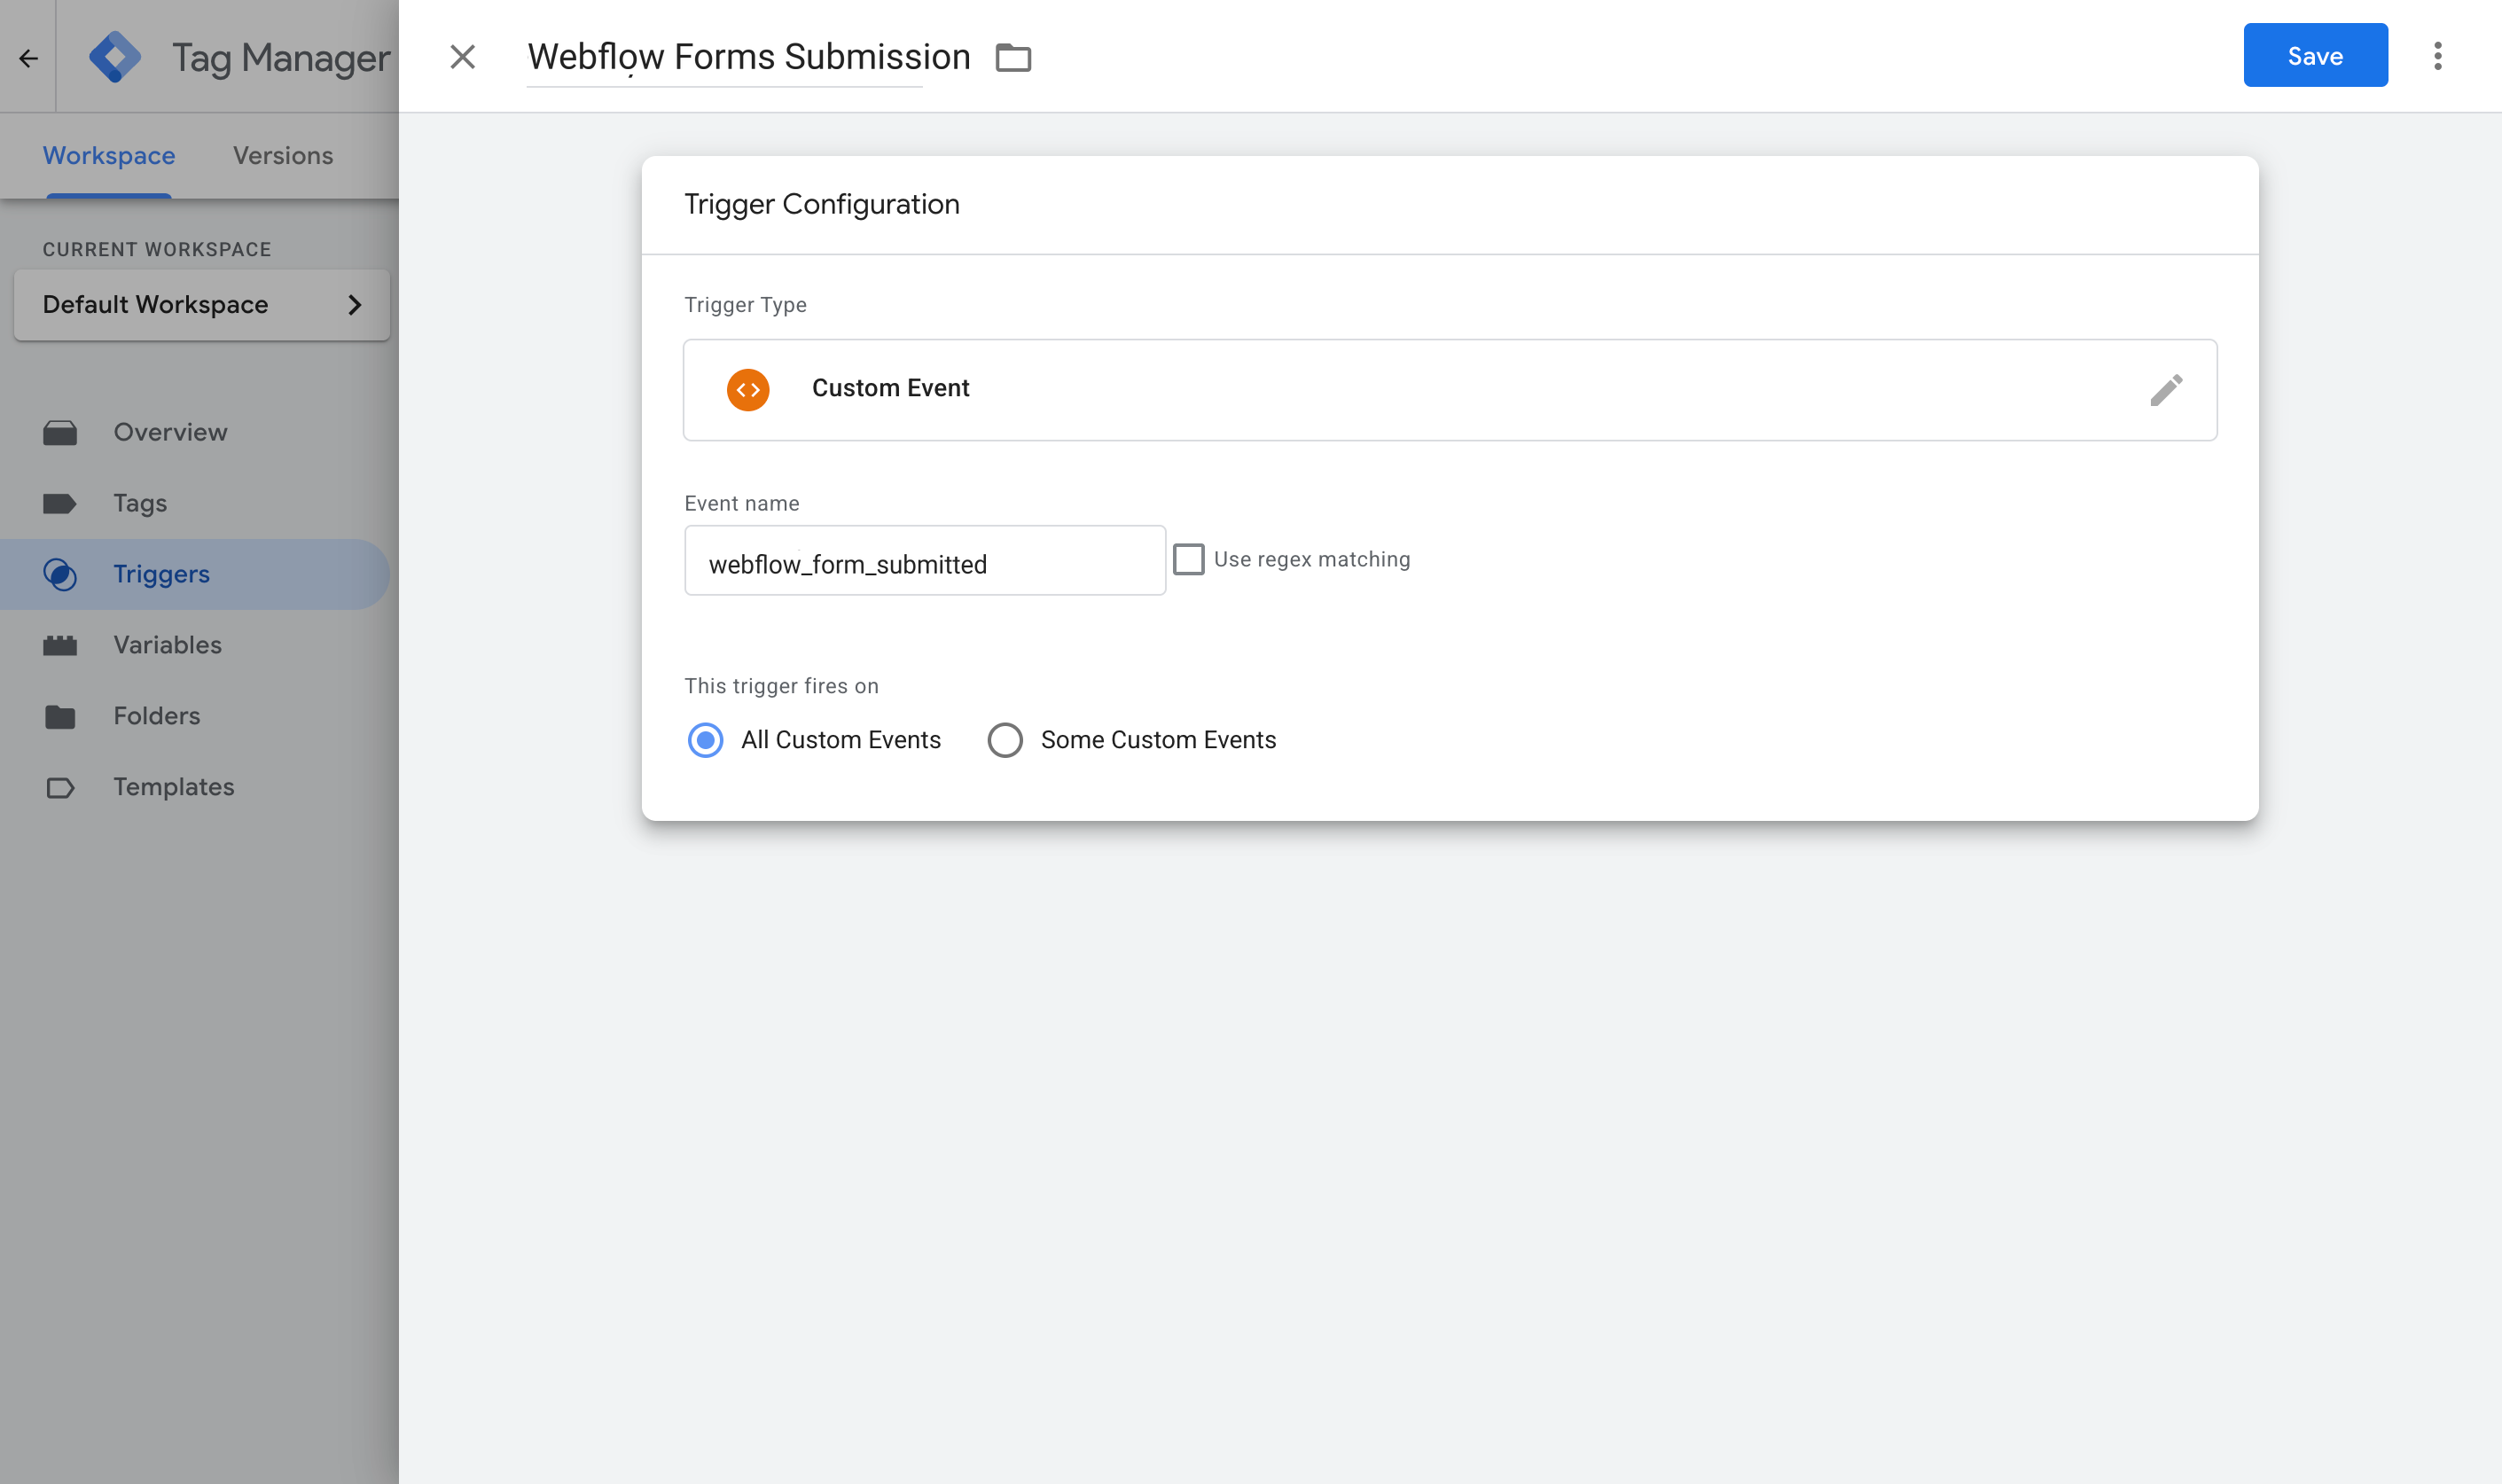
To create one, head to the Triggers section in GTM, click New, choose the Custom Event type, and set the event name to webflow_form_submitted(being careful to get this exactly right). This is the trigger your Google Ads tag will fire on in the next step.
Step 4: Turn on Enhanced Conversions in Google Ads
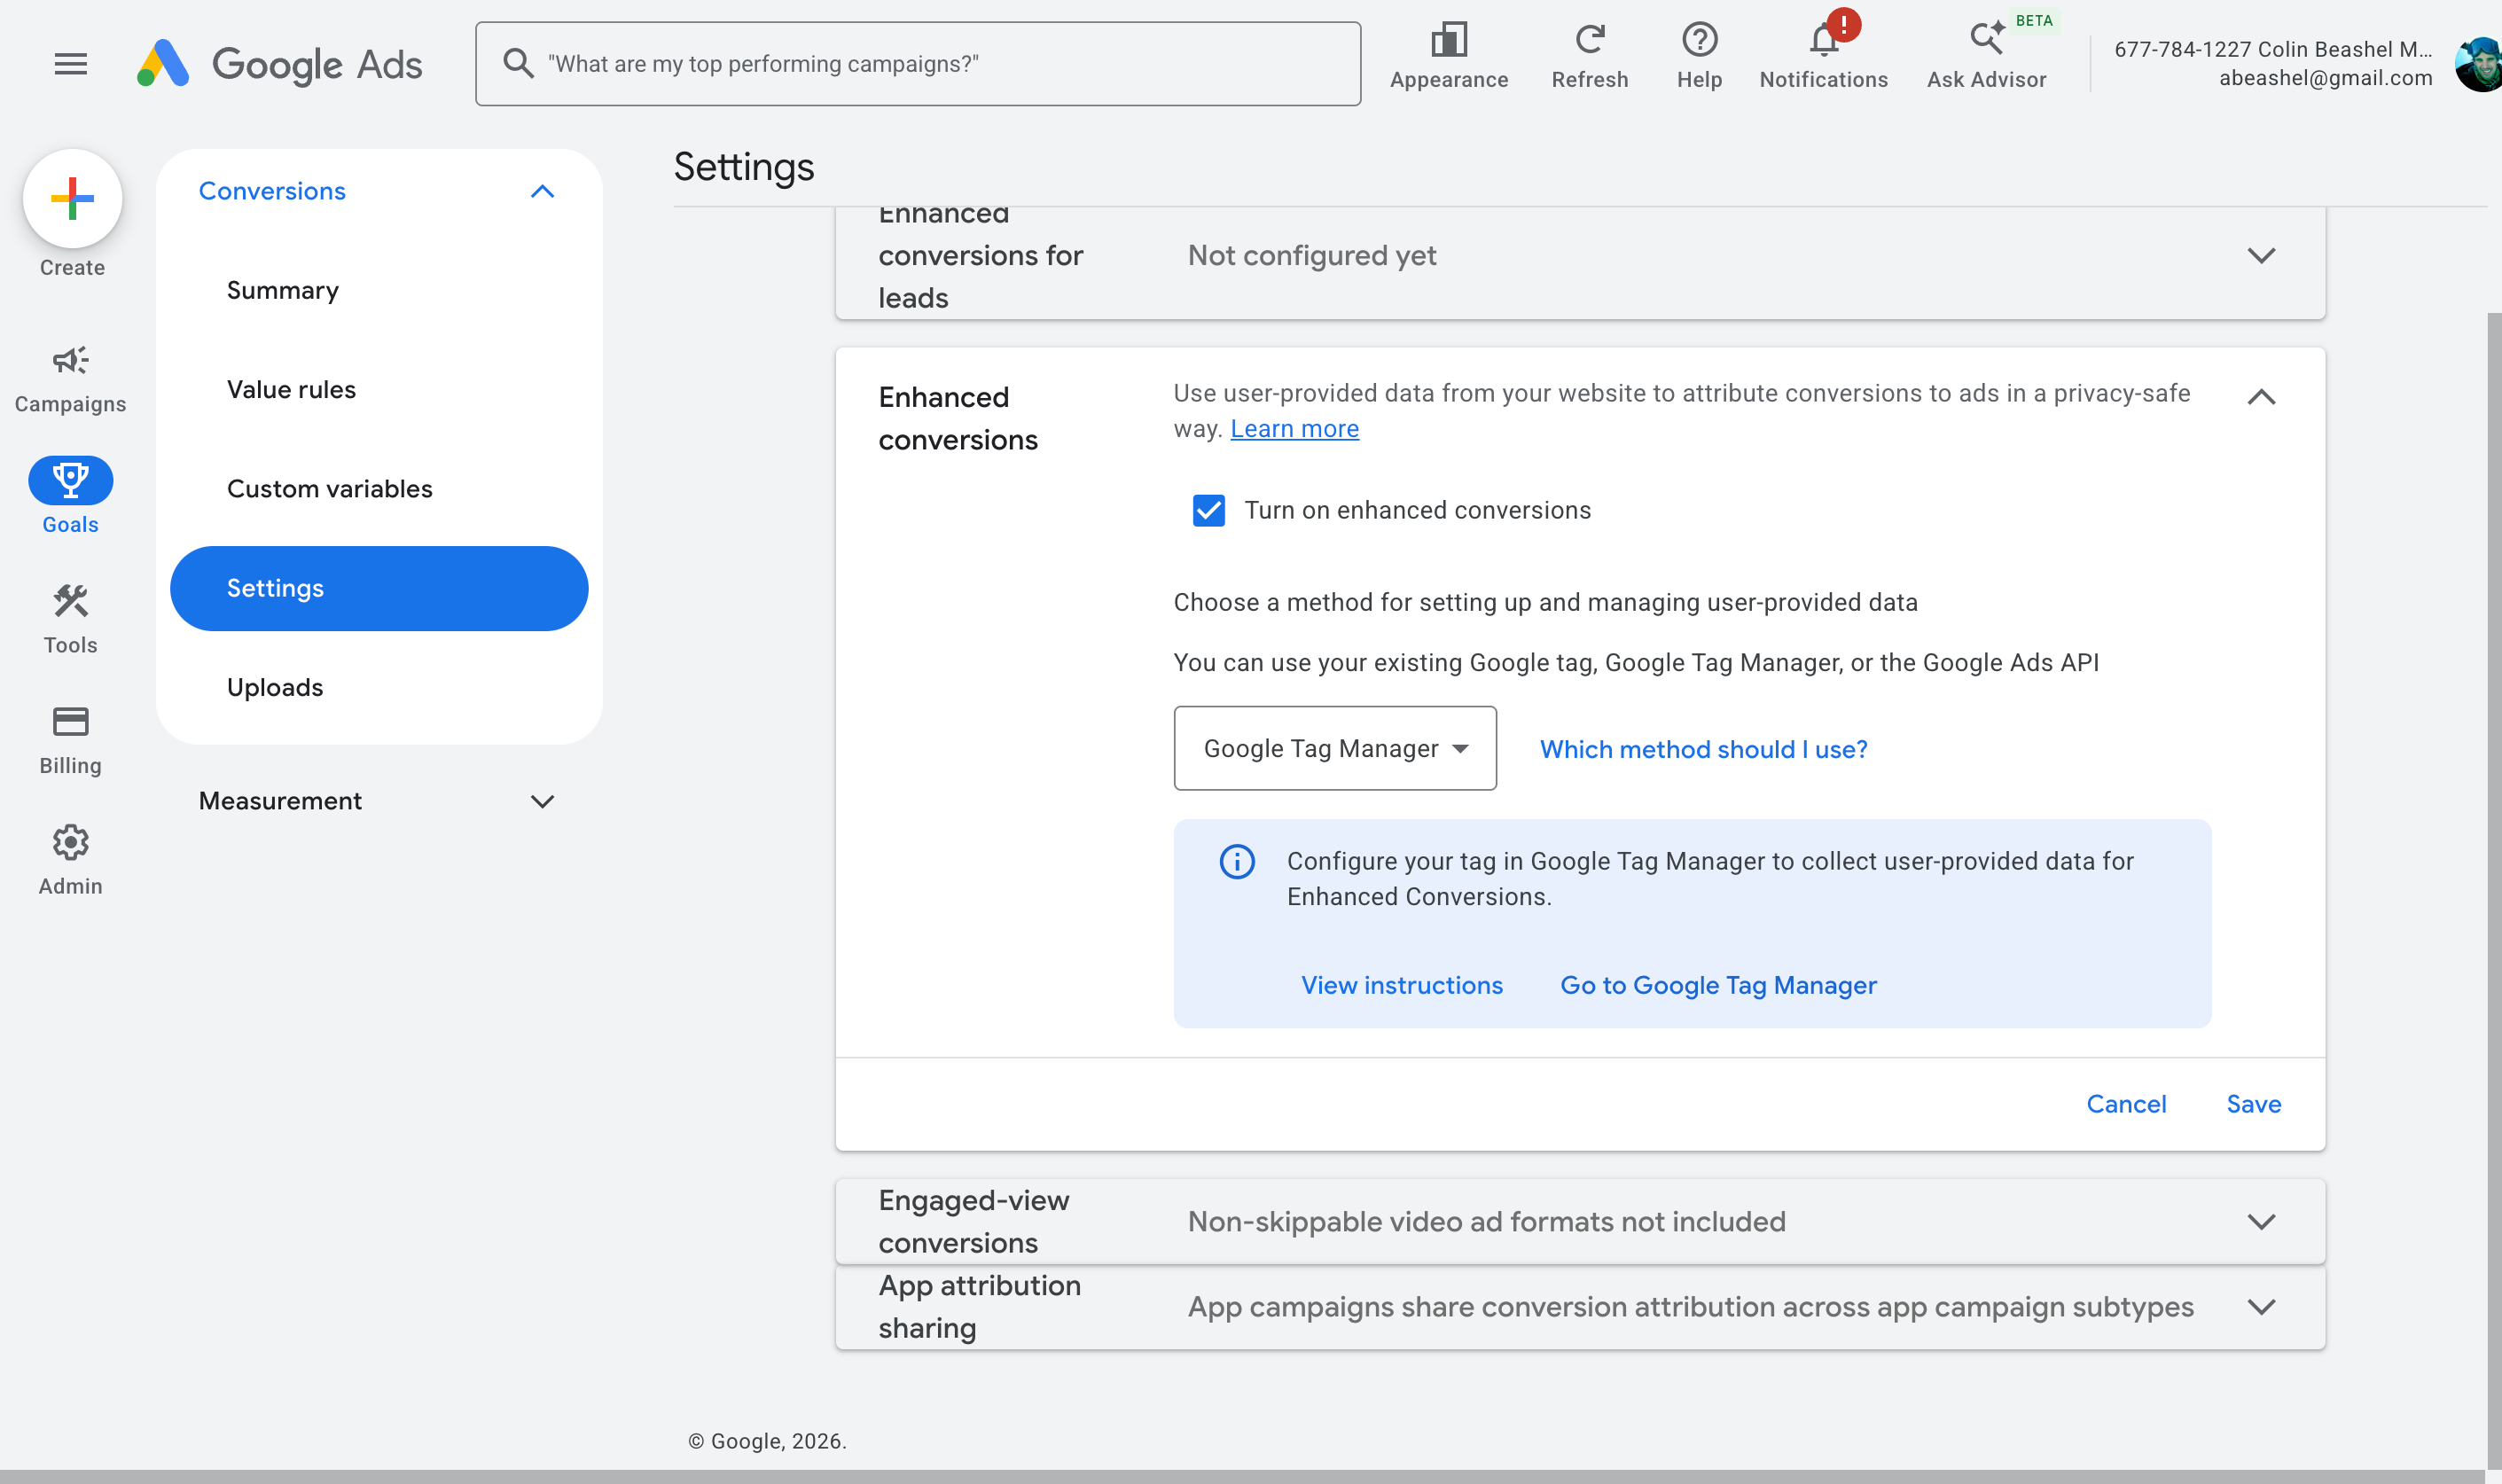
Head over to your Google Ads account, then go to Goals, then Conversions, then Settings, and switch on Enhanced Conversions.
When it asks how you'd like to implement it, choose Google Tag Manager. That grants Google Ads permission to receive and use the customer data you're about to send it.
Step 5: Create your Google Ads conversion tag and map the data
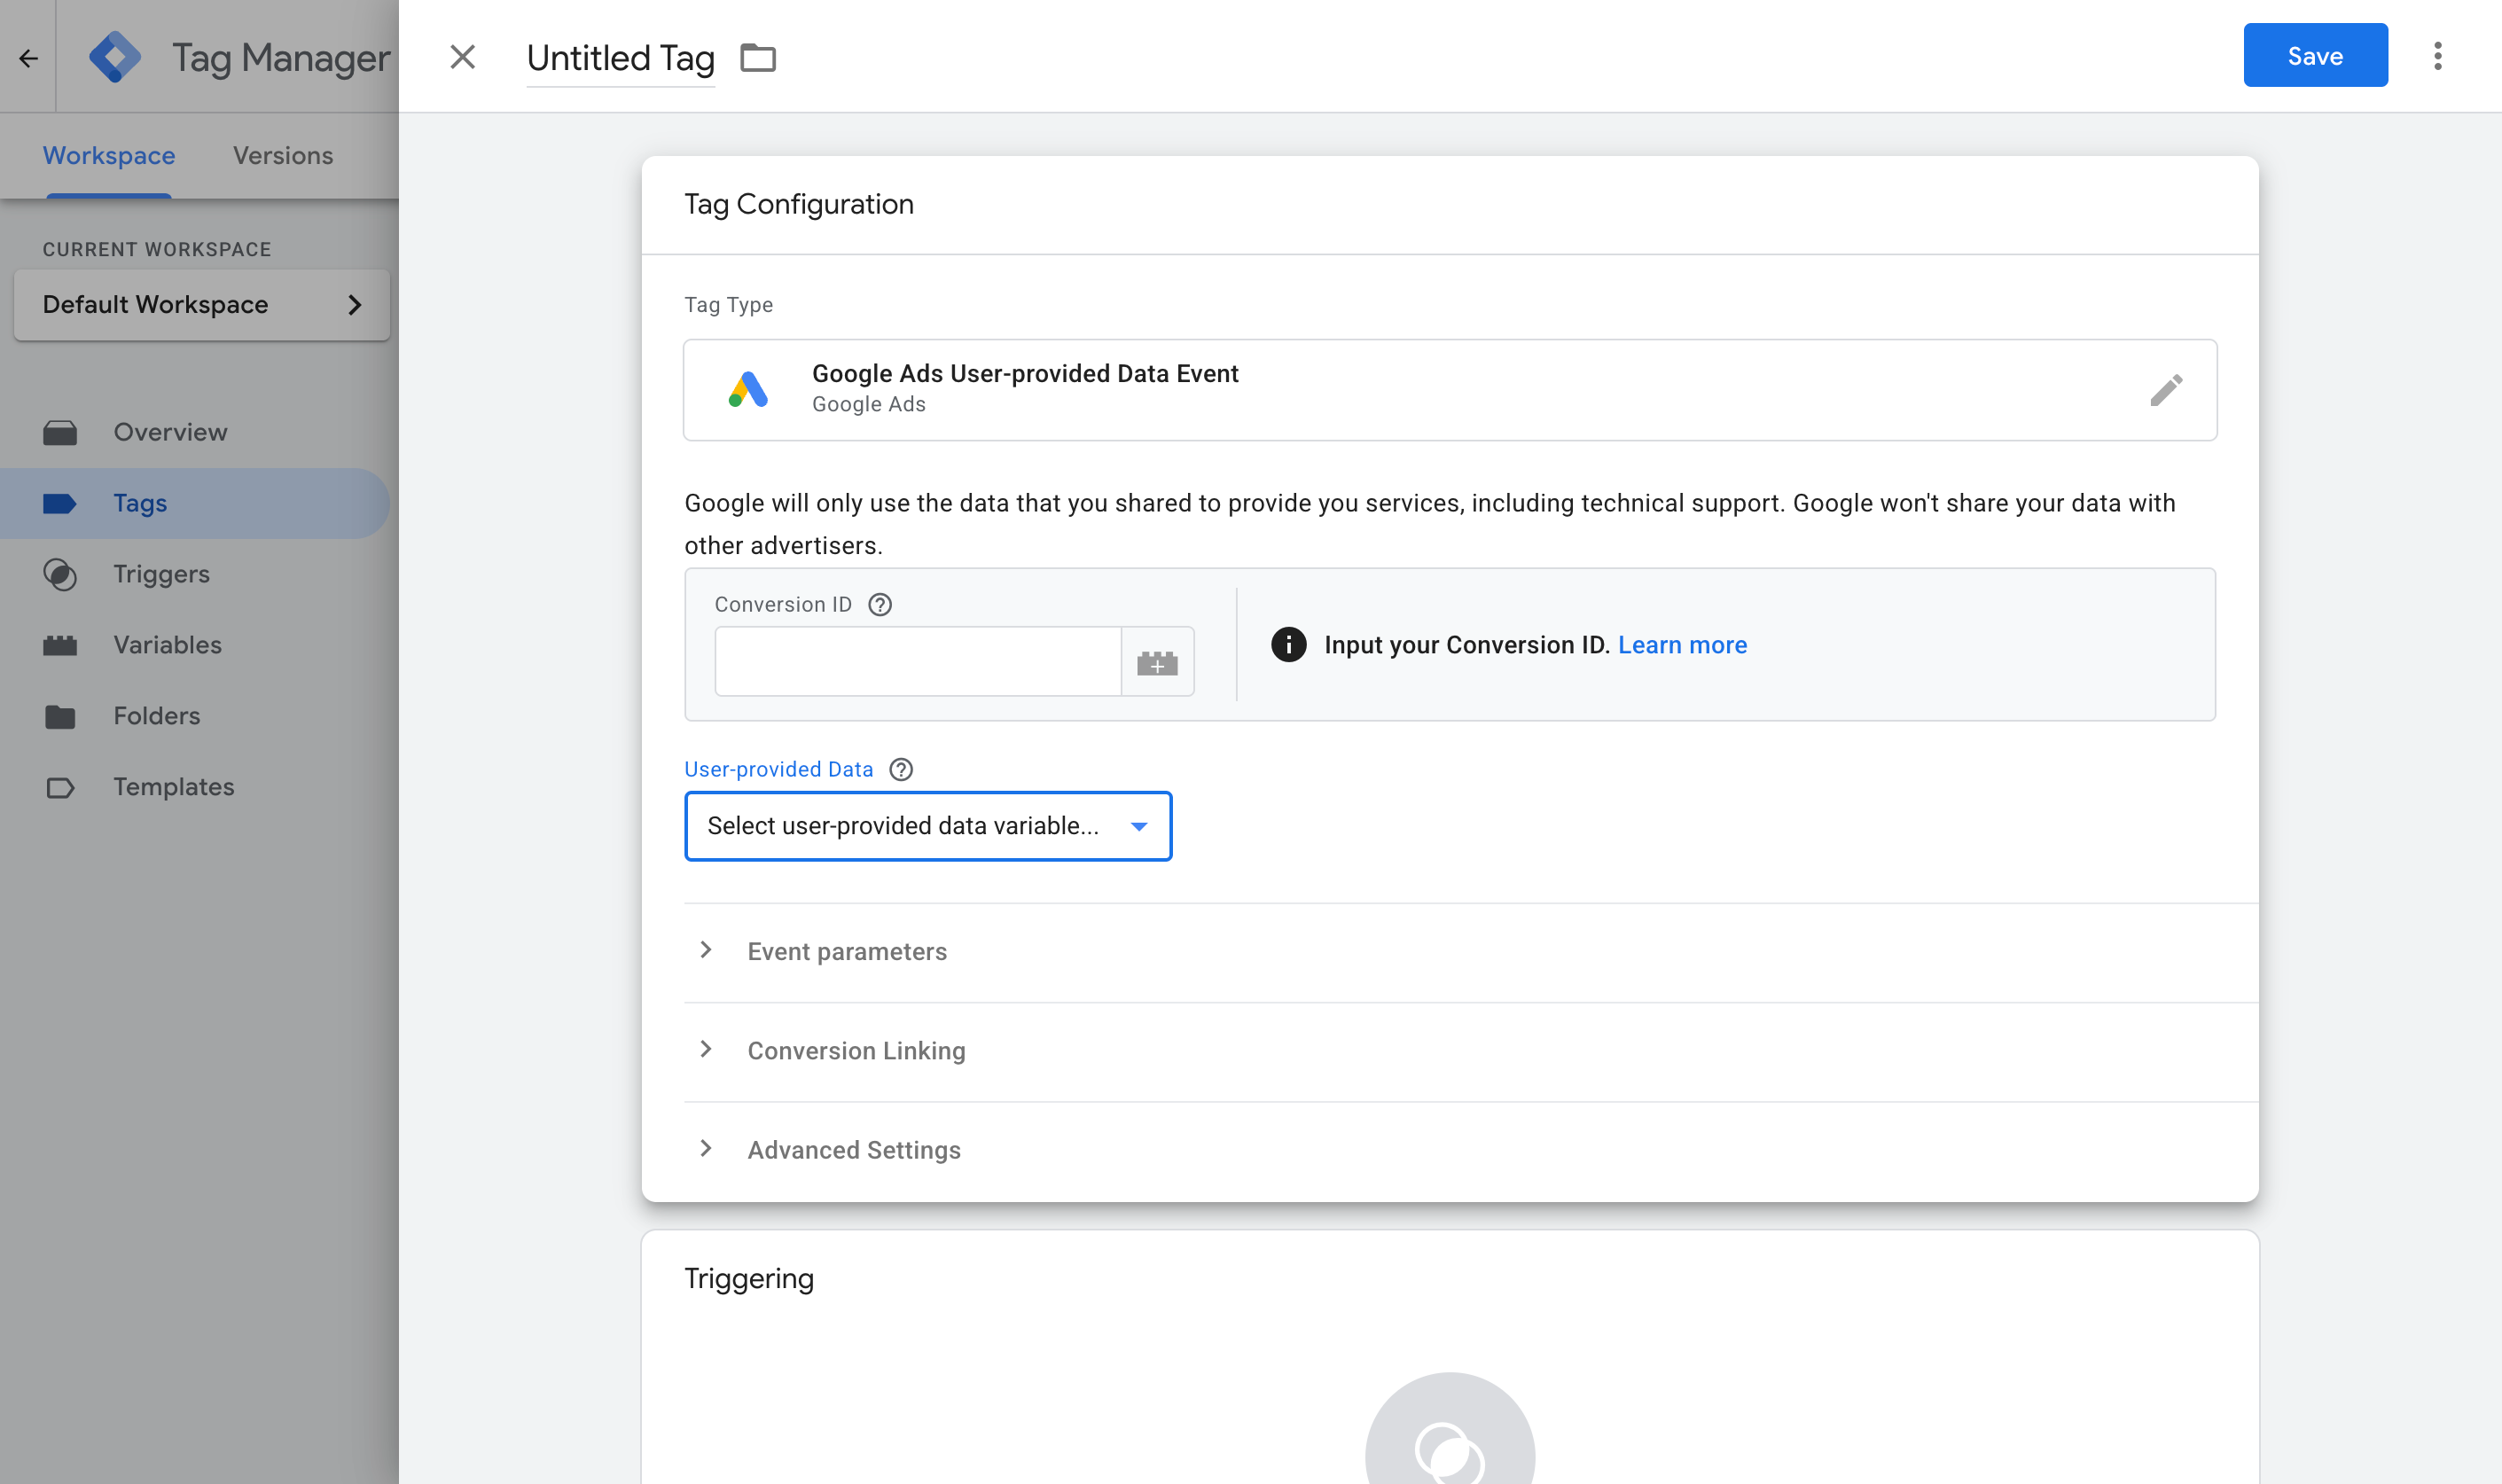
Back in GTM, open the Tags section, click New, choose Google Ads User Provided Data Event as the tag type, and map the variables you built earlier to the fields it asks for (Email, Phone, and so on).
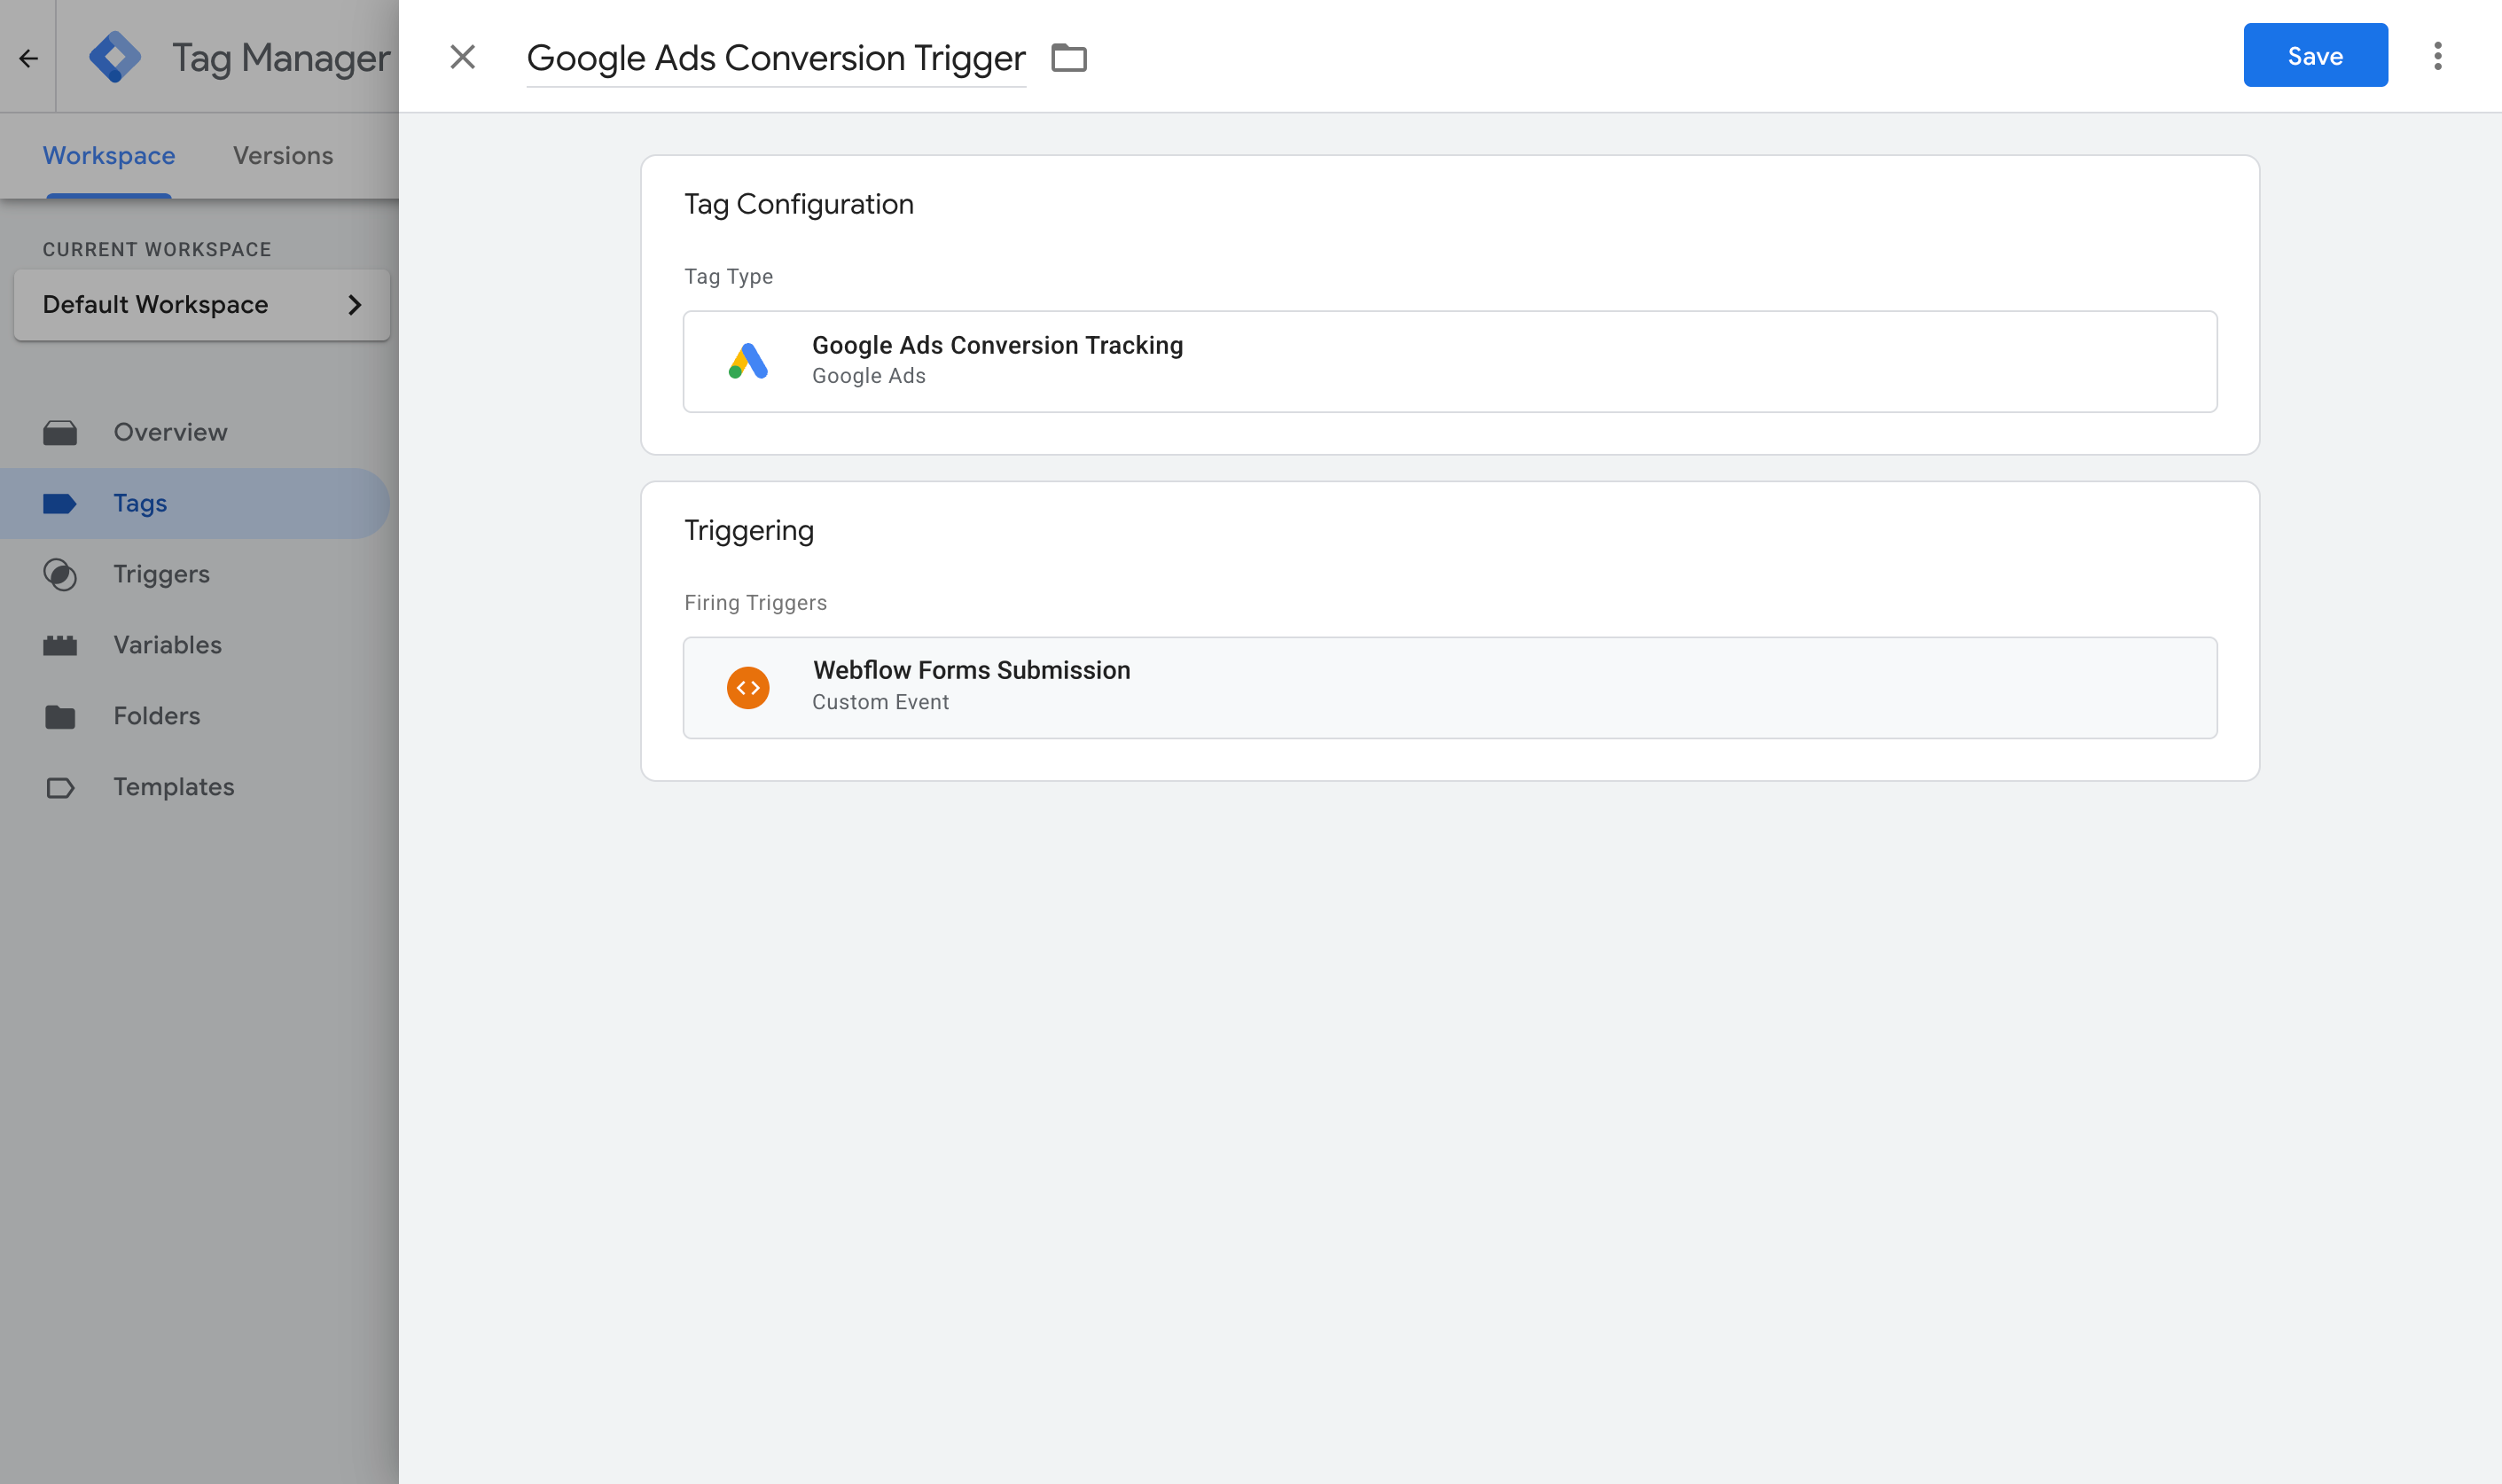
Then set it to fire on the Custom Event trigger you built in Step 3.
Once that's done, publish your GTM container. To check it's actually working, submit a test entry with GTM's Preview mode running and confirm the webflow_form_submitted event shows up with the email and name filled in.
Pros and cons
Pros:
- It's free, and it uses Google Tag Manager, which you may already have installed.
- It captures the email and name, which is the minimum Google Ads Enhanced Conversions needs to start matching conversions back to ad clicks.
- Like Method 1, it only counts genuine, completed submissions, since it's tied to Webflow's own confirmed success signal rather than a click or a page load.
Cons:
- Between the custom code, the GTM tag, the trigger, the variables, the Google Ads settings, and the conversion tag itself, there's a lot that can go wrong. And Google Tag Manager isn't great at telling you when something isn't right either, it will just not work and you'll have no idea (Reddit is littered with people asking why their conversion tracking isn't working)
- You own it and are responsible for maintaining it, so even if you get it up and running now it's easy for a Webflow update, a renamed field, etc to break your conversion tracking. Google Tag Manager doesn't send email alters when this happens either, so you'll only notice 2 weeks later when your Google Ads account says 0 conversions.
- Sensitive data is a real risk. The code snippets we gave you are doing their best to exclude it but it isn't foolproof (you might capture a different type of sensitive data that we haven't accounted for, or maybe it's captured in a field that has a different name. If you end up sending sensitive data into the dataLayer than any person or any code can read it.
- Forms set to redirect to a separate thank you page rather than showing the confirmation inline can lose the conversion entirely, since the
.w-form-doneelement never shows in the browser. - It still runs in the browser, so ad blockers and privacy-focused browsers can stop it from firing.
- Even set up perfectly, it misses the signals Google values most, since it only captures what's in the form, not click identifiers like the Google click ID (GCLID), the visitor's IP address, or their user agent. These are the signals Google relies on heavily for Enhanced Conversions so if you're not sending them then your conversion tracking will be sub-optimal (sending name and email is good, but plenty of people have the same name, and someone might enter their work email into your form but be logged in to Google with their personal email). On the contrary, things like the Google Click ID are specific to that person and to the ad they clicked.
That last point is what pushes a lot of people toward Method 3.
Method 3: Use Converly
Best for: Sending proper, server-side conversions to Google Ads, Meta Ads, LinkedIn Ads, GA4, and more, without wrestling with complicated Google Tag Manager configuration.
Converly is a dedicated conversion tracking tool. It makes it easy to send proper, server-side conversions to Google Ads, Meta Ads, LinkedIn Ads, and more, every time someone submits a Webflow form on your site.
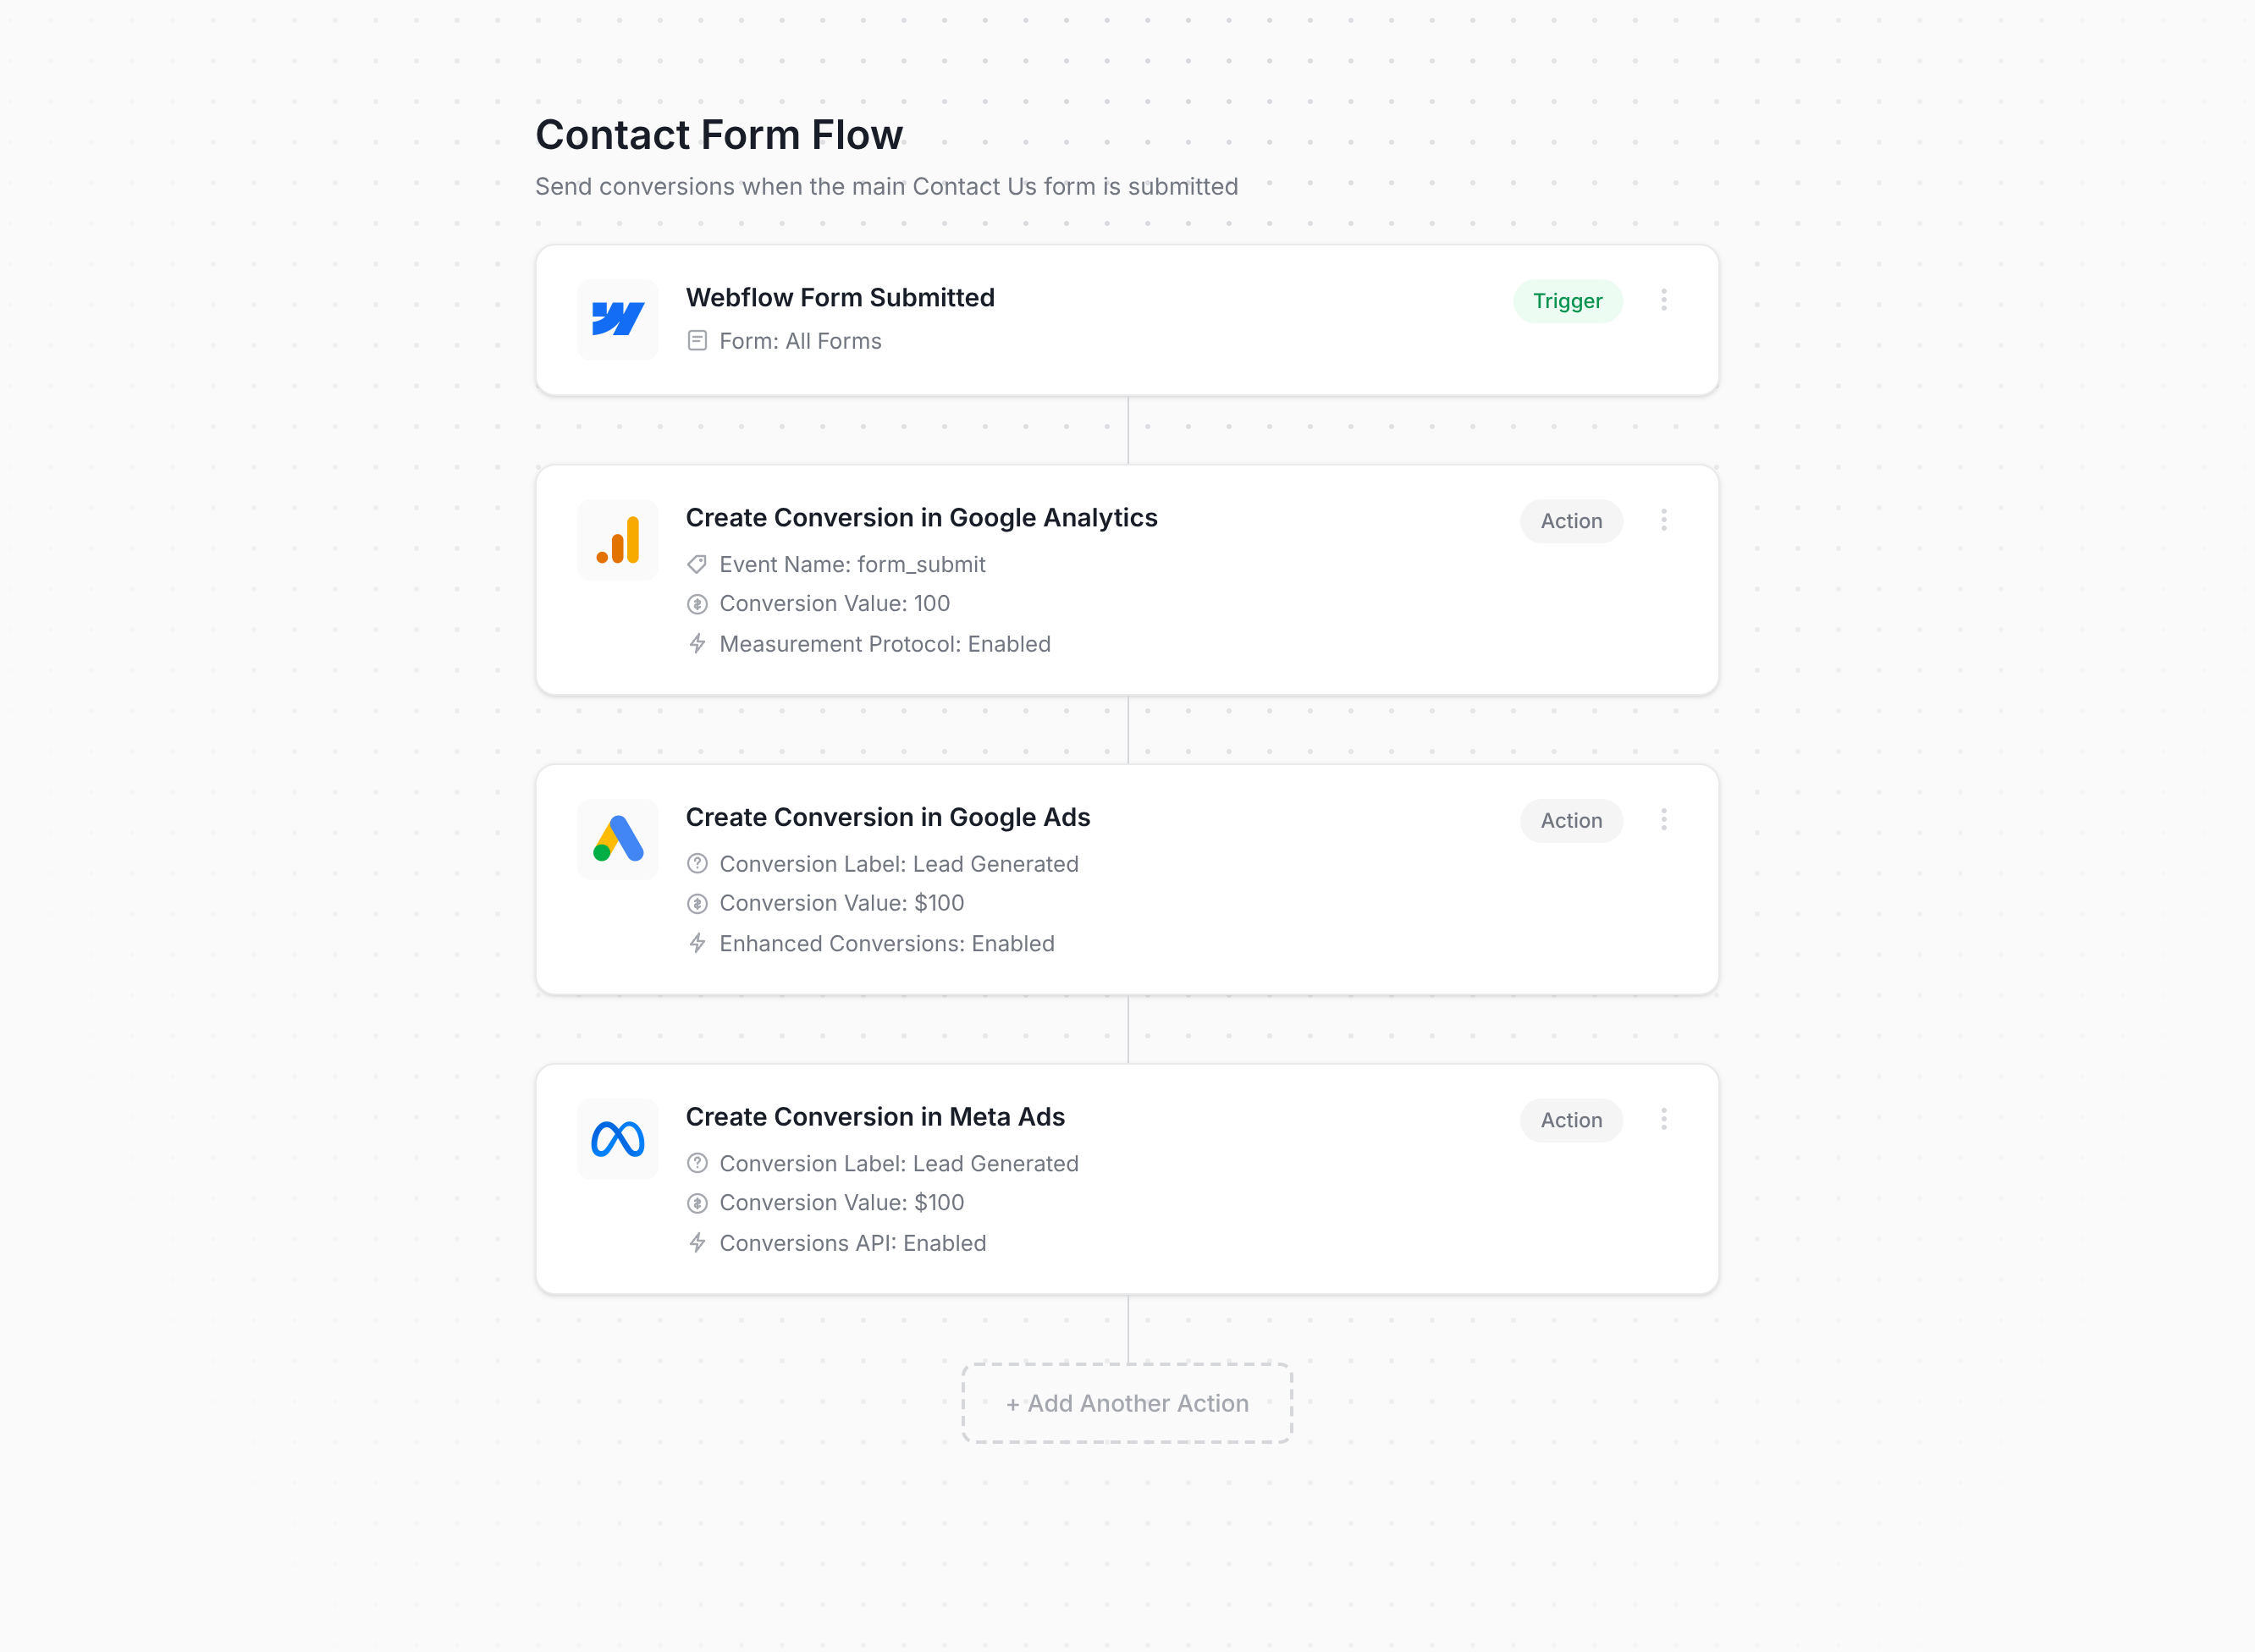
As the screenshot above shows, setting it up is super easy. You just pick a trigger (like a Webflow form being submitted on your site) and then add one or more actions (send a conversion to Google Ads, send a conversion to Meta Ads, send an event to GA4, and so on). That's the entire setup. No custom code, and no wrangling Google Tag Manager triggers and variables.
You then add a little bit of code to your Webflow site (or install our official Webflow App), and Converly takes care of the rest. It listens for successful Webflow form submissions, pulls out the name, email, and phone number, sends them to Converly's own servers, which then send them on to Google Ads, Meta Ads, etc. (this is the ‘server-side conversions' part that ensures ad blockers or privacy restrictions in Safari and iOS can't get in the way).
But here's the part that really matters if you're running paid ads. Alongside the name and email, Converly also captures the Google and Meta click IDs (GCLID and fbclid), Meta's browser cookies, the visitor's IP address, their user agent, and more, and sends all of it over to Google Ads, Meta Ads, etc. with every conversion. These are the signals Google and Meta really need to do proper conversion tracking, and having all of them is what takes your match quality from weak to strong (on Meta, that can take your Event Match Quality score from around 3 up to a 9 or 10).
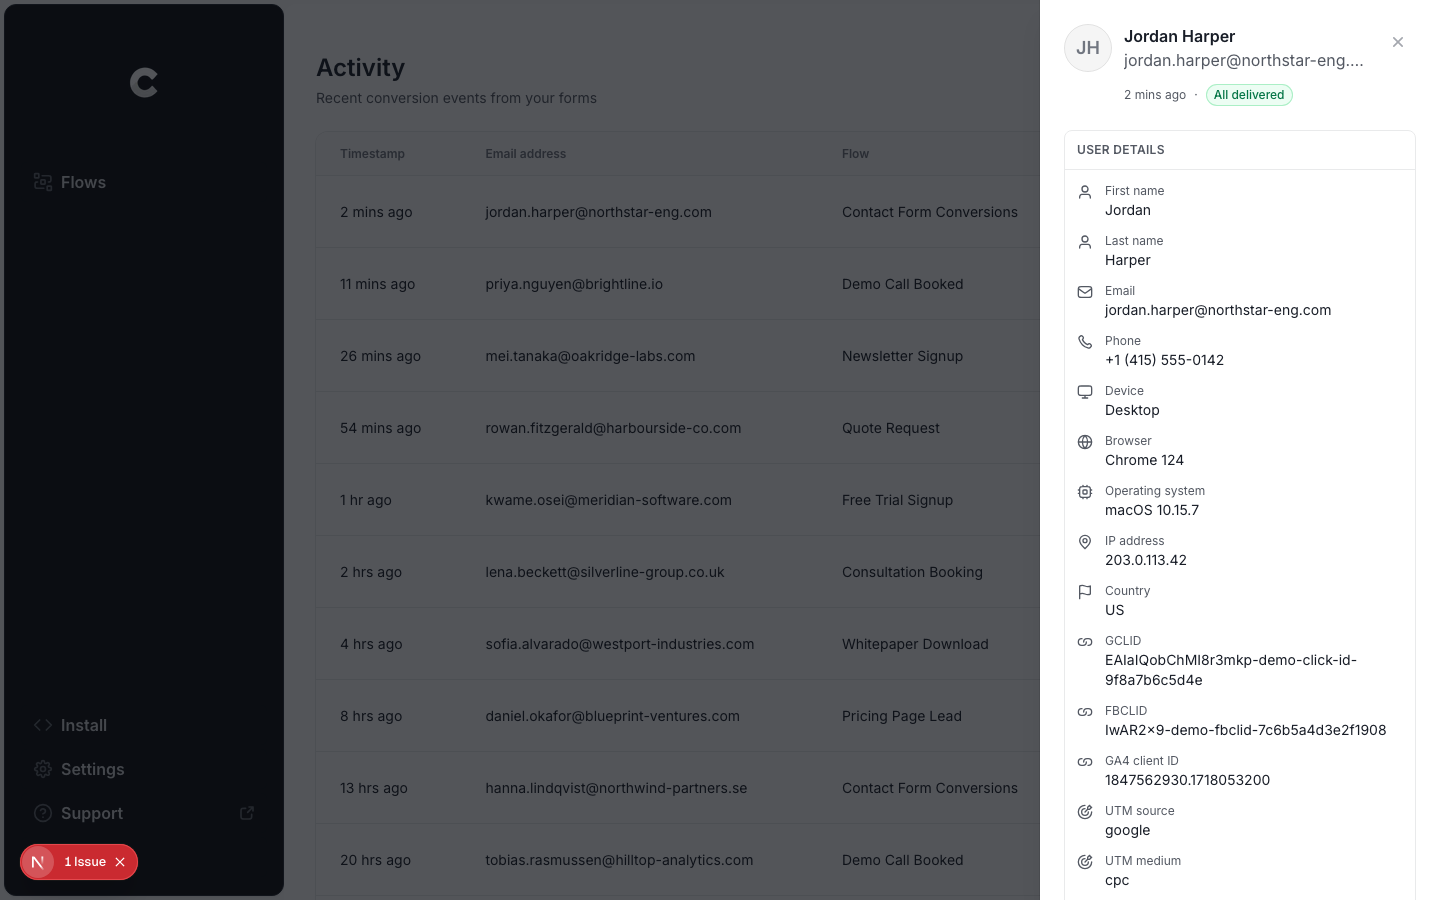
And as you can see in the screenshot above, Converly also gives you a full Conversion Log where you can see every lead that came through from your Webflow site, exactly what data was captured, what was sent on to your ad platforms, and whether it was received successfully.
Pros and cons
Pros:
- It's fast and easy to set up. Simply choose a trigger (a Webflow form submission) and choose the actions you want to happen (like sending a conversion to Google Ads, Meta Ads, etc). No code, no dataLayer wrangling, just simple conversion tracking that works.
- Handles all the Webflow form quirks we mentioned earlier, like capturing the lead's name, email, phone, etc before Webflow deletes them from the fields.
- Captures click IDs, cookie identifiers, IP address, and user agent and sends it to the ad platform, which meaningfully improves the chance of the conversion being matched back to the original ad click.
- Delivers the conversion server-side, so ad blockers and privacy browsers can't get in the way.
- Lets you apply conditional logic, so different forms can trigger different conversions (so for example, someone submitting your Quote Request form could be counted as a ‘Primary Conversion’ in Google Ads, and someone submitting your newsletter signup form could be counted as a ‘Secondary Conversion’).
- You can connect your Google Ads, Meta Ads, Google Analytics, etc in just a few clicks, and then just choose which conversion to fire (it will show all the available conversions you have set up in your account). You don't need to go hunting around for account IDs or conversion IDs in the ad platforms.
- The Conversion Log gives you full visibility into every lead that came through, what data was captured, what was sent to each ad platform, and whether each ad platform actually received it. You can even set up email notifications to alert you if anything goes wrong, so your conversion tracking will never break without you knowing.
- You get a real support team behind it, which is more than you'll get from Google if something in your GTM setup goes wrong.
Cons:
- It costs money once the trial period ends, starting at $19 a month. Most customers recoup that quickly though, both from the setup time it saves and from the lower cost per lead that comes with sending ad platforms proper conversion data.
What not to do
We've covered the three best ways to track Webflow form conversions and when each one makes sense, but it's just as useful to know which approaches to steer clear of, since some of the most common DIY methods will actually hurt your results more than it will help them. Here are the ones to avoid.
Tracking thank you page visits
This is the most common DIY approach we see, and the one we'd steer you away from the most. The idea is to redirect people to a dedicated thank you page after they submit, then count visits to that page as conversions. It sounds pretty straightforward (and it is), but there are a lot of ways it goes wrong in reality.
- It fires for people who never submitted anything. A thank you page is just a URL, and a URL can be reached without a person ever completing your form. People could stumble onto it through browser autocomplete, get sent the link by a colleague, or find it indexed in Google. Every one of those gets logged as a conversion, even though no form was ever submitted.
- It doesn't send the data the ad platforms actually need. When you track a page visit, you have no idea who actually submitted the form, so you can't pass along the name, email, phone, GCLID, fbclid, and so on that Google Ads Enhanced Conversions or Meta's Conversions API need. That means even though you're technically sending conversions to these platforms, they're essentially useless, because they don't carry the data needed to match the conversion back to the original ad click.
The underlying problem is that a thank you page visit is just a signal that a form submission *may *have happened. It's far better to just track the form submission itself. All three methods above fire on Webflow's actual confirmed submission instead, so they stay tied to what genuinely happened.
Relying on GTM's built-in Form Submission trigger
As we mentioned earlier, the built-in form submission trigger in Google Tag Manager doesn't work very well with Webflow forms.
Webflow forms submit over AJAX but fire the browser-native form whenever clicks the submit button (before Webflow's own servers have accepted or rejected the form submission). If the AJAX call then fails (because a required field is missing, an email address has been entered wrong, or Webflow's own spam protection rejects the submission), then GTM's built-in trigger has already fired and counted it as a conversion regardless. And then when the lead fixes the issues and submits the form again, you end up counting two form submissions for one lead.
So between the double submissions of a real user and the fact a conversion would fire before Webflow's spam protection blocks the form submission, it's likely doing using GTM's built-in form submission trigger would significantly overcount your actual conversions. You need to wait for Webflow's own success signal instead, the moment its .w-form-done box actually appears, exactly like Converly does under the hood.
Using Google Analytics's automatic form tracking (Enhanced Measurement)
GA4 has a built-in Enhanced Measurement feature that claims to track form submissions automatically, with no setup required.
This suffers from the same issue mentioned above though. Webflow forms submit over AJAX. The browser fires its native submit event as soon as someone clicks the button, but at that point Webflow's servers haven't accepted or rejected anything. That happens a moment later, in the background. And if that background request fails (maybe because Webflow's spam protection blocks it or the site has hit its monthly form submission limit), the visitor sees the error message, but a conversion was already counted.
So if you want actual, confirmed form submissions recorded as conversions in GA4, use Method 1 above or use Converly.
Firing the conversion on the submit button click
Some conversion tracking setups we've seen fire the conversion when someone clicks the Submit button, usually with a click trigger in GTM pointed at the button itself.
The problem is that a click isn't a successful submission. The visitor might have left a required field blank, mistyped their email, tripped Webflow's spam protection, or hit any number of other issues that caused the form submission to not go through. But if you're tracking submit button clicks as conversions, then every one of those is going to be counted. And when they fix the error and click submit again, that's a second conversion logged for the same lead.
This is particularly damaging if you're sending conversions to ad platforms like Google Ads or Meta Ads. If you give them inflated conversion numbers, then you're training their smart bidding algorithms to chase people who were never actually leads, which results in fewer real leads and a higher cost per lead, since the platforms can't optimize your ad delivery against accurate data.
So which method should I use?
Here's how the three ways to track Webflow Forms conversions compare.
| Method | Best for | Sends conversions to | Data sent |
|---|---|---|---|
| Method 1. GA4 event built in Google Tag Manager | Sending submissions to Google Analytics, if you're happy building the tag and trigger yourself | Google Analytics 4 | The submission event only |
| Method 2. Enhanced Conversions through Google Tag Manager | Sending to Google Ads, if fiddly configuration doesn't put you off | Google Ads | Name, email and phone |
| Method 3. Converly | Sending to any ad platform, with the least setup work | Google Ads, Meta Ads, LinkedIn Ads, ChatGPT Ads, GA4 and more | Name, email and phone, plus the GCLID, the Meta click ID, IP address and user agent |
Wrap up
Conversion tracking is worth getting right, especially when real money is being spent on Google Ads, Meta Ads, and other platforms.
Google states that advertisers who set up proper server-side conversion tracking get an average 19% increase in conversions. Meta reports an average 23% increase in conversions on their platform.
Fortunately for you, Converly makes it really easy to do. You simply pick a trigger (a Webflow form submission, in this case) and choose where the conversions should go. There's no complex configuration and most of our customers get it set up in under 10 minutes. It's free to get started, so start your 14-day free trial today!
About the author

Aaron is the founder of Converly. With over 15 years of experience in digital marketing and SaaS, he's passionate about helping businesses track and optimise their ad conversions.