


Ninja Forms conversion tracking: 3 ways to do it
Learn three different ways to set up conversion tracking for Ninja Forms, and how to work out which one is right for you.
Are you spending money on ads, or time on SEO, to bring people to your site, but have no clear picture of which of those channels actually turn into leads? You are not the only one.
Without that visibility, it is easy to keep pouring budget into channels that are not delivering, simply because you cannot tell them apart from the ones that are.
The fix is conversion tracking set up properly, so that every time someone submits one of your Ninja Forms forms, a conversion gets recorded.
The catch is that there is more than one way to do this, and which one suits you depends on what you are trying to achieve. If you just want submissions to show up in Google Analytics, there is a quick path for that. But if you want those same conversions reaching Google Ads, Meta Ads, and similar platforms, you need something more robust, and that is where most DIY attempts start to fall apart.
This article walks through three different ways to set up conversion tracking for Ninja Forms and helps you work out which one fits your situation. We build form conversion tracking for a living, and Ninja Forms has a genuine quirk of its own (it wipes its own form fields clean before your tracking code gets a chance to read them), so we will flag the gotchas as we go so you know what to watch for.
Method 1: Use Ninja Forms' own Google Analytics 4 action
Good for: Sending form submission events to Google Analytics 4.
If all you need is for submissions to show up as events in GA4, this is the simplest path.
Since version 3.10.0, Ninja Forms ships its own Google Analytics 4 form action built directly into the plugin. You add it to a form the same way you would add an email notification, and it sends an event to GA4 with whatever event name you configure.
Step 1: Add the Google Analytics 4 action to your form
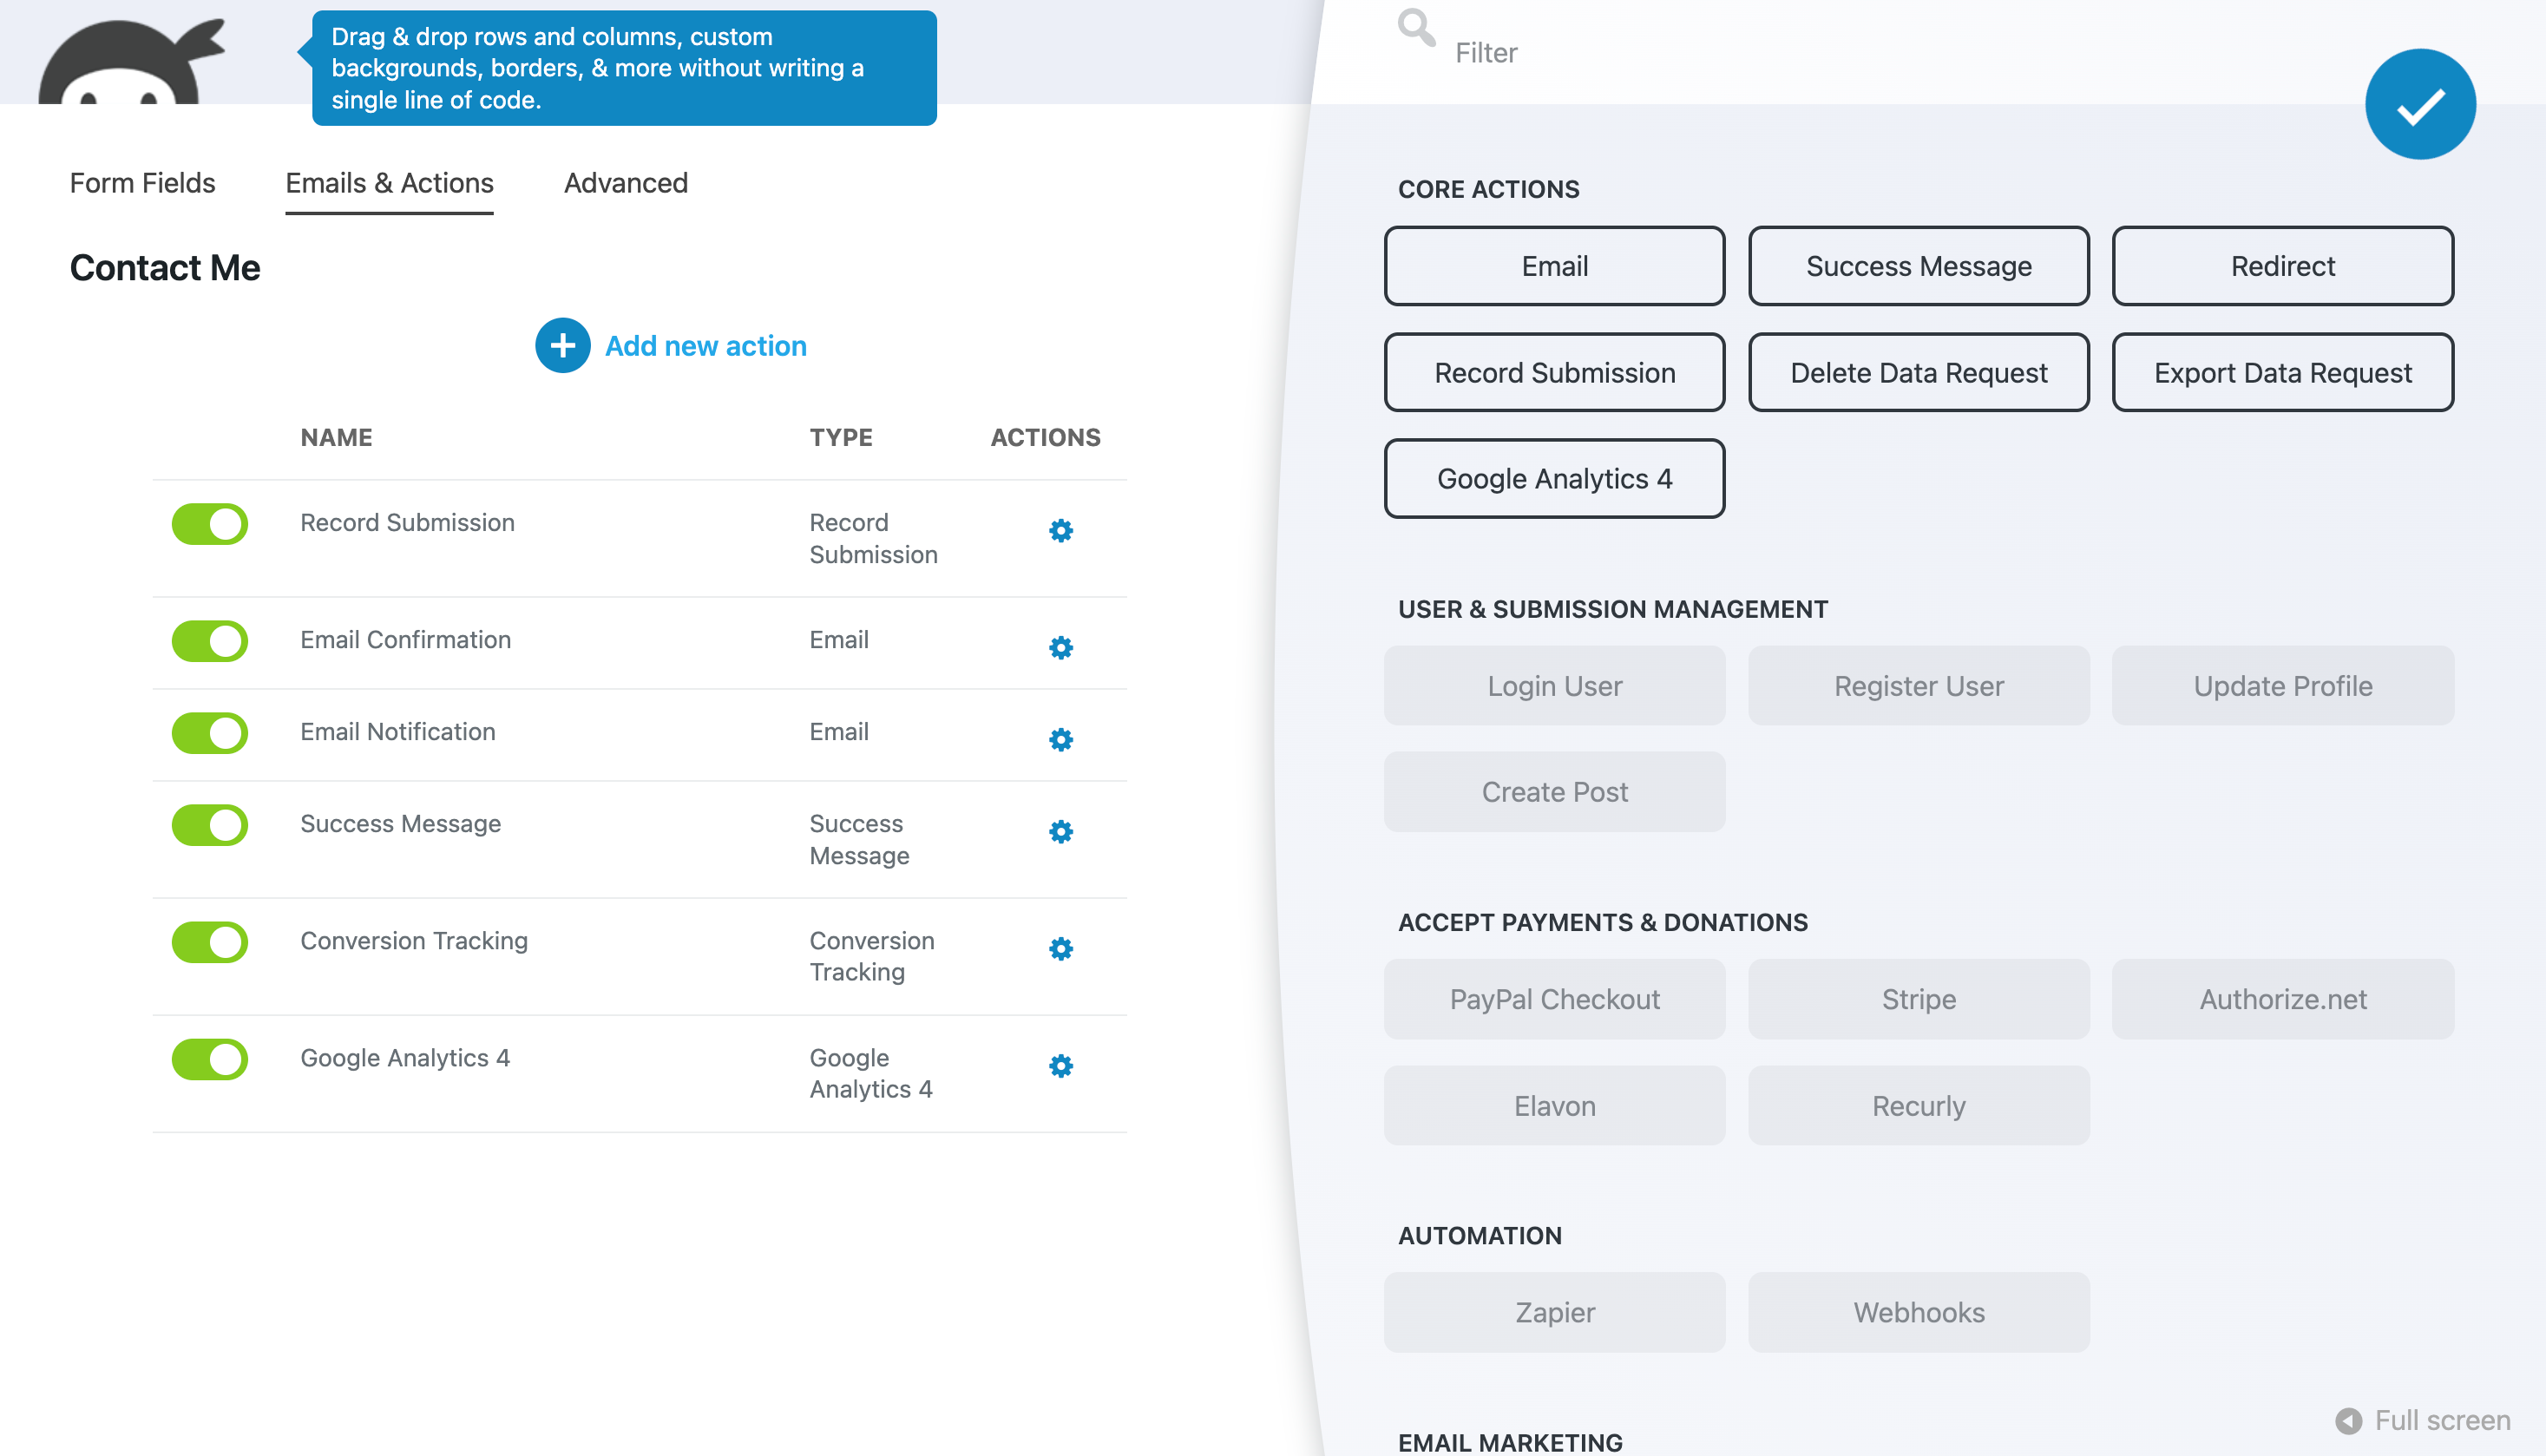
Open the form in the Ninja Forms builder, go to the Emails & Actions tab, click Add New Action, and choose Google Analytics 4 from the list of actions.
Step 2: Choose GA4 and set your event name
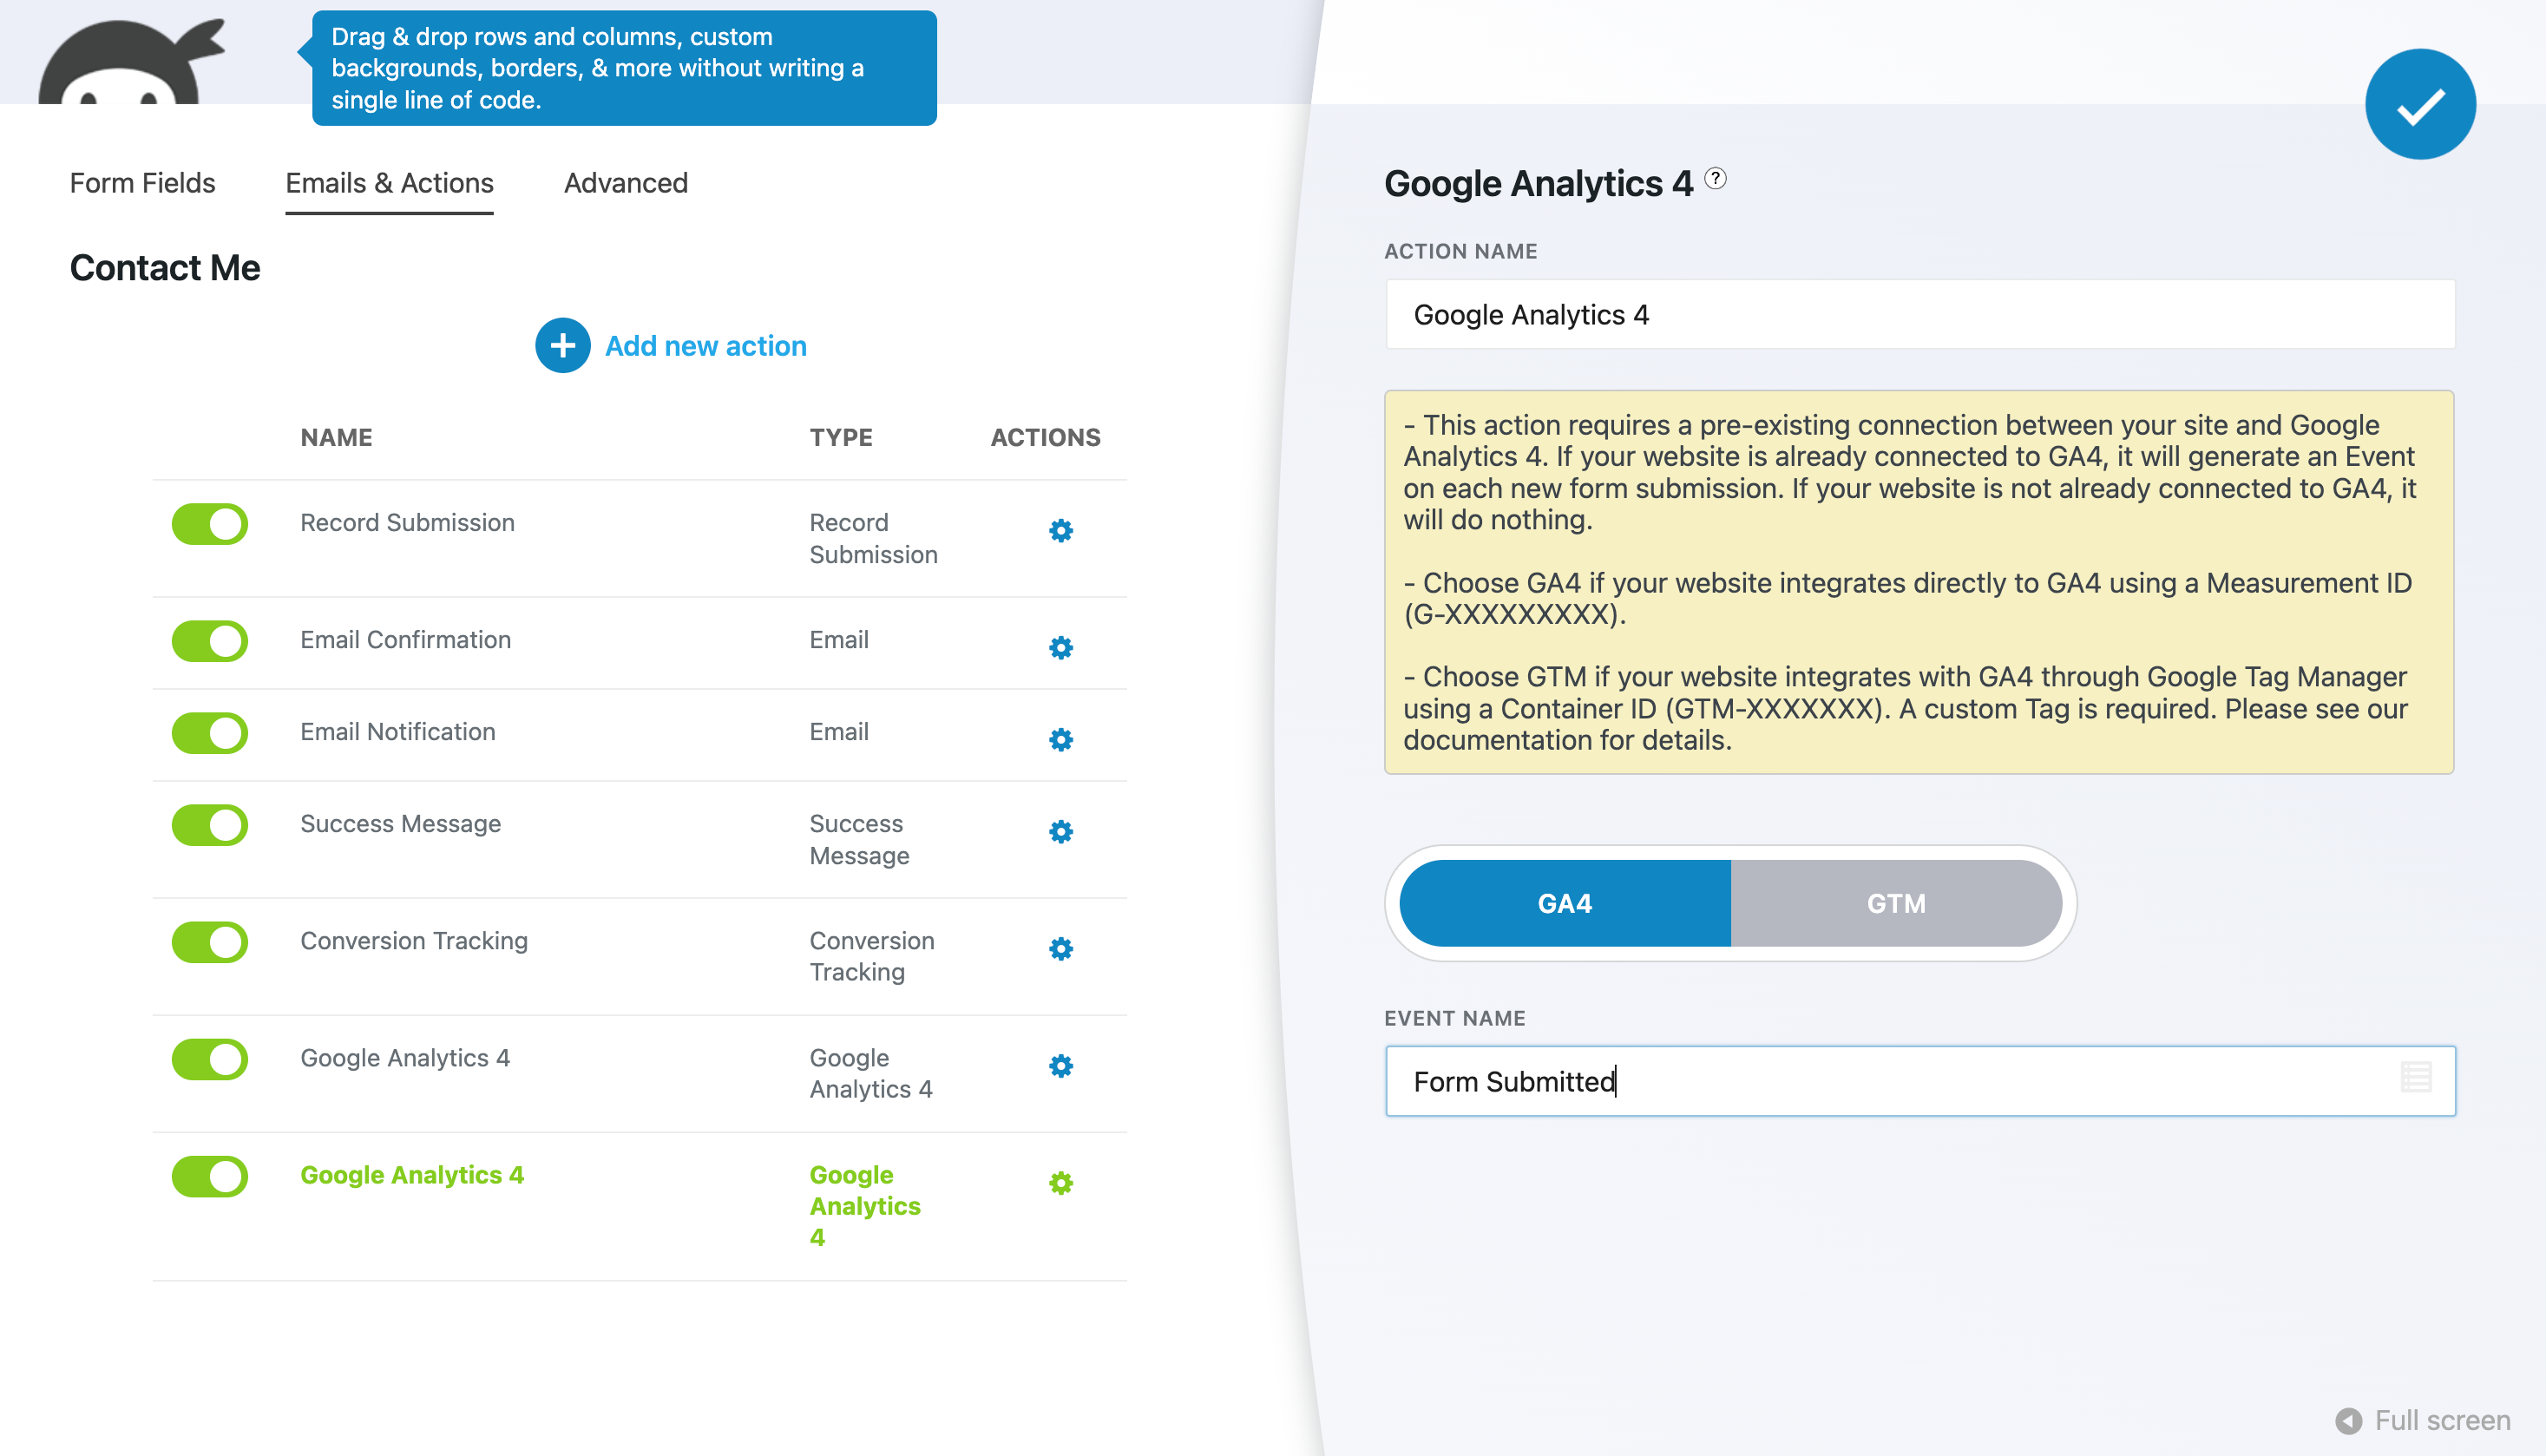
In the configuration screen that appears, select GA4 from the toggle, and then give the event a name (like 'Form Submitted)
Step 3: Test it, then mark it as a Key Event in GA4
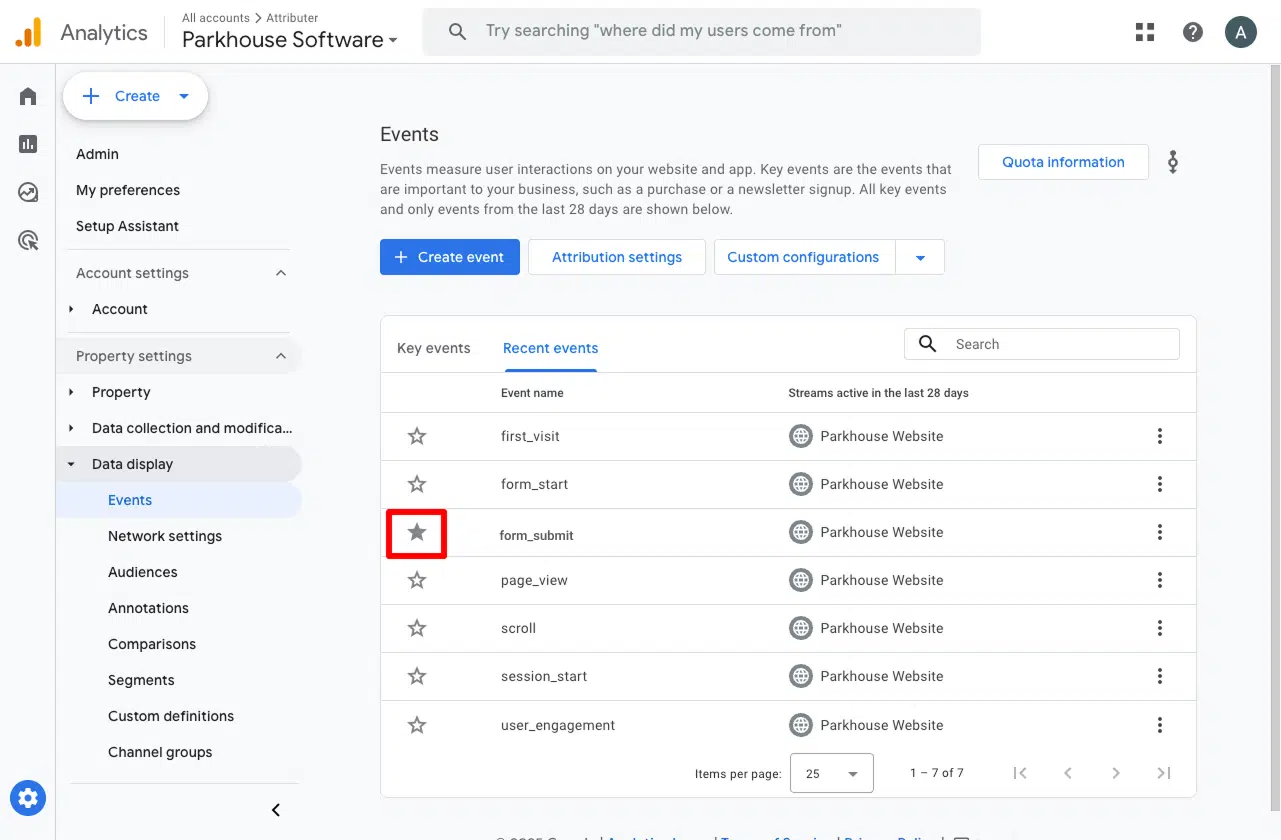
Submit a test entry, then open the Realtime report in GA4 and look for the event name you configured. Once you can see it coming through, go to Admin, then Events (or Key Events), find that event, and mark it as a Key Event so GA4 treats it as a conversion in your reporting.
Pros and cons
Pros:
- It's free, easy to set up and built right into Ninja Forms.
Cons:
- It only sends an event to Google Analytics. It does not send conversions to Google Ads, Meta, or any other ad platform, so it does nothing for ad platform optimisation, which is what Methods 2 and 3 are for.
- You need to have Google Analytics already set up and working on your website. All this does is fire an event to the Google Tag on your website when a form is submitted, so if you don't have the Google Tag on your site already, it will do nothing.
- The event is sent to Google Analytics via the visitor's web browser, which means ad blockers and privacy restrictions in Safari, iOS, etc will block it. Studies suggest you would lose approximately 30% of all conversions.
- It is possible to use Google Analytics events as conversion sin Google Ads, but it's not a good approach. Google Ads wants you to send the lead's name, email, phone, Google Click ID, etc back with each conversion so it can match the conversion to the original ad click. This literally just sends an event called ‘Form Submitted’ (or whatever you name the event). It's pretty much useless when it comes to tracking conversions in ad platforms like Google Ads, Meta Ads, etc (that's what Method 2 and 3 are for).
Method 2: Use Google Tag Manager
Good for: Sending Enhanced Conversions to Google Ads.
If you are running Ads on Google, Meta, ChatGPT, etc then a plain ‘form submitted’ event being sent via the visitor's browser is essentially useless.
Ad platforms like Google need to be able to match a conversion back to the exact person who clicked your ad, and that requires sending information that identifies them, like their name, email, phone, Google Click ID, etc. This is what Google Ads calls Enhanced Conversions.
Here is how to set that up with Google Tag Manager:
Step 1: Set up a Custom HTML Tag with the form listening code
In GTM, create a new Custom HTML Tag, paste in the snippet below, and set it to fire on the All Pages trigger, with the tag firing option set to Once per event.
The above code does a bunch of things:
- Captures the visitor's details as they type. Ninja Forms clears every field's value when a form is first submitted, before
submit:responseeven fires, so if we tried to read the data from the fields, then they would be blank. Instead, the code records each field's value while the visitor is typing and stores it in their browser to be retrieved later. - Listens for Ninja Forms submission success event. Ninja Forms is built on Backbone.js and communicates over its own internal channel called
nfRadio(rather than firing a plain browser event). So the above code listens for theformschannel'ssubmit:responseevent to determine when a form is submitted. It also falls back to rawBackbone.Radioand then to watching the page for Ninja's own success message if neither channel is reachable. - Skips sensitive fields. Passwords, card numbers, CVV fields, one-time codes, and similar sensitive fields are checked and dropped before the code fires anything into the dataLayer.
- **Sends an event to the dataLayer. **The code sends a
ninja_forms_submittedinto the dataLayer to be used as the Trigger for your conversion tags. The event contains the lead's name, email and phone which you can use to send back to Google Ads to enable Enhanced Conversions.
This snippet of code has been extensively tested and addresses a number of issues that other scripts on the internet do not, including:
Issue 1: the event Ninja Forms fires on submission does not mean the submission succeeded. Other scripts listen for the submit:response event and assume that means the form was successfully submitted (because its name sounds like a success signal). But it actually comes back regardless of whether the form was submitted or not, and contains an errors object that needs to be checked before firing any conversions. This snippet checks the errors object first and only fires when it's clean, so a rejected submission never counts.
Issue 2: Identifies which field is which from the label, not the name. Ninja Forms names its fields generically, like nf-field-1, which makes it impossible to tell what field contains the key information like name, email, phone, etc. Instead, the code snippet above reads the visible label sitting next to each field to determine where the key information is, and then falls back to the HTML field type (i.e. email field, phone field, etc), and then back any autocomplete hint that exists on the field. It's by far the best way to work out which fields hold the email, name, and phone.
Issue 3: By the time the success event fires, Ninja Forms has already erased the values you want to send. Ninja's default behaviour (clear_complete) wipes the data from every field when the form is submitted, before submit:response success message comes back. So a script that waits for the success message and then tries to read the form fields finds nothing there. This snippet solves that issue by recording what the visitor types as they go and storing it in their browser, so when the success message comes back, and it's time to fire the conversion event, the name, email, and phone are safely stored and can be sent with the conversion event.
As you can probably tell from reading the above, this is not a snippet we put together just for this article. It is ported from the same detection logic we use in our conversion tracking software to track Ninja Forms submissions and send them to ad platforms and analytics tools. It has been tested extensively (we maintain a WordPress install with Ninja Forms and test weekly), and it's been used to detect thousands of form submissions by our customers. You can use this snippet with confidence.
Step 2: Create Data Layer Variables for the captured data
To make sense of this step, it helps to understand what the dataLayer actually is, since everything from here relies on it.
Picture the dataLayer as a messageboard sitting between your website and Google Tag Manager. Your site drops messages onto it (a form was just submitted, and here is the email and name that came with it), and GTM watches everything that lands there. This is actually what the code from step 1 above does. Once a Ninja form submission goes through successfully, it pushes a message onto the dataLayer called ninja_forms_submittedcomplete with the lead's name, email, and phone.
Unfortunately, though, GTM will not automatically pick this up. You have to tell it to grab the name, email and phone from the message so that it can be used in the later steps, and a Data Layer Variable is how you do that.
To set one up, go to the Variables section in GTM, click New under User-Defined Variables, choose Data Layer Variable as the type, and give it a name.
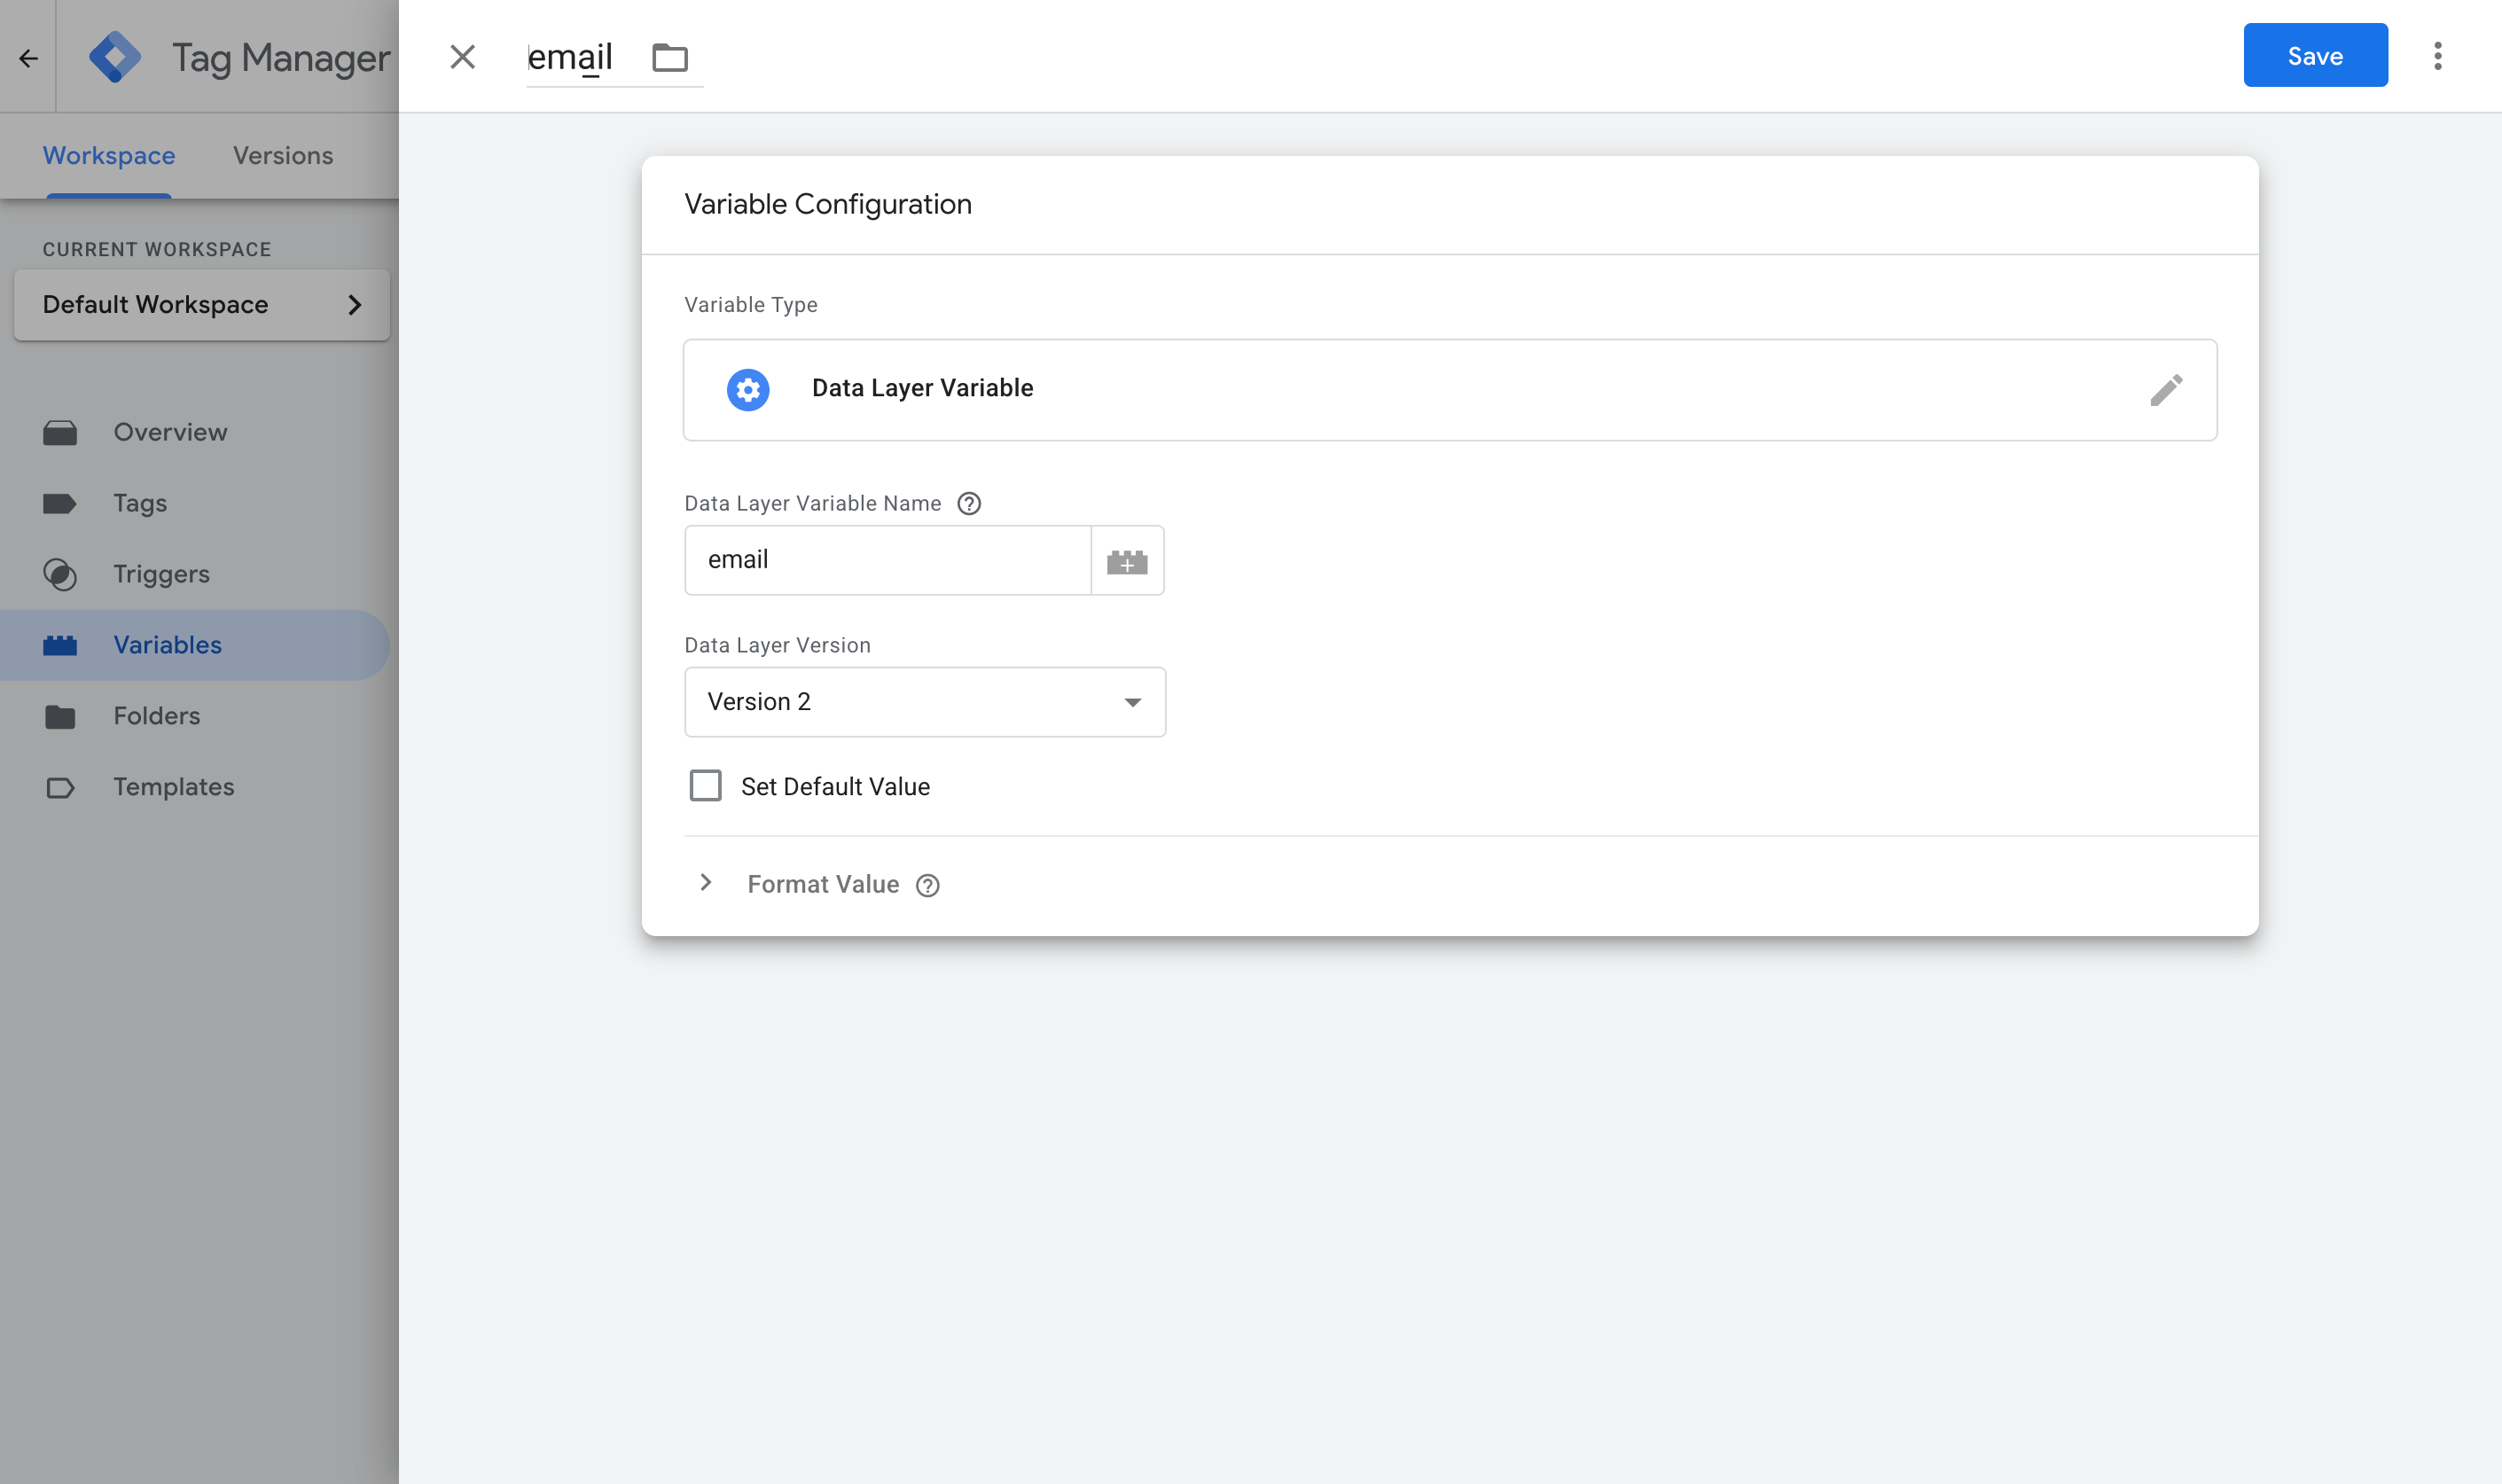
Here are the four you need.
Variable 1:
- Name: Email
- Variable Type: Data Layer Variable
- Data Layer Variable Name: email
Variable 2:
- Name: First Name
- Variable Type: Data Layer Variable
- Data Layer Variable Name: first_name
Variable 3:
- Name: Last Name
- Variable Type: Data Layer Variable
- Data Layer Variable Name: last_name
Variable 4:
- Name: Phone
- Variable Type: Data Layer Variable
- Data Layer Variable Name: phone
Step 3: Create a Custom Event trigger
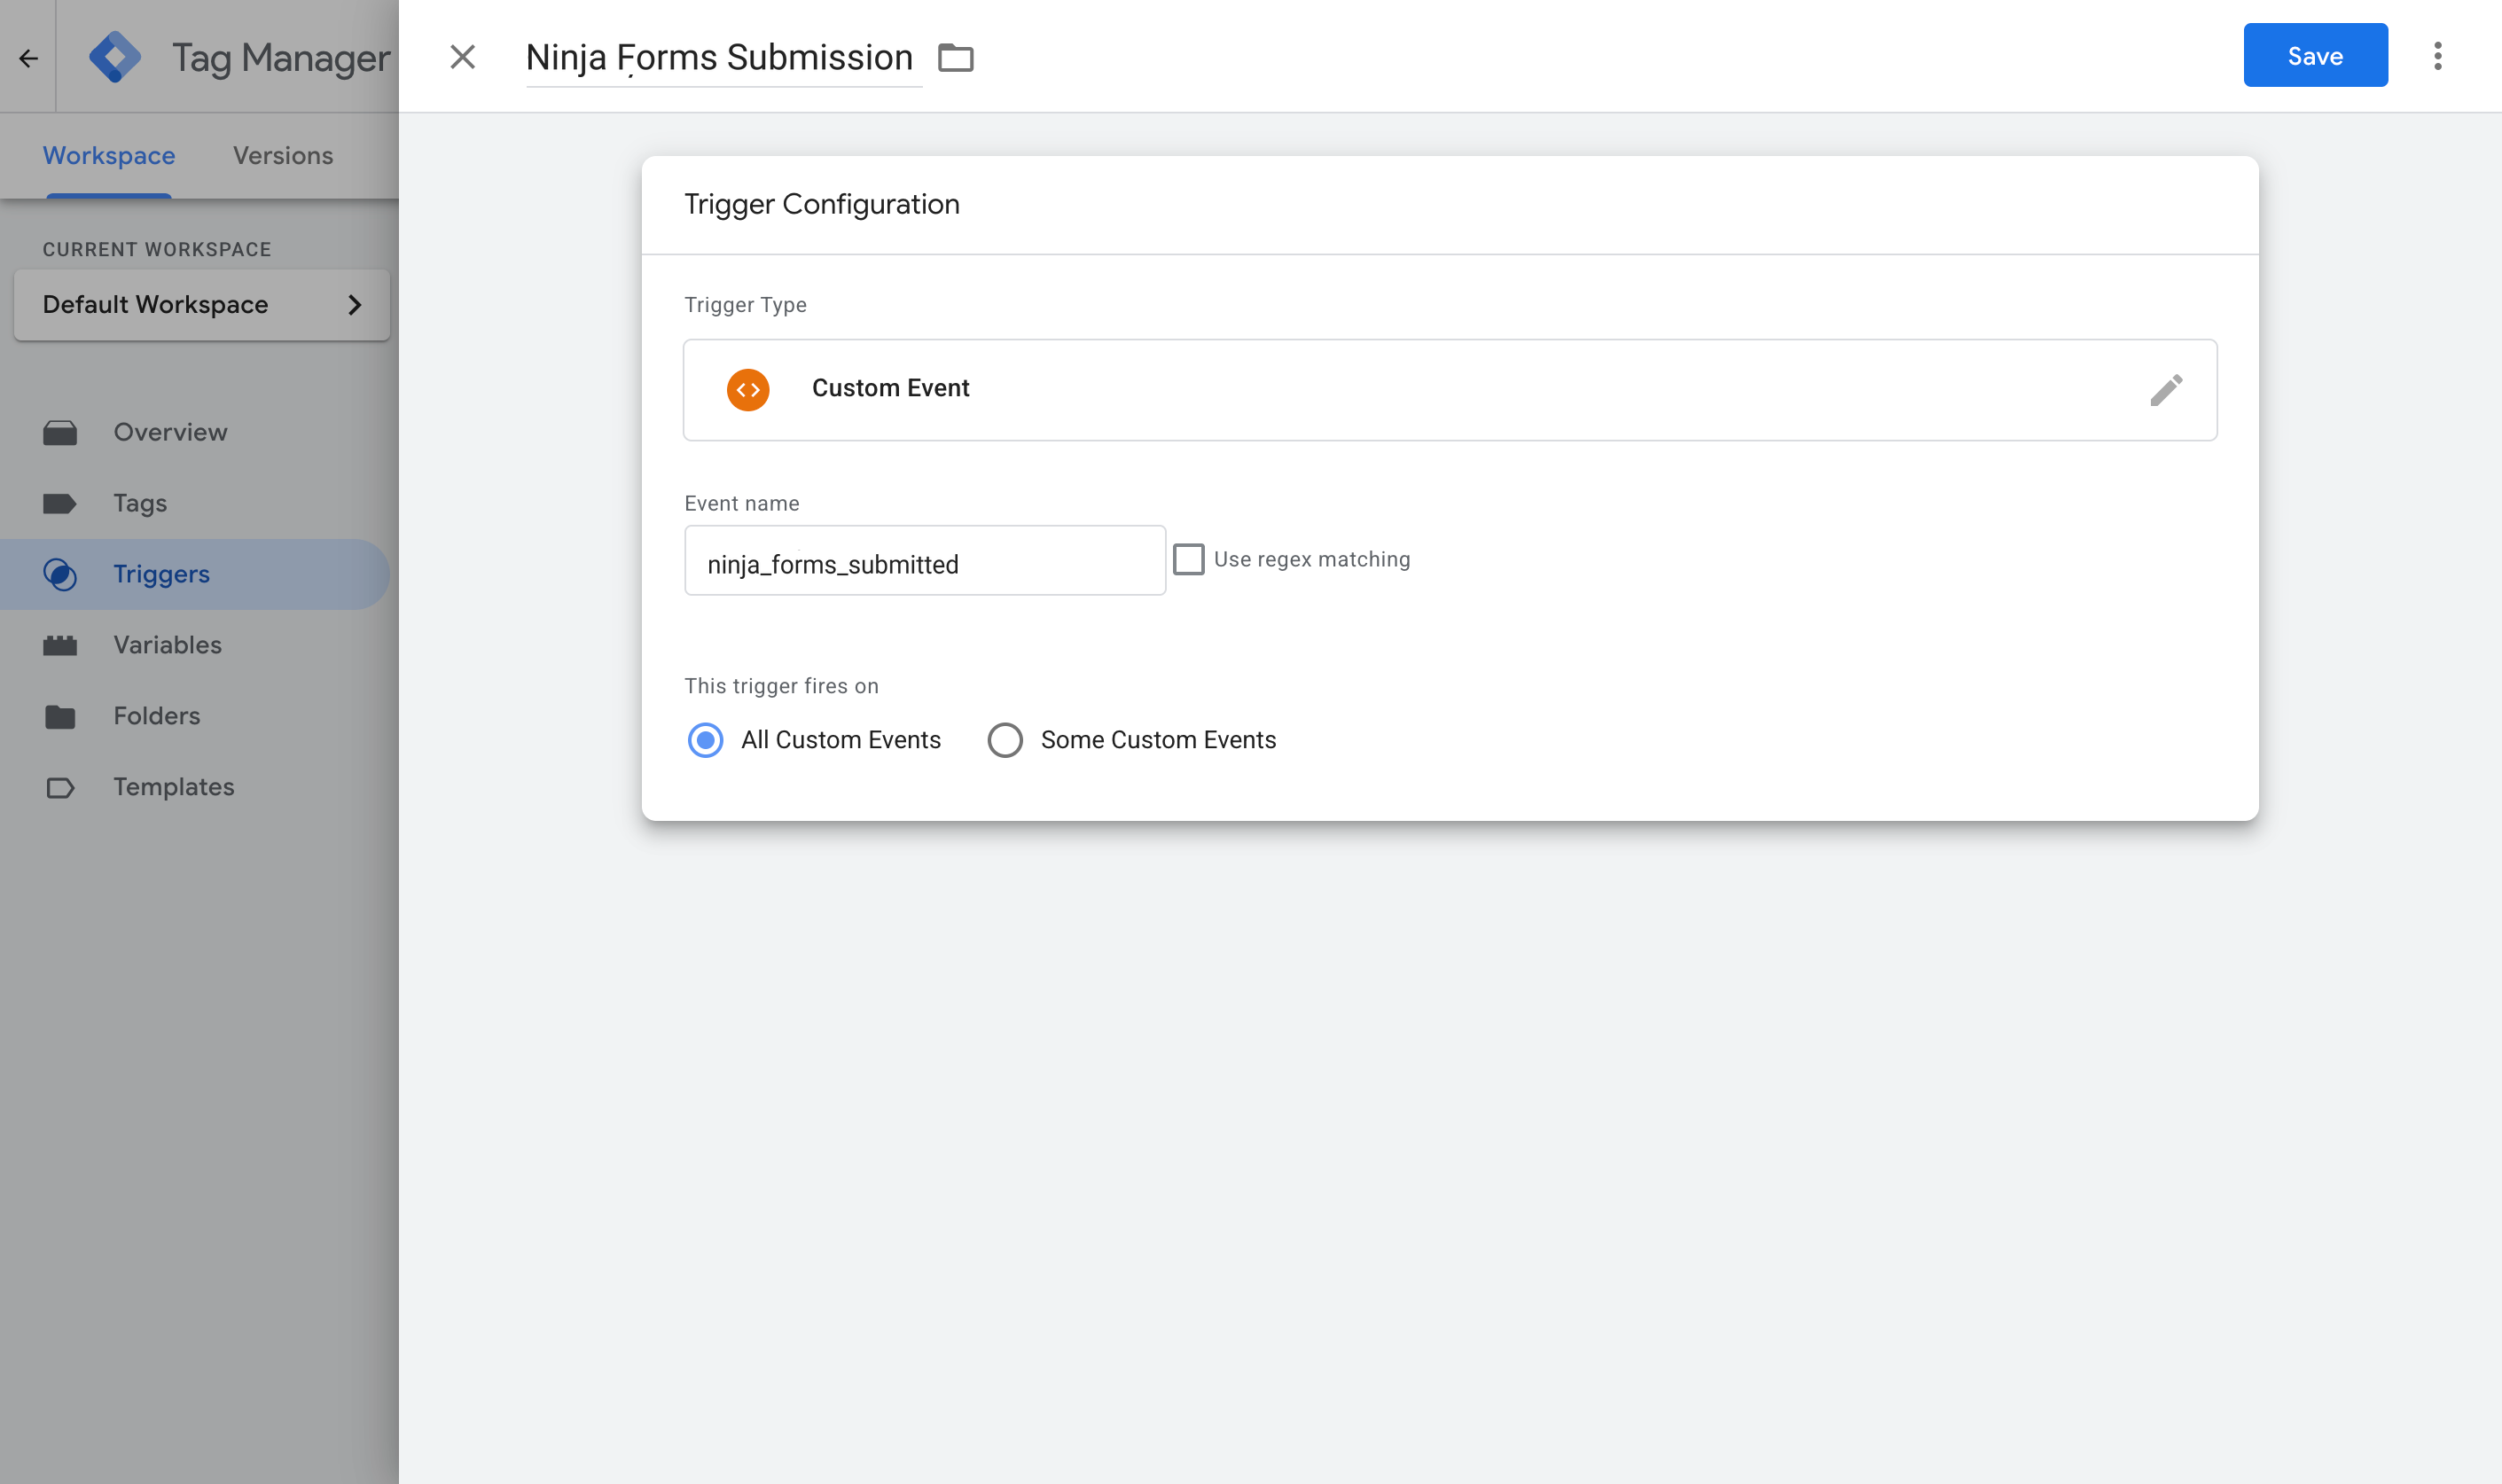
The next step is to create a custom Trigger in GTM. This is what will listen for the message that gets sent when a Ninja Form is successfully and tell your conversion tags to fire.
To set this up, navigate to the Triggers section, click New, choose the Custom Event type, and set the event name to ninja_forms_submitted. It has to match what the code pushes exactly.
Step 4: Turn on Enhanced Conversions in Google Ads
Before we can start firsing any conversions in to Google Ads, you need to set Google Ads up to accept them. To do that, head over to your Google Ads account, go to Goals, then Conversions, then Settings, and turn on Enhanced Conversions.
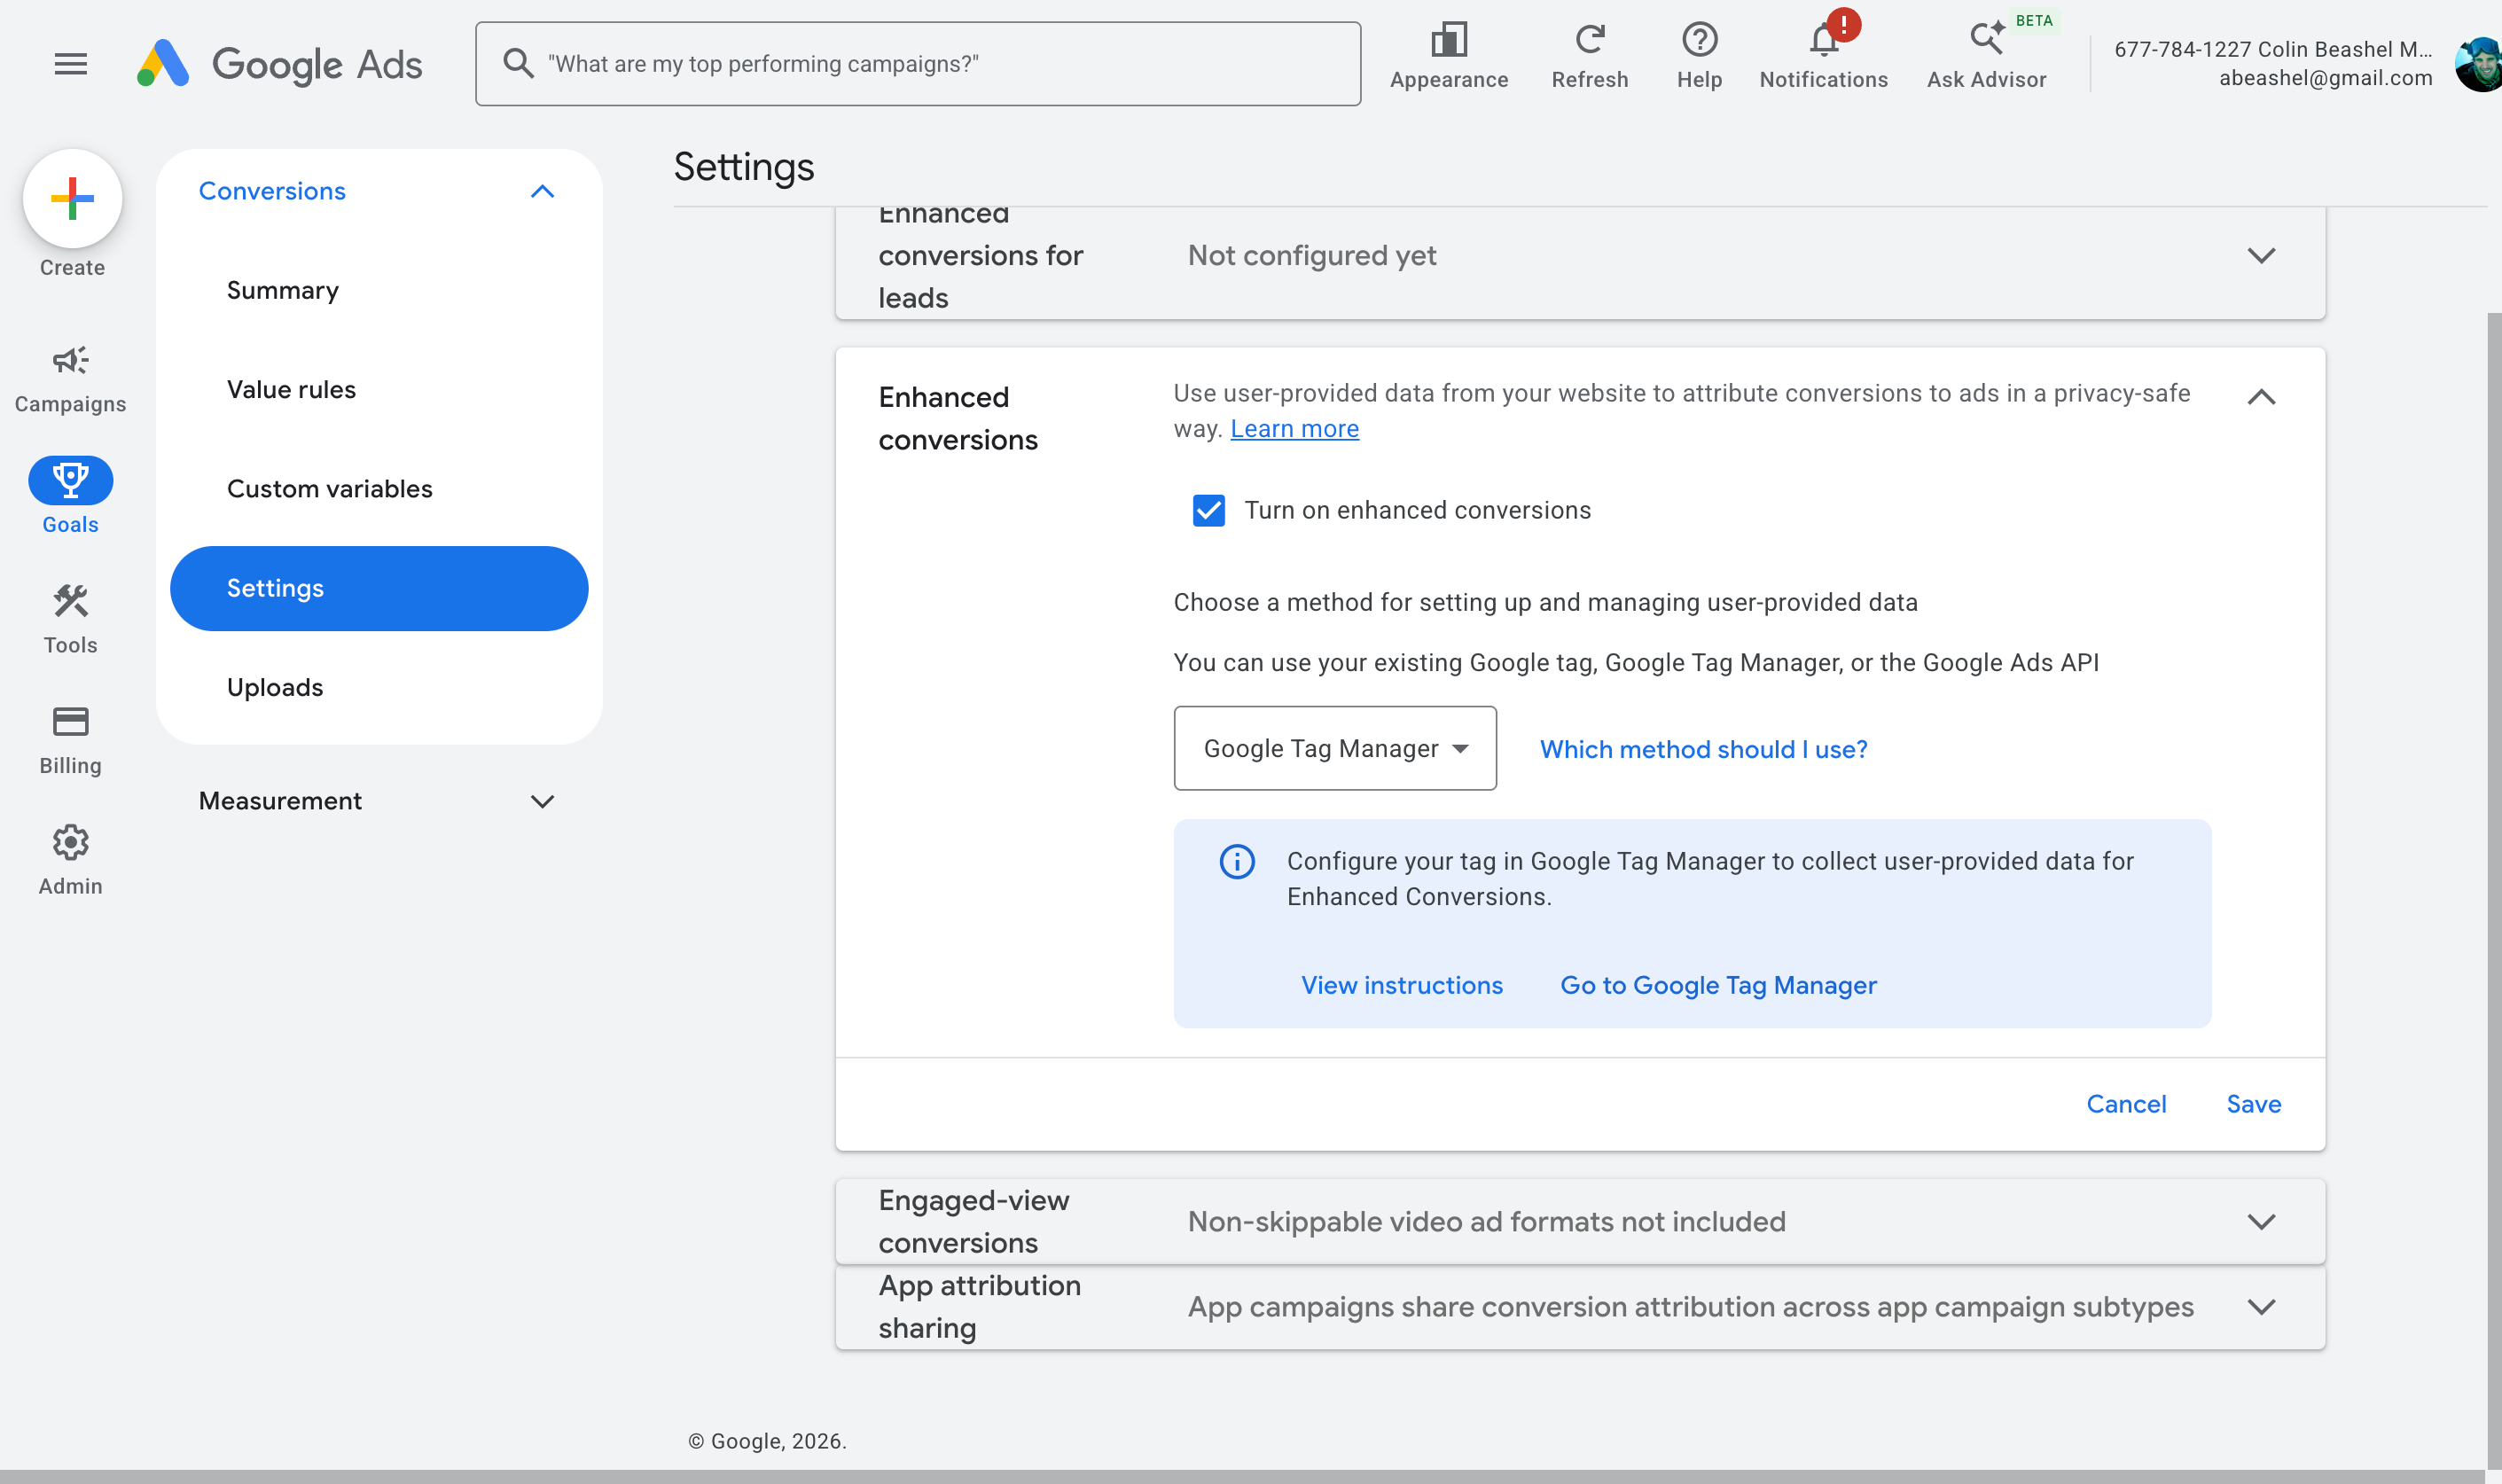
When it asks how you want to implement it, choose Google Tag Manager. This gives Google Ads permission to receive and use the customer data you are about to send.
Step 5: Create your Google Ads conversion tag and map the data
In this final step, we're going to put all of the pieces together. We'll create a Google Ads conversion tag that will send a covnersion to Google Ads, we'll set it up to fire on our Custom Trigger, and we'll map the name, email, and phone that was captured using the dataLayer variables.
To do this, jump back into GTM, go to Tags, select New, choose Google Ads User Provided Data Event as the tag type, and map the variables you set up earlier to the fields it asks for.
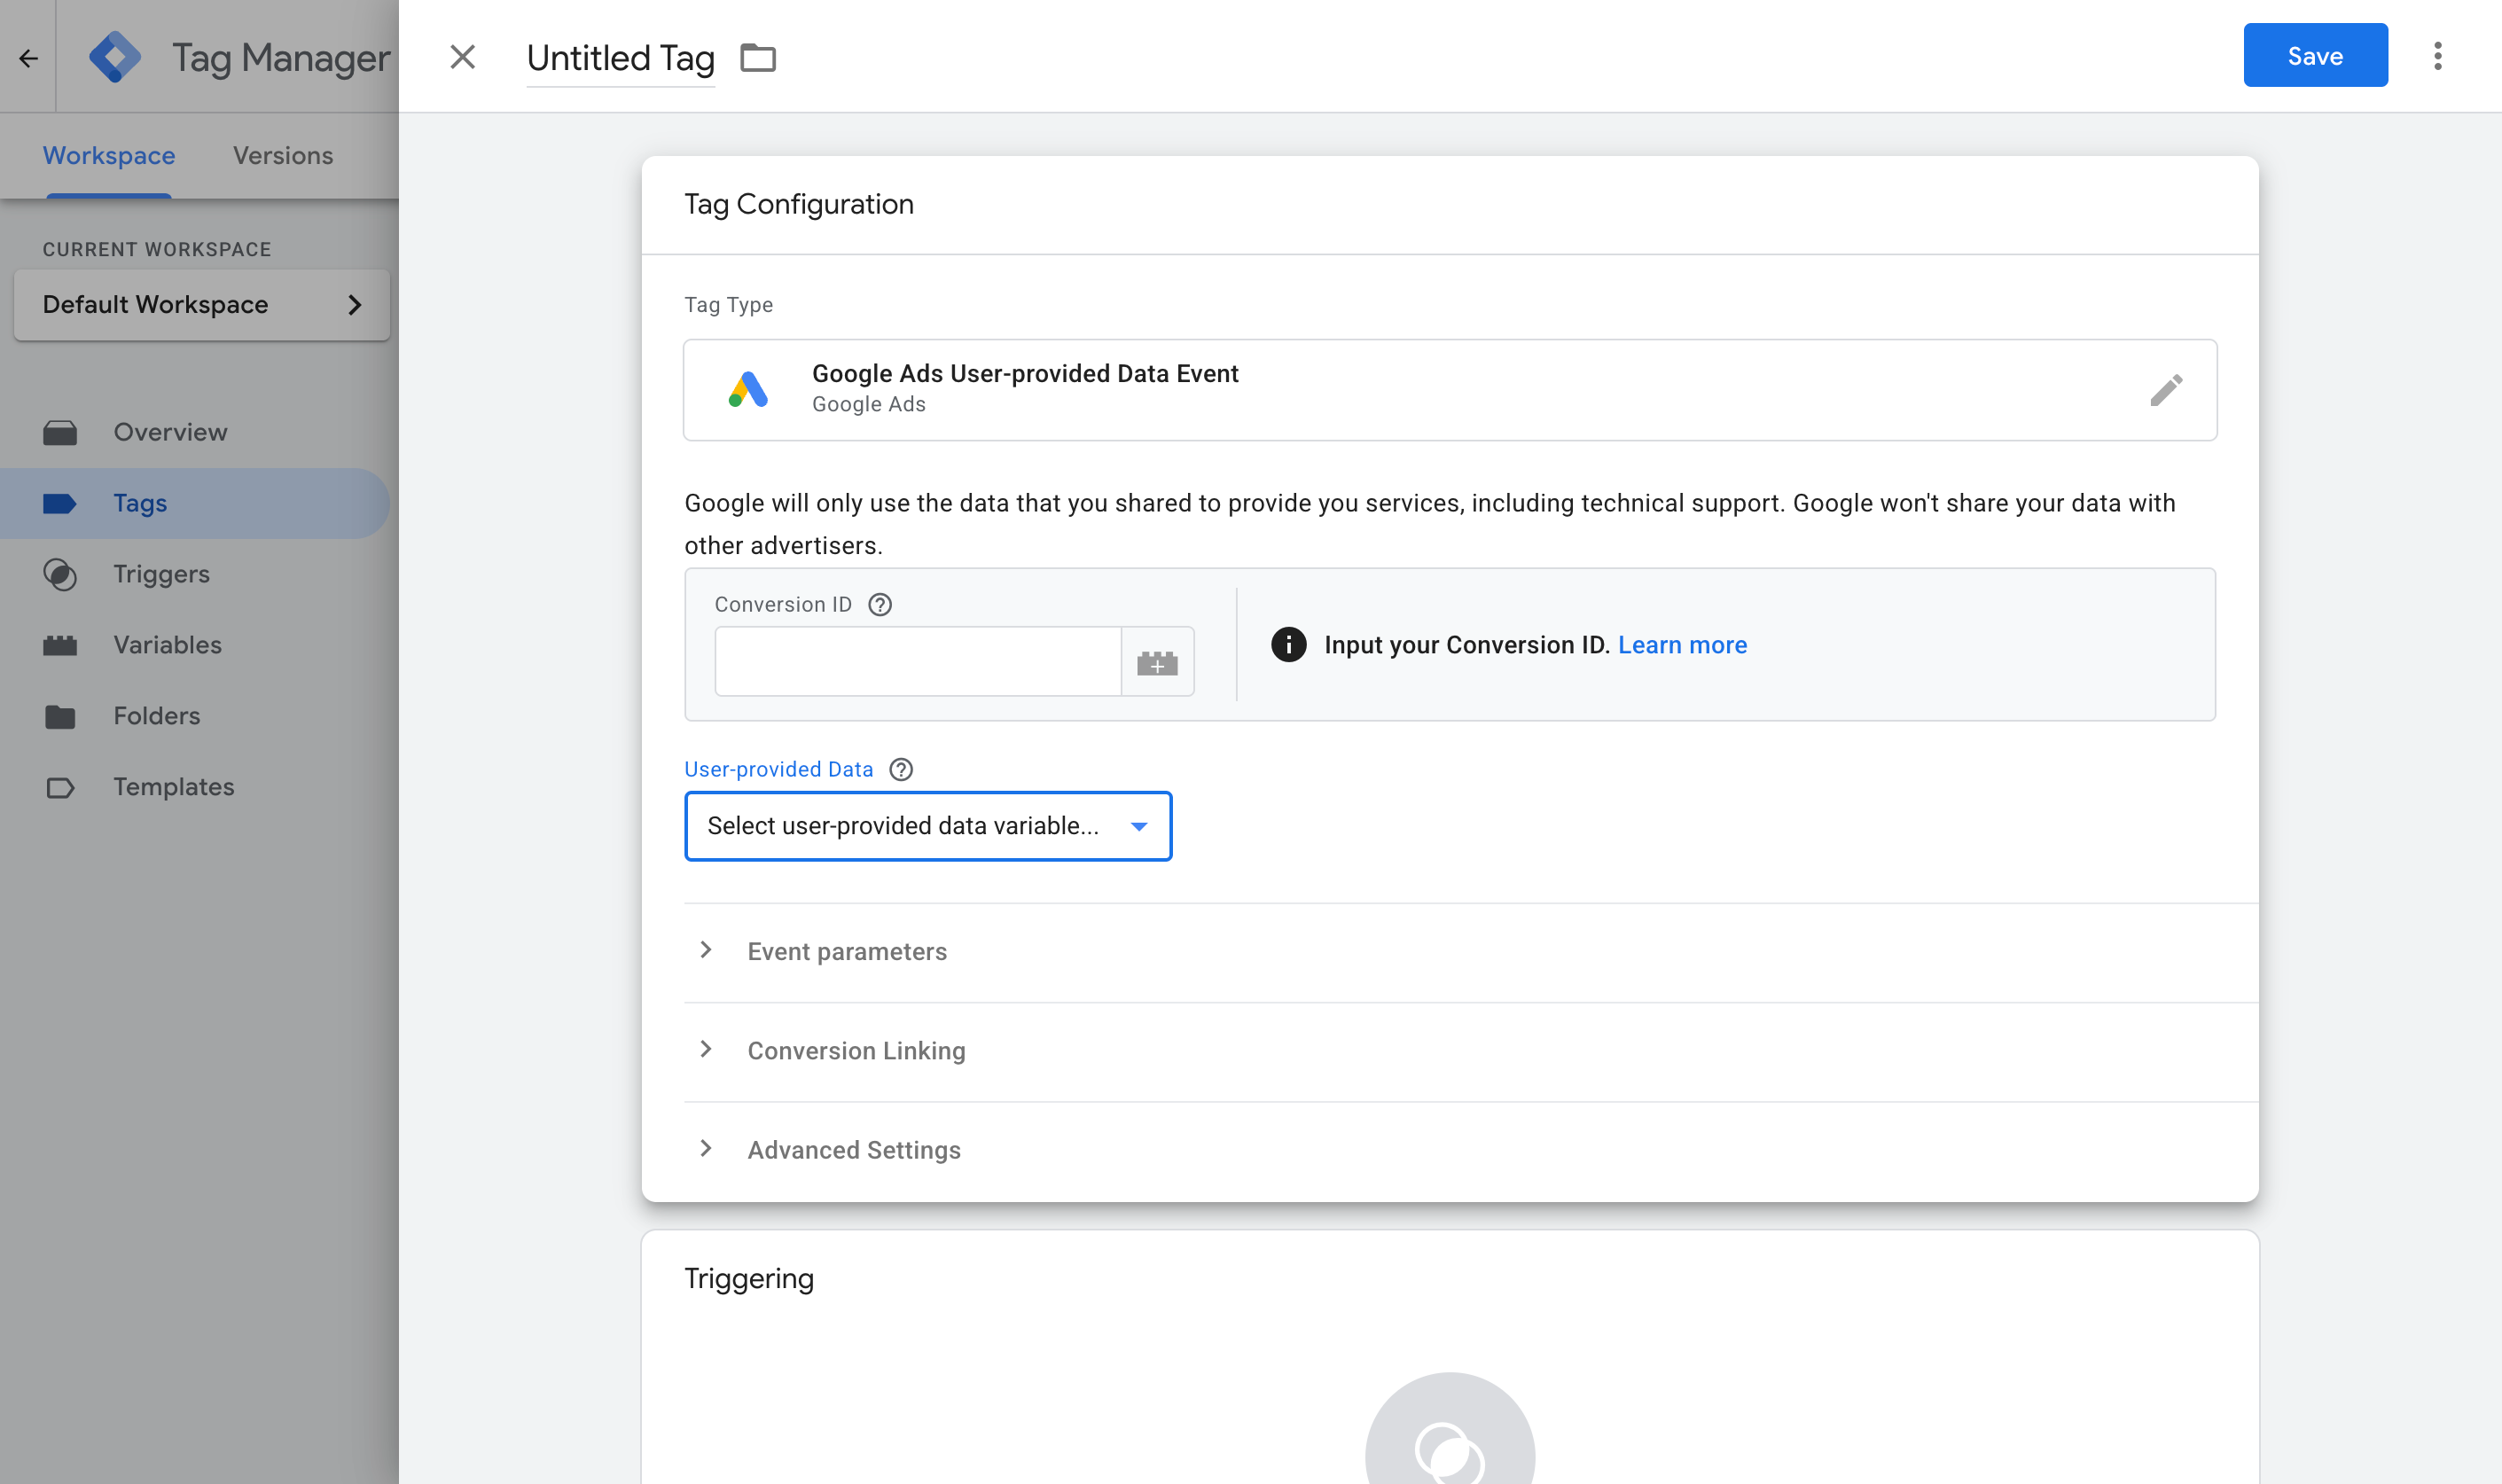
Then set it to fire on the Custom Event trigger you created in Step 3.
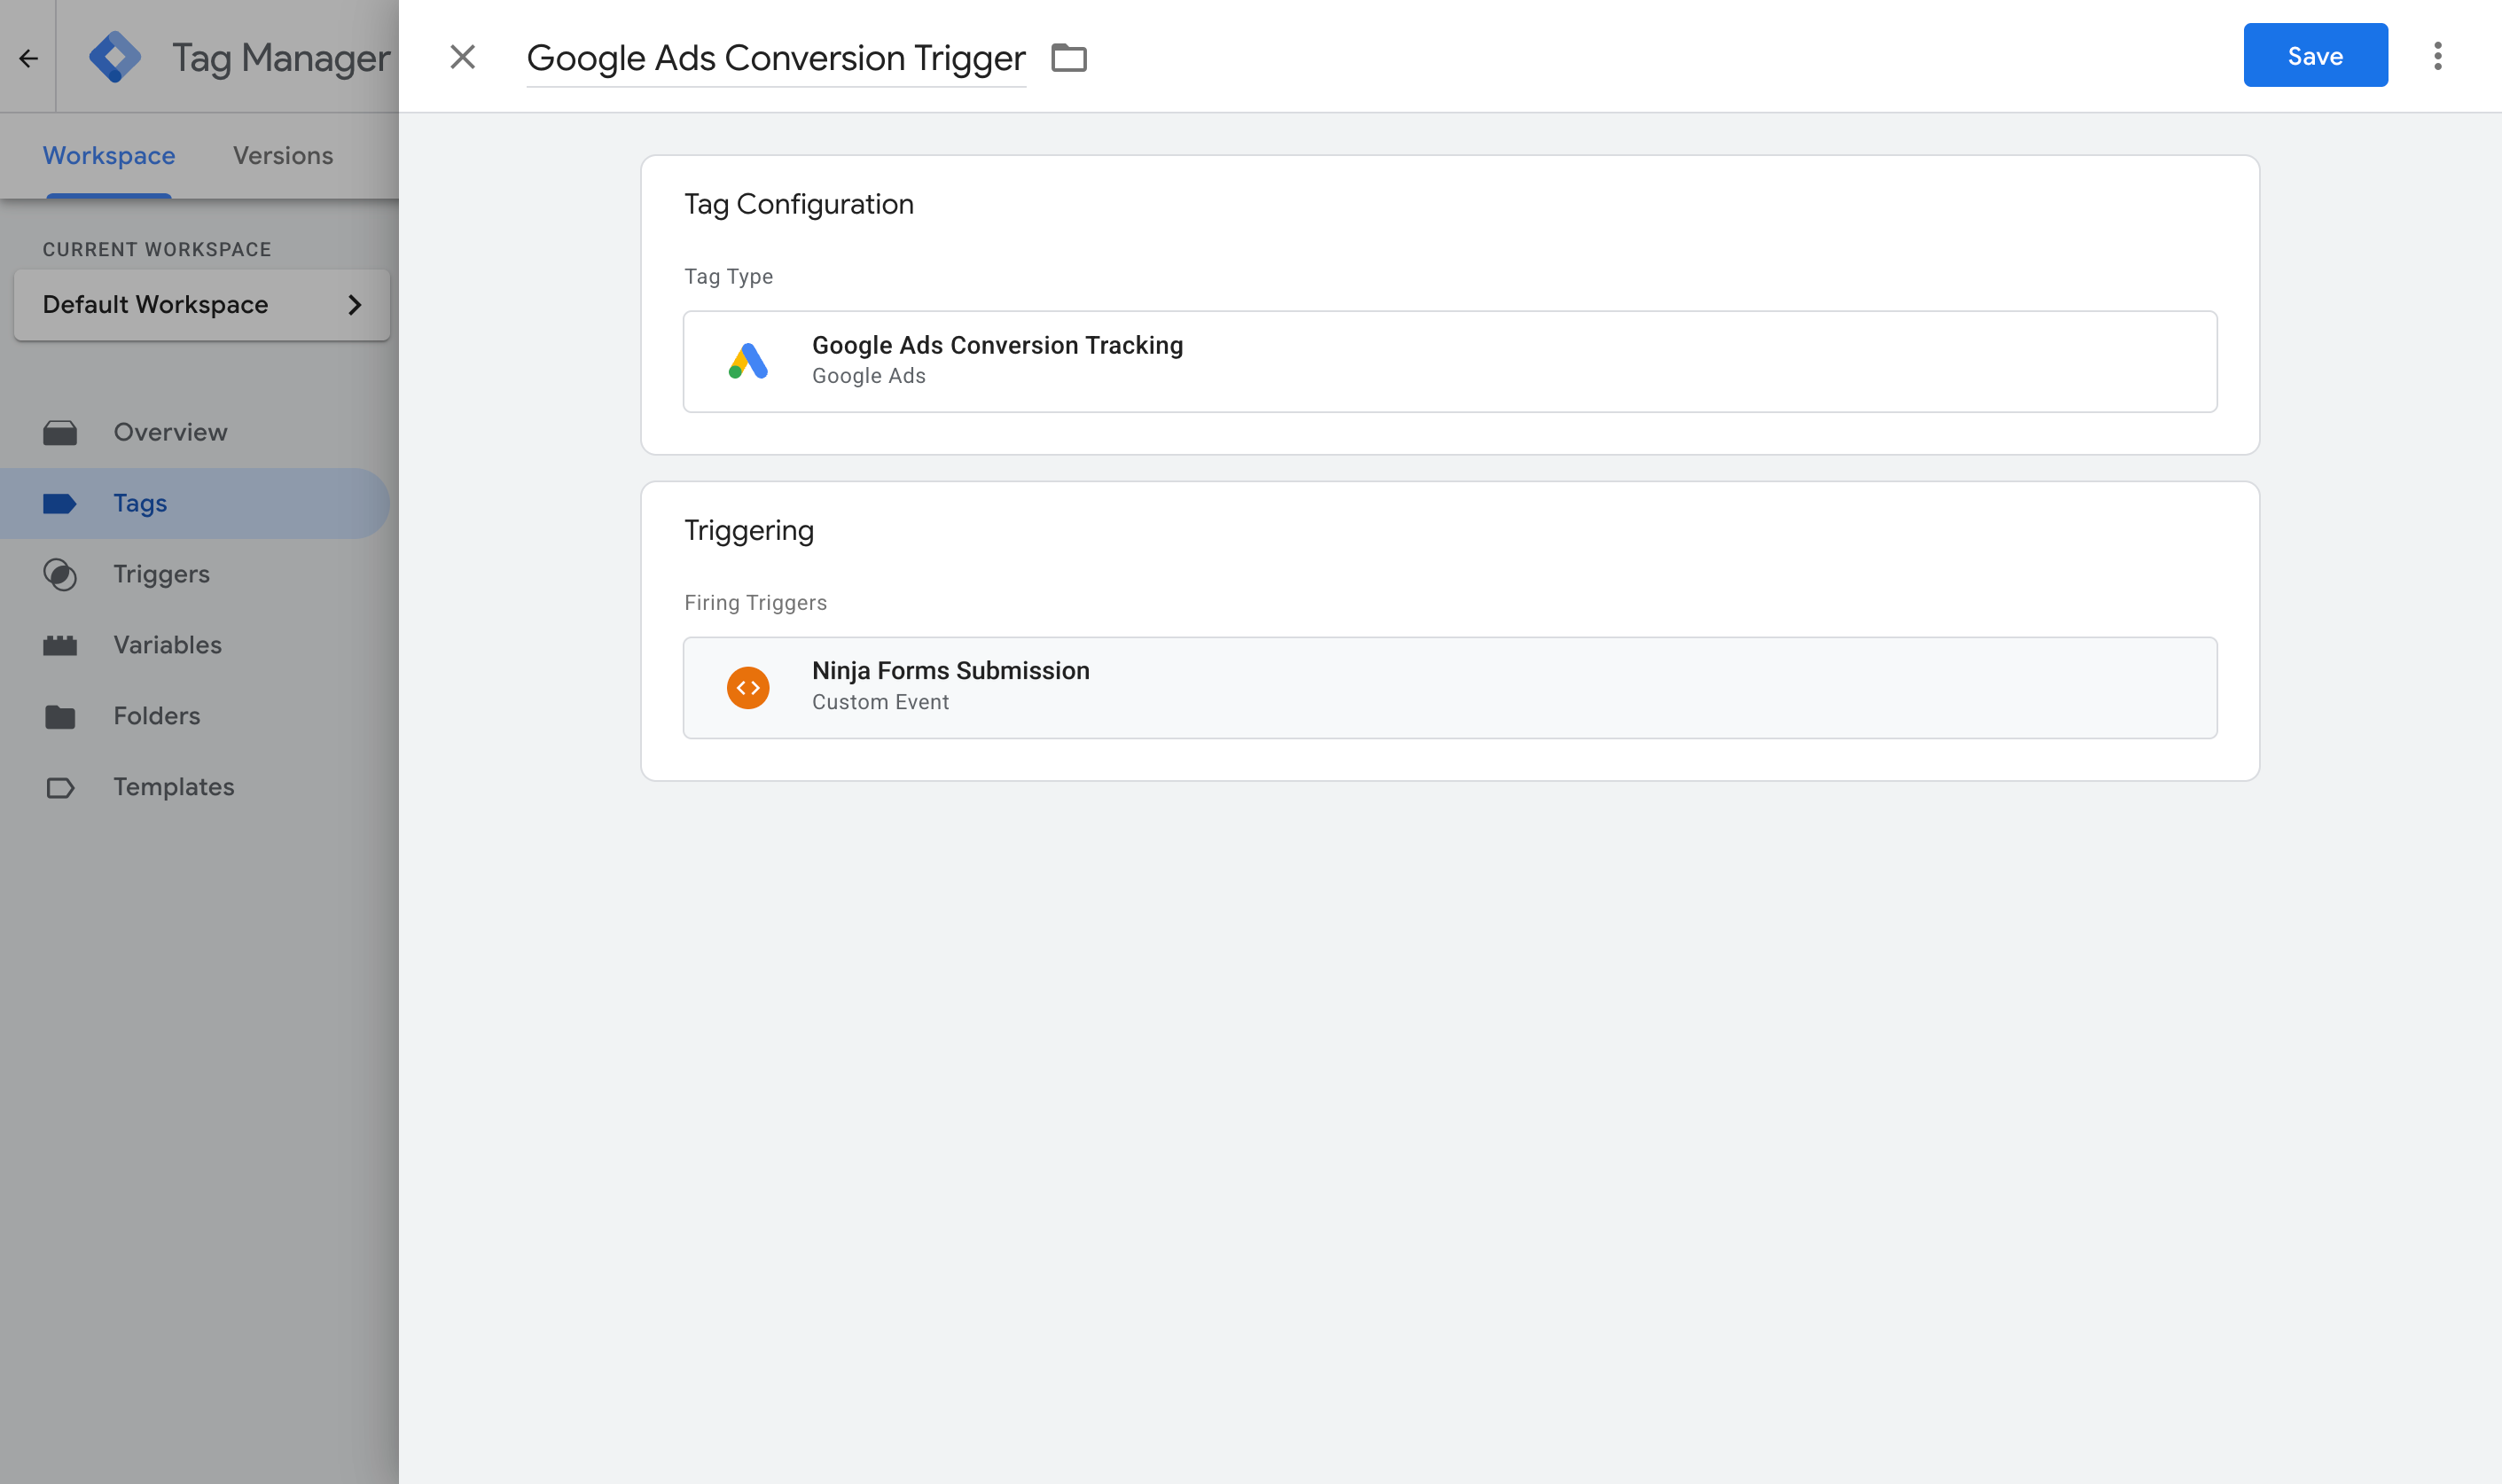
Once that is done, publish your GTM container. To check it is working, open GTM Preview mode, submit the Ninja Form on your site, and confirm the ninja_forms_submitted event arrives with the email and name filled in.
Pros and cons
Pros:
- It is free and you may already have Google Tag Manager installed on your site.
- It captures the email, name and phone and sends it to Google Ads, which is the minimum you need to enable Enhanced Conversions.
- It correctly distinguishes a successful form submission from a rejected one, so you don't end up overcounting conversions when someone makes a mistake on your form (e.g. they miss a required field, press submit, and the submission is rejected)
Cons:
- There are a lot of moving parts. Between the GTM tag, the Trigger, four Variables, the Google Ads settings and the Google Ads conversion tag, there is plenty to get wrong. Worse still, there are no error messages or logging. It just won't work and you'll have no idea why.
- It still sends the conversion to Google Ads through the visitor's browser, so ad blockers and privacy browsers can stop it firing. Expect 30+% of your conversions to not make it back to Google Ads.
- It still misses the data Google values most. Although it sends the lead's name, email, and phone, this is just the minimum for Enhanced Covnersions. It doesn't capture and send the Google Click ID, their IP address, the User Agent, etc. These are the signals Google values most because they are exact match identifiers. A Google Click ID is assigned to that specific user, whereas name and email are fuzzy (millions of people have the same name, or they could enter their work address in your form but be logged in to Google with their personal email).
That last point is the one that pushes a lot of people to Method 3.
Method 3: Use Converly
Best for: Sending proper, server-side conversions to Google Ads, Meta Ads, ChatGPT Ads, LinkedIn Ads, and more, without having to do complicated configuration in Google Tag Manager.
Converly is a purpose-built conversion tracking tool that makes it easy to send server-side conversions to Google Ads, Meta Ads, LinkedIn Ads, and more, whenever a visitor submits a Ninja Forms form on your site.
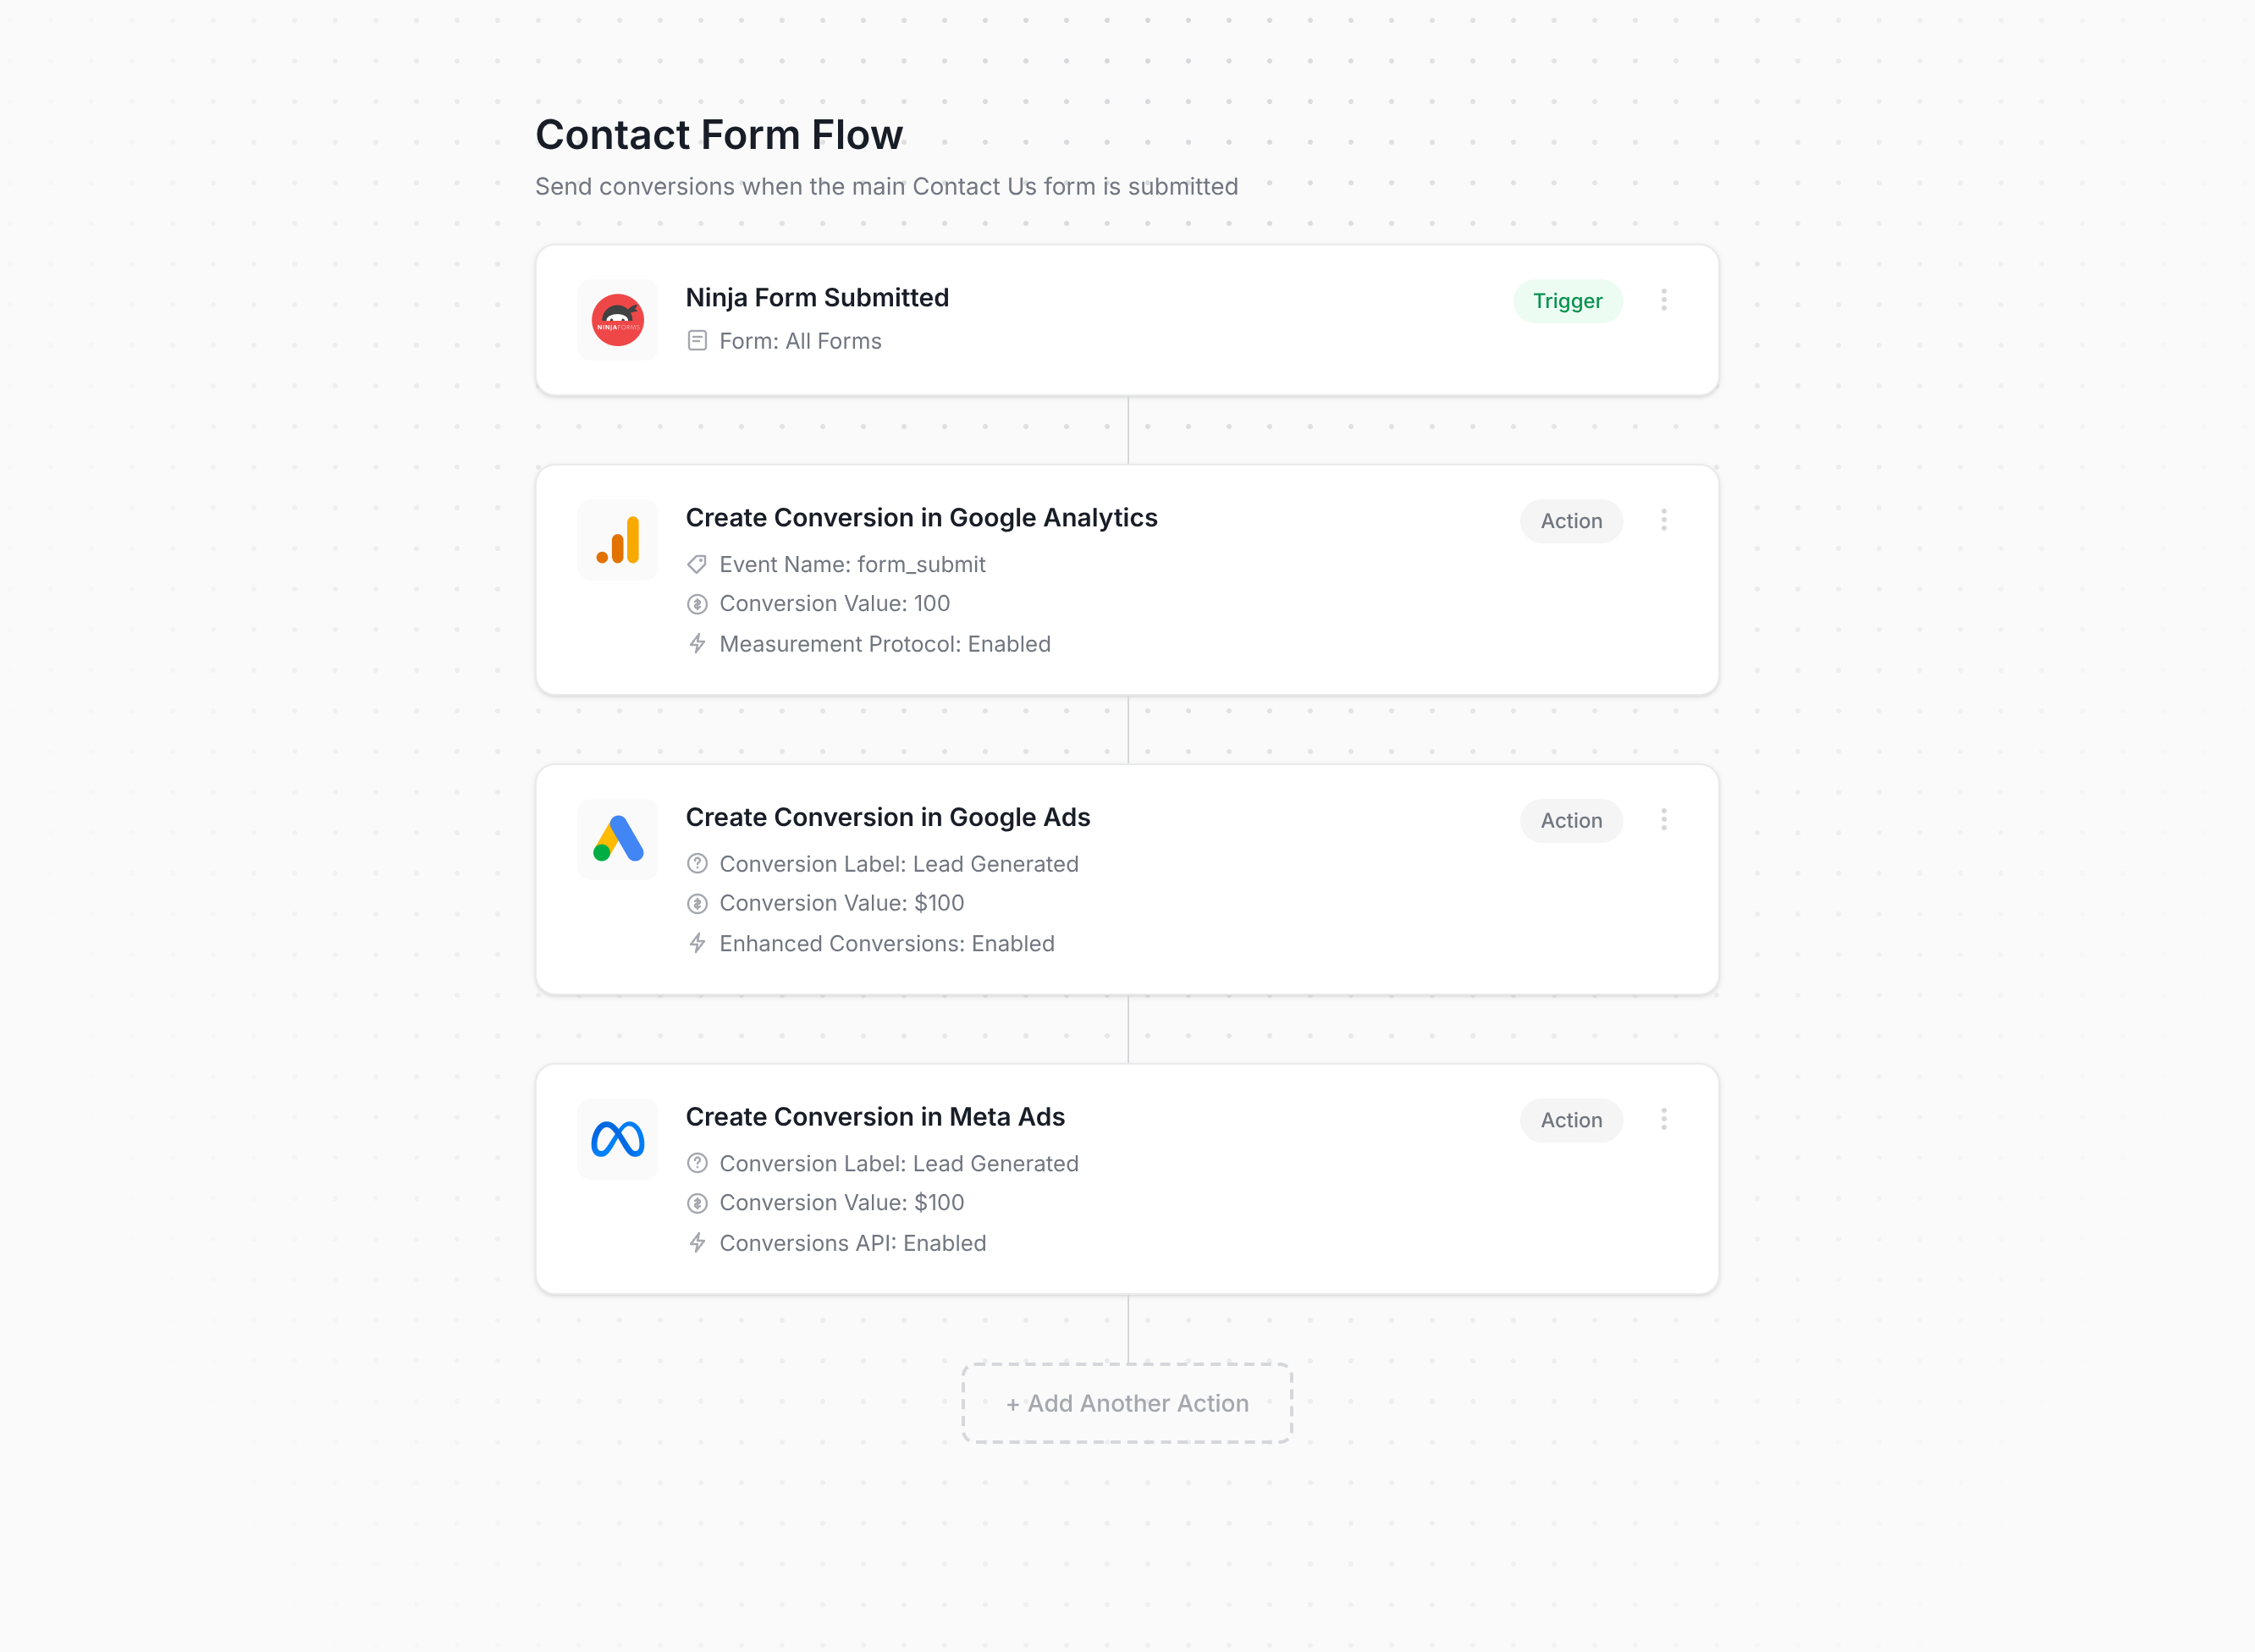
The setup, as you can see above, is really simple. You pick a trigger (like a Ninja Form being submitted) and then pick one or more actions, such as a conversion being sent to Google Ads, a conversion being sent to Meta Ads, etc. That's it! There is no custom code to write and no Tag Manager triggers or variables to wrangle.
From there, you install Converly on your site, and it takes care of the rest. It watches for Ninja Forms submissions, pulls out the name, email and phone, and sends them to Converly's own servers, which pass them on to Google Ads, Meta Ads, etc. (because the forwarding step happens server-side, ad blockers and privacy-focused browsers like Safari cannot get in the way).
But here is the part that matters most if you are running paid campaigns. On top of the name, email and phone, Converly also grabs the Google and Meta click IDs (GCLID and fbclid), Meta's browser cookies, the visitor's IP address, their user agent, and more, and passes all of it to Google Ads, Meta Ads, etc with every conversion. Those are exactly the signals Google and Meta reward, and having the full set is what pushes your match quality from weak to strong (on Meta, that alone can lift Event Match Quality from around 3 up to a 9 or 10).
Converly also gives you a full conversion log, so you can see every lead that came in through Ninja Forms, what data was captured, what was sent to each ad platform, and whether it landed.
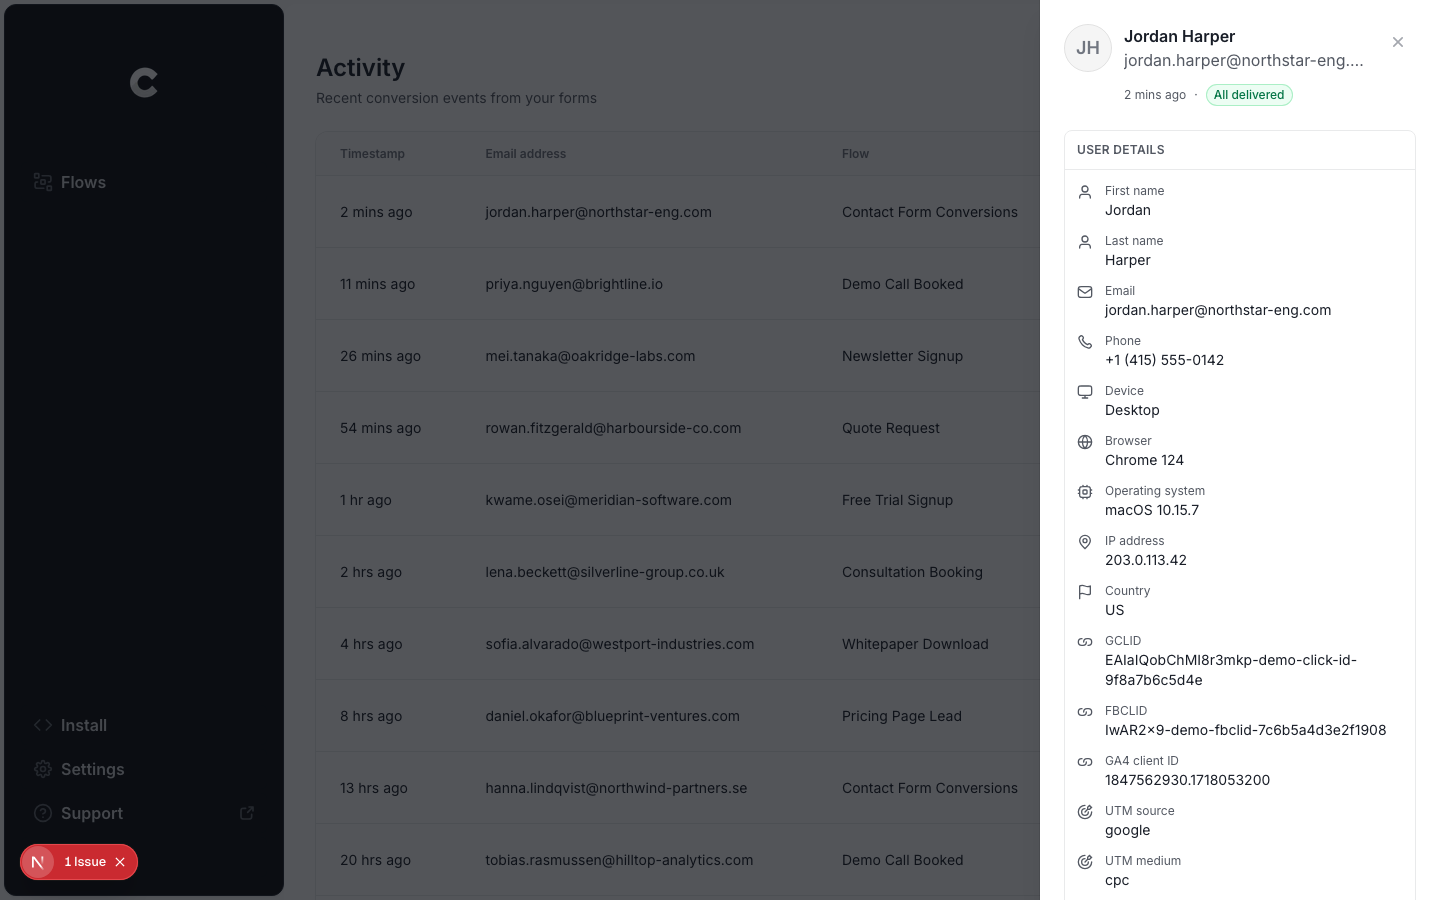
The other benefit is that a single setup in Converly can send the same conversion to Google Ads, Meta Ads, ChatGPT Ads, LinkedIn Ads, GA4, and other destinations at the same time. Start advertising somewhere new next month and you just add it as another action on the flow you already have. No new snippet, no new GTM tag, nothing to rebuild.
Pros and cons
Pros:
- It's super easy to set up. No code to write or maintain and no complex configuration.
- Captures the click IDs, cookies, IP and user agent and sends it along wioth each conversion. This boosts match quality in the ad platform (for instance, in Meta you would go from an Event Match Quality score of 3 or 4 to a score of 9 or 10 by using Converly).
- Sends server-side, so ad blockers and privacy browsers do not stop your conversions. You'll likely get 30% more covnersions recorded using Converly.
- Supports conditional logic, so you can send specific conversions when certain forms are completed on your site (for example, only send a conversion when the Quote Request form is submitted, and not the newsletter signup form).
- Lets you log in to Google Ads, Meta Ads, and so on within the platform and just pick the conversion you want to fire. No need to dig around looking for technical things like account IDs and conversion IDs.
- Gives you a full conversion log where you can see every lead that submitted your Ninja Forms form, what data was captured, whether it was successfully sent to your ad platforms, and more.
- You get support from a team of experts who will happily help you get set up and troubleshoot any issues. You have no chance of getting help from Google if you use GTM.
Cons:
- It is a paid tool after the free trial. Plans start at $19 per month (but you would probably make that back in both the time saved setting up conversion tracking manually, plus the reduced cost per lead you will get when you have proper conversion tracking working in Google Ads, Meta Ads, and so on).
What not to do
So far in this article, we have covered the three best approaches to conversion tracking for Ninja Forms, and when to use each one. But it is also worth knowing which approaches to avoid, because several of the most common approaches to Ninja Forms conversion tracking end up producing horribly inaccurate data. Here is what to steer clear of:
Tracking thank-you page visits
This is the single most common DIY approach, and it is one of the worst. The idea is to send people to a dedicated thank you page after they submit, then count visits to that page as conversions. It sounds clean, but there are so many ways it goes wrong.
It fires for people who never submitted anything. A thank you page is just a URL, and a URL can be reached without ever submitting a form,. People bookmark it, land on it from their history or browser autocomplete, or find it in Google if it ever gets indexed. Every one of those gets counted as a conversion, even though no form was submitted.
It can double-count genuine submissions. If a lead accidentally refreshes the thank you page, a second conversion is recorded. If they accidentally hit back and land on it again, another conversion is recorded. One real lead can generate several conversions which inflates your total conversion count.
Match rates would be poor. A thank you page has no information about who submitted the form, so you couldn't capture the lead's name, email, phone, Google Click ID, Facebook Click, ID, etc and send those back to the ad platforms. And without that data, sending conversions is pretty pointless as the ad platforms won't be able to match the conversion back to the person and the ad they clicked.
It also misses conversions of its own. By default, Ninja Forms shows its confirmation message inline rather than redirecting anywhere, so if you create a new form but forget to configure the redirect, this approach never even gets a chance to fire.
The root problem is that a thank you page visit is a proxy for a conversion, not the conversion itself. The three methods above all fire on Ninja Forms' actual confirmed submission, so they stay tied to what really happened.
Relying on the default form submit trigger in Google Tag Manager
If you are setting up conversion tracking in Google Tag Manager, the obvious first move is to use its built-in Form Submission trigger (which listens for the browser's native form submit event).
The problem with that is Ninja Forms submits through its own Backbone-driven event system, so this event never fires. There is no page-reload fallback here the way there is with some other WordPress form plugins. Every Ninja Forms submission goes through the same AJAX path, so GTM's built-in Form Submission trigger would never fire.
Always listen for a genuine Ninja Forms success signal instead, the way tools like Converly do.
Using GA4's automatic form tracking (Enhanced Measurement)
GA4 ships a built-in Enhanced Measurement feature that claims to detect form submissions with no setup, but it runs into the same issue as the Form Submission trigger above. Its detection also depends on the browser's native form submission event, and because Ninja Forms never fires that event, it simply doesn't work.
If you want submissions showing up in GA4, use Ninja Forms' own Google Analytics 4 action from Method 1, or use Converly.
Firing the conversion on the submit button click
Some setups we come across send the conversion when someone clicks the submit button, typically with a click trigger in GTM on the button itself. The trouble is that a click is not a submission. The visitor might have left a required field blank, mistyped their email, or tripped Ninja Forms' spam protection, and in those cases the form submission will be rejected but the conversion will be counted because the button was clicked.
And then when they fix the issue and click the submit button again, another conversion is counted.
This matters beyond messy reporting. When that inflated data flows back into Google Ads or Meta Ads, it's used to train their bidding algorithms on what an ideal customer looks like for you, and if that data is wrong then your budget is going to be wasted chasing the wrong type of people.
So which method should I use?
Here's how the three ways to track Ninja Forms conversions compare.
| Method | Best for | Sends conversions to | Data sent |
|---|---|---|---|
| Method 1. Ninja Forms' own Google Analytics 4 action | Sending submissions to Google Analytics with no code | Google Analytics 4 | The submission event only |
| Method 2. Enhanced Conversions through Google Tag Manager | Sending to Google Ads, if fiddly configuration doesn't put you off | Google Ads | Name, email and phone |
| Method 3. Converly | Sending to any ad platform, with the least setup work | Google Ads, Meta Ads, LinkedIn Ads, ChatGPT Ads, GA4 and more | Name, email and phone, plus the GCLID, the Meta click ID, IP address and user agent |
Wrap up
Conversion tracking rarely gets much credit, but it quietly determines how well your advertising actually performs. Do it properly, and those platforms' algorithms have real data to optimize toward. Do it poorly and the algorithms are essentially guessing what an ideal lead looks like for your business.
The payoff is not hypothetical either, and both Google and Meta have put figures on it. Google's own published stats show that implementing proper server-side conversion tracking lifts conversions by an average of 19%. Meta's says that implementing proper conversion tracking on their platform lifts conversions by 23%.
Converly gets you to that outcome without any of the hard parts. Simply choose a trigger (a Ninja Form being submitted), decide which platforms should get the conversions, and you're done.
Converly is free to start with, and most people have it fully running in under 10 minutes. Start your 14-day free trial today.
About the author

Aaron is the founder of Converly. With over 15 years of experience in digital marketing and SaaS, he's passionate about helping businesses track and optimise their ad conversions.