


HubSpot Forms conversion tracking: 3 ways to do it
Learn three different ways to set up conversion tracking for HubSpot Forms, and how to work out which one is right for you.
If you're running ads to generate leads for your business, then it's really important to get proper, accurate conversion tracking set up.
It tells you which campaigns and ads are actually producing leads, and it gives your ad platforms (Google, Meta, etc) the data they need to work out who is converting and who isn't (and ultimately who they should be showing your ads to in order to get more of them).
The catch is that HubSpot forms are a little different from most form tools. The form you embed on your site actually runs inside a small window loaded from HubSpot's own servers (known as an iFrame), which means a lot of the standard tracking approaches simply don't work.
So in this article, we'll walk you through three ways to set up conversion tracking with HubSpot Forms that do work. We'll give you full instructions for each, plus some resources (code snippets, a Google Tag Manager recipe, etc) to make it easy.
Method 1: Send a GA4 event via Google Tag Manager
Good for: Sending form submission events to Google Analytics 4, for free.
This method is the one to pick if all you want to do is send a conversion event to GA4 whenever a HubSpot form is submitted. Unlike ad platforms such as Google Ads and Meta Ads, Google Analytics doesn't need to know who filled the form in, only that a form submission happened (it's actually against their terms of service to send personally identifiable information in).
The best free way to do it is with Google Tag Manager, using a Recipe (a bundle of pre-built pieces you import straight into your Google Tag Manager account). We've already built one for HubSpot Forms, and you can grab it for free below.
Step 1: Download the HubSpot Forms Conversion Tracking GTM Recipe
Start by grabbing the HubSpot Forms GTM recipe from this page. Inside, you'll find:
- A Custom HTML Tag that listens for HubSpot's own confirmation that a form submission was accepted, then pushes a
hubspot_form_submittedevent to Google Tag Manager. It works with forms built in both HubSpot's current forms editor and its older legacy editor (the two announce a successful submission in completely different ways, but the tag listens for both. - A Variable holding the ID of the submitted form, which is useful if you want to narrow your triggers down to specific forms later (i.e. you only want to send a conversion to GA4 when someone submits your Request A Quote form, and not your Newsletter Signup form).
- A Trigger tied to the
hubspot_form_submittedevent, which you can use to fire the conversion Tags you build (like a GA4 event).
Step 2: Import the GTM recipe into your account
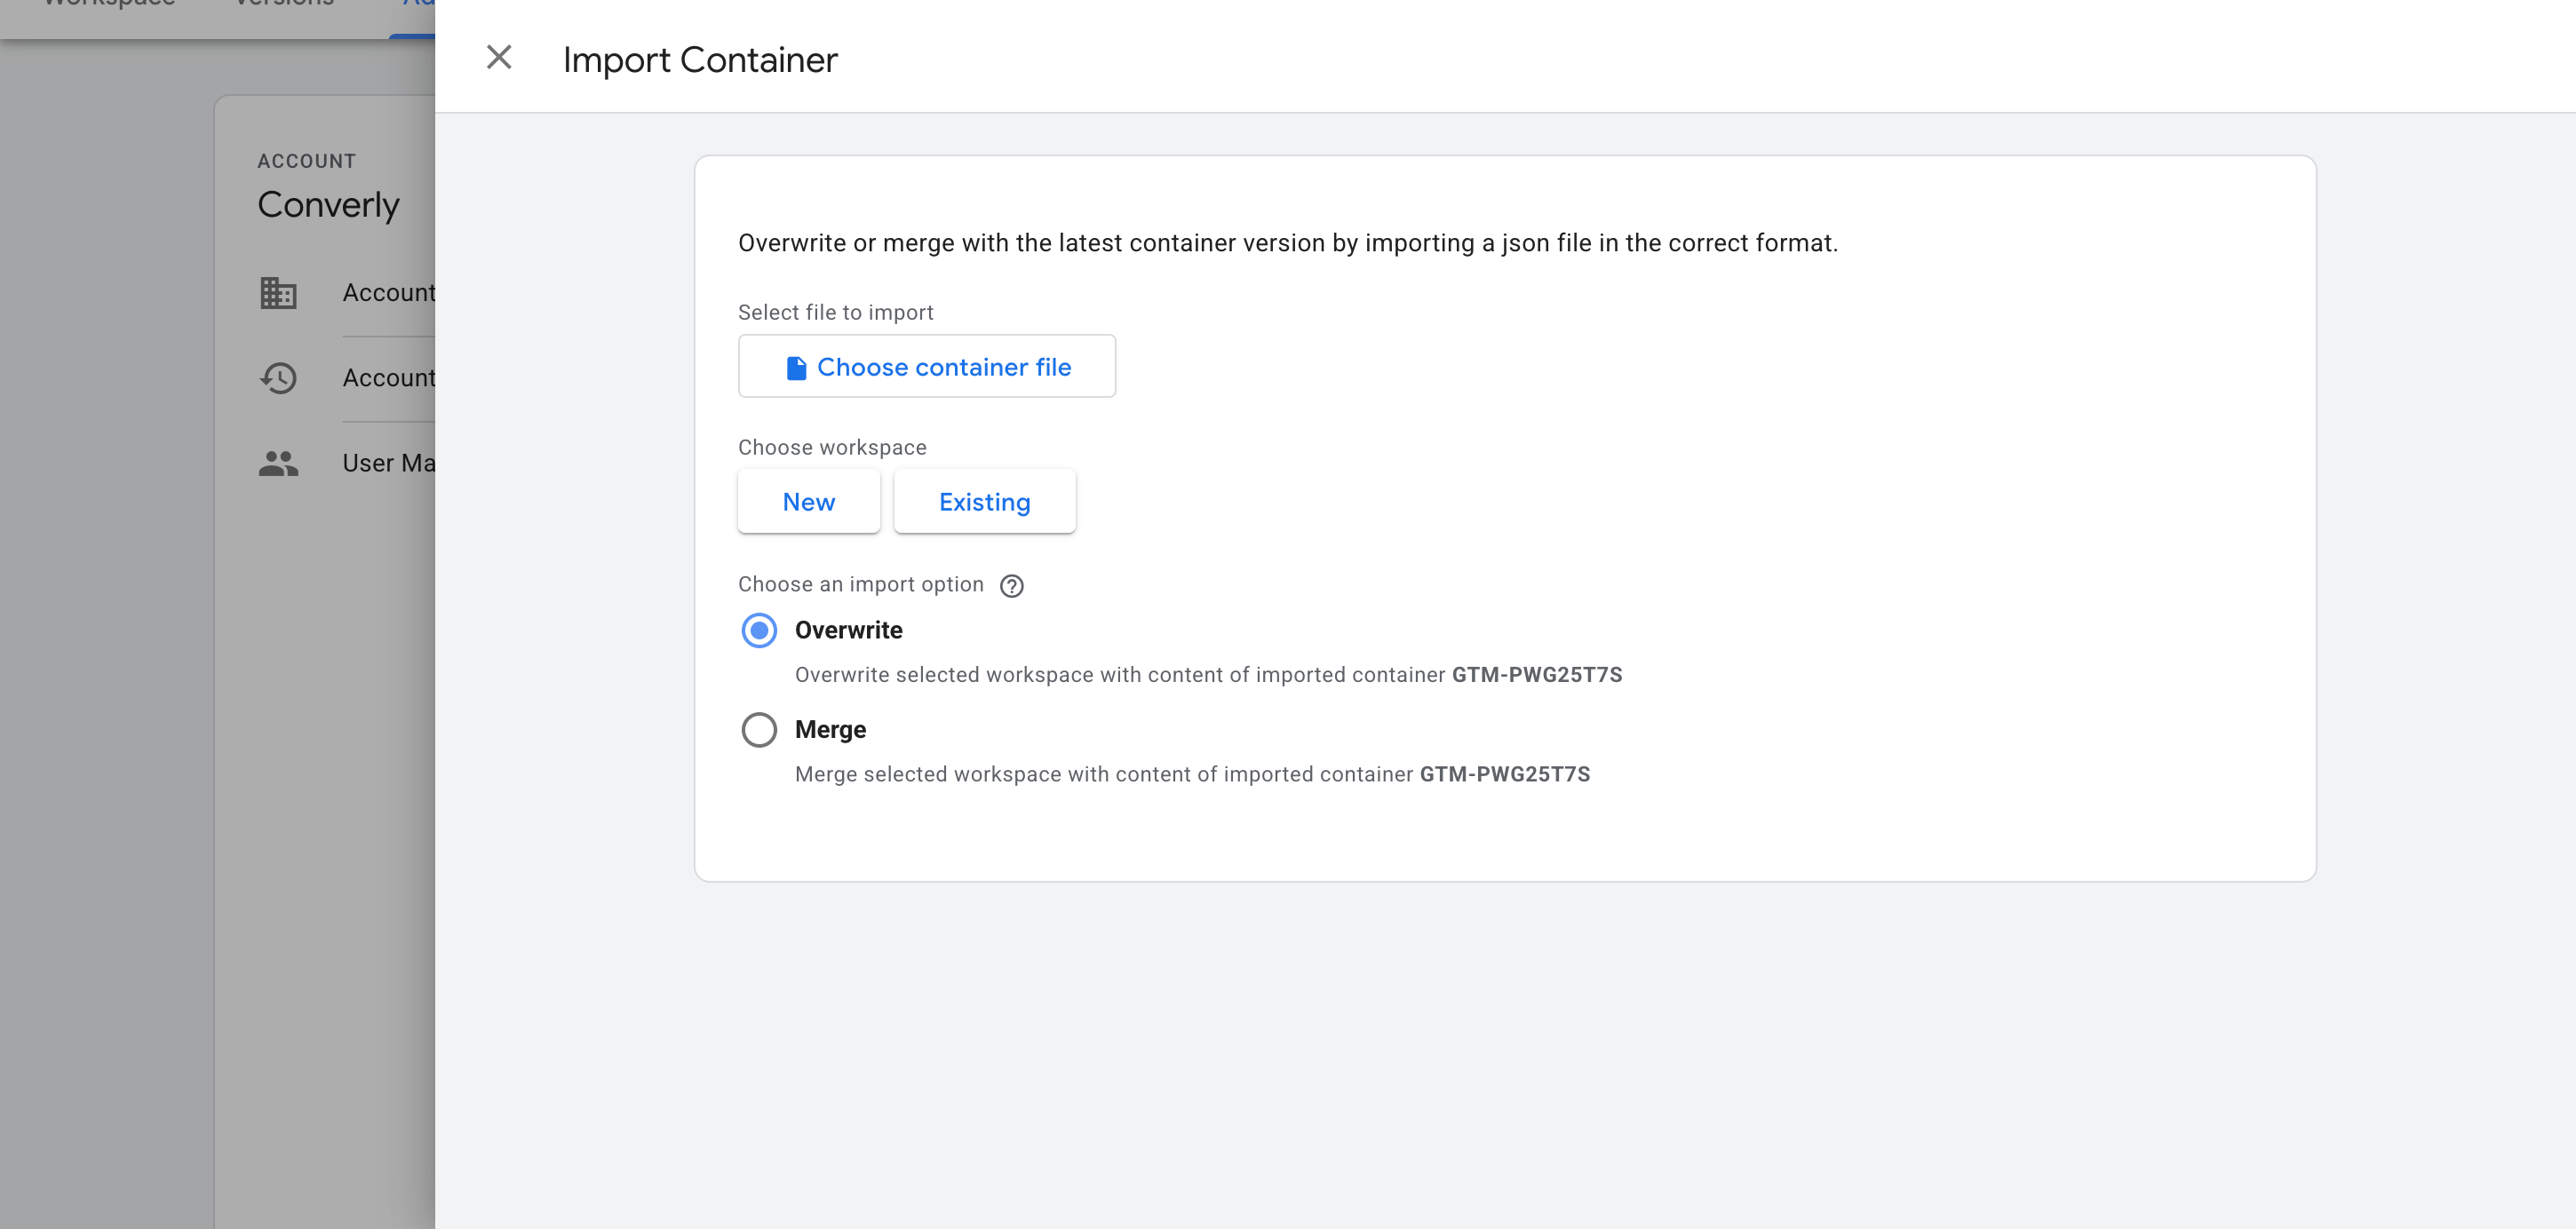
Once you've downloaded the recipe from the page linked above, the next job is getting it into your Google Tag Manager container. Open your Google Tag Manager account, go to Admin, choose Import Container, select the file you downloaded, and pick the Merge option (so nothing already in your container gets overwritten). The listener, variable and trigger are all added for you.
Step 3: Build a GA4 event tag
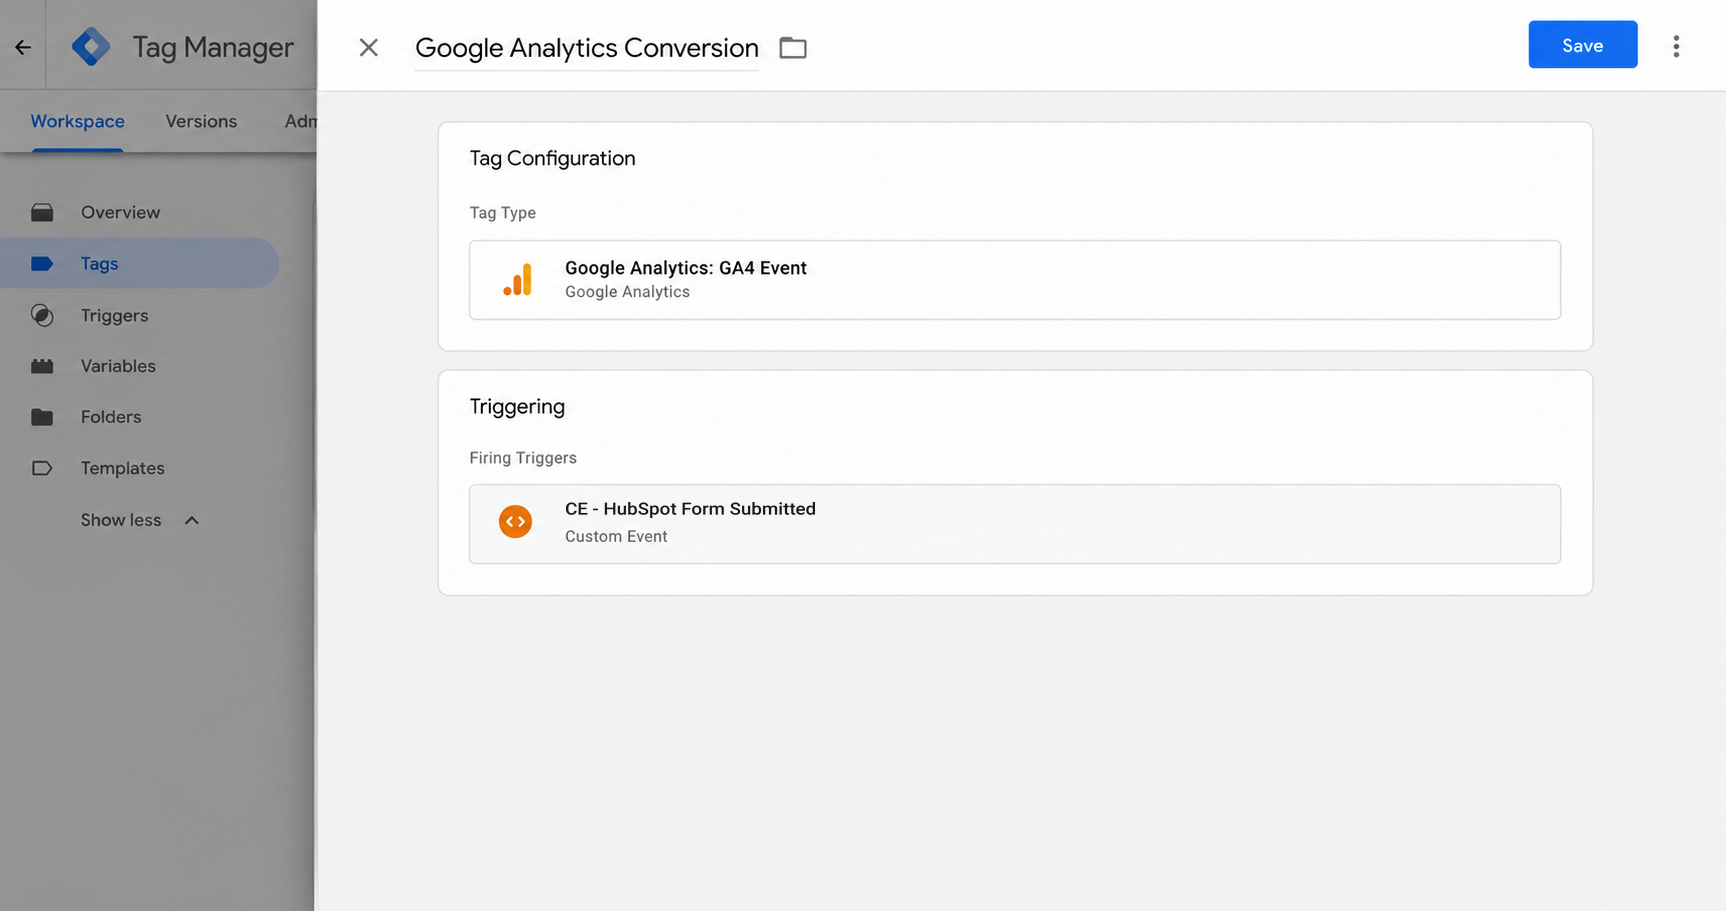
With the recipe in place, you now have a Trigger that fires every time a HubSpot form is successfully submitted, so the next step is telling it what to fire. To send the conversion to Google Analytics, create a GA4 event tag and set its Trigger to the one the recipe provides (called CE - HubSpot Form Submitted).
Step 4: Test it, then mark it as a Key Event in GA4
Now that the tag is built, you need to check the event is actually reaching GA4 and then tell GA4 to count it as a conversion. Submit a test entry on your HubSpot form, open GA4's Realtime report, and confirm the event shows up in the Recent Events list.
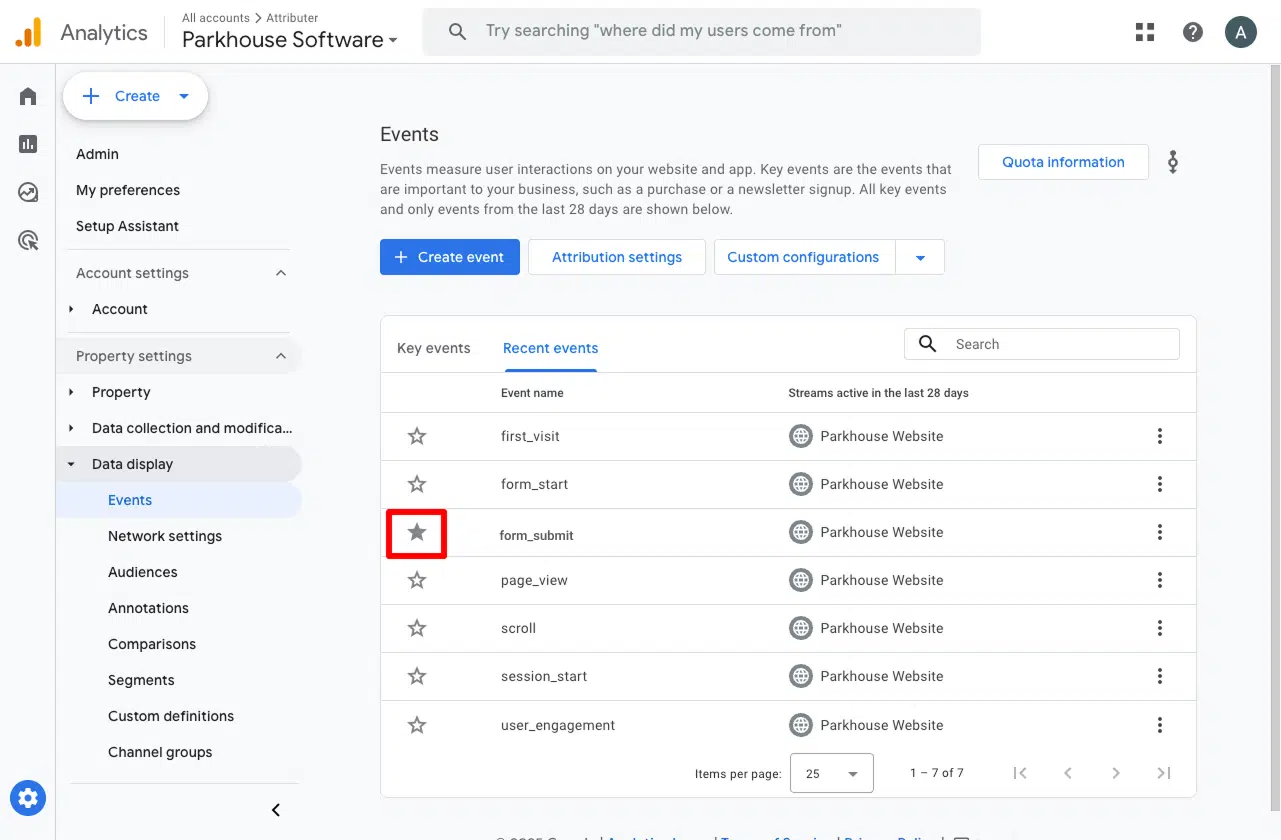
Once it's arriving, go to Admin, then Events, find the event in the list, and toggle it on as a Key Event. That's what tells GA4 to treat it as a conversion in your acquisition and funnel reports, rather than leaving it as an ordinary event.
Pros and cons
Pros:
- It's free. Google Tag Manager doesn't cost anything to use.
- Works with HubSpot's new form builder as well as the older forms from its legacy editor, and with both of the embed codes HubSpot gives you (the new form tool and the old form tool use a different type of embed code to place the form on your site).
- Only counts a conversion once HubSpot has accepted the submission. A form submission attempt that is blocked from submitting (maybe because a required field is left empty) or rejected by HubSpot (like when the email address isn't valid) never fires a conversion.
- Most of the work is already done for you. The listener, trigger and variable come pre-built, so the GA4 event tag is the only thing you need to configure by hand (and that's the easy part).
Cons:
- There's still some setup involved. The recipe takes care of the hardest part, but building the GA4 tag and checking it all works is on you. And if you get stuck, there's nobody to ask (Google doesn't provide support for Google Tag Manager).
- Every HubSpot form on your site pushes the same event. You can separate them using the Form ID variable, but that means building a separate trigger for each form (based on HubSpot's long form IDs) and then building separate tags for each one. Unless you do that, a Quote Request submission and a Contact Support submission land in GA4 as the same event, with no way to tell them apart afterwards. That's fine if you have one form, but a real problem if you have several.
- The conversion reaches Google Analytics through the visitor's browser, so ad blockers and privacy-focused browsers like Safari can stop it from ever arriving. Industry studies put the loss at roughly 30% of conversions.
- This is only good for sending events to Google Analytics. It's not a great solution for sending conversions to Google Ads, Meta Ads, or any other destination (that's what Methods 2 and 3 are for).
Method 2: Use Google Tag Manager to set up Enhanced Conversions
Good for: Sending Enhanced Conversions to Google Ads.
Counting submissions (the way Method 1 does) is fine for Google Analytics, but it won't get you very far in Google Ads.
That's because Google Ads wants to match each conversion back to a real person who clicked your ad, and to do that it needs details like their name, email, and phone sent along with every conversion (Google calls this Enhanced Conversions).
With most form tools, getting those details is a matter of reading them out of the form on your page. HubSpot doesn't allow that, because the form's fields sit inside HubSpot's own embedded window where your site's code can't reach them. The good news is that HubSpot gives your page a way to ask for the submitted values once the submission is confirmed, and that's what this method does.
Step 1: Set up a Custom HTML Tag with the form listening code
In GTM, create a new Custom HTML Tag, paste in the snippet below, and set it to fire on the All Pages trigger, with the tag firing option set to Once per event.
The above code does a bunch of things:
- Listens for HubSpot's confirmation that the submission was accepted. Forms built in HubSpot's current editor announce a successful submission to the page once HubSpot's servers have accepted it. Forms from the older legacy editor announce it a different way, so the snippet listens for both and treats them the same.
- Ignores fake confirmations. Before it counts anything, the snippet checks the confirmation came from a form HubSpot actually put on your page, or from HubSpot's own website. A message sent by an ad or any other embedded window on the page is ignored.
- Asks HubSpot for the submitted details. Your site can't read the fields inside HubSpot's form, and by the time the submission is confirmed HubSpot has already swapped the form for its thank you message anyway. So the snippet asks HubSpot to hand over the values that were just submitted, which it does almost instantly.
- Identifies which field is which. HubSpot only tells the page each field's internal name (like
email,firstnameormobilephone), not its label. HubSpot's standard contact fields use sensible names, so the snippet matches on those to find the email, first name, last name and phone. - Skips sensitive fields. Passwords, card numbers, CVV codes and similar sensitive fields are dropped by name before their values are ever read.
- Sends all the data to the dataLayer. Finally, the snippet sends one event to the dataLayer with the form ID and the lead's details. If HubSpot hasn't handed the details back within a second and a half, or the form redirects to another page first, it sends the conversion anyway without them, so you never lose a submission HubSpot has already accepted.
This approach addresses a number of issues that other articles on the internet don't, including:
Issue 1: GTM's built-in form trigger can't see a HubSpot form at all. Other articles on the internet tell you to use GTM's built-in Form Submission trigger, or a click trigger on the Submit button. But HubSpot's form runs inside an iFrame, and nothing that happens in there (the click or the submission) is visible to Google Tag Manager on your page. You'd set it all up, it would never fire, and your Google Ads conversion count would sit at zero with nothing telling you why. This snippet listens for the confirmation HubSpot sends out to your page instead.
Issue 2: Most published HubSpot tracking code only works on older forms. A lot of the "track HubSpot forms in GTM" code you'll find online listens for the message HubSpot's legacy forms send. Forms built in HubSpot's current editor never send that message, so that code tracks nothing on any form you've built recently, and you'd only find out when the conversion count sits at 0 in Google Ads. This snippet listens for what current forms actually send, and still handles the older message for legacy forms.
Issue 3: The lead's details can't be read from the page. The usual way to capture a name and email is to read them straight out of the form fields. That doesn't work with HubSpot Forms though, because the fields are inside an iFrame. So if you tried to take this approach, your conversions would reach Google Ads but they wouldn't have the lead's name, email, phone, etc (which is the data Enhanced Conversions depends on). This snippet asks HubSpot for the submitted values after it confirms the submission, which is the one way the page can get them.
As you can probably tell from reading the above, this isn't a snippet we put together just for this article. It's built from the HubSpot detection code in our own conversion tracking software, and we've tested it against a real HubSpot form on both of HubSpot's embed codes, so you can use it with confidence.
Step 2: Create Data Layer Variables for the captured data
The snippet above puts the lead's details (the email, first name, last name, and phone) into the dataLayer, but Google Tag Manager won't do anything with them until you tell it to pull each one out of the dataLayer. A Data Layer Variable is what does that.
To set one up, go to the Variables section in GTM, click New under User-Defined Variables, choose Data Layer Variable as the type, and give it a name.
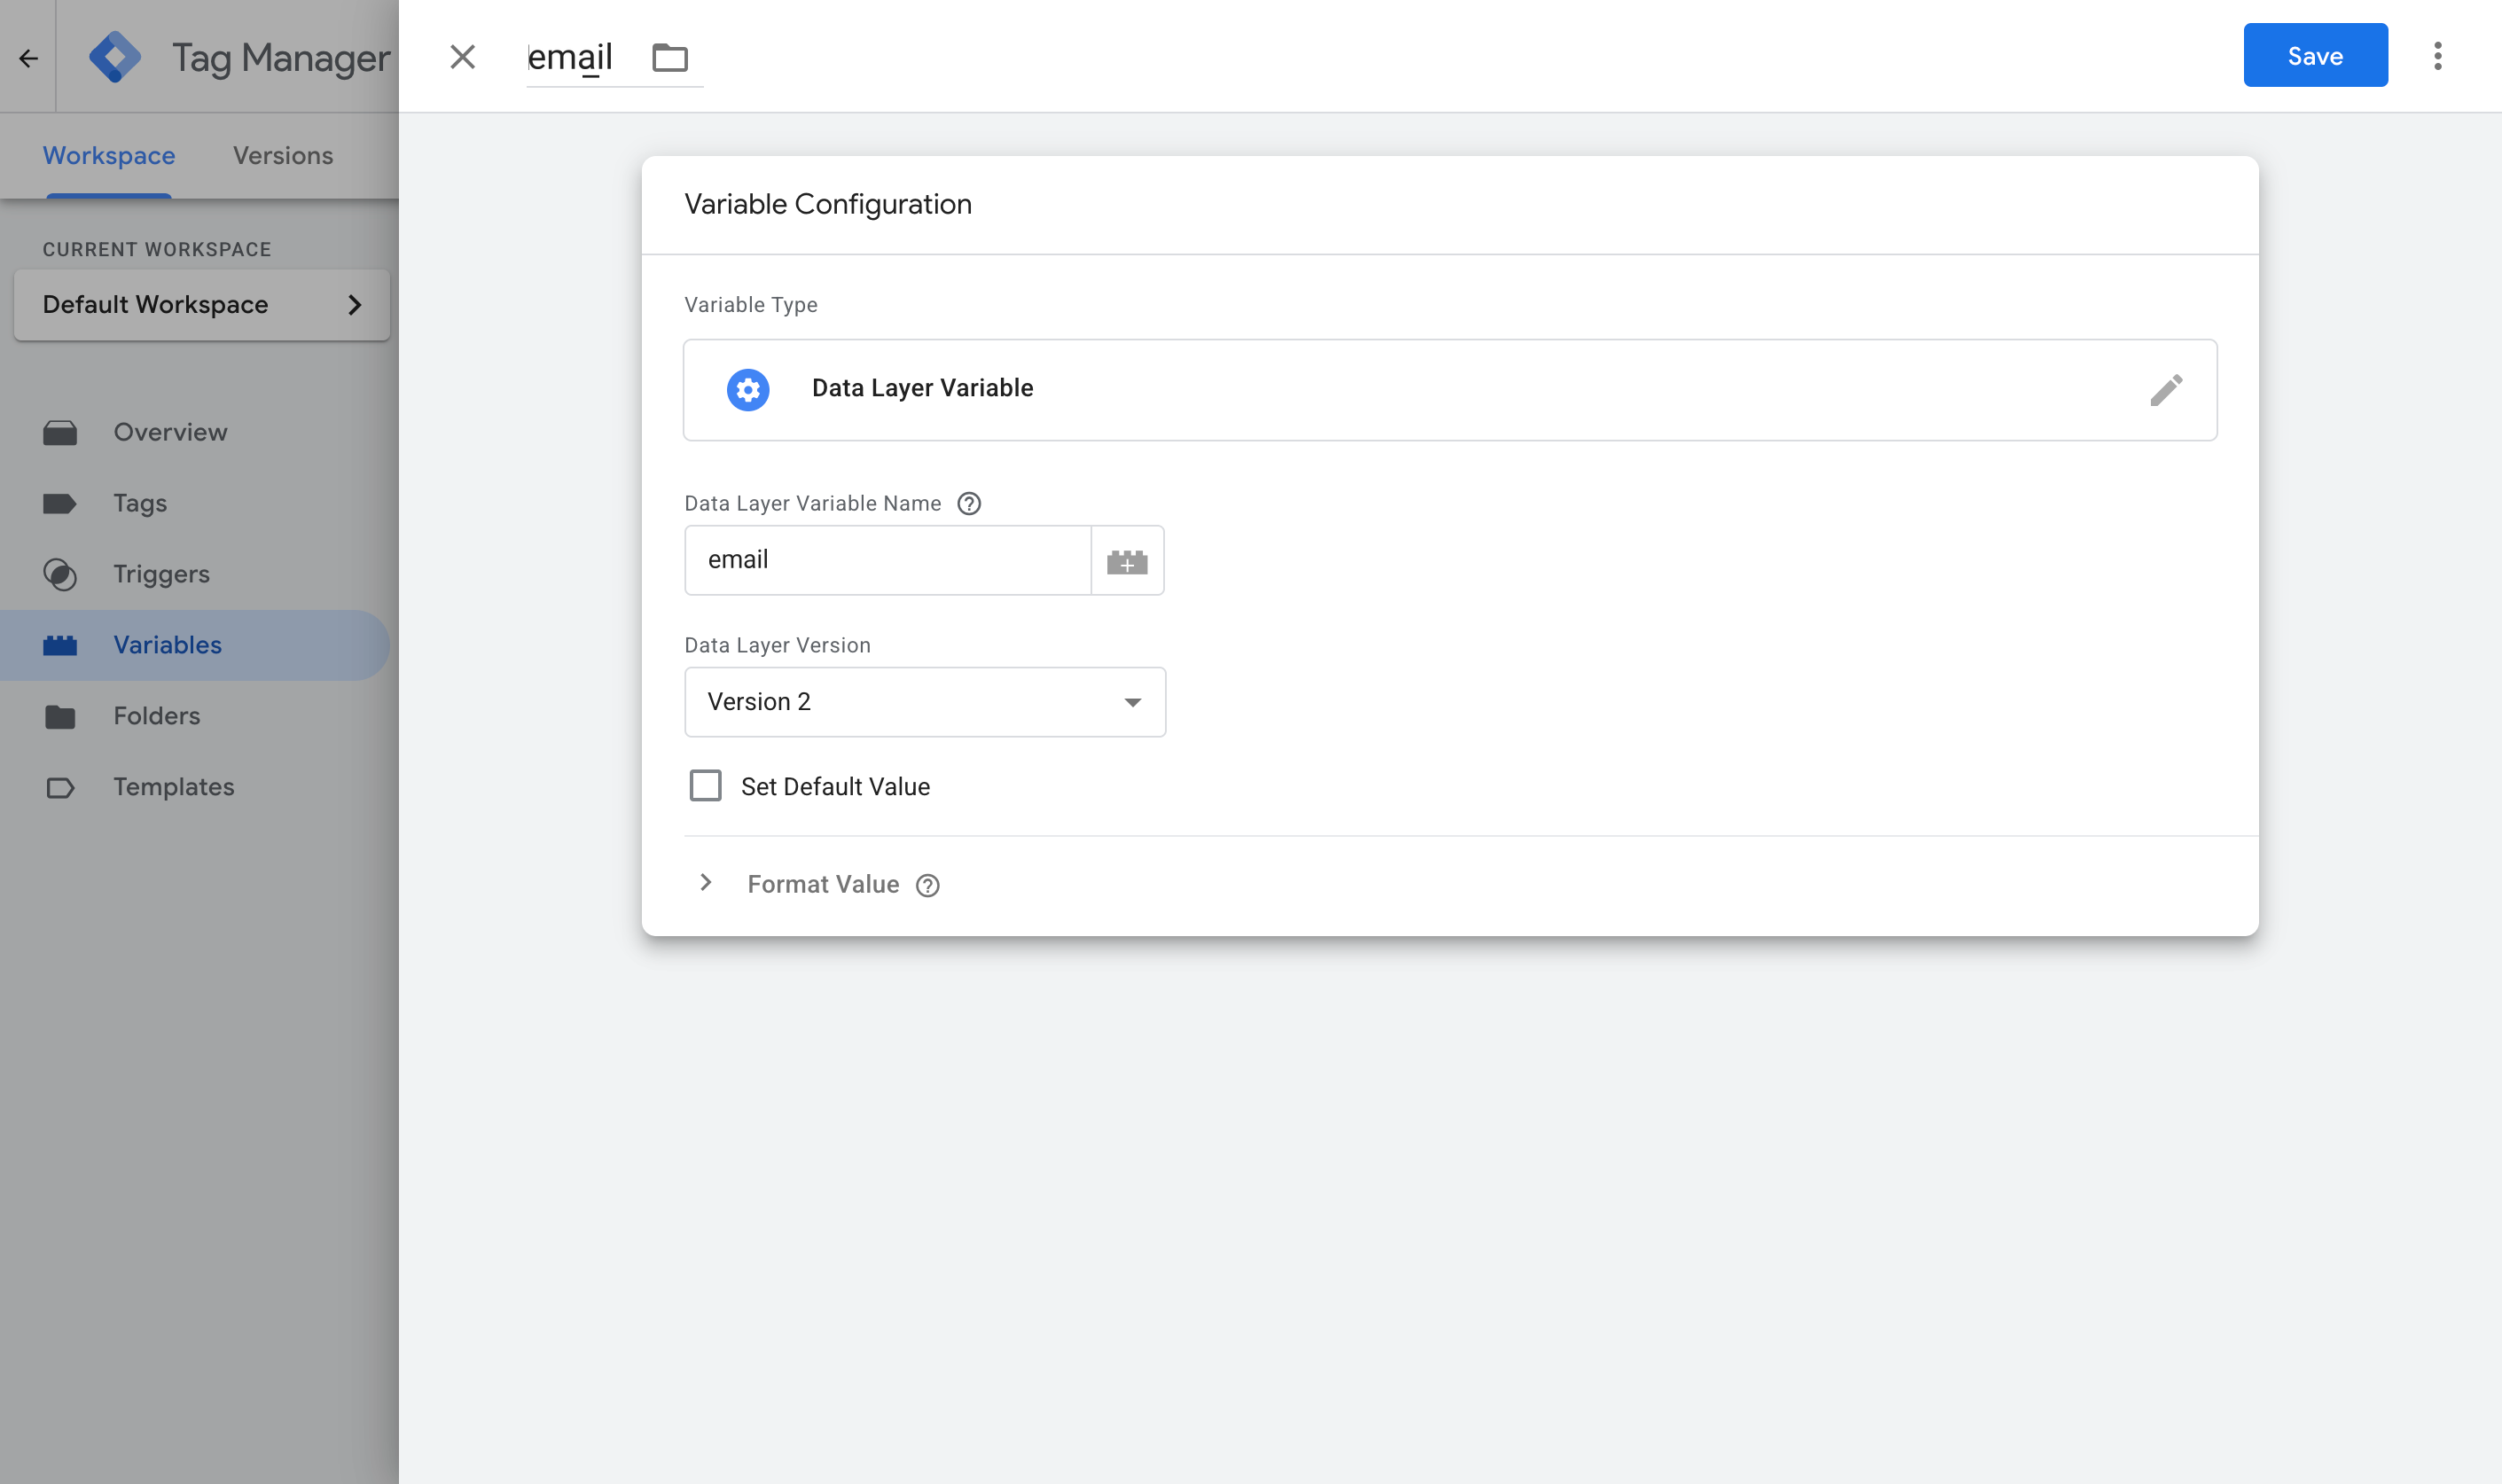
Here are the four you need.
Variable 1:
- Name: Email
- Variable Type: Data Layer Variable
- Data Layer Variable Name: email
Variable 2:
- Name: First Name
- Variable Type: Data Layer Variable
- Data Layer Variable Name: first_name
Variable 3:
- Name: Last Name
- Variable Type: Data Layer Variable
- Data Layer Variable Name: last_name
Variable 4:
- Name: Phone
- Variable Type: Data Layer Variable
- Data Layer Variable Name: phone
Step 3: Create a Custom Event trigger
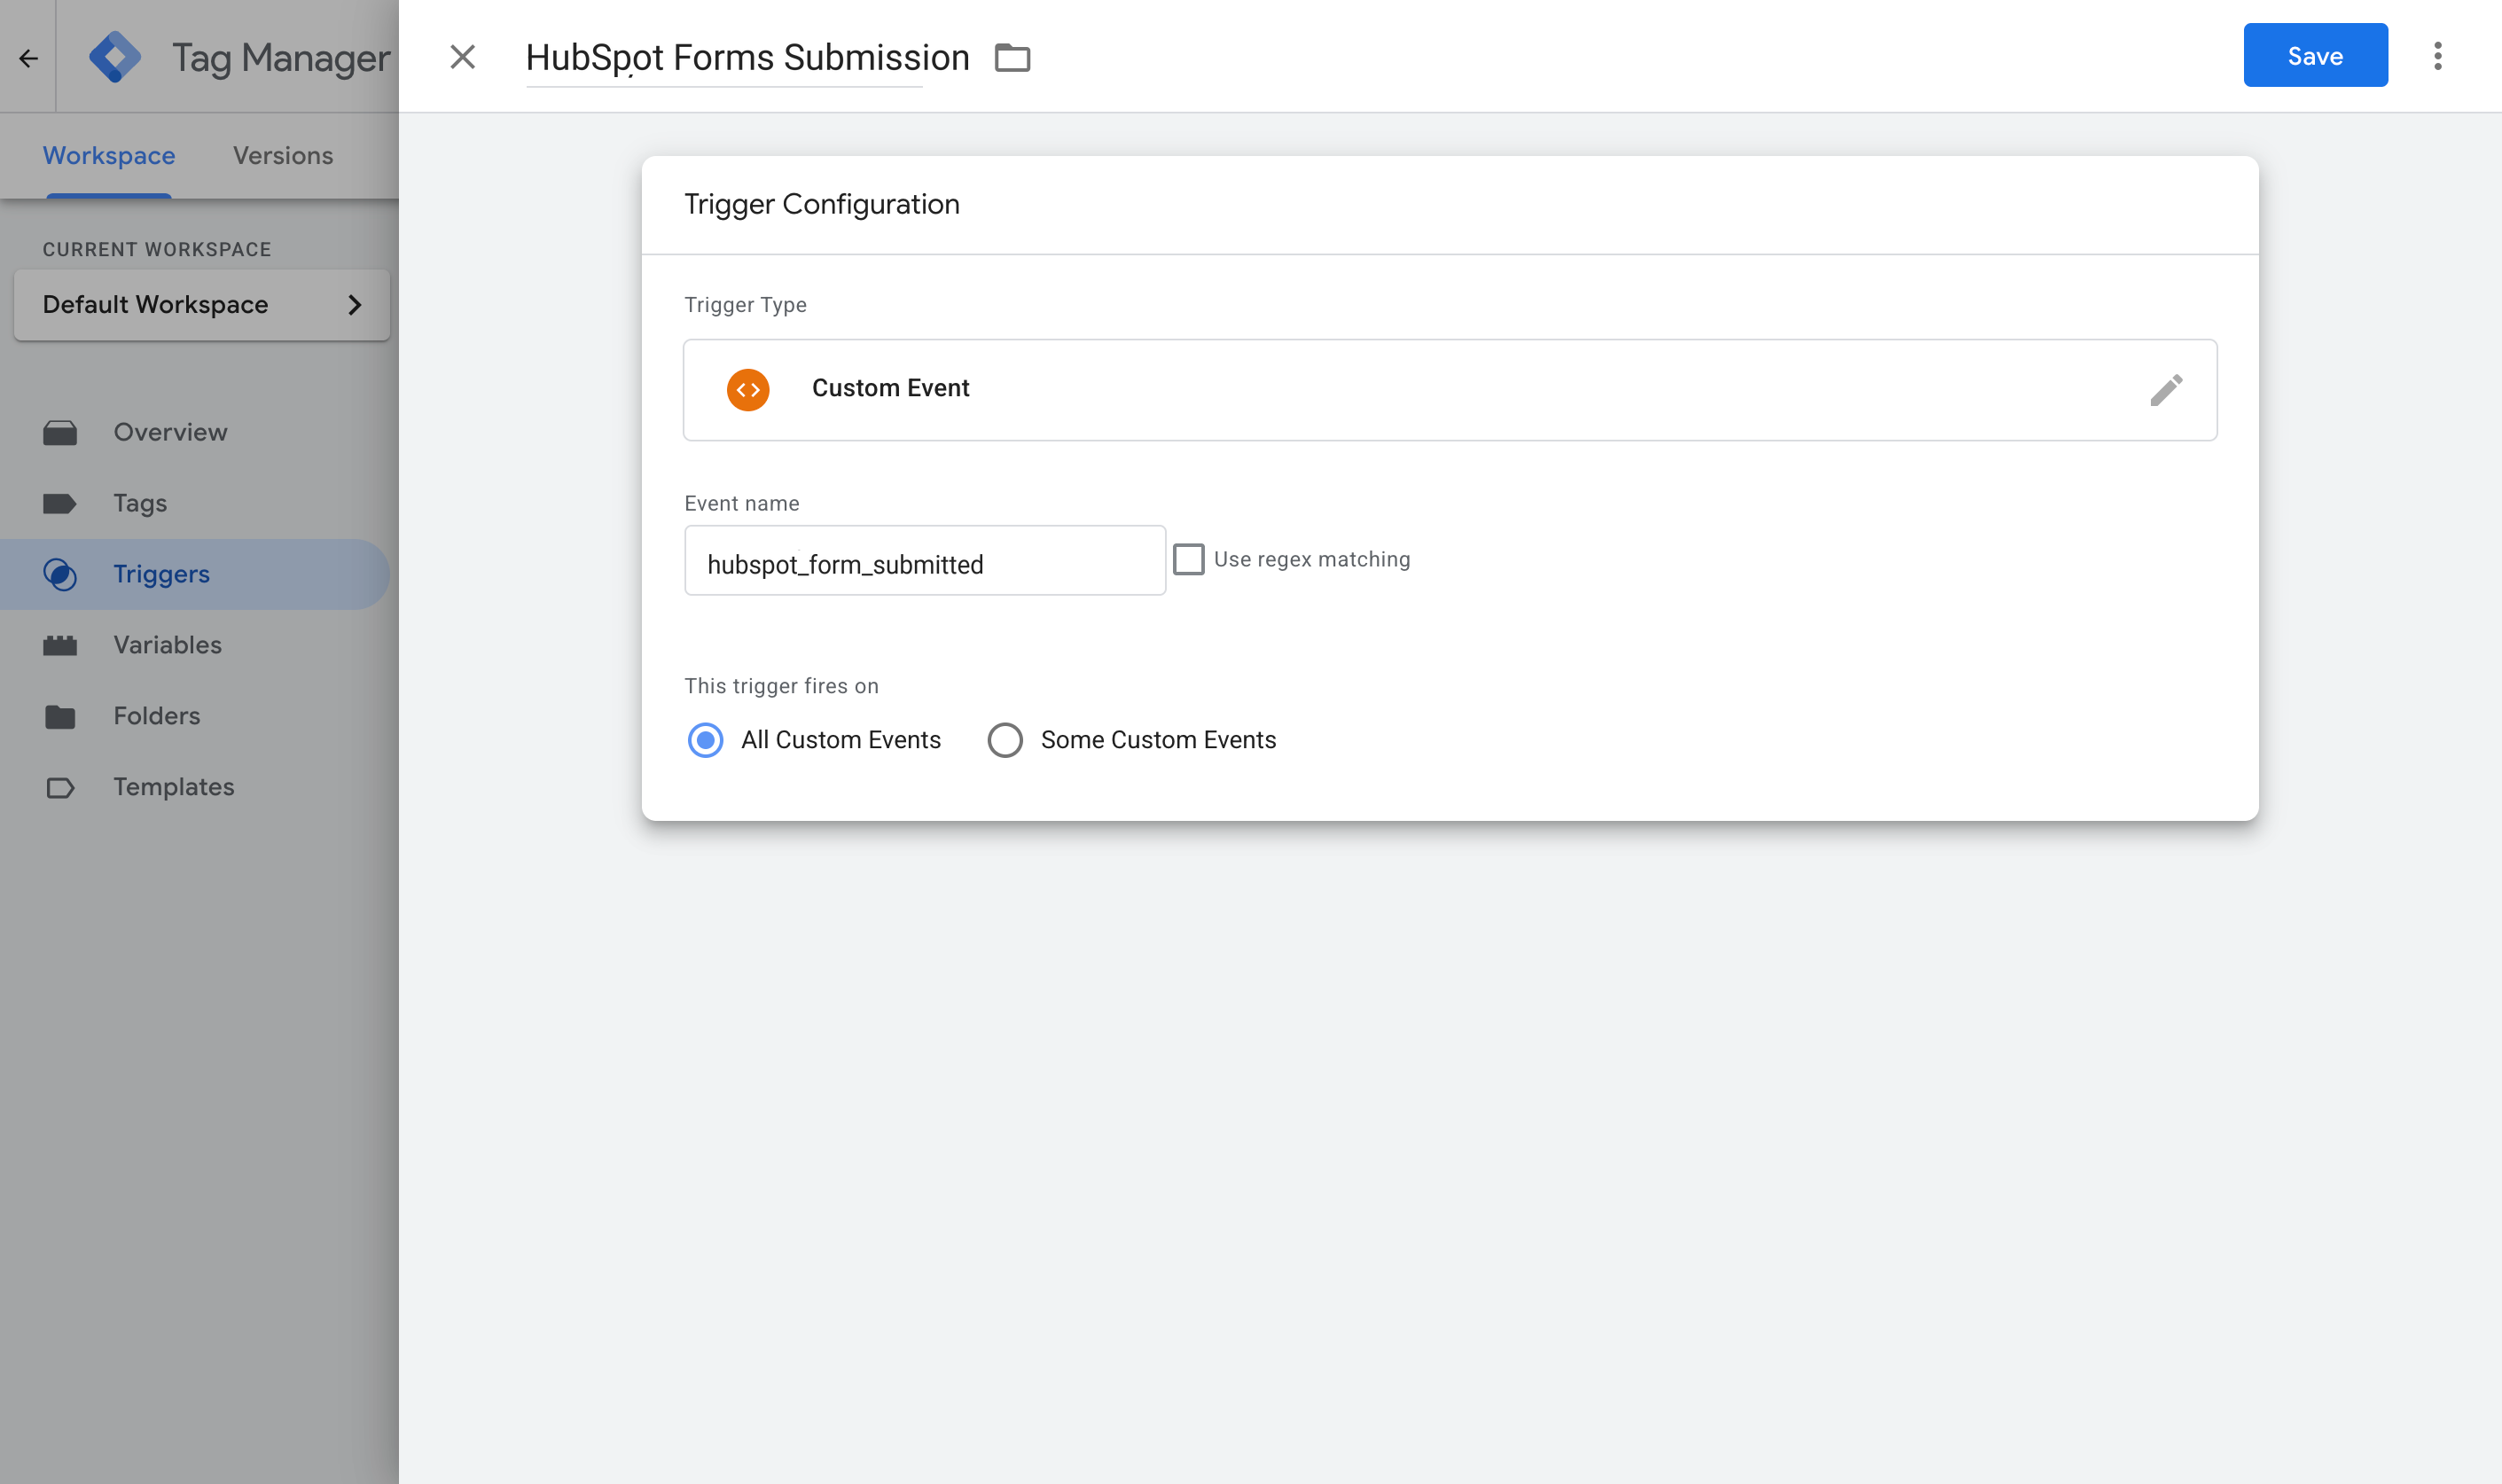
With the Variables pulling the data out of the dataLayer, the next step is telling Google Tag Manager when to use them. That's the job of a Trigger. It watches for the event the snippet pushes into the dataLayer when HubSpot accepts a submission, and tells your conversion tags to fire when it arrives.
To set it up, go to the Triggers section, click New, choose the Custom Event type, and set the event name to exactly hubspot_form_submitted (it has to match what the code pushes).
Step 4: Turn on Enhanced Conversions in Google Ads
Everything so far happens inside Google Tag Manager, but Google Ads also has to agree to accept the data before any of it can be used. To do that, head to your Google Ads account, go to Goals, then Conversions, then Settings, and turn on Enhanced Conversions.
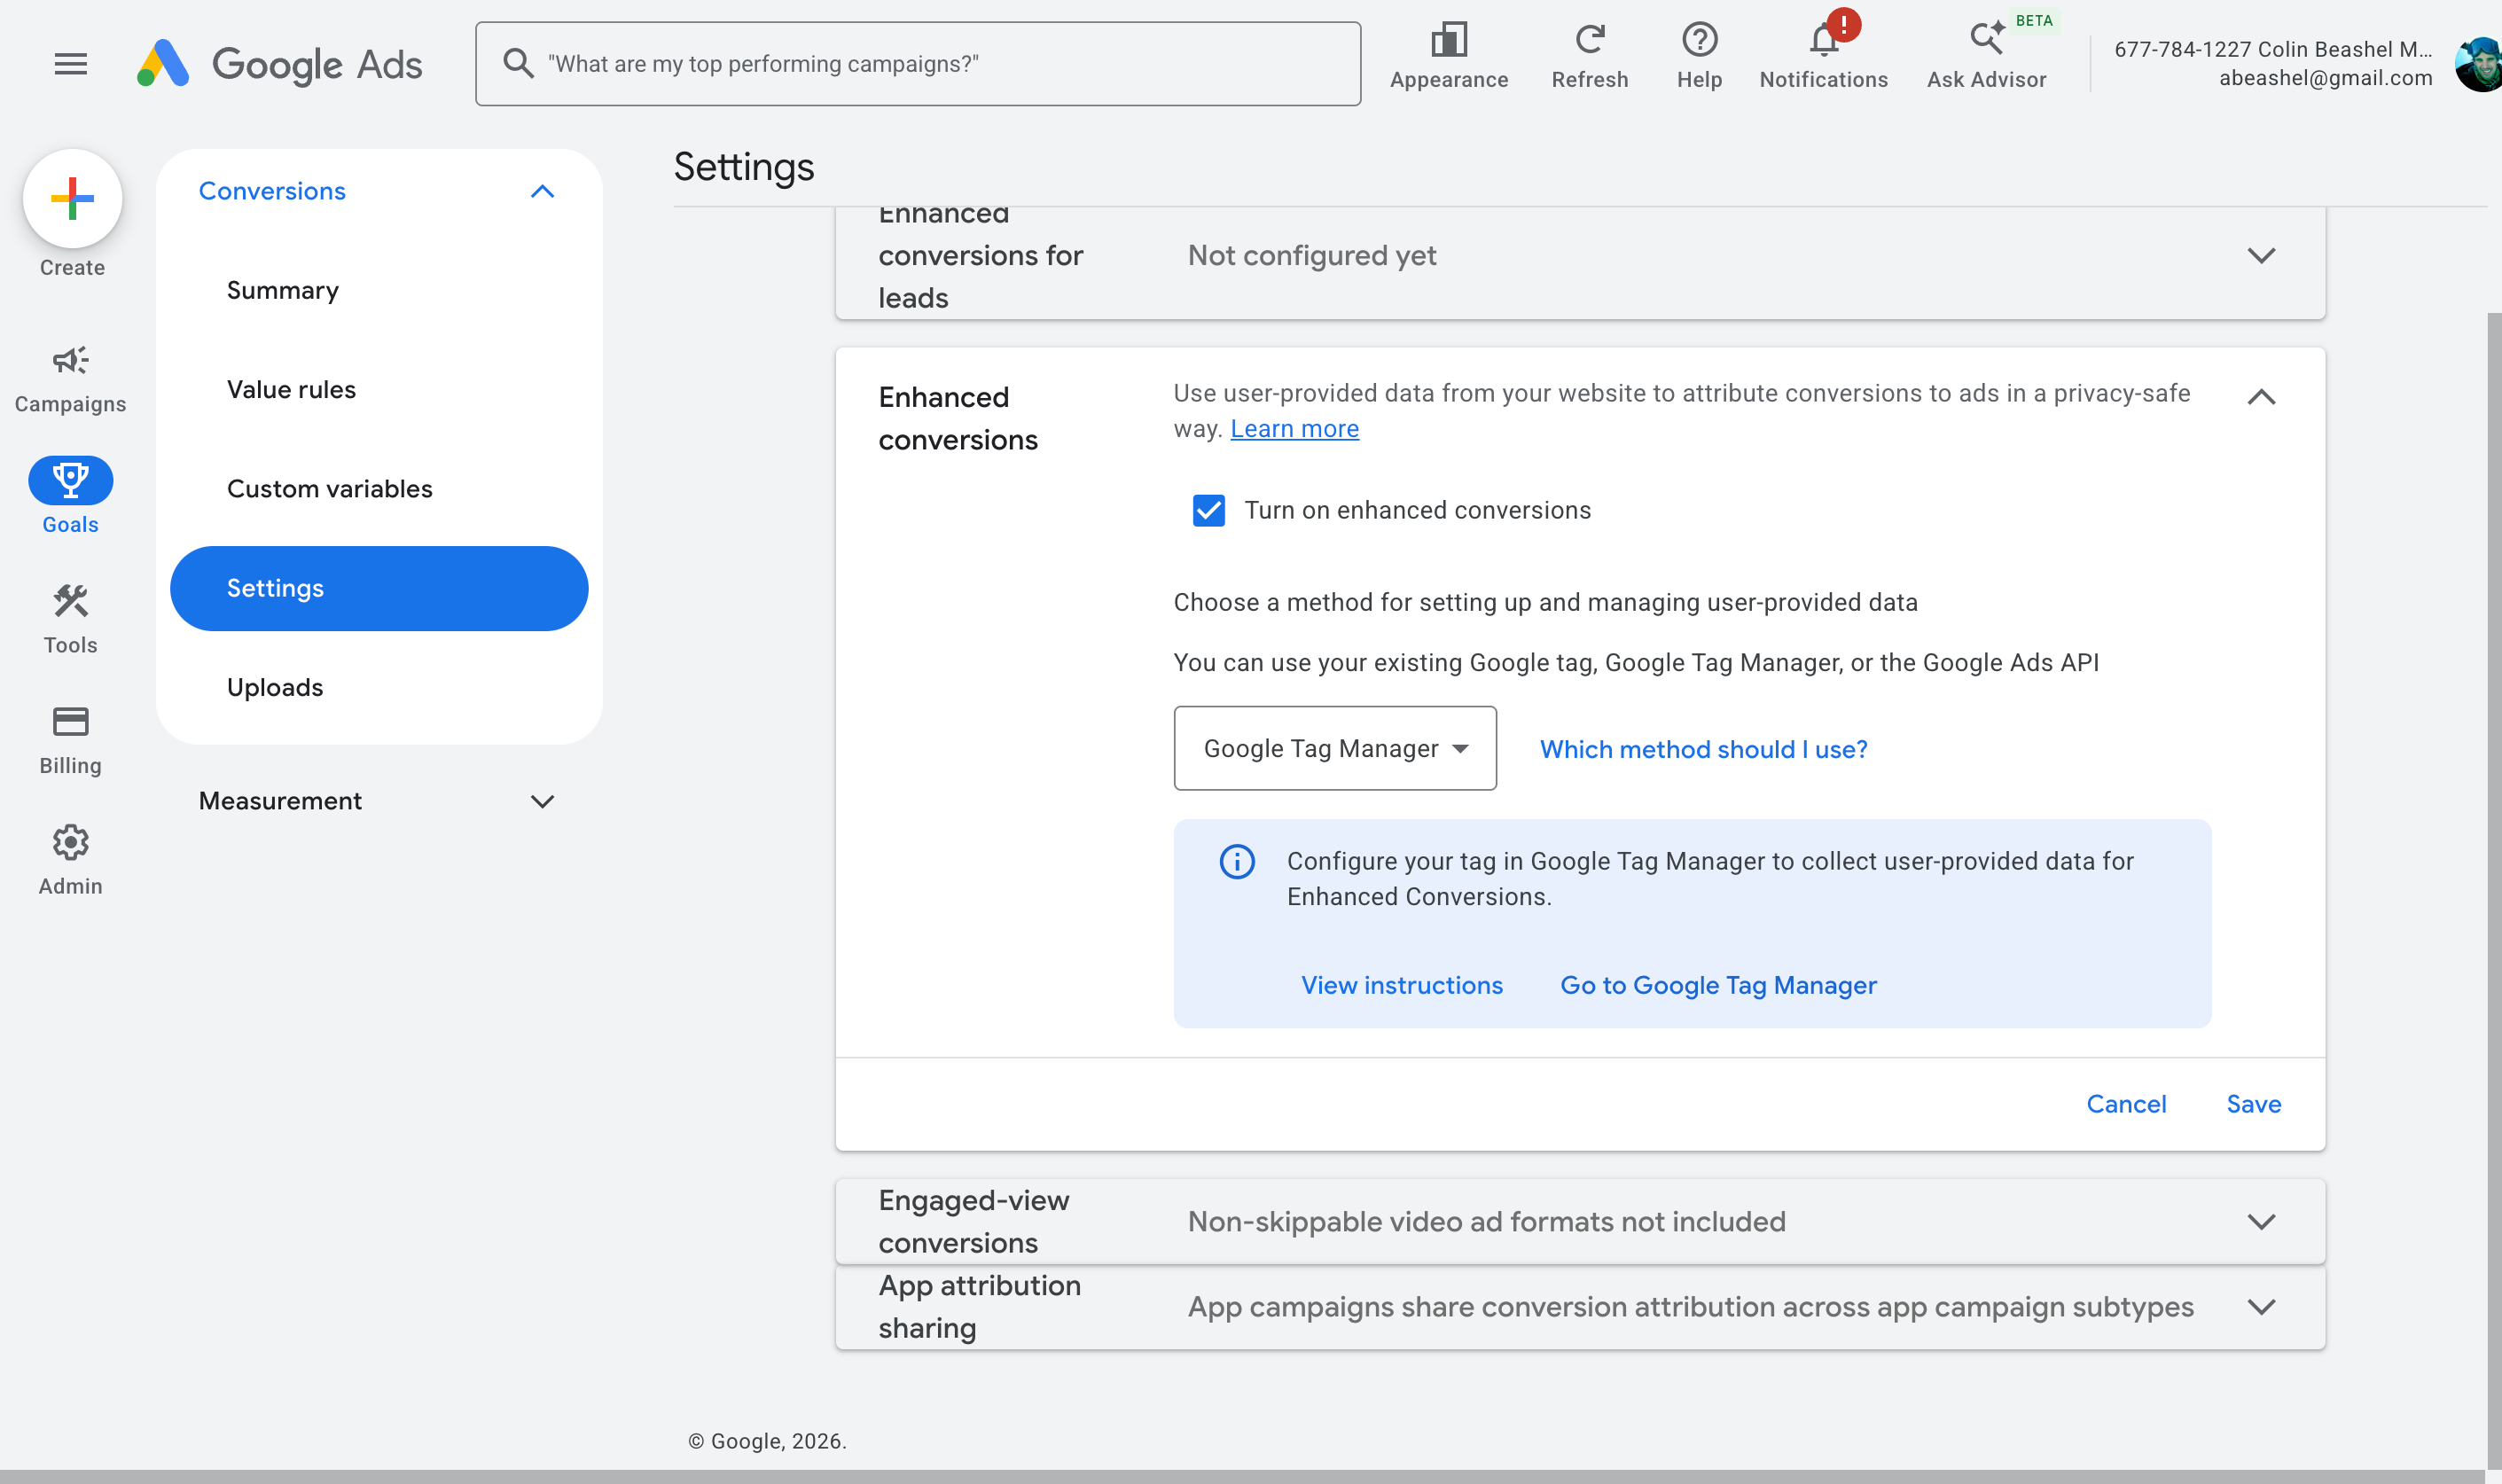
When it asks how you want to implement it, choose Google Tag Manager. This gives Google Ads permission to receive and use the customer data you're about to send.
Step 5: Create your Google Ads conversion tag and map the data
This is the step that ties everything together, because it's the tag that actually sends the conversion. Jump back into GTM, go to Tags, select New, choose Google Ads User Provided Data Event as the tag type, and map the variables from Step 2 to the fields it asks for.
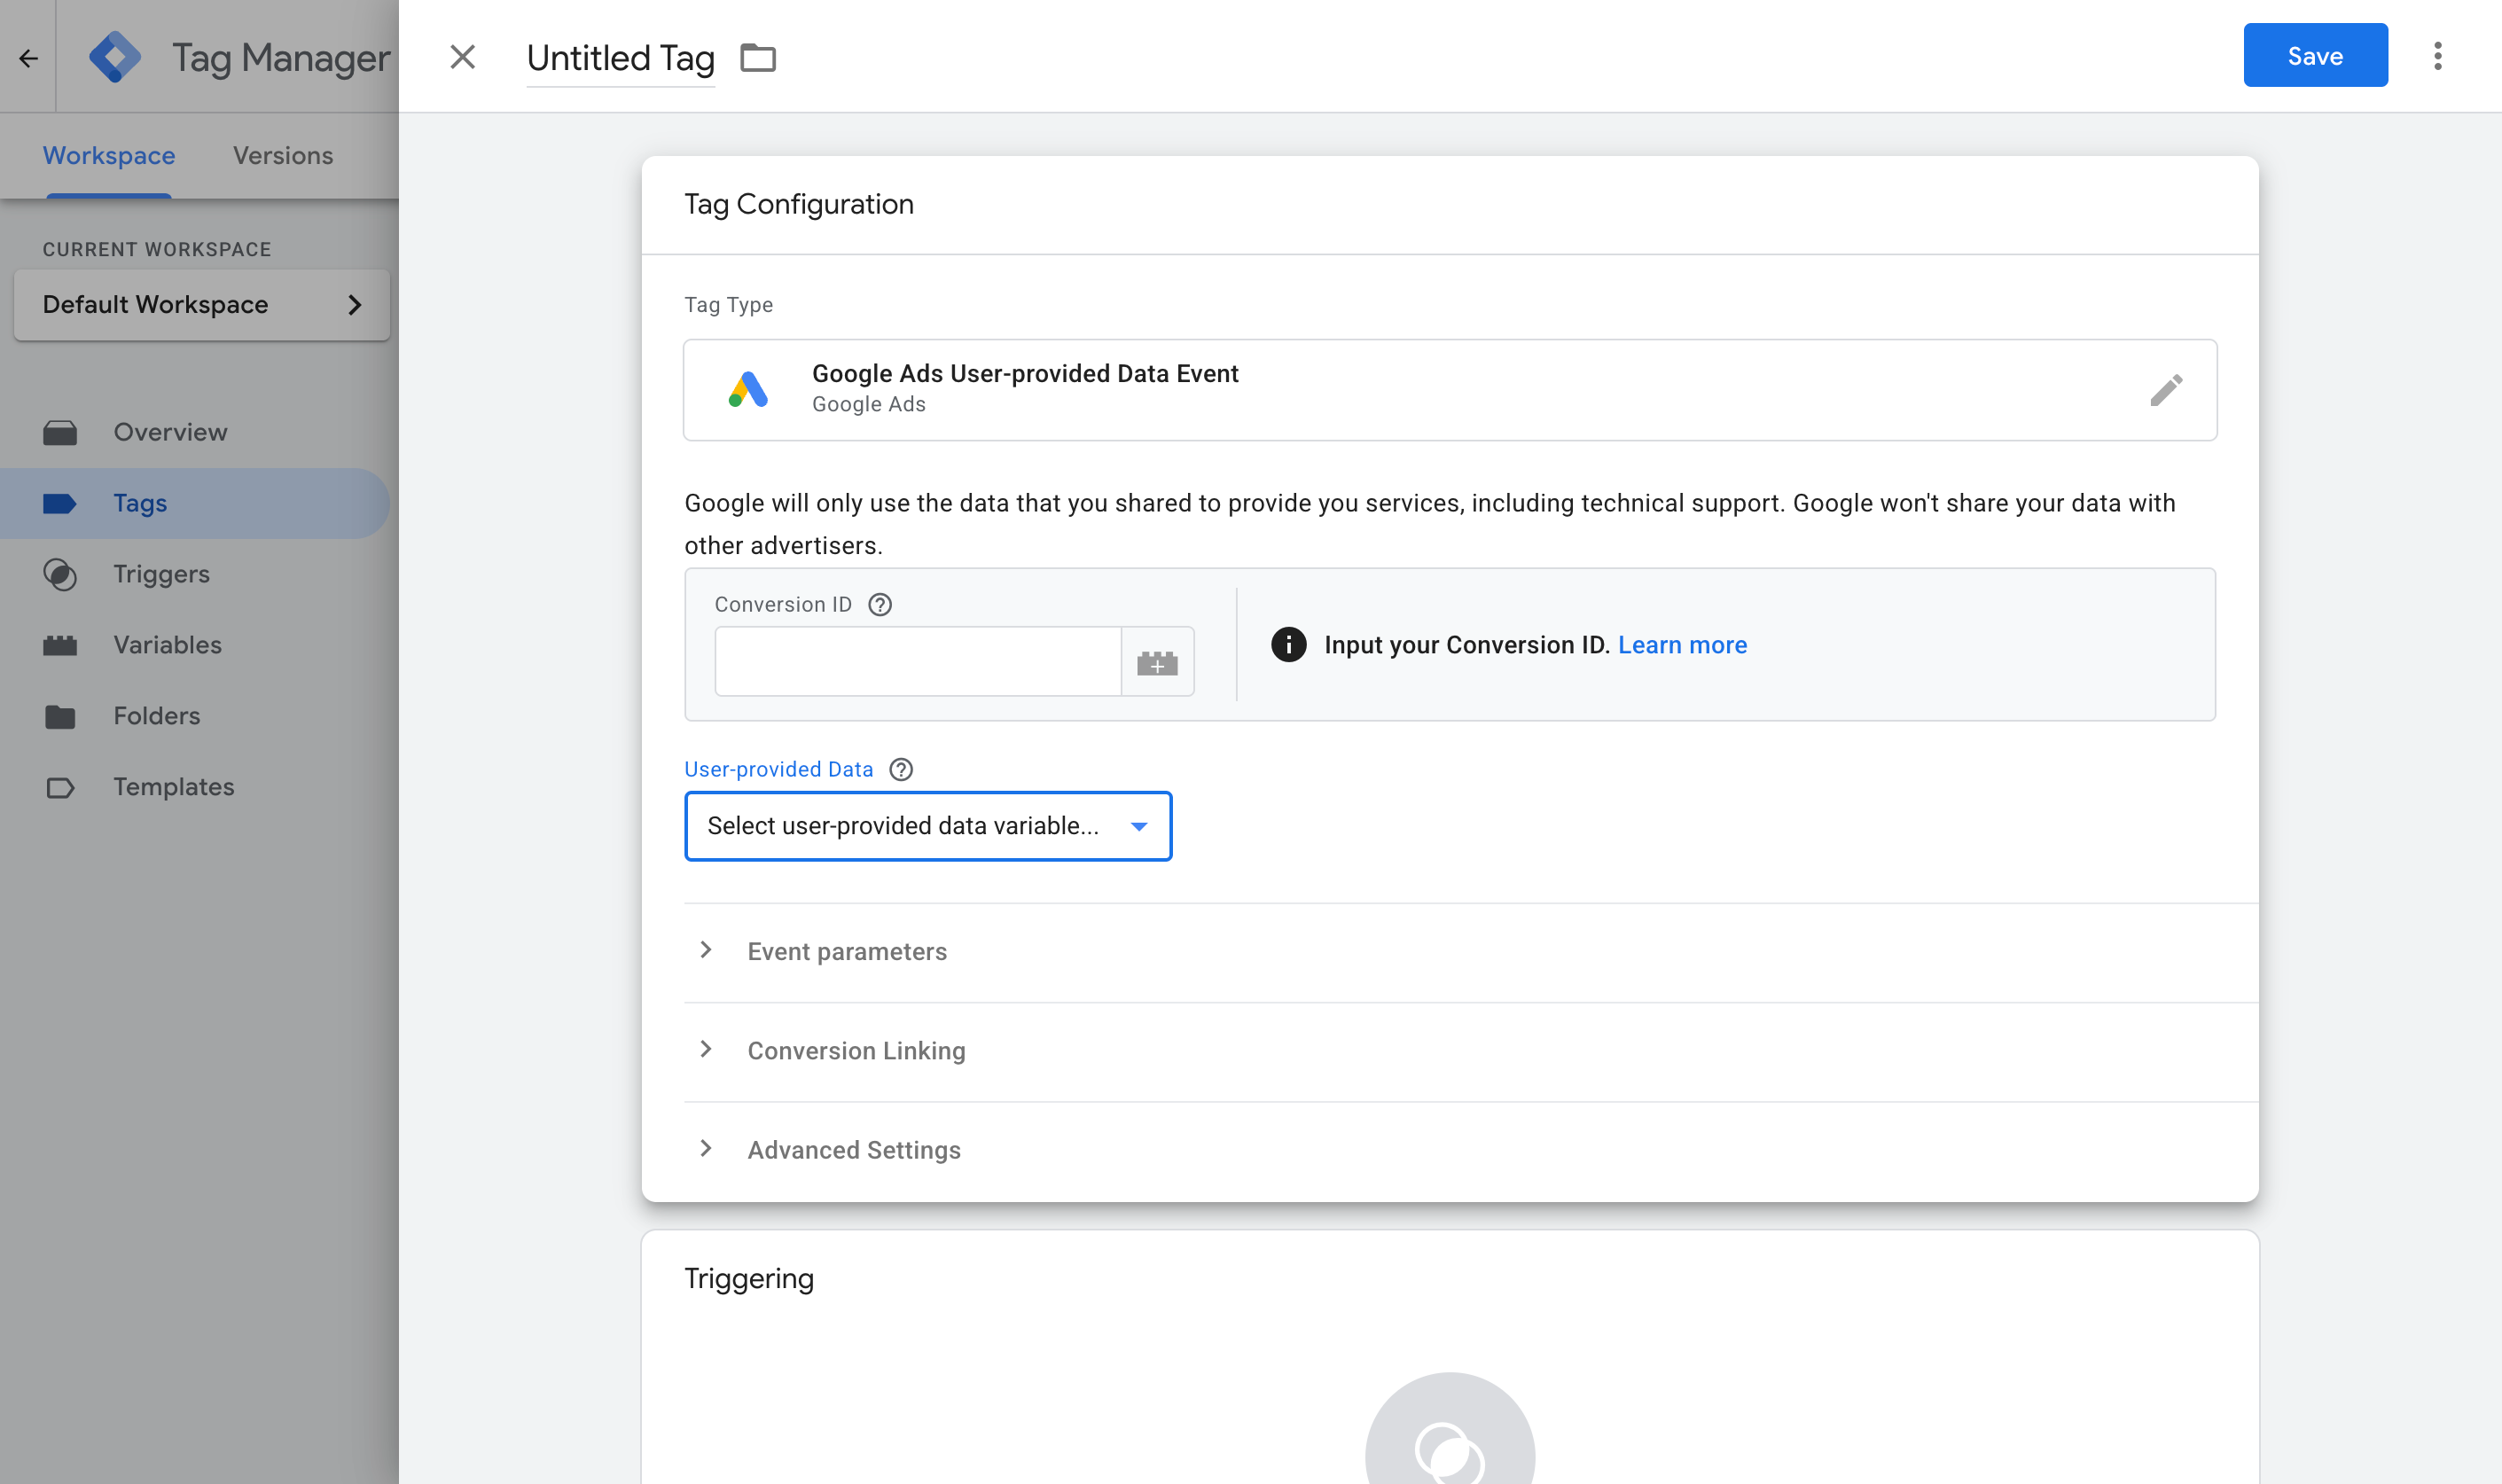
Then set it to fire on the Custom Event trigger you created in Step 3.
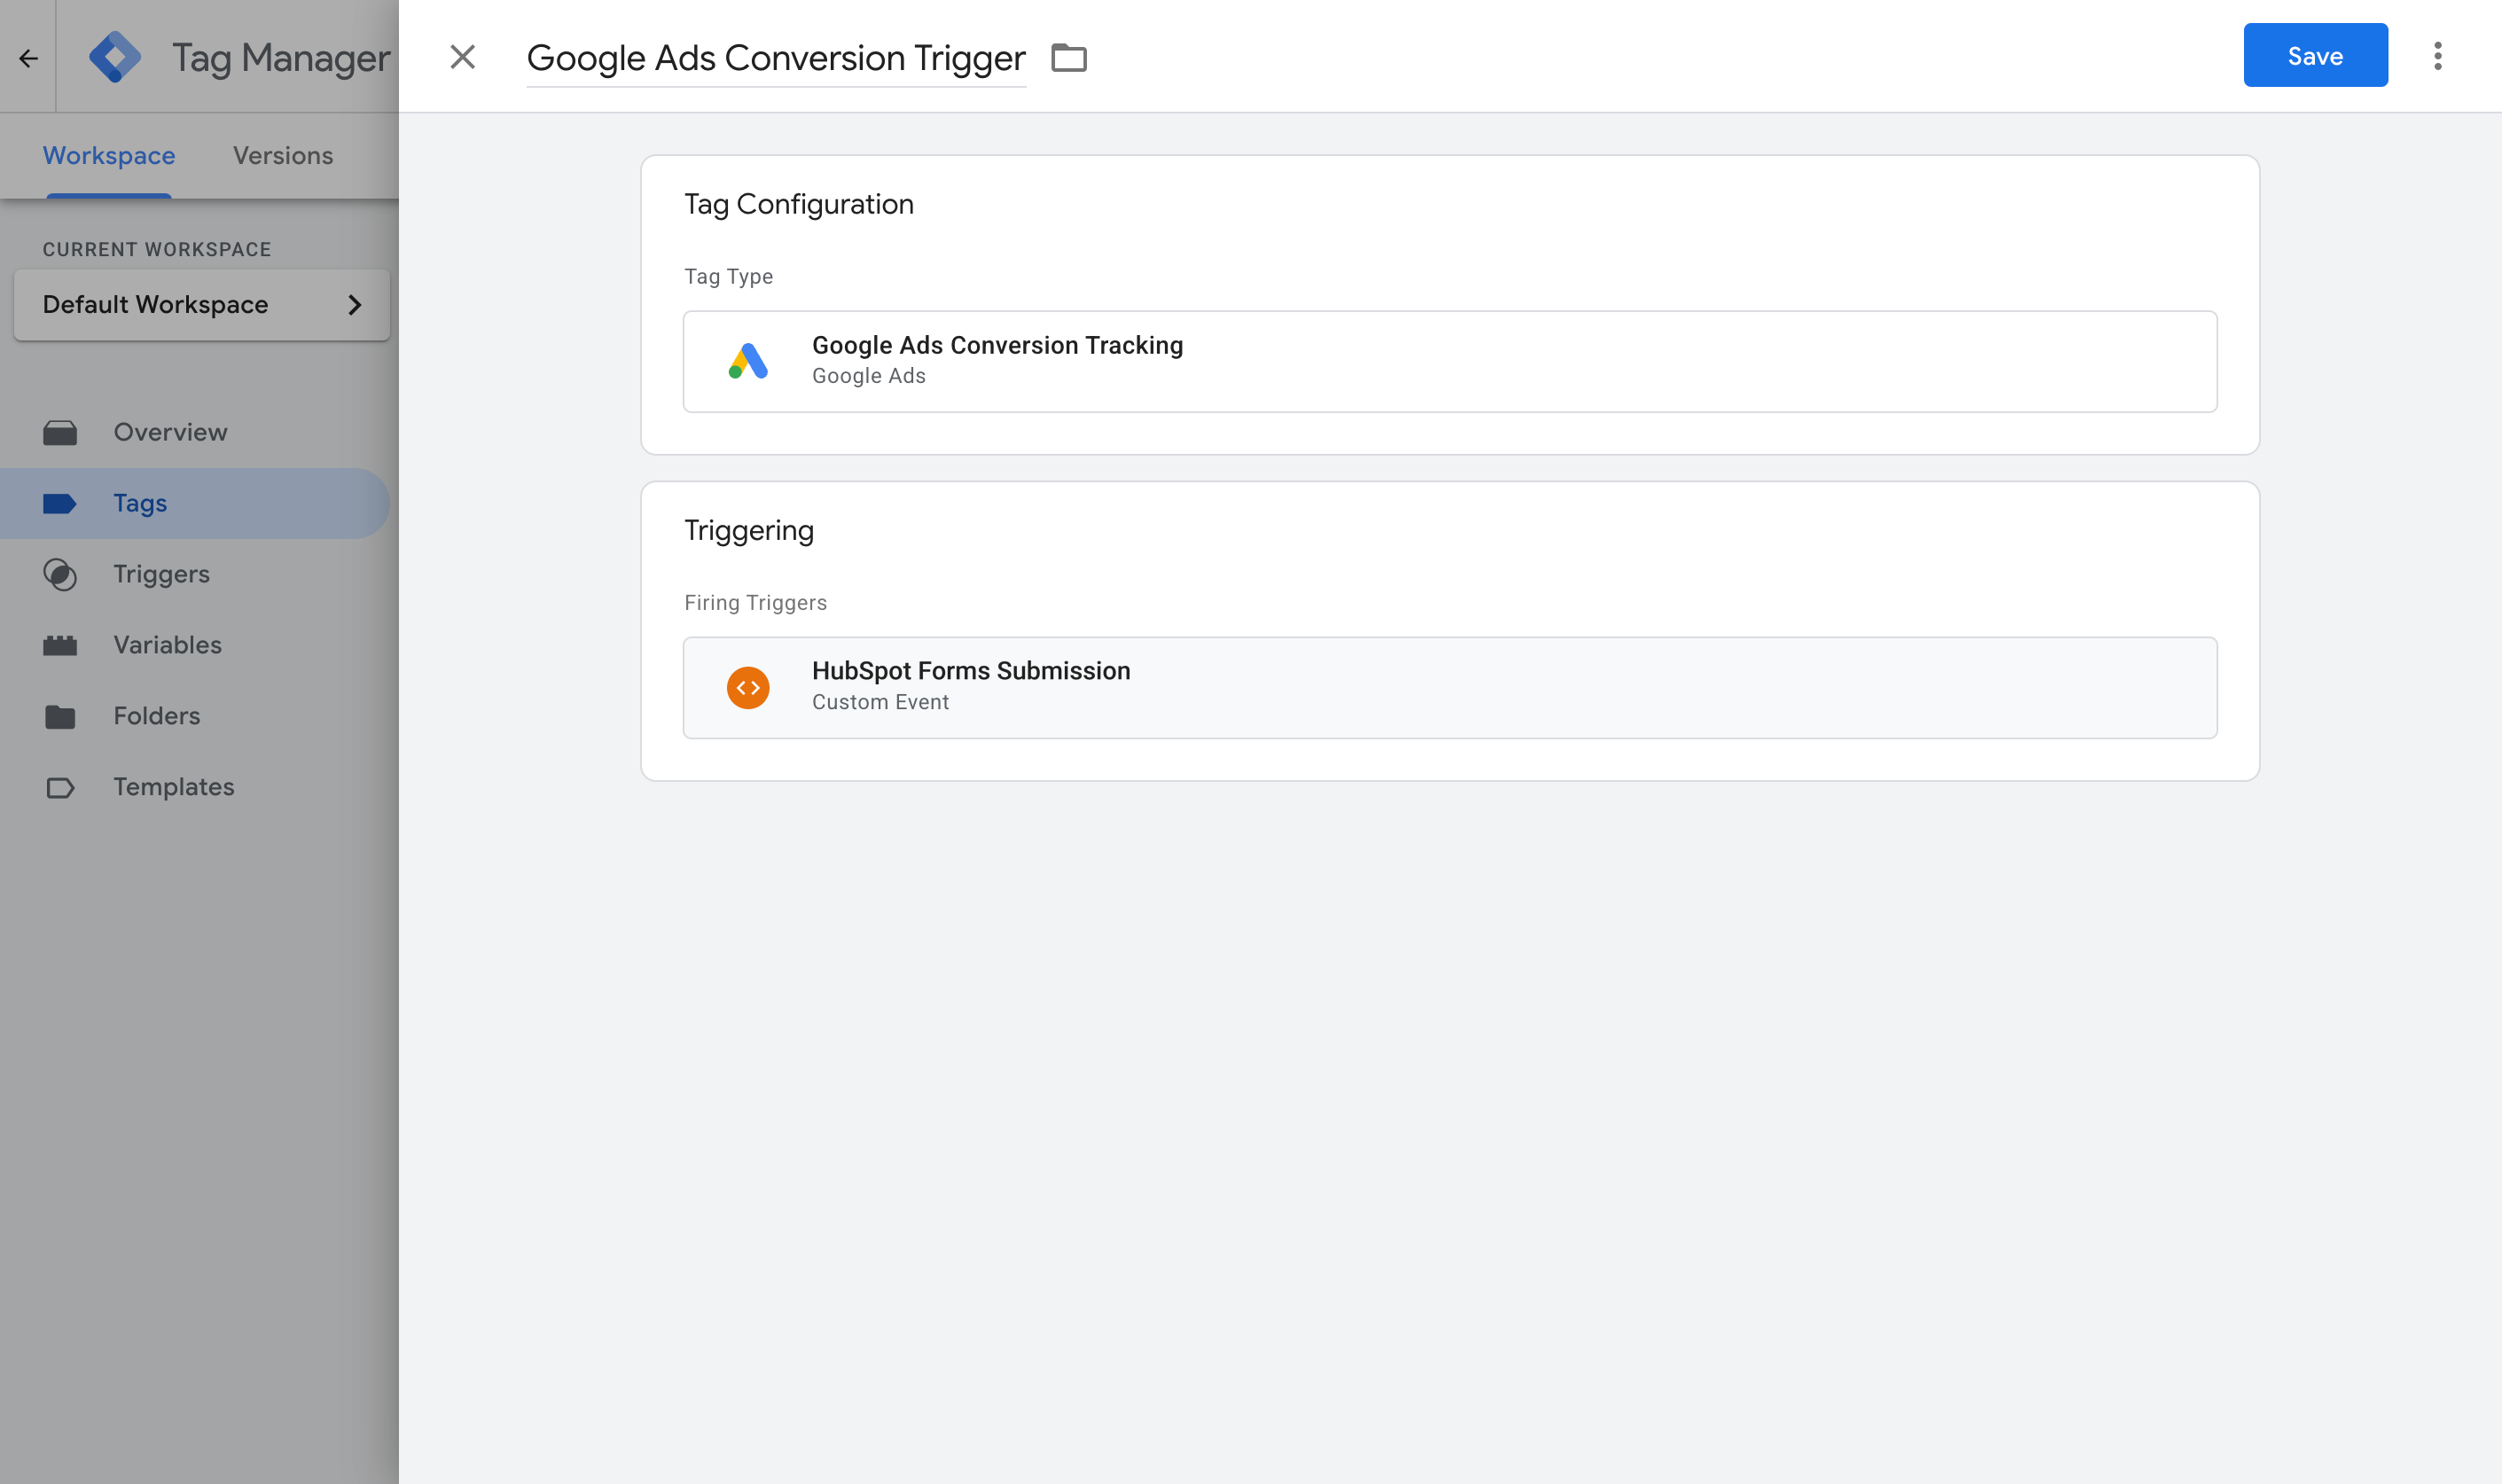
Once that's done, publish your GTM container. You should now have a Tag that listens for HubSpot's confirmation and sends an event to the dataLayer, some Variables that pull the details out of the dataLayer, a Trigger that watches for the event, and another Tag that sends the conversion when the Trigger fires.
To check it's working, open GTM Preview mode, submit the HubSpot form on your site, and confirm the hubspot_form_submitted event arrives with the email and name filled in.
Pros and cons
Pros:
- It's free, and you may already have Google Tag Manager on your site, which gives you a head start.
- Unlike Method 1, it captures the name, email, and phone and sends them to Google Ads (the minimum you need to turn on Enhanced Conversions).
- It works on HubSpot's current forms as well as legacy ones, and only fires once HubSpot has actually accepted the submission.
Cons:
- There are a lot of moving parts. Between the GTM tag, the Trigger, four Variables, the Google Ads settings, and the conversion Tag itself, there's plenty to get wrong. And when something does go wrong, nothing tells you where or why. It just doesn't work, and it's up to you to figure it out.
- It still sends the conversion through the visitor's browser, so ad blockers and privacy browsers can stop it from firing. Expect to lose 30% or more of your conversions this way.
- It only recognises HubSpot's standard contact fields. If your form collects the email or phone in a custom field with an unusual internal name, the snippet can't tell what it is and the conversion goes out without it.
- It still misses the data Google values most. A name, email, and phone are a good start, but lots of people share the same name and plenty have more than one email address (so the one they typed into your form may not be the one they were signed in to Google with when they clicked your ad). Ideally you'd also capture the Google Click ID, which ties the conversion back to the original ad click with 100% accuracy, but this method doesn't do that.
That last point is the one that pushes a lot of people to Method 3.
Method 3: Use Converly
Best for: Sending proper, server-side conversions to Google Ads, Meta Ads, ChatGPT Ads, LinkedIn Ads, and more, without complicated configuration in Google Tag Manager.
Converly is a dedicated conversion tracking tool, built to send server-side conversions to Google Ads, Meta Ads, ChatGPT Ads, LinkedIn Ads, and more whenever a HubSpot form is submitted on your site.
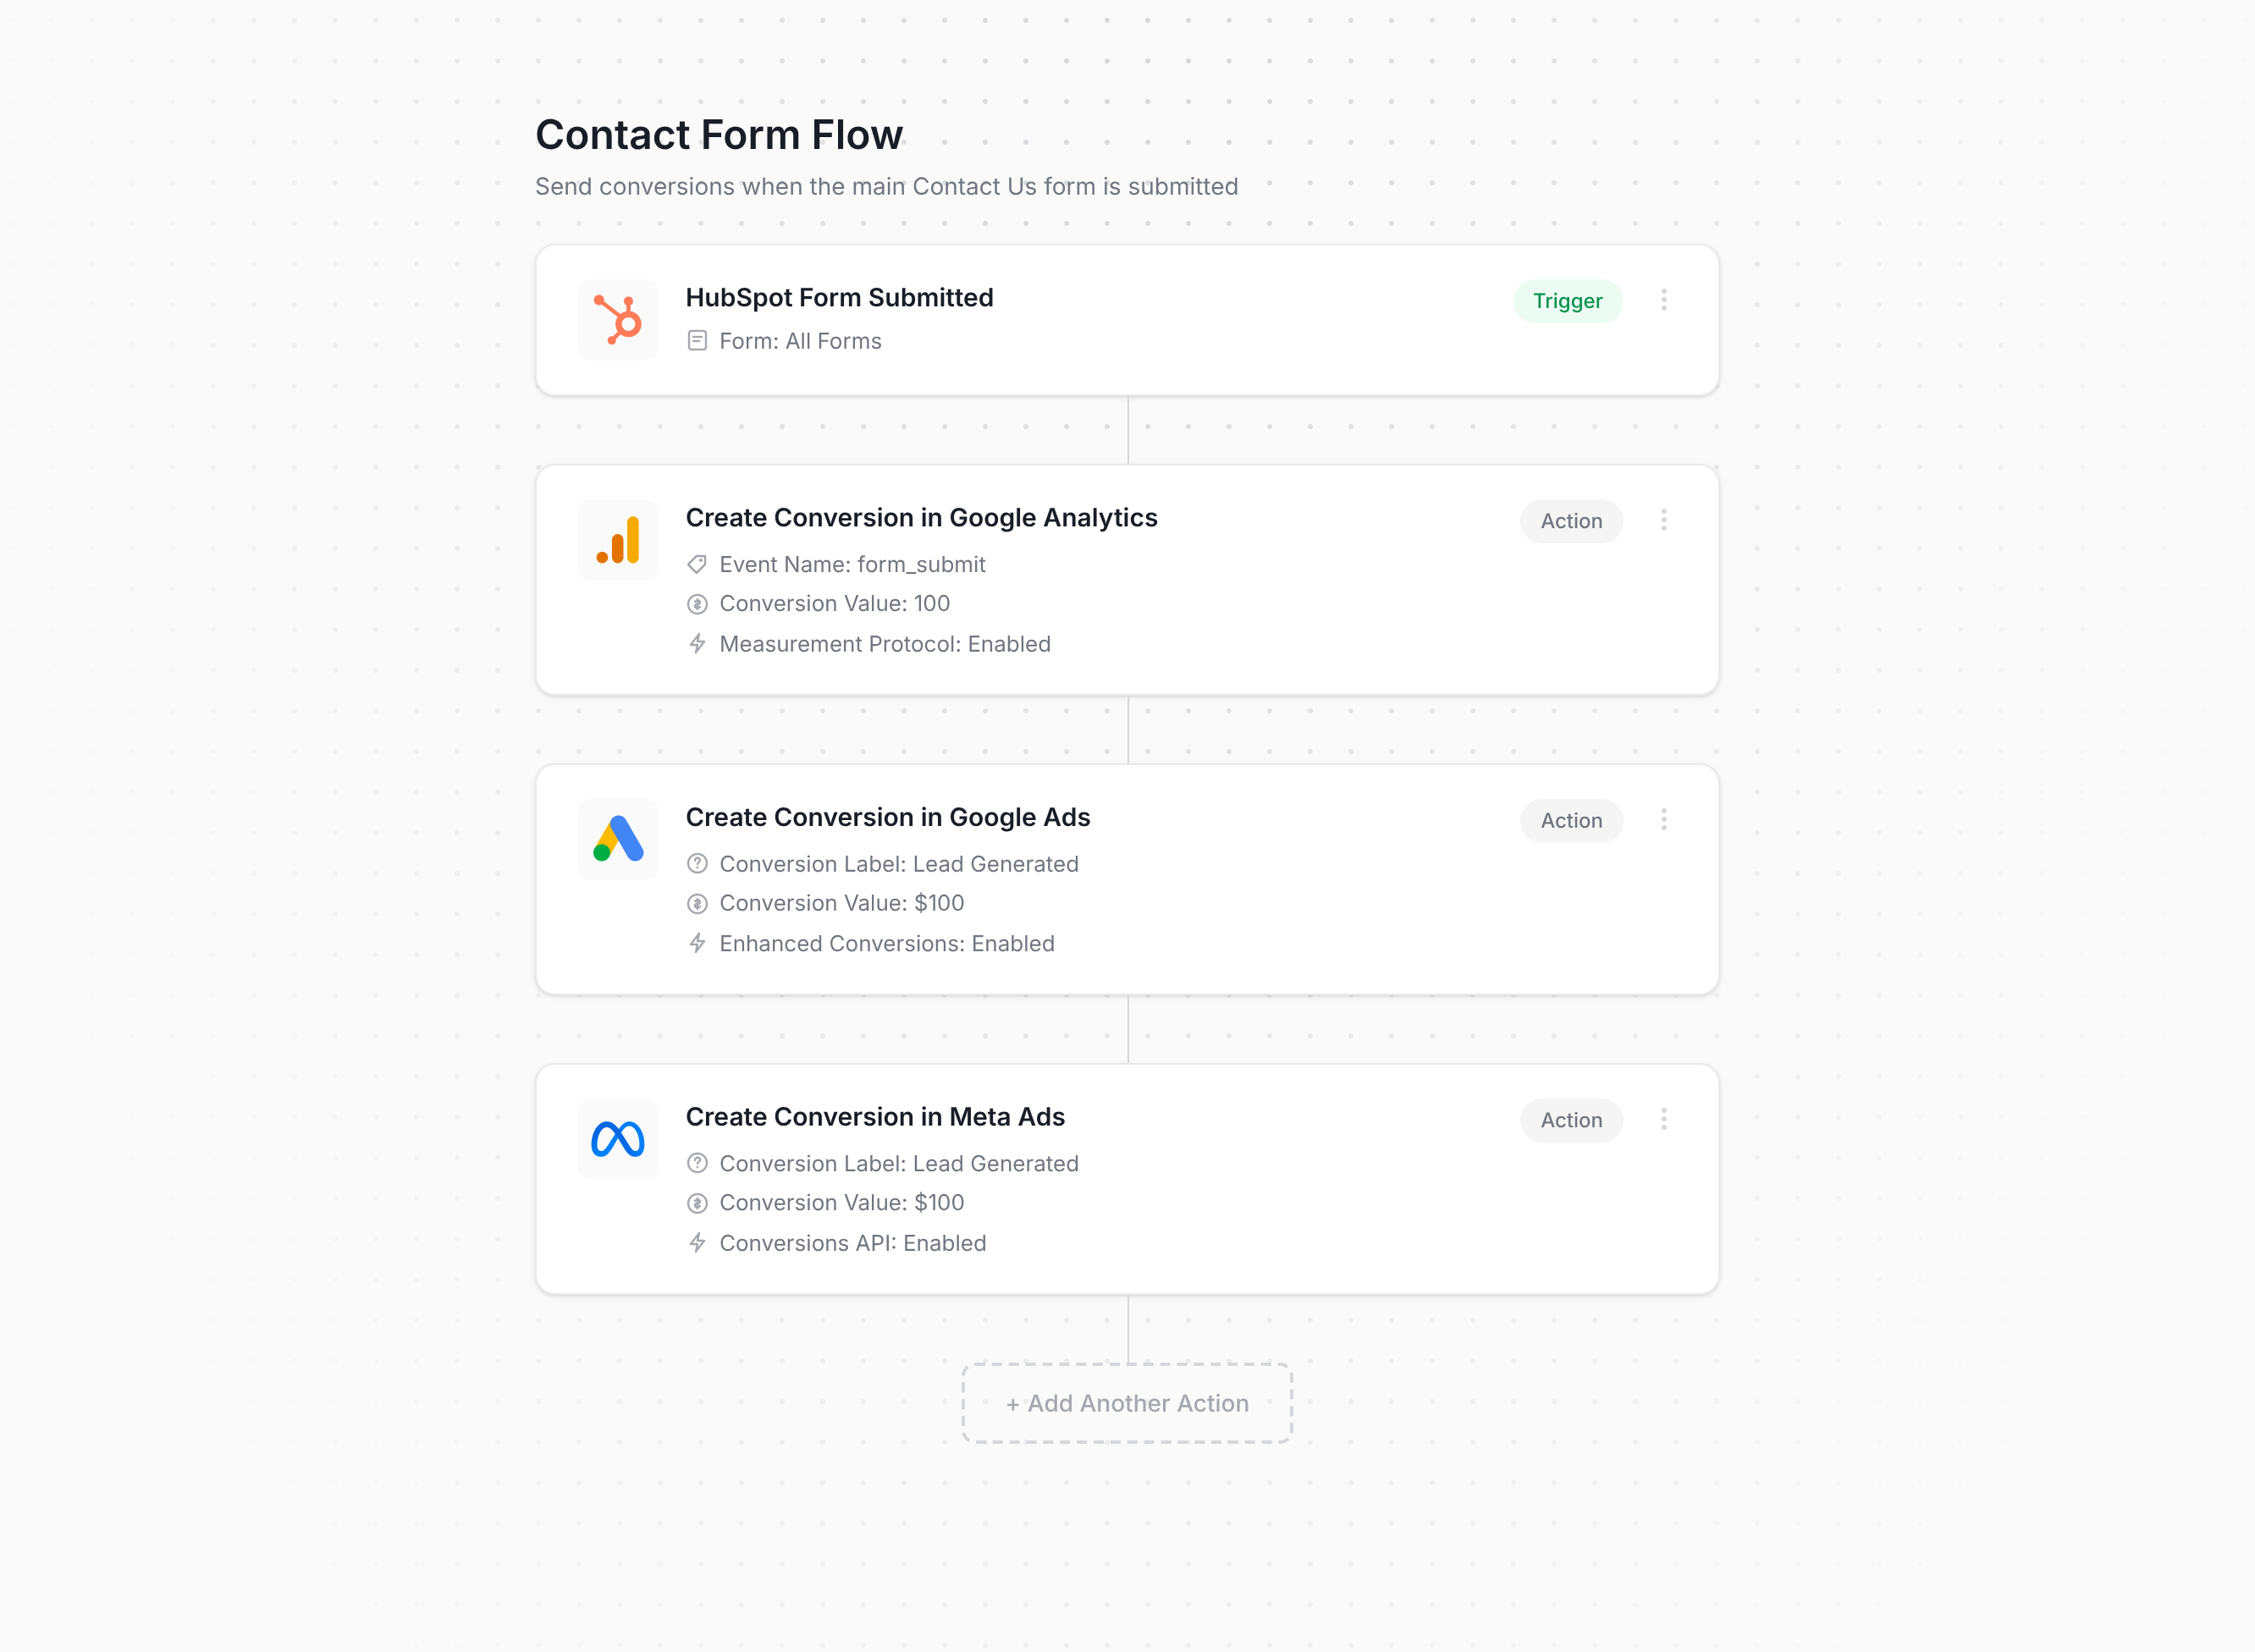
That screenshot is pretty much the entire setup. You pick a trigger (like a HubSpot form submission), add one or more actions (like sending a conversion to Google Ads or Meta Ads), and that's it! There's no code to write and nothing to wire together by hand in Tag Manager (and you don't need to know which HubSpot editor your form was built in or which embed code you used, because Converly deals with that for you).
With that configured, you add the snippet of code Converly gives you to your site, and it handles the rest. It watches for HubSpot form submissions, picks up the name, email, and phone, and sends them to Converly's servers. From there they're forwarded to Google Ads, Meta Ads, and any other destination you've connected. Because that forwarding happens on Converly's servers instead of in the browser, ad blockers and privacy browsers like Safari can't get in the way (so the ad platforms end up with far more accurate conversion data).
And if you advertise on Google, Meta, ChatGPT, or similar platforms, this is the part that really makes the difference. Alongside the name, email, and phone, Converly also captures the click IDs (i.e. GCLID, fbclid, etc), Meta's browser cookies, the visitor's IP address, and their user agent, and sends all of it with every conversion. Ad platforms love these signals, and sending all of them is what lifts your match quality from mediocre to strong (Meta's Event Match Quality score, for instance, usually rises from around 3 to somewhere in the 9 to 10 range).
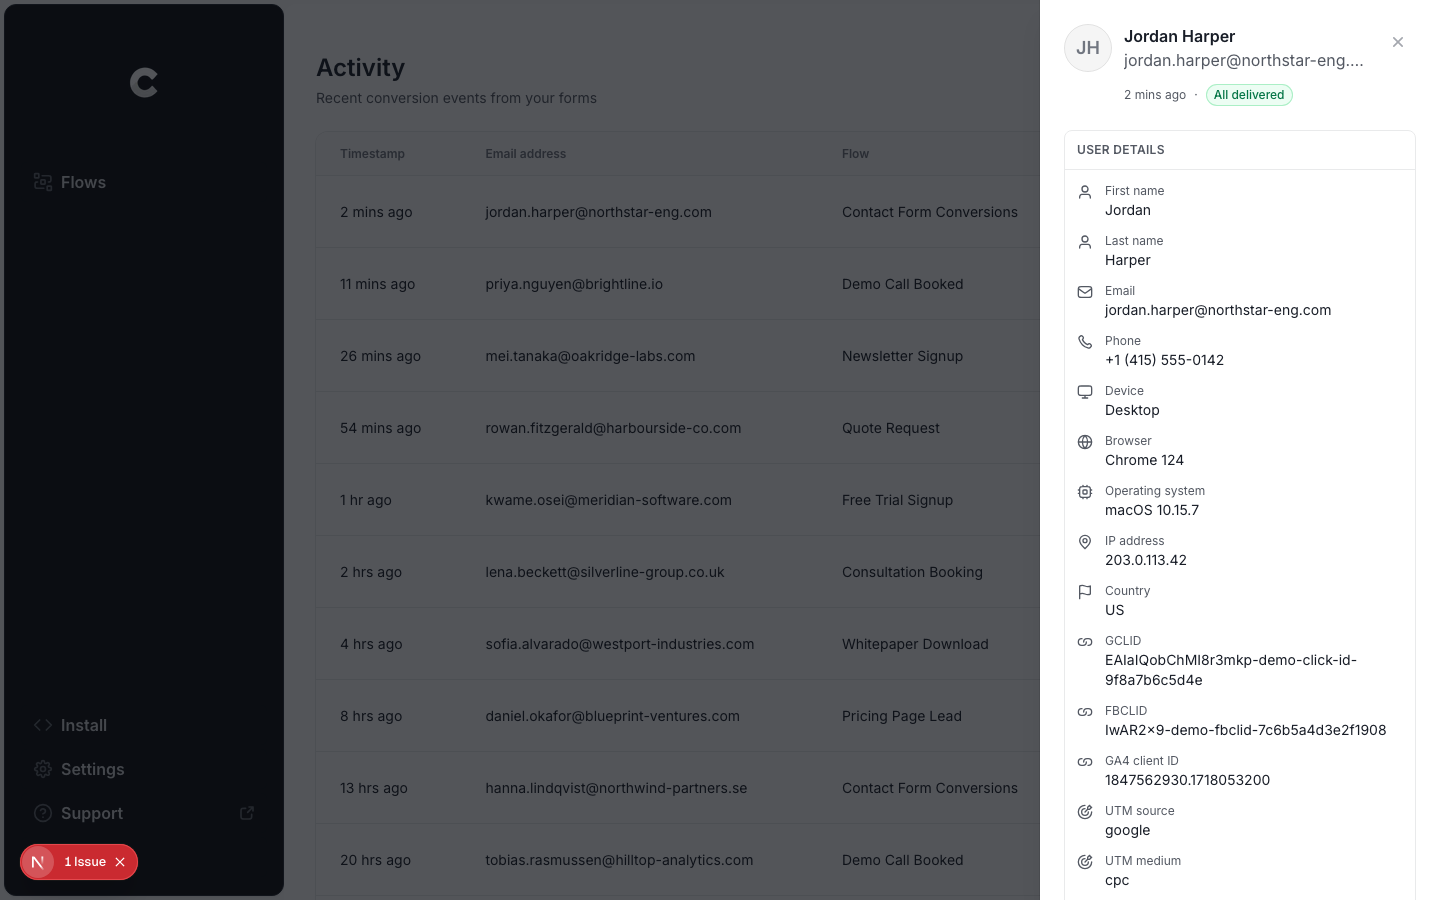
You also get a full conversion log, showing every lead who submitted a HubSpot form, exactly what data Converly captured, what was sent to each platform, and whether it got there successfully.
Pros and cons
Pros:
- Setup really is quick and easy. Pick a trigger, pick your actions, done. There's no code to write or maintain, nothing fiddly to configure, and no need to work out which HubSpot editor or embed code your form uses.
- Sends click IDs, cookies, IP address and user agent with every conversion, which noticeably improves match quality in the ad platform (Meta's Event Match Quality typically goes from a 3 or 4 up to a 9 or 10 with Converly).
- Sends conversions server-side, so ad blockers and privacy browsers can't stop them. Expect roughly 30% more recorded conversions than a Google Tag Manager setup.
- Supports conditional logic, so you decide which forms trigger a conversion (like firing one when someone submits your Quote Request form but not your Contact Support form).
- Lets you connect Google Ads, Meta Ads, etc directly inside the platform and just pick which conversion should fire. No digging around for account IDs or conversion IDs.
- Has a dedicated MCP and CLI, so you can connect AI tools like Claude or ChatGPT and simply say 'Set up conversion tracking in Google Ads and Meta Ads when someone submits my HubSpot form' and it will do all of it for you.
- Includes a complete conversion log covering every lead who submitted a HubSpot form, what data was captured, whether it reached your ad platforms, and more.
- Backed by a real support team who'll help you get set up and fix any issues. Good luck getting that kind of help from Google if your GTM setup breaks.
Cons:
- It costs money once the free trial is over. Plans start at $19 a month.
What not to do
So far we've covered the three best ways to set up conversion tracking for HubSpot Forms and when each one makes sense. It's just as useful to know which approaches to steer clear of, because several of the most common ways people try to track HubSpot form submissions as conversions don't work well (and with HubSpot, some don't work at all). Here are the ones to avoid.
Tracking thank-you page visits
This is still the most popular DIY approach, largely because HubSpot lets you set a form to redirect people to a separate thank-you page once they submit, so tracking visits to that page feels like the natural thing to do. In reality it creates more problems than it fixes:
It counts people who never submitted anything. A thank-you page is just a URL, and anyone can reach a URL without completing your form. People bookmark it, come back to it through their browser history or autocomplete, get sent the link by a colleague, or find it in Google if it's ever indexed. Each of those is recorded as a conversion, even though nobody filled in the form.
It can double count genuine submissions. Refresh the thank-you page and that's a second conversion. Press the back button and come back, or return to it later from your history, and that's more. One lead can end up recorded as several conversions, which inflates your numbers and means Google and Meta are optimising your ads against the wrong data.
Your match rates would be terrible. A thank you page doesn't know anything about who submitted the form, so it can't pass on the name, email, phone, GCLID, fbclid, etc. that ad platforms like Google and Meta need to match the conversion back to a real person and the ad they clicked. So even though you're sending conversions to these ad platforms, they'd mostly go to waste.
All three methods above fire on HubSpot's actual confirmation that it accepted the submission, so they stay tied to what really happened.
Relying on the default form submit event in Google Tag Manager
When people set up tracking in Google Tag Manager, the obvious choice is GTM's built-in Form Submission trigger (which listens for the browser's native form submit event on your page).
With HubSpot that trigger has nothing to listen to. HubSpot forms run inside an iFrame, and a submission in there never shows up as a form submit on your page. So you'd set the whole thing up, assume it was working, and your Google Ads conversion count would sit at zero with nothing telling you why.
What you need to listen for is the confirmation message HubSpot sends out to your page when it accepts a submission, which is exactly what Methods 1 through 3 above do.
Using GA4's automatic form tracking (Enhanced Measurement)
GA4 comes with an Enhanced Measurement feature that promises to track form submissions automatically, with no setup at all.
It works by listening for that same native browser submit event on your page, so it runs into the same wall as GTM's default trigger. A form running inside HubSpot's embedded window never produces that event on your page, so Enhanced Measurement has nothing to pick up.
If you want submissions recorded reliably in GA4, use the free recipe from Method 1 above, or use Converly.
Firing the conversion on the submit button click
Some conversion setups we've seen fire the conversion when the Submit button is clicked, usually with a click trigger in GTM. With a HubSpot form built in the current editor that doesn't work at all, because the button sits inside HubSpot's iFrame and not actually on your page.
And even where a click can be seen, a click isn't a submission. HubSpot checks the form after the visitor clicks, so lots of clicks never become real submissions (because a required field was left empty, or HubSpot rejected the email address, for instance). Every one of those would be counted as a conversion, and when the visitor fixes the problem and clicks again, it gets counted as a second conversion.
As we said earlier, you need to fire on HubSpot's real confirmation that the submission was accepted, not on a stand-in for it (like a click of the submit button).
So which method should I use?
Here's how the three ways to track HubSpot Forms conversions compare.
| Method | Best for | Sends conversions to | Data sent |
|---|---|---|---|
| Method 1. GA4 event built in Google Tag Manager | Sending submissions to Google Analytics (use our free GTM recipe to make it easier) | Google Analytics 4 | The submission event only |
| Method 2. Enhanced Conversions through Google Tag Manager | Sending to Google Ads, if fiddly configuration doesn't put you off | Google Ads | Name, email and phone |
| Method 3. Converly | Sending to any ad platform, with the least setup work | Google Ads, Meta Ads, LinkedIn Ads, ChatGPT Ads, GA4 and more | Name, email and phone, plus the GCLID, the Meta click ID, IP address and user agent |
Wrap up
Conversion tracking doesn't get a lot of attention, but it's actually one of the bigger factors in how well your advertising performs.
Get it set up properly and the algorithms will have the data they need to learn what your ideal customer looks like, so they can show your ads to more people like them. Set it up badly (or not at all), and you'll keep paying to put ads in front of people who were never going to convert.
The major ad platforms have even published figures on how much this matters. According to Google, businesses that move to proper server-side conversion tracking see around 19% more conversions on average, and Meta reports a 23% increase from making the same switch.
Converly gives you all the benefits of server-side tracking but without any of the hard parts. You just choose your trigger (someone submitting a HubSpot form), pick the platforms you want the conversions sent to, and you're done (and hooking up an AI tool like Claude or ChatGPT makes it even easier. Connect it, ask it to 'set up HubSpot Forms conversion tracking', and it handles everything for you through our MCP or CLI).
Converly is free to get started (you don't even need a credit card to begin the trial), and most people have it fully running in well under 10 minutes. Start your 14-day free trial today.
About the author

Aaron is the founder of Converly. With over 15 years of experience in digital marketing and SaaS, he's passionate about helping businesses track and optimise their ad conversions.