


Forminator conversion tracking: 3 ways to do it
Learn three different ways to set up conversion tracking for Forminator, and how to work out which one is right for you.
So you're running some ads and maybe putting effort into SEO too, and leads are coming in through the Forminator forms on your WordPress site.
That's great, but do you actually know which campaigns are driving those leads, or are you mostly just guessing based on clicks and traffic?
Without real conversion data, you don't know what's working and what isn't. And you'll end up spending your marketing budget on channels & campaigns that are generating website visitors but not necessarily leads.
The fix is setting up proper conversion tracking in your ad platforms and analytics tools, so a conversion gets recorded every time someone submits one of your Forminator forms and tied back to the campaign that actually brought that visitor to your site.
There's more than one way to build this though, and which one you need depends on your goal. We build form conversion tracking for a living here at Converly, and Forminator has a few quirks of its own that catch people out, so this article walks through three ways to set it up and flags those gotchas as we go.
Method 1: Send a GA4 event via Google Tag Manager
Good for: Sending form submission events to Google Analytics 4, for free.
If all you want is to see Forminator submissions land in GA4, track your conversion rate, and work out which channels are actually driving leads, this is genuinely enough. Google Analytics doesn't need to know who submitted the form, only that a submission happened.
Unlike other WordPress form plugins, Forminator doesn't come with a Google Analytics integration (not even behind a paid tier), so you need to set something up yourself. The best way to do this is to use a Google Tag Manager recipe (which is essentially a set of pre-built assets that you upload into your Google Tag manager account).
Step 1: Download the Forminator Conversion Tracking GTM Recipe
The first thing you need to do is go and download the Forminator GTM recipe from this page. If you're not familiar with them, GTM recipes are basically just a set of pre-built assets that you can upload into your Google Tag Manager account.
This one in particular contains the following:
- A Custom HTML Tag that gets added to your site, listens for submissions of your Forminator forms and passes an event called ‘forminator_form_submitted’ to Google Tag Manager when a successful form submission is detected
- A Variable that captures the ID of the form that was submitted (which you can use to filter your triggers to only fire on certain forms if needed).
- A Trigger that fires when the 'forminator_form_submitted' event is received, which you can use as the Trigger for any of your conversion Tags (i.e. Google Analytics 4 event, Google Ads Conversion, etc).
Step 2: Import the GTM recipe into your account
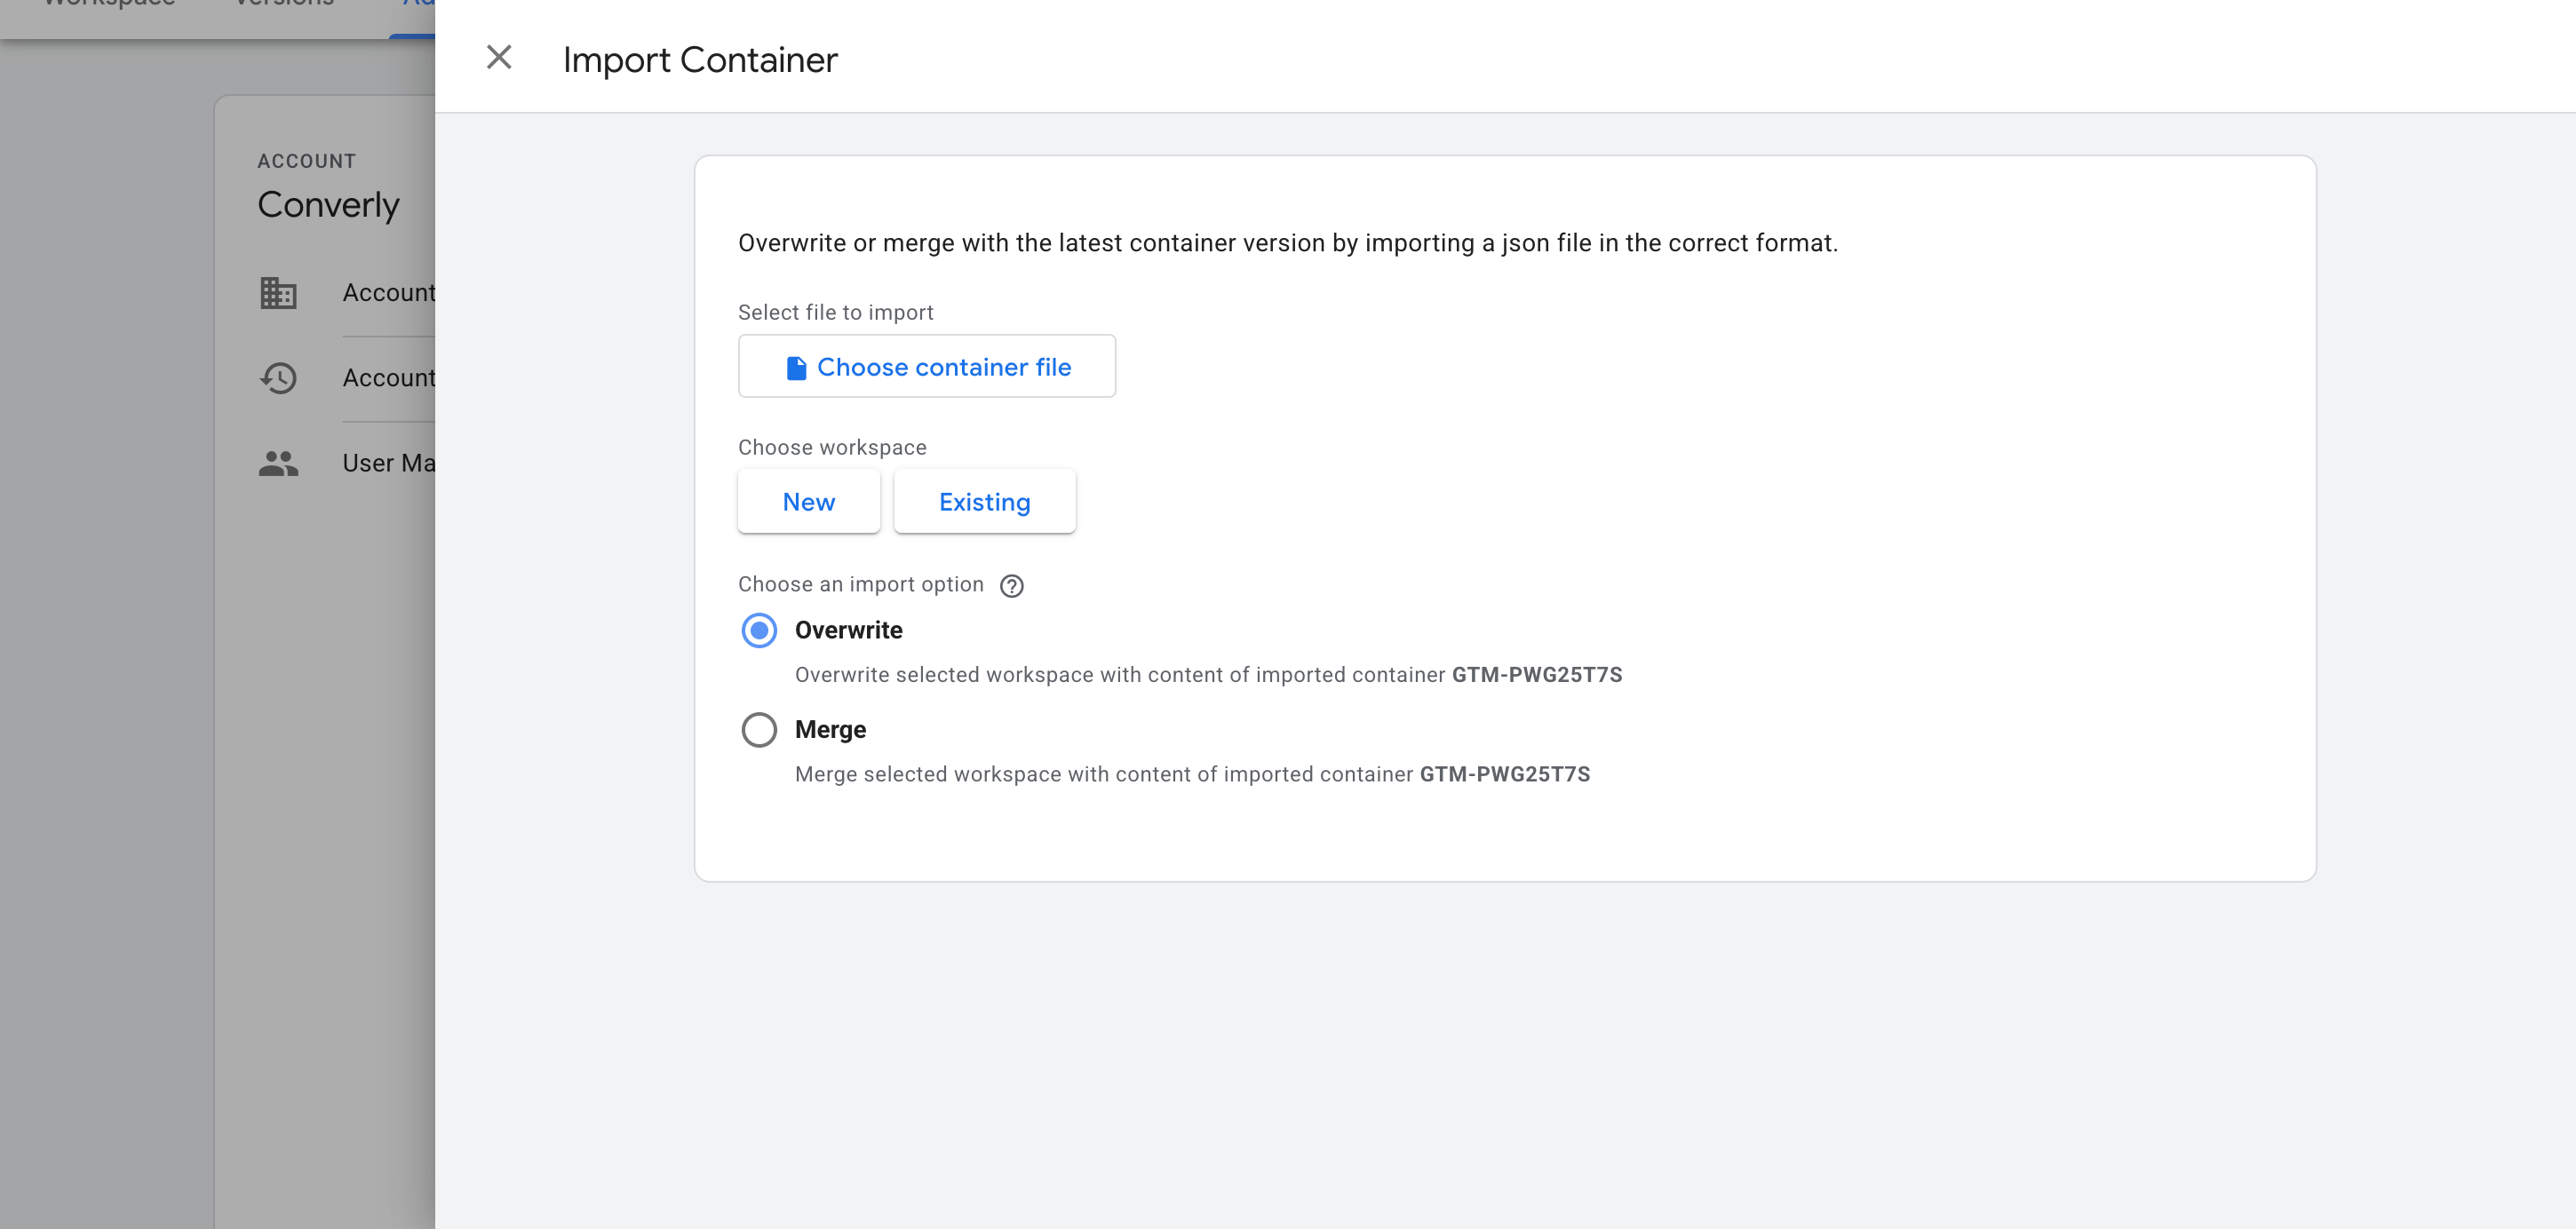
Once you've download it from the page linked above, you then need to import it into your Google Tag Manager container. To do, open your Google Tag Manager account, head to Admin, choose Import Container, select the downloaded file, and pick the Merge option (so it doesn't overwrite anything already in your container). The listener, variable and trigger are added for you automatically.
Step 3: Build a GA4 event tag
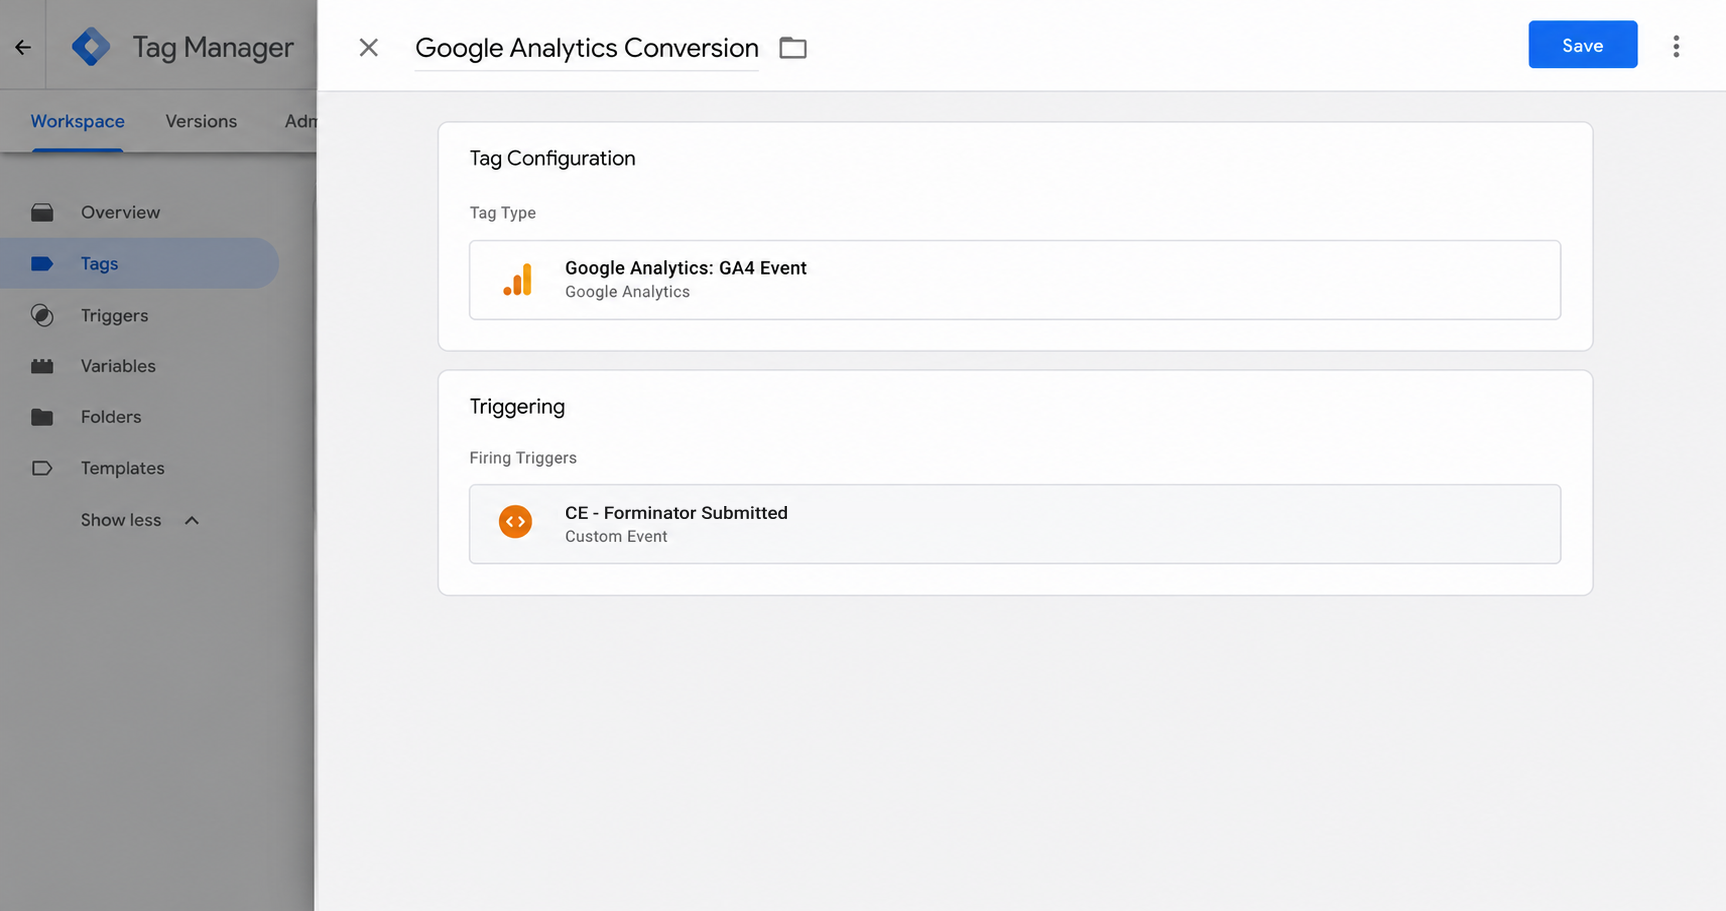
Now that the recipe is installed, you can use it as a Trigger for your conversion tags. To send a conversion to Google Analytics, create a GA4 event tag and set the Trigger to the one the recipe provides (called CE - Forminator Submitted).
Step 4: Test it, then mark it as a Key Event in GA4
Now that everything is set up, the next thing to do is test it's working. To do this, head to one of the pages with your Forminator forms on it, submit a test entry, open GA4's Realtime report, and confirm the event shows up in the recent events list.
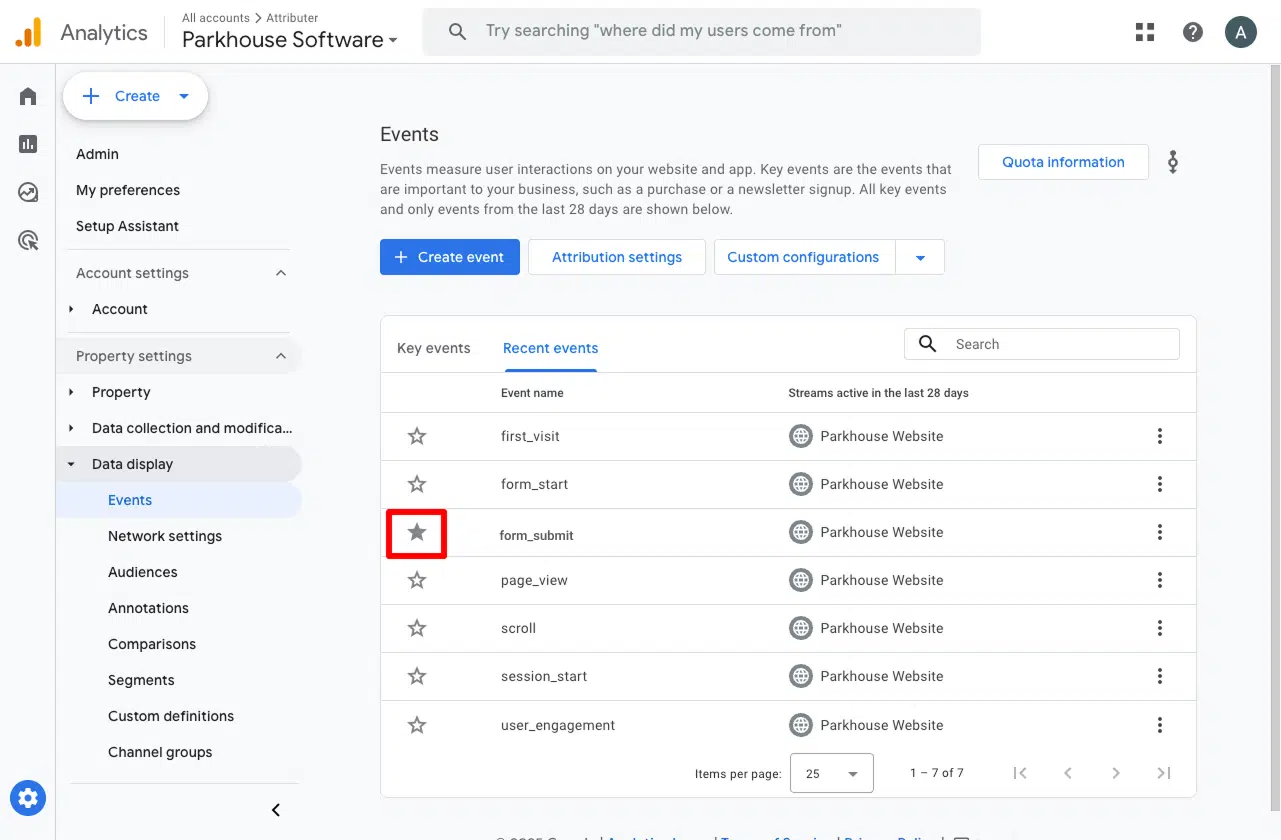
Once it's arriving, go to Admin, then Events (or Key Events), find it, and toggle it on as a Key Event. That's what tells GA4 to treat it as a conversion in your acquisition and funnel reports, rather than leaving it sitting there as an ordinary event.
Pros and cons
Pros:
- It's free, and it doesn't need Forminator Pro or any premium license.
- It fires when Forminator sends their ‘form submission successful’ event, so a rejected submission is never counted.
- You don't need to install anything on your website beyond Google Tag Manager, which you may already have running.
Cons:
- It's a bit complicated to set up. Using a pre-built recipe helps, but you're still dealing with a Custom HTML Tag, a Trigger, and a GA4 conversion tag by hand. There's definitely room for things to go wrong, and Google Tag Manager doesn't offer any support when it does.
- It runs in the browser, so ad blockers and privacy browsers like Safari can stop the event before it ever reaches Google Analytics. That can cost you a meaningful share of your real conversions (studies say you'll miss anywhere between 30%-40% of conversions this way).
- Every Forminator form on your site pushes the same event. So someone completing your Quote Request form will be indistinguishable from someone submitting your Contact Support or Job Application form (which can make it difficult to understand how many real conversions you got).
- It only reaches Google Analytics. It does nothing for Google Ads, Meta Ads, or anywhere else, which is what Methods 2 and 3 below are for.
Method 2: Use Google Tag Manager with Enhanced Conversions
Good for: Sending Enhanced Conversions to Google Ads.
Simply counting submissions, as in Method 1, won't get you very far if you're spending money on Google Ads. Google Ads wants to match every conversion to the specific person who clicked your ad, and it can only do that when you send identifying information (like their name, email, and phone number) with each conversion.
Here's how to build that with Google Tag Manager.
Step 1: Set up a Custom HTML tag with the form listening code
In GTM, create a new Custom HTML tag, paste in the snippet below, and set it to fire on the All Pages trigger, with the tag firing option set to Once per event.
The code above does a sequence of things, in the order they actually happen:
- Watches every Forminator form on the page. It scans for Forminator forms as soon as the page loads and keeps watching for new ones that might appear (which matters if a form appears inside a popup or is loaded in after the initial page render).
- Snapshots what the visitor types as they type it. It saves the form's values on every keystroke, and again as soon as the submit button is clicked, so it has it's own stored copy of the lead's details (this matters for reasons discussed later).
- Drops anything sensitive before it's ever stored. Passwords, card numbers, CVV codes, one-time codes, SSNs, and PINs are excluded by checking the field's type, its autocomplete hint, and its visible label, so a "Card Number" box under a generic field name still gets caught and never touches the dataLayer.
- Waits for Forminator's genuine success signal. It only acts once Forminator fires
forminator:form:submit:success, the jQuery event Forminator sends after it validates the form submission is successful. If Forminator rejects the form submission (maybe because they missed a required field, or because it didn't pass a spam check), then the conversion is never fired. - Reads the email, first name, last name and phone from the saved snapshot. Forminator deletes the data from the form as soon as the form is successfully submitted, so this script reads the stored version of the lead's details.
- Sends an event to the dataLayer called
forminator_form_submitted.The event includes the data extracted from the form, including the lead's name, email and phone number. You can then use this as a Trigger for your conversion Tags in Google Tag Manager.
This snippet is the same one we use in our dedicated conversion tracking tool, Converly, so it's been well tested and gets around a few issues other Forminator snippets may fall to.
Catch 1: Forminator wipes the form before you get a chance to read it. Most other scripts try to read the visitor's email and name once Forminator confirms the form was submitted successfully, but Forminator clears every input as soon as a submission succeeds, and it does this before it fires the success event. So a script that waits for the success signal and then tries to extract the data gets nothing but empty fields. This would mean you would end up sending a conversion with no data attached to it, and Enhanced Conversions matching would fail for every single lead with nothing telling you why. This snippet solves the problem by saving the form's values continuously as the visitor fills it in, then reading from that snapshot once Forminator's success event fires.
Catch 2: the success event's own payload is empty. Several published tutorials tell you to read the form's ID from the success event's response argument. But when we tested this on a real, Forminator install that argument was an empty object with nothing in it, so any script built that way would push a conversion with a blank form ID every time. This would break any trigger or destination tag that filters by form ID, with nothing to flag that it happened. This snippet reads the form ID from the data-form-id attribute Forminator always renders on the form element instead, which is the value that's actually reliable.
Step 2: Create Data Layer Variables for the captured data
Before this next step makes sense, it helps to know what the dataLayer actually is, since everything from here relies on it.
Think of the dataLayer as a messenger sitting between your website and Google Tag Manager. Your site drops messages onto it (someone just submitted a form, and here is their email and name), and GTM sits there reading every message that arrives.
That's exactly what the code in Step 1 does. When a form is submitted successfully, it sends a message called forminator_form_submitted to the dataLayer (with the lead's email, first name, last name, and phone) and then Google Tag Manager recevies it.
The catch is that GTM won't automatically pull the name, email, etc out for you just because it can see it in the message. You have to tell it which ones you want, and that's what a Data Layer Variable does.
To set it up, head to the Variables section of Google Tag Manager, click New under User-Defined Variables, choose Data Layer Variable as the type, and create one for each value below.
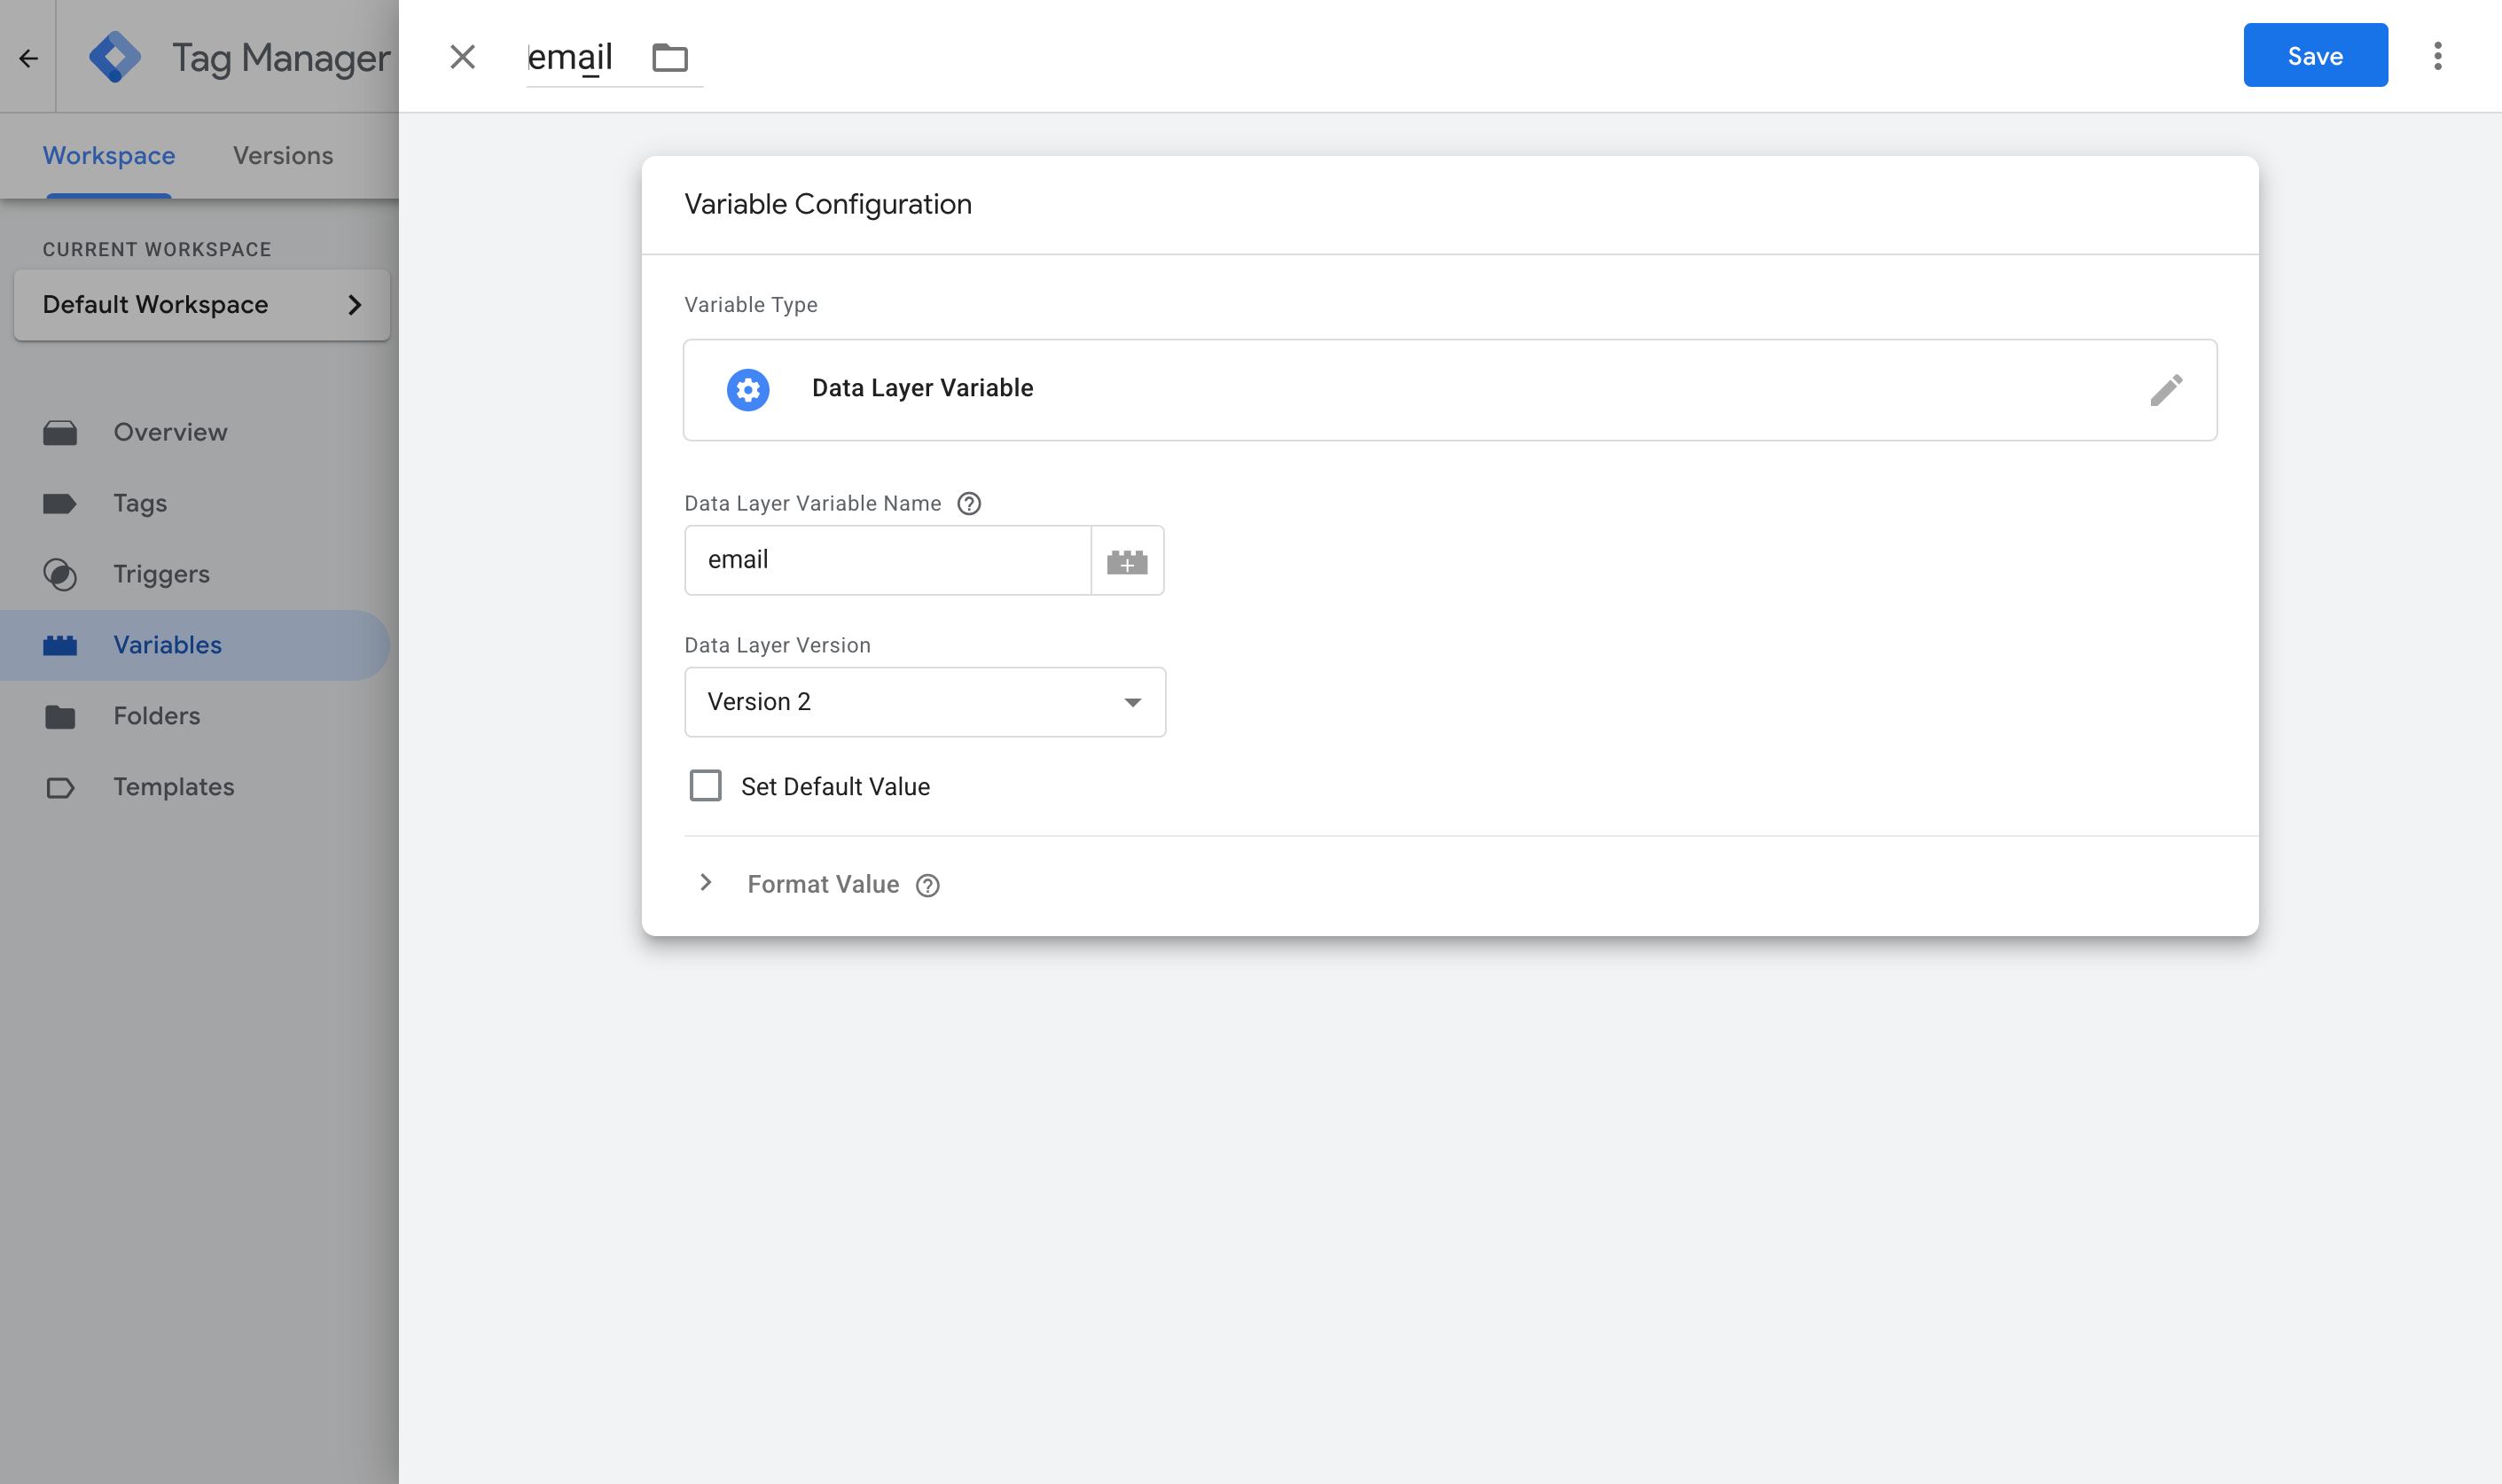
Variable 1:
- Name: Email
- Variable Type: Data Layer Variable
- Data Layer Variable Name: email
Variable 2:
- Name: First Name
- Variable Type: Data Layer Variable
- Data Layer Variable Name: first_name
Variable 3:
- Name: Last Name
- Variable Type: Data Layer Variable
- Data Layer Variable Name: last_name
Variable 4:
- Name: Phone
- Variable Type: Data Layer Variable
- Data Layer Variable Name: phone
Step 3: Create a Custom Event trigger
With the code in place and the variables built, the next task is to set up a ‘Trigger’ that is fired when the forminator_form_submitted event arrives in the dataLayer.
Go to the Triggers section of Google Tag Manager, click New, choose the Custom Event type, and set the event name to forminator_form_submitted, matching what the code pushes exactly. Name the trigger something you'll recognise later, like Forminator Submission. This is what your Google Ads tag fires on in the next step.
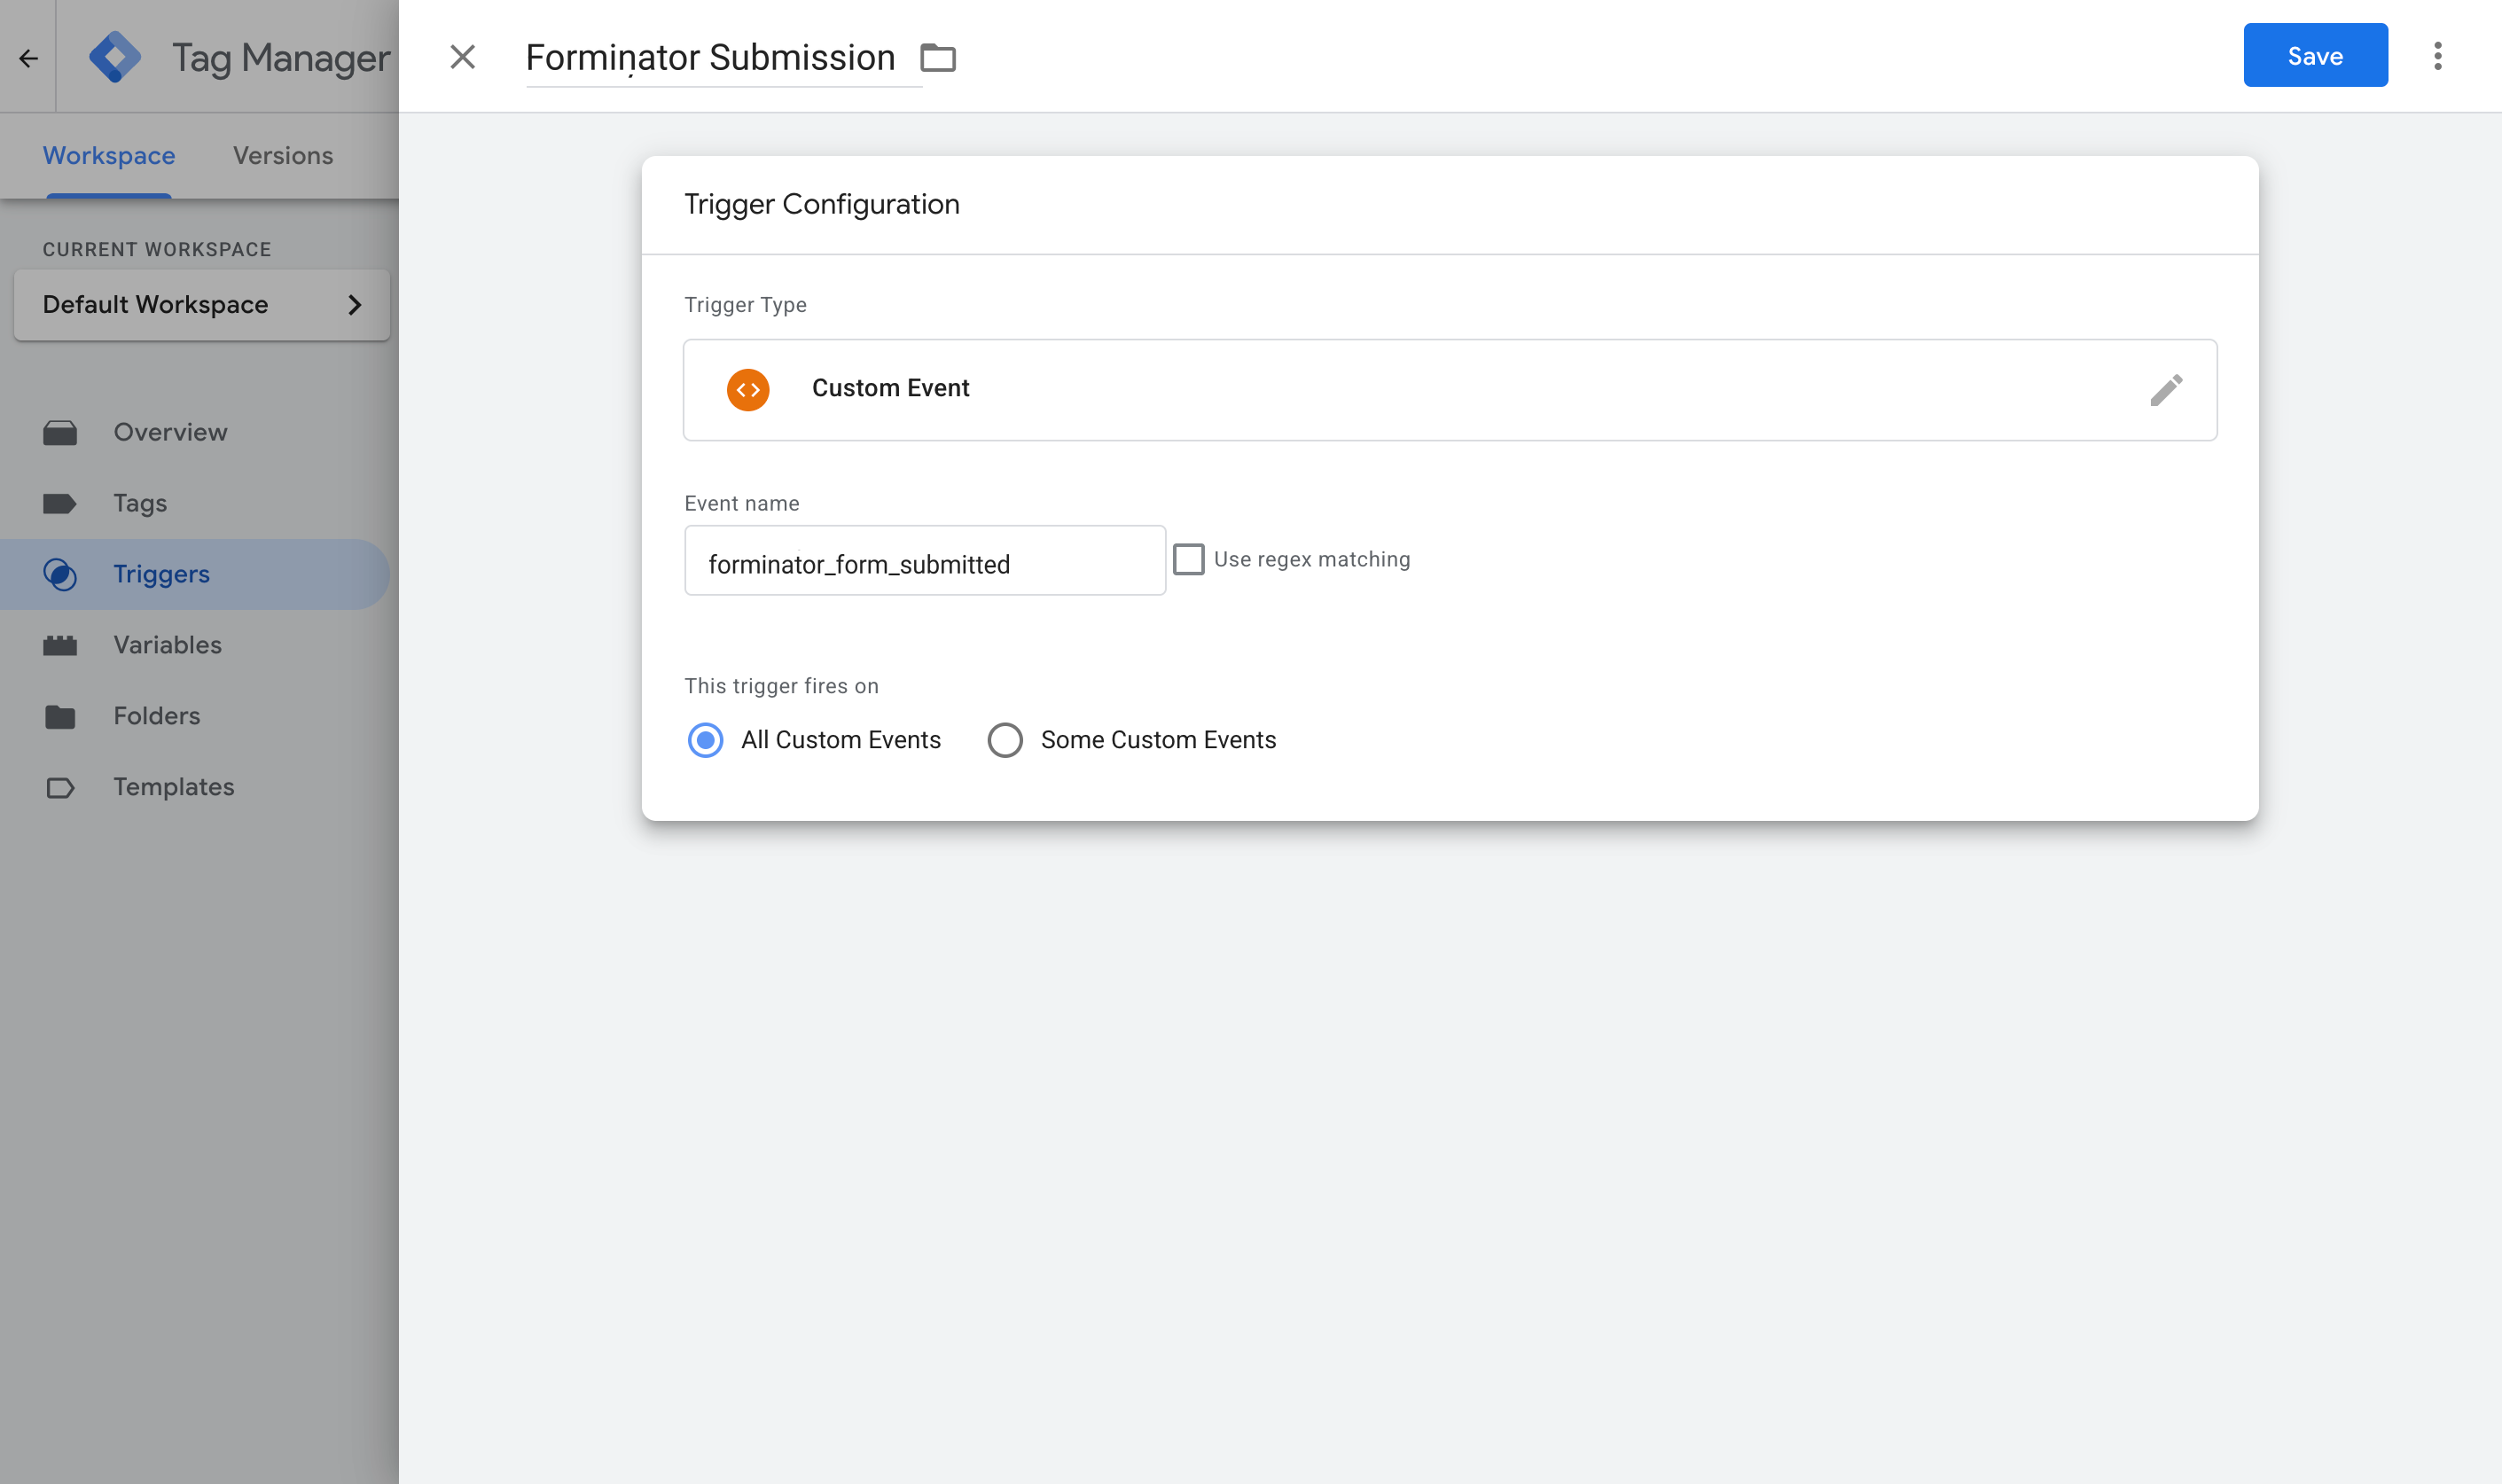
(If you want to track specific forms separately, you can add a condition here on form_id, since the code sends that too. To fire on every Forminator submission on your site, the event name alone is enough.)
Step 4: Turn on Enhanced Conversions in Google Ads
Before you can send the data to Google Ads, you basically need to tell it to accept it. To do this, go to Goals, then Settings, and turn on Enhanced Conversions.
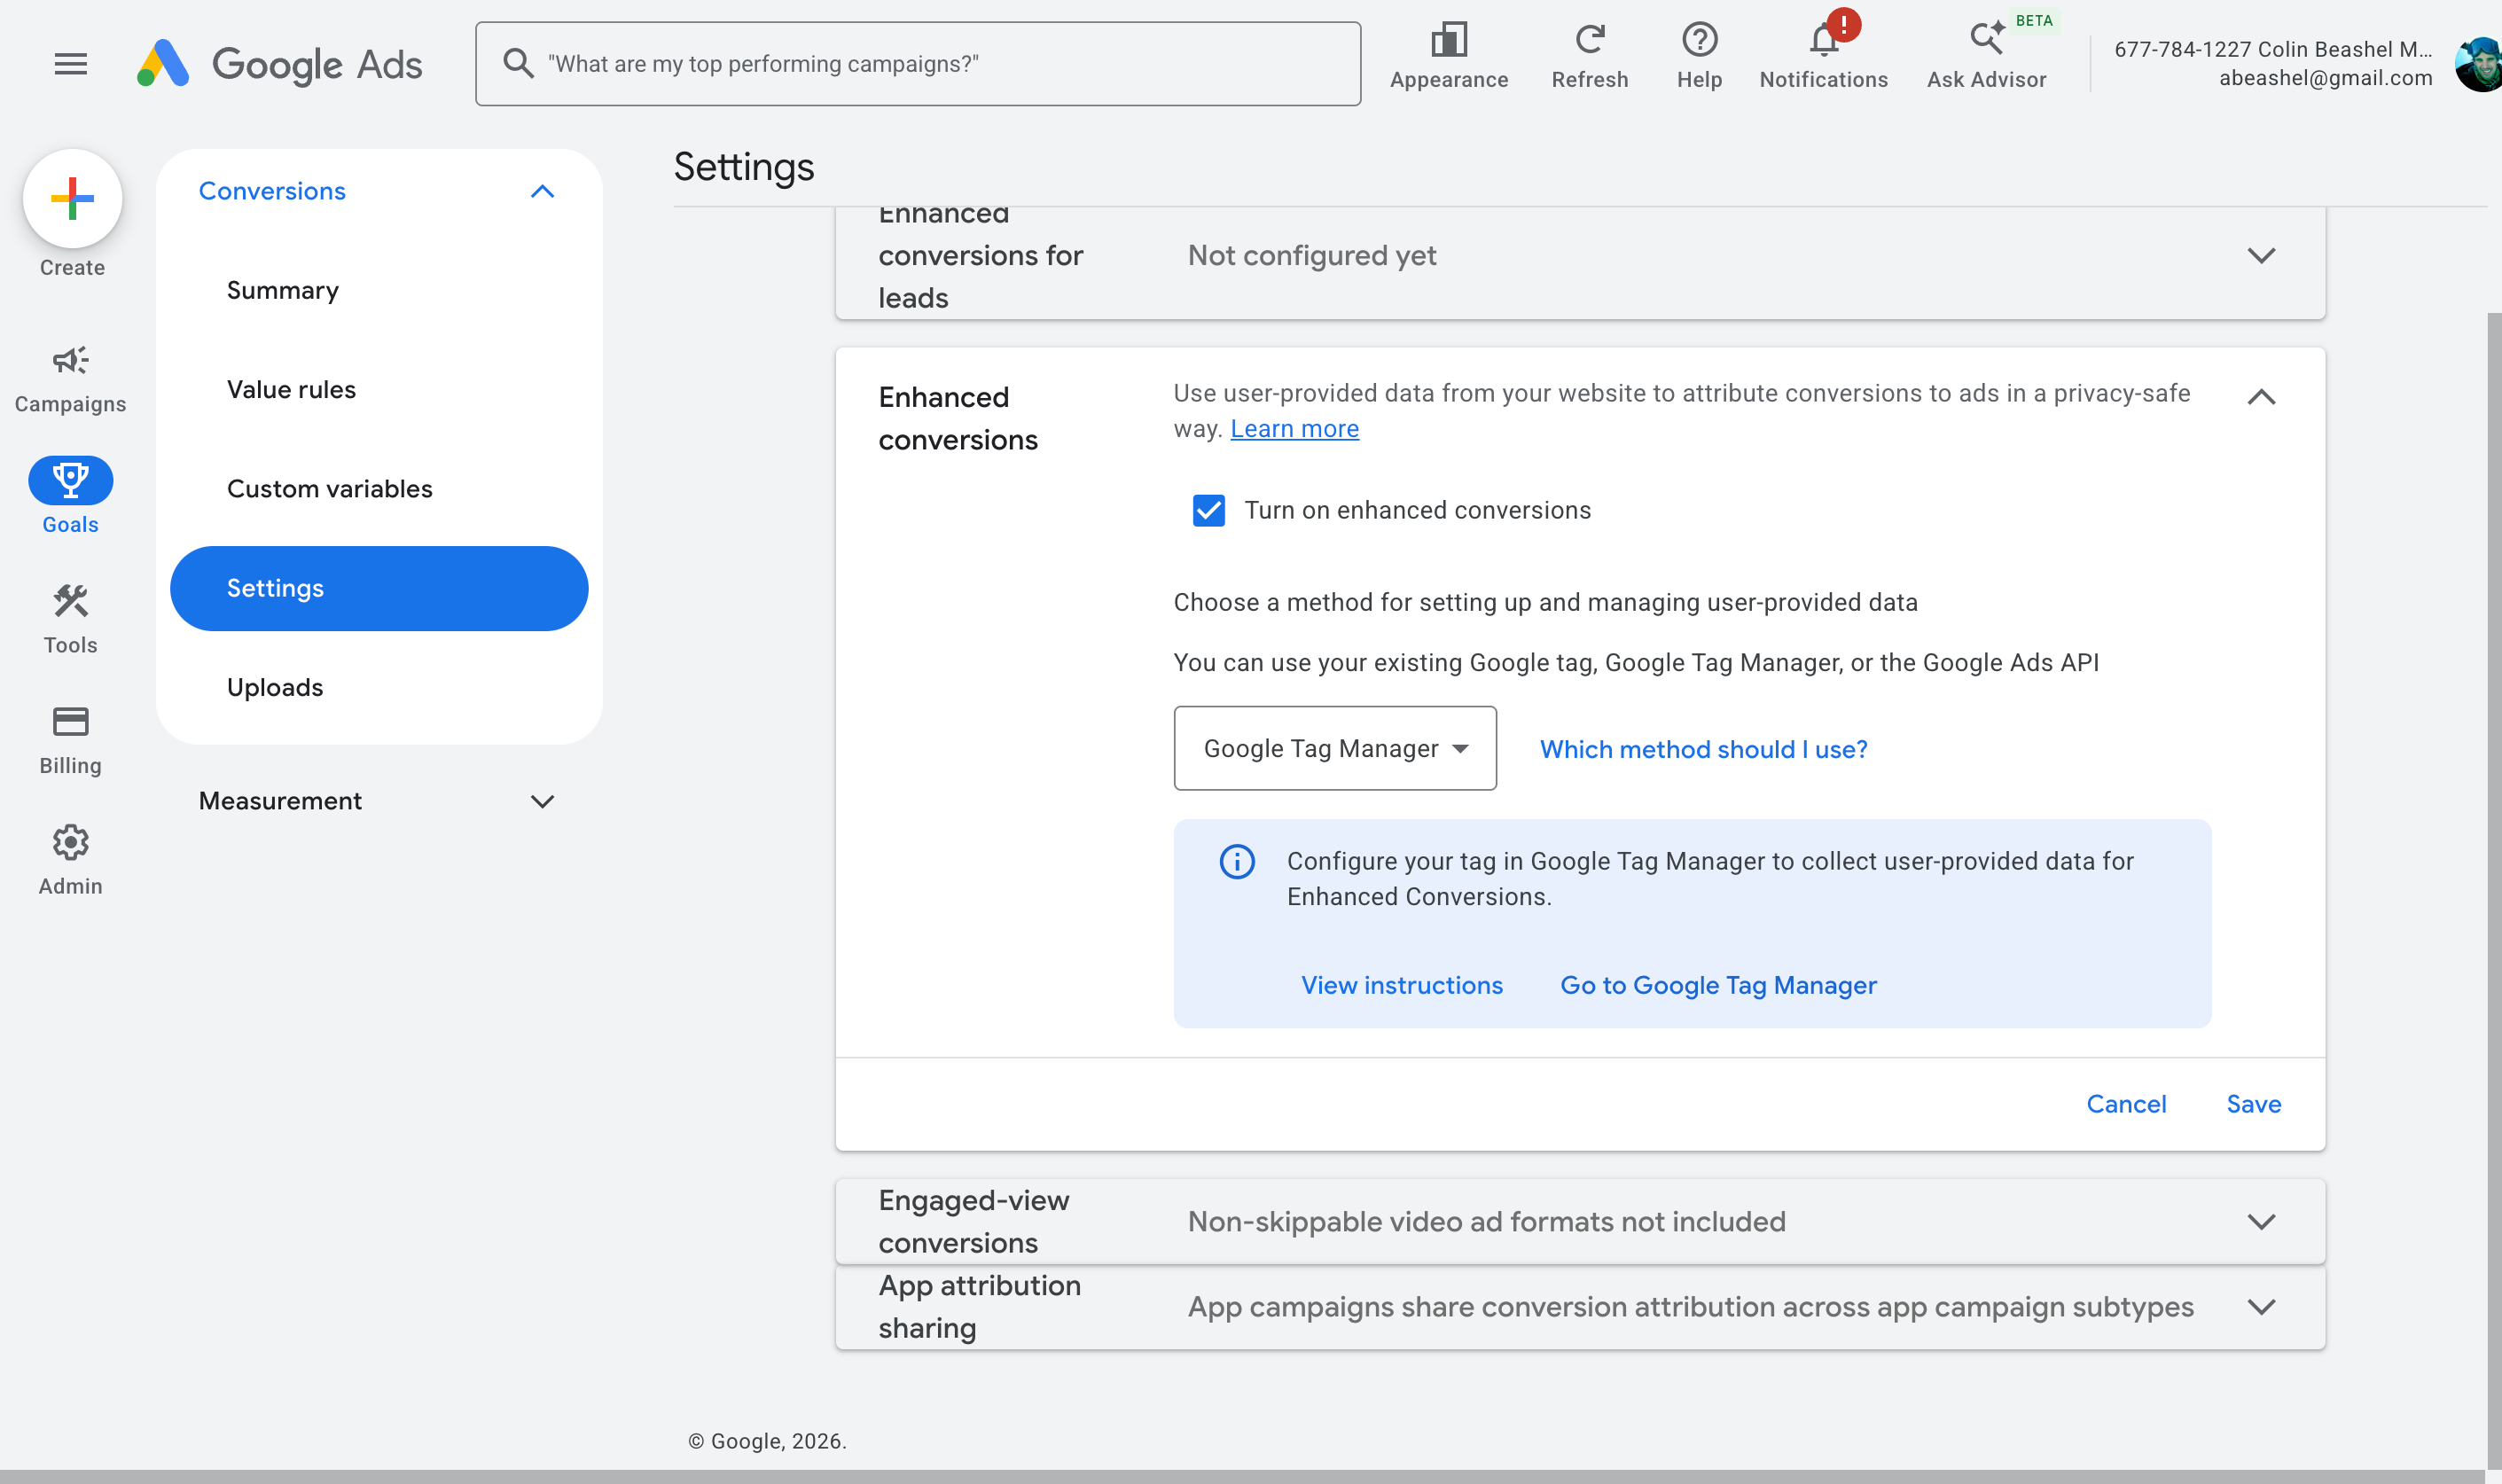
When it asks how you want to implement it, choose Google Tag Manager. This gives Google Ads permission to receive and use the customer data you're about to send.
Step 5: Create your Google Ads conversion tag and map the data
The final step is to actually set up the tag that sends the conversion to Google Ads. To do this, jump back into GTM, go to Tags, click New, choose Google Ads User Provided Data Event as the tag type, then map the Variables you built in Step 2 to the fields it asks for (Email, Phone, and so on).
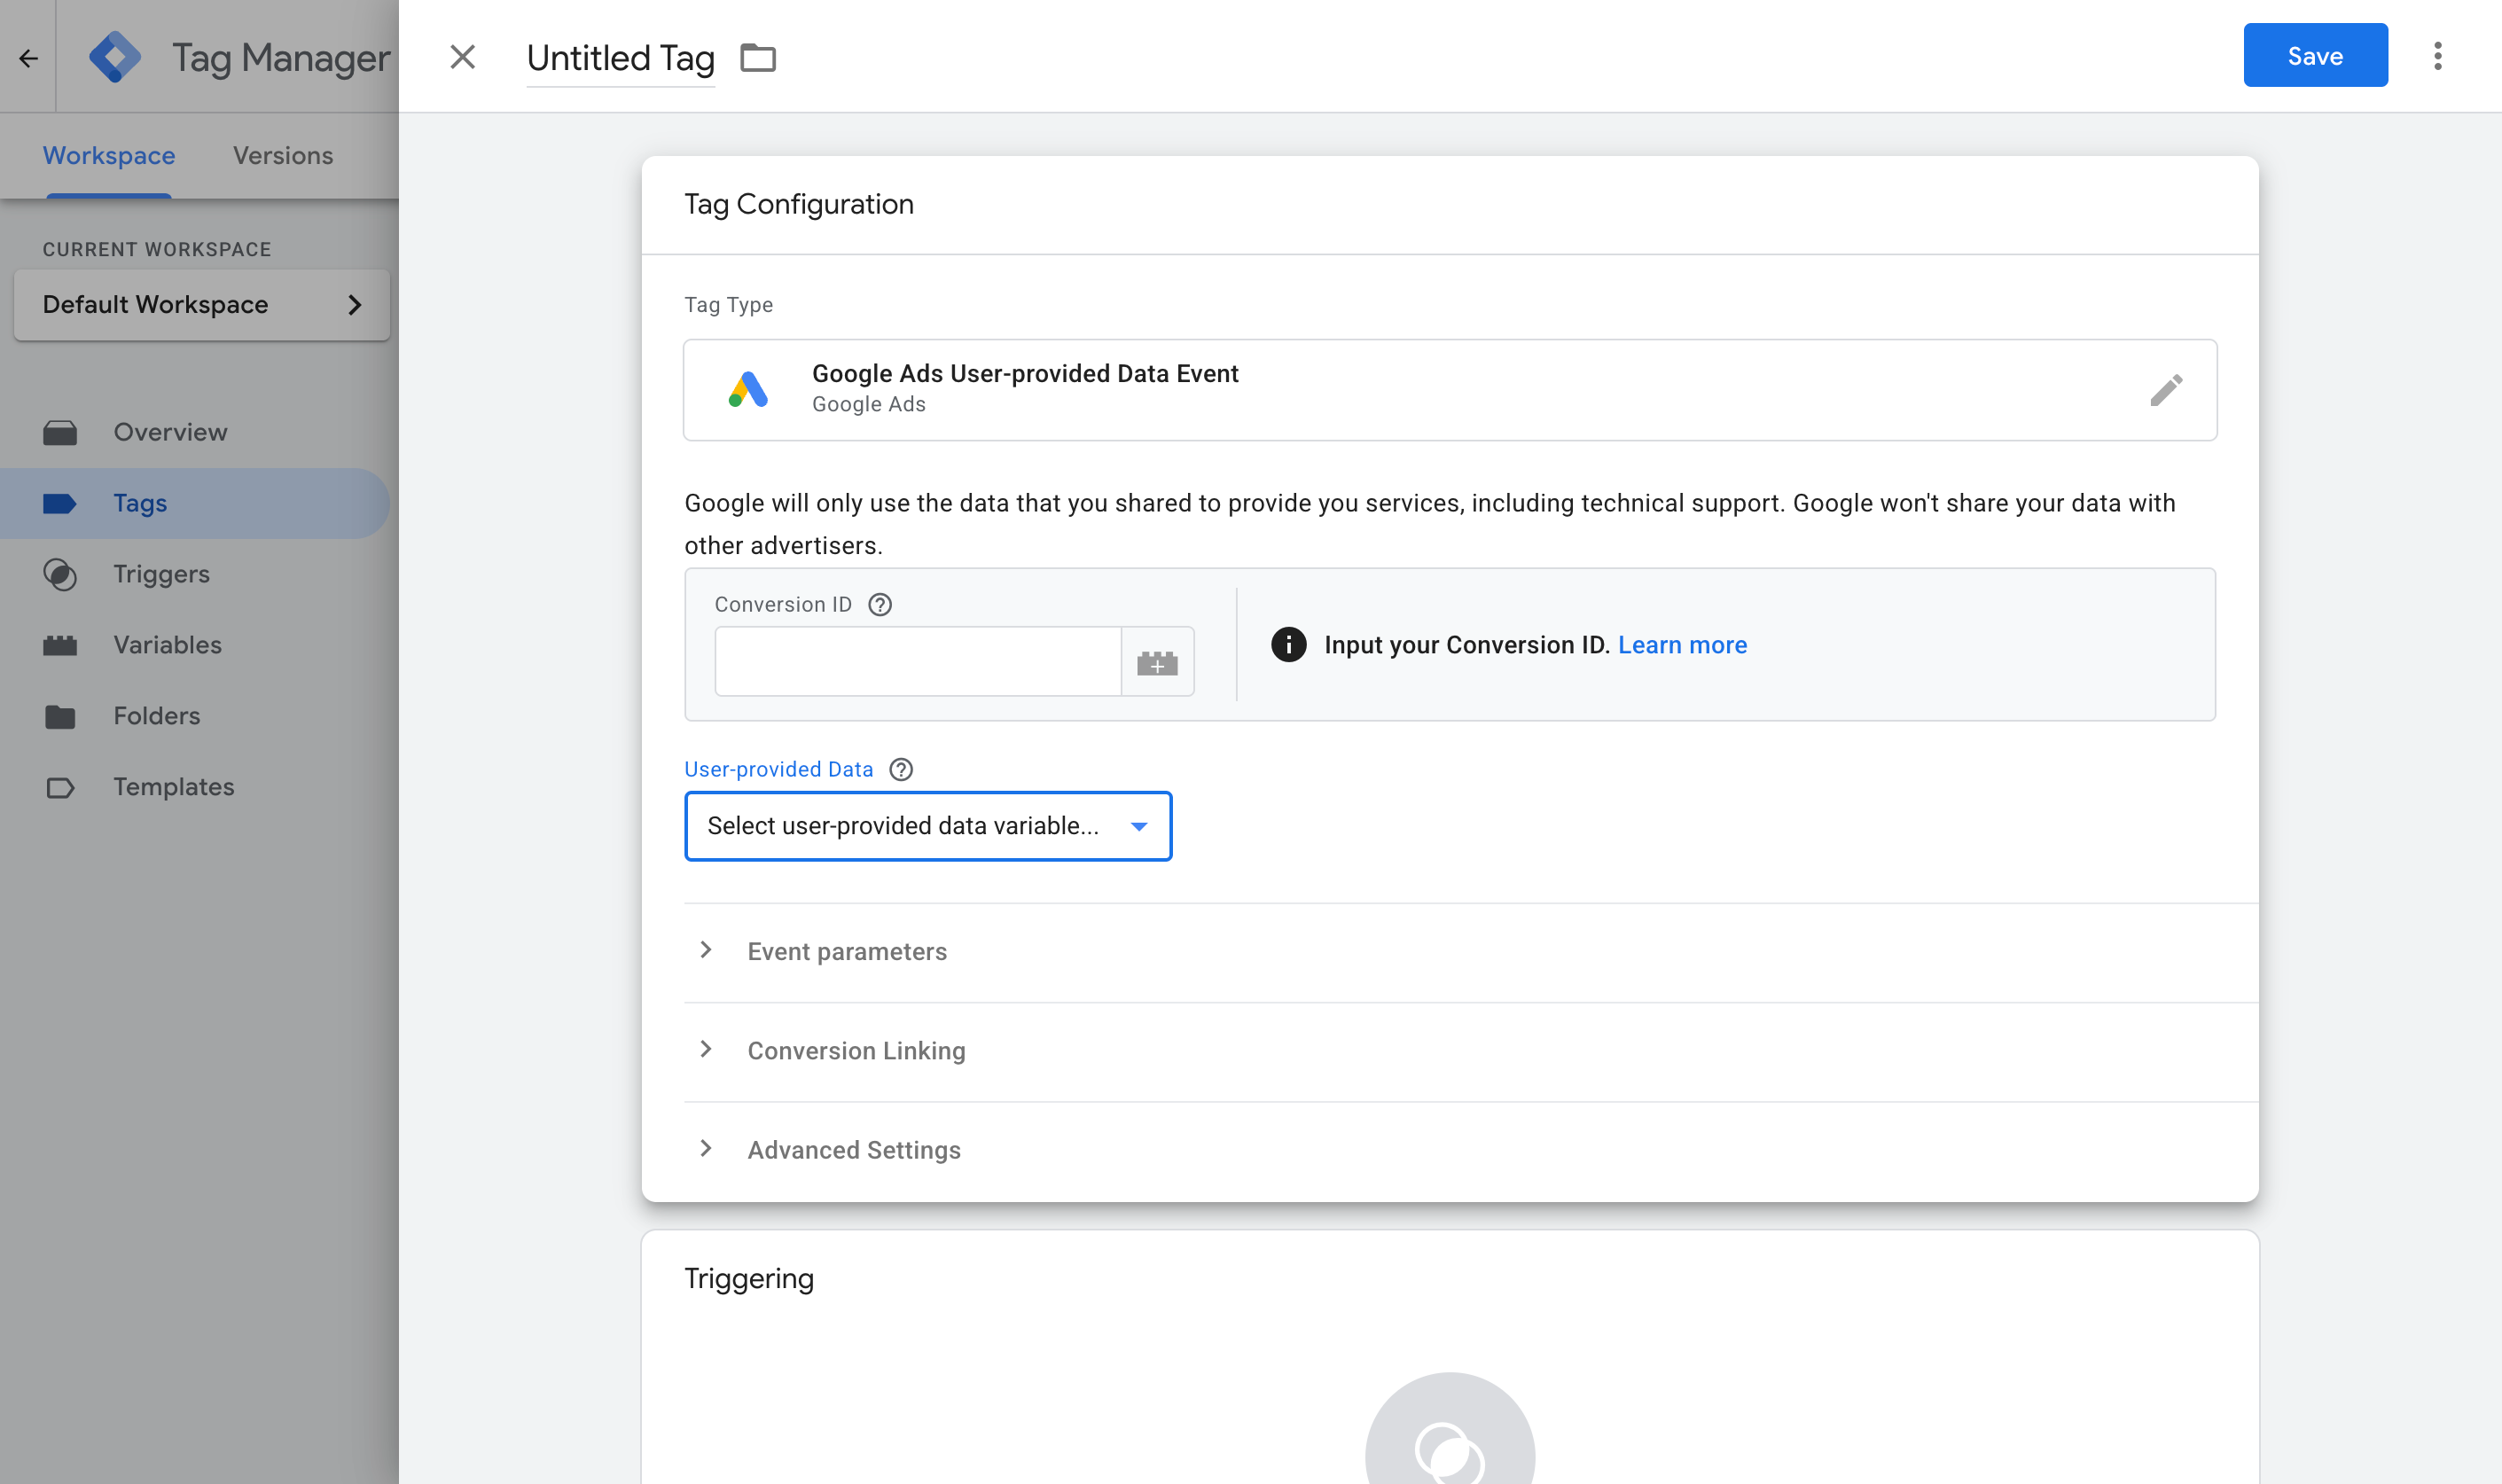
Set it to fire on the Custom Event trigger from Step 3, then publish your GTM container. To confirm it's working, submit a test entry in GTM Preview mode and check that the forminator_form_submitted event arrives with the email and name filled in. Then keep an eye on the Enhanced Conversions diagnostics for the conversion action in Google Ads over the next day or two, which will tell you whether the data is being received and matched.
Pros and cons
Pros:
- It's free, and it uses Google Tag Manager, which you may already have installed on your site.
- It captures the email, first name, last name, and phone, which is what Google Ads Enhanced Conversions needs to start matching conversions back to real people and the ads they clicked.
- The capture logic handles Forminator's real quirks (fields being wiped before success fires, the empty success payload, etc)
- Like Method 1, it only counts real, completed submissions, because it fires on Forminator's genuine success event.
Cons:
- There are a lot of moving parts. Between the GTM tag, the trigger, four variables, the Google Ads settings, and the conversion tag, there's plenty to misconfigure, and if you get it wrong then there's nothing that tells you what happened. Google offers no support for Google Tag Manager either, so you are on your own.
- You own and maintain it. A Forminator update or a theme change can break the capture, and nothing will tell you. You'll only find out weeks later when the ad account reports zero conversions.
- Sensitive data is a risk if you go off script. Plenty of tutorials show you how to dump every form field into the dataLayer at once. Never do that. Once a password or card field lands there, every other script on the page can read it. It's exactly why this snippet only ever reads email, name, and phone.
- This method only works if the form submits over AJAX, which is Forminator's default. If a form is switched to Forminator's Page Reload behaviour, the page navigates away before the success event has a chance to fire, so there's no client-side signal left to hook.
- It still runs in the browser, so ad blockers and privacy browsers can stop it firing. Roughly 30%-40% of your conversions will never make it to your chosen ad platforms using this method.
- Even done well, it doesn't send the data that ad platforms like Google Ads need the most (like the Google Click ID, the IP address, etc). Sending the name and email is a good step, but millions of people have the same name, and it's common for people to be logged in to their Google or Meta account using a personal email but enter their work email into your form. A real number of the conversions you report won't be able to be matched back to a real person and the ad they clicked, so they won't appear in your reports.
That last point is what pushes a lot of people to Method 3.
Method 3: Use Converly
Best for: Sending proper, server-side conversions to Google Ads, Meta Ads, LinkedIn Ads, ChatGPT Ads, and more, without wrangling Google Tag Manager configuration.
Converly is a dedicated conversion tracking tool that makes it really easy to send proper, server-side conversions to Google Ads, Meta Ads, LinkedIn Ads, etc. when a Forminator form is submitted on your site.
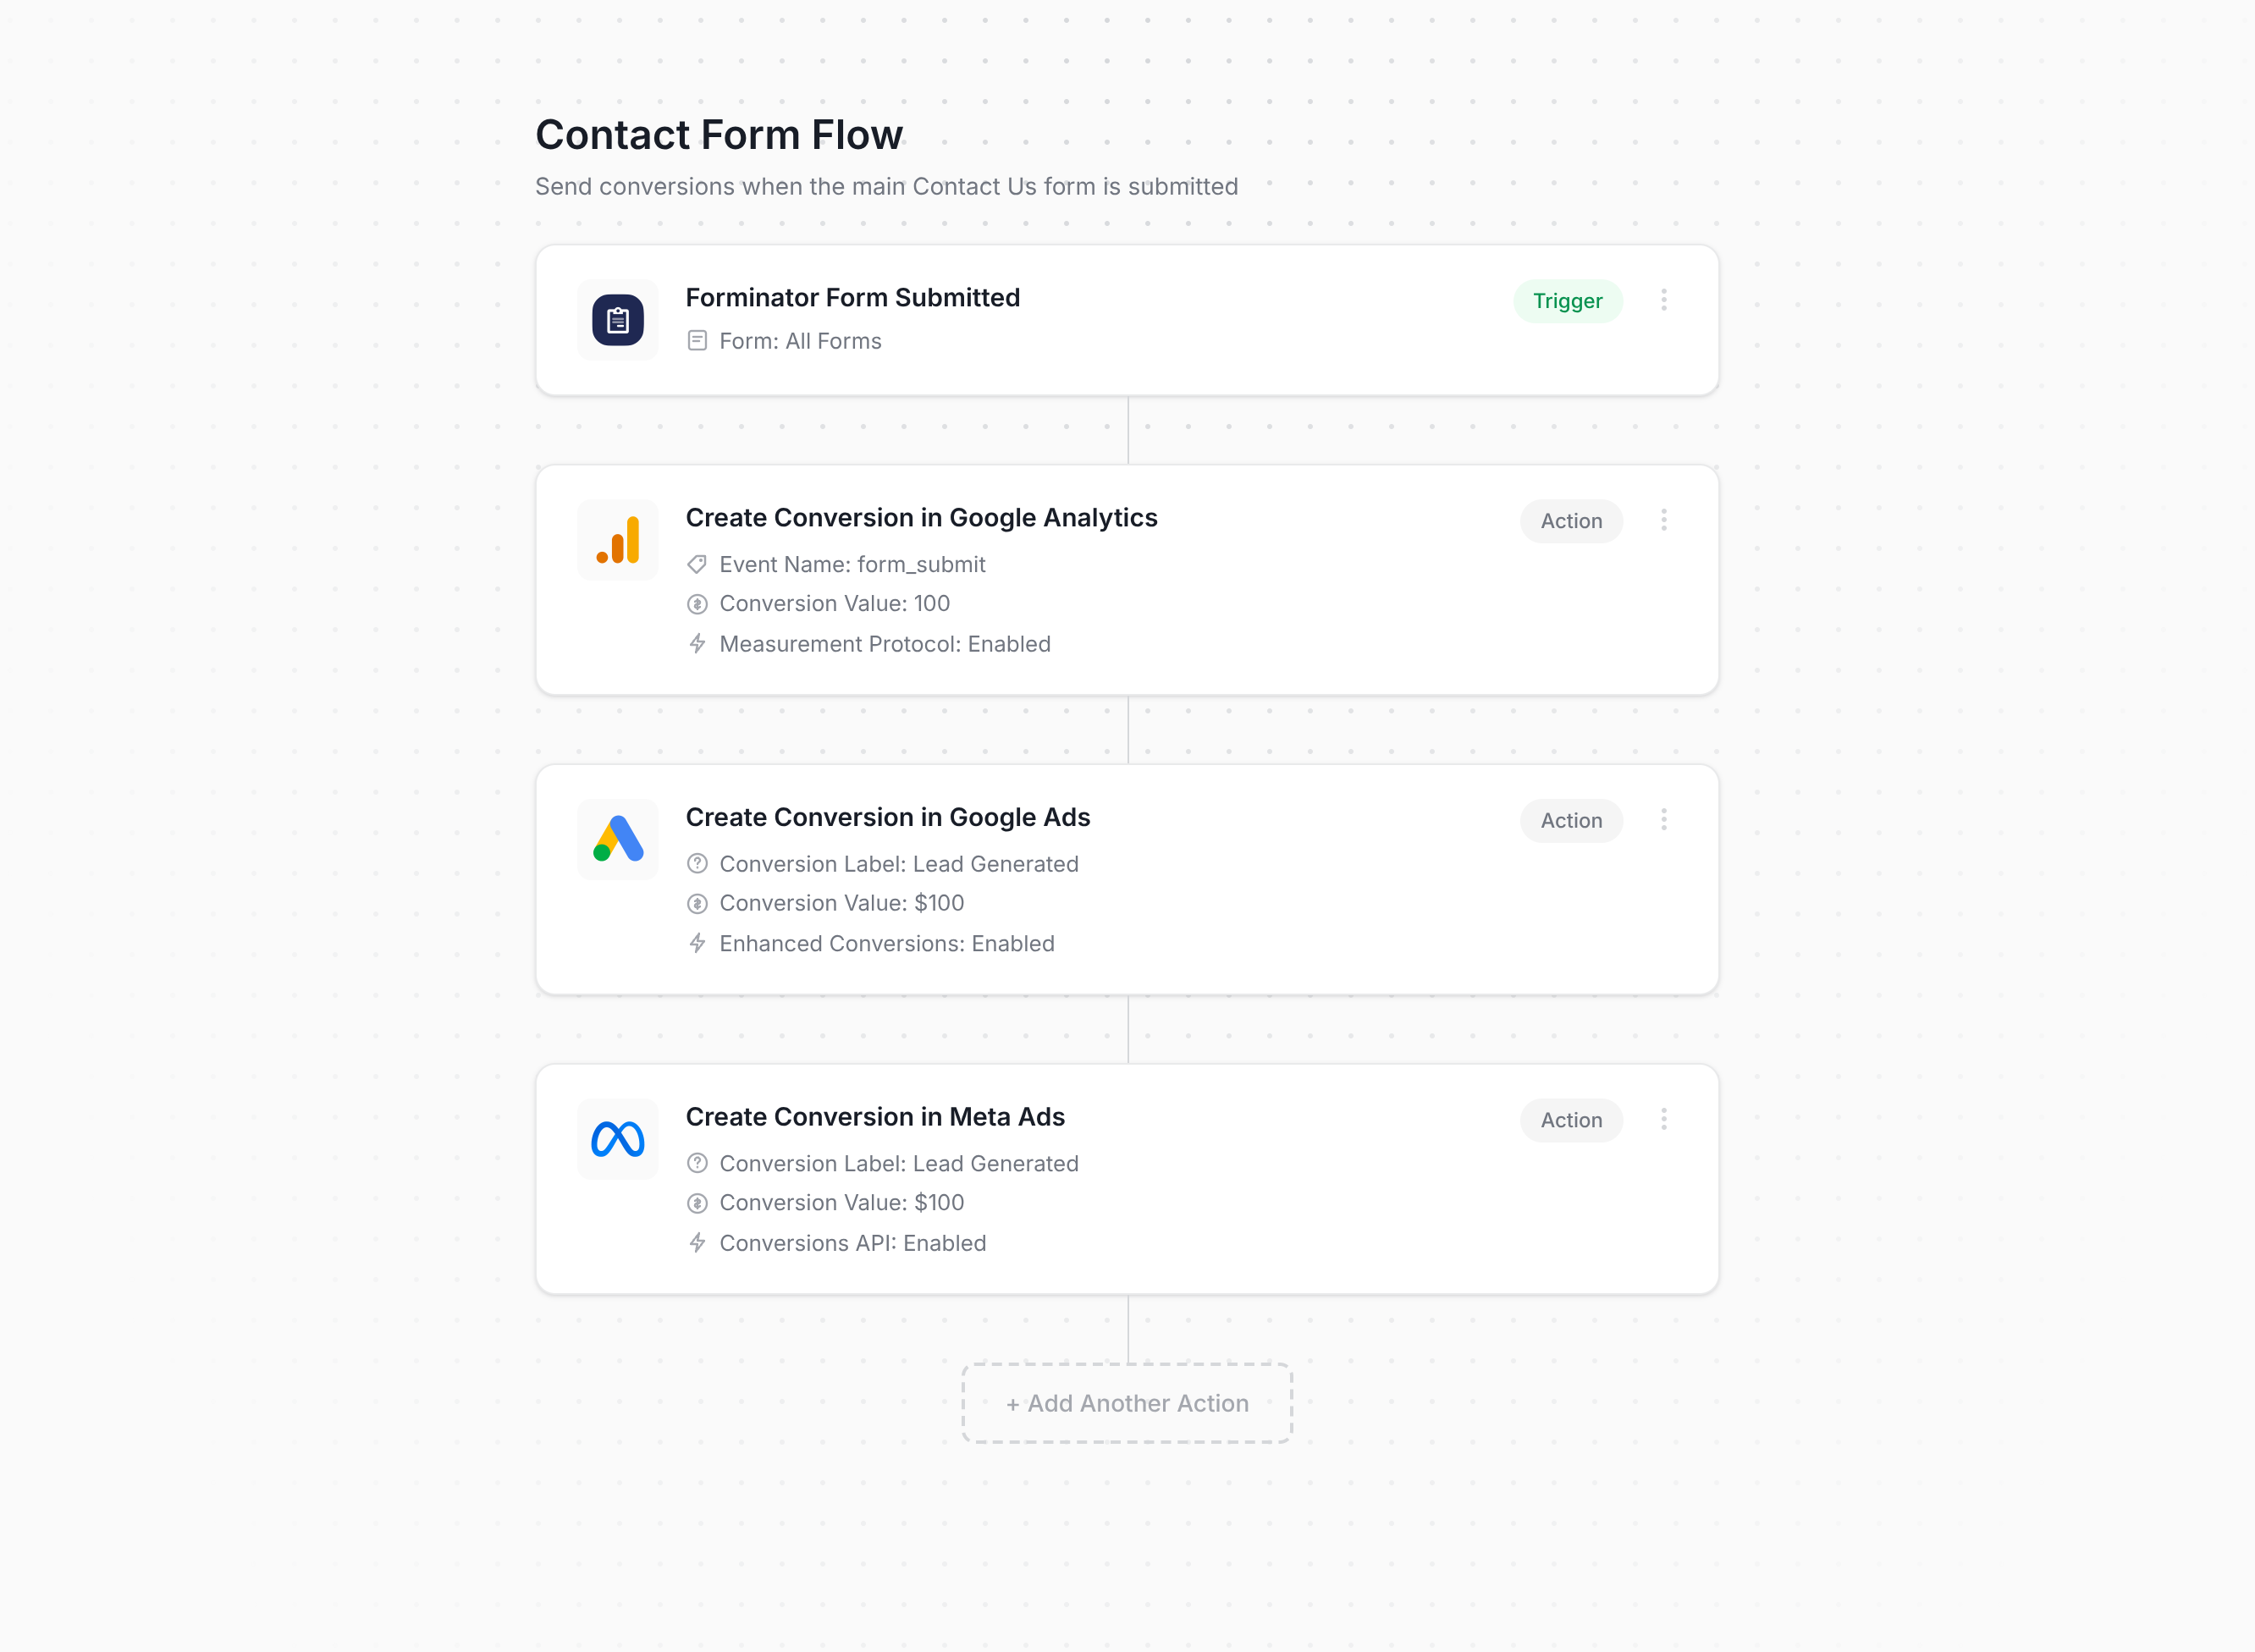
As you can see in the screenshot above, setting it up is really simple. You pick a trigger (like when a Forminator form is submitted on your site) and then choose one or more actions (like sending a conversion to Google Ads, sending a conversion to Meta Ads, sending an event to GA4, and so on). That is the whole setup. No custom code, no complicated configuration in Google Tag Manager.
Converly then gives you a small snippet of code to add to your site and it takes care of the rest from there. It listens for Forminator's real success event, extracts the name, email and phone, and sends it to Converly's own servers, which then send it over to Google Ads, Meta Ads, and more (this is what makes it a server-side conversion, which means ad blockers or privacy restrictions in browsers like Safari can't get in the way).
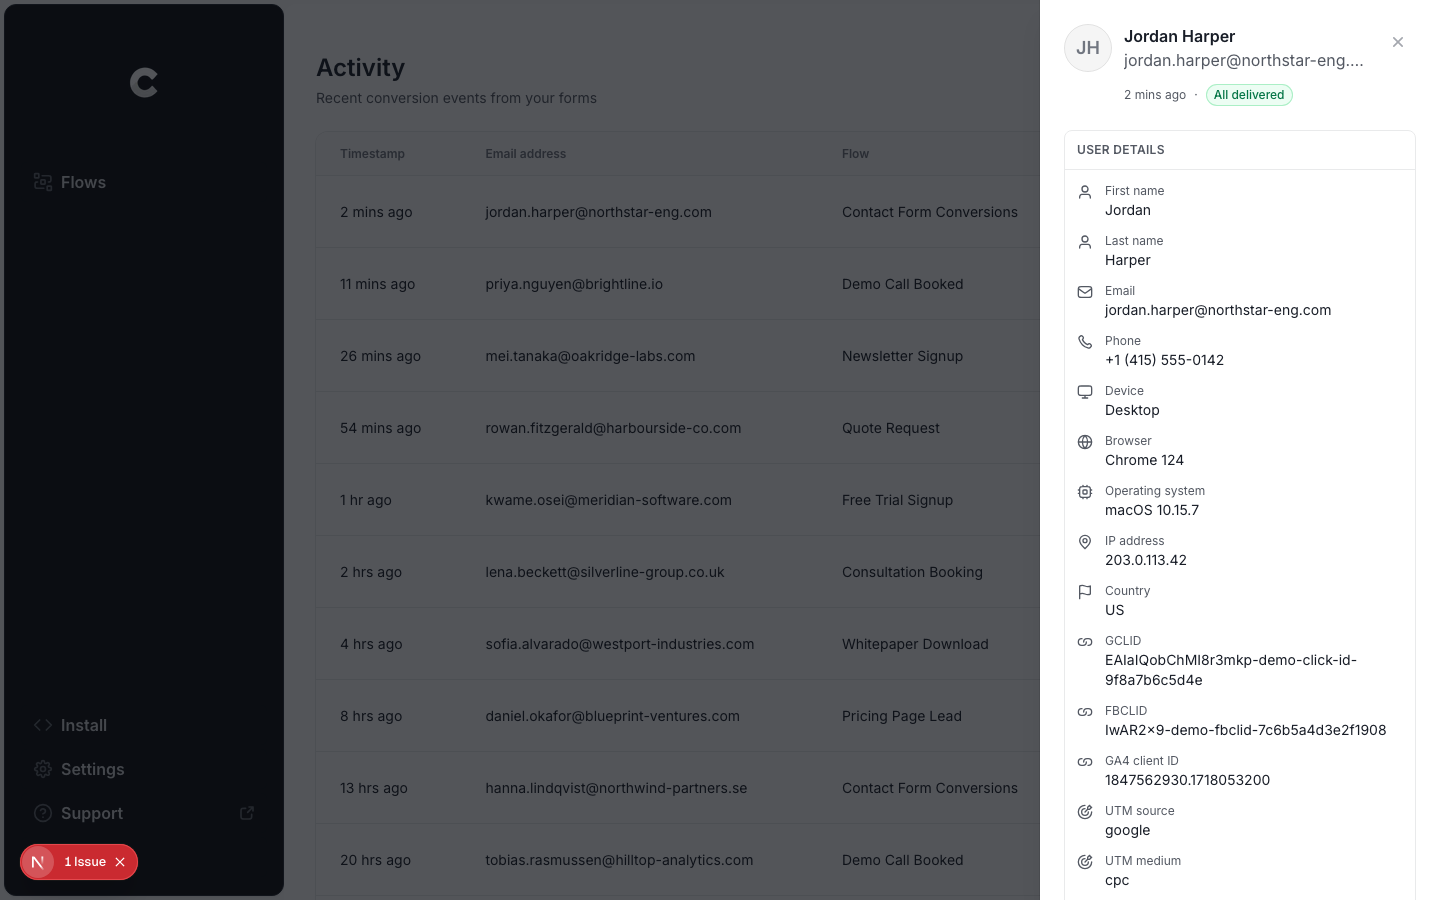
And here is the part that really matters for paid campaigns. Alongside the name and email, Converly captures the Google and Meta click IDs (GCLID and fbclid), the Meta browser cookies, the IP address, the user agent, and more, and sends it all over to Google Ads, Meta Ads, and so on with each conversion. These are precisely the signals Google and Meta reward, and capturing all of them is what takes your match quality from weak to strong (in Meta it would take your Event Match Quality score from about 3 to a 9 or 10).
Converly also gives you a full Conversion Log where you can easily see every lead that came through Forminator, what data was captured, what data was sent to the ad platforms, whether it was successfully received, and so on.
Finally, the other big advantage is reach. One setup in Converly can send the same conversion to Google Ads, Meta Ads, LinkedIn Ads, ChatGPT Ads, GA4, and plenty of other platforms in one go. So if you start advertising on a new platform next month, you just add it as another action to your existing flow. No new snippet, no new GTM tag, no rebuild.
Oh, and did we mention we provide full support for it as well? Good luck getting help from Google if your conversions aren't firing in Google Tag Manager.
Pros and cons
Pros:
- No code to write or maintain. One snippet, then a visual flow builder. It even connects to AI tools like Claude and ChatGPT, so you can just say ‘Setup Forminator conversion tracking’ and it will be done for you.
- Handles Forminator's real gotchas automatically (the fields being wiped before success, the empty success payload).
- Captures the click IDs, cookies, IP, and user agent and sends them to the ad platforms with each conversion. This gives ad platforms more data to use when trying to match the conversion back to a real person and the ad they clicked, and ultimately results in more conversions being recorded.
- Sends the conversions to ad platforms server-side, so ad blockers and privacy browsers can't get in the way. This too results in more conversions being recorded.
- Supports conditional logic, so you can fire a conversion only for specific forms (like your Quote Request form) and not others (like your Contact Support form).
- Lets you log in to Google Ads, Meta Ads, and the rest and just pick the conversion you want to fire, rather than hunting down account IDs and conversion IDs yourself.
- Gives you a full conversion log showing every lead who submitted your Forminator form, what data was captured, and whether it reached your ad platforms.
- Comes with support from a team who will help you get set up and troubleshoot issues. Good luck getting that from Google if your GTM setup stops working.
Cons:
- It's a paid tool after the free trial. Plans start at $19 a month, which you'd likely make back in the setup time saved alone, but it is an extra subscription.
What not to do
We've covered the three best ways to track conversions in Forminator and when each one is best. But it's just as useful to know what to avoid, because some of the most common DIY approaches to Forminator tracking will fall a long way short of giving you accurate conversion tracking. Here are the ones to stay away from.
Tracking thank-you page visits
This is the most common DIY approach, and the one we'd steer you away from hardest. The idea is to redirect people to a dedicated "thank you" page after they submit the form (Forminator's own Behaviour settings even offer a "Redirect user to a URL" option for exactly this), and then count visits to that page as conversions. It sounds like a decent idea at first, but there are a lot of ways it can go wrong.
It fires for people who never submitted anything. A thank-you page is just a URL. Someone can bookmark it, find it in their browser history, get sent the link by a colleague, or stumble on it through Google if it ever gets indexed. Every one of those gets counted as a conversion, even though nobody submitted anything.
Match rates would be terrible. A thank you holds no information about the actual lead who submitted the form, so it can't pass the name, email, phone, click ID, etc. back to the ad platform (which is what Google needs for Enhanced Conversions or Meta needs for a high match rate score). For the most part, if you're not sending this information with each conversion, then it's probably not even worth doing.
It can also miss real conversions. If the visitor closes the tab before the thank you page loads, nothing gets counted. If you build a new form but accidentally forget to set up the redirect, no page visit happens at all. If the page is cached, the tracking tag may not fire. These can all lead to you significantly undercounting the amount of conversions you get.
The root problem is that a thank-you page visit is a stand-in for a conversion, not the conversion itself. The three methods above all fire on Forminator's actual confirmed success event, so they stay tied to what genuinely happened.
Relying on the default form submit trigger in Google Tag Manager
The obvious first move when setting up tracking in GTM is to try and use its built-in Form Submission trigger, which listens for the browser's native form submit event. But a Forminator form on the default settings never sends it, so the built-in Form Submission trigger never fires.
By default, Forminator uses AJAX to send the form to your WordPress backend and never fires the browser's native submit event. And the failure is quiet too. The trigger looks correctly configured, GTM saves without complaint, and you walk away thinking tracking is live while your reports sit at zero.
If you change your Forminator settings to use the Page Reload submission method, then the native event can fire, but it fires before the form submission is validated. So if a form submission is rejected (maybe because they missed a required field or entered their email in an incorrect format), then a conversion would fire even though the form submission was rejected. And then when they fix the error and submit again, you get a second conversion from the same lead.
You are best off using Forminator's own success event instead, the way the methods above all do.
Firing the conversion on the submit button click
Some tracking setups we've seen will fire the conversion as soon as someone clicks the submit button, usually with a GTM click trigger targeting the button.
But clicking the submit button doesn't mean the submission went through successfully. The visitor might have left a required field empty, entered their email in an invlaid format, or tripped Forminator's spam filtering, and every one of those clicks still gets counted. And then when they fix the error and click submit again, it gets counted twice.
So which method should I use?
Here's how the three ways to track Forminator conversions compare.
| Method | Best for | Sends conversions to | Data sent |
|---|---|---|---|
| Method 1. GA4 event built in Google Tag Manager | Sending submissions to Google Analytics, if you're happy building the tag and trigger yourself | Google Analytics 4 | The submission event only |
| Method 2. Enhanced Conversions through Google Tag Manager | Sending to Google Ads, if fiddly configuration doesn't put you off | Google Ads | Name, email and phone |
| Method 3. Converly | Sending to any ad platform, with the least setup work | Google Ads, Meta Ads, LinkedIn Ads, ChatGPT Ads, GA4 and more | Name, email and phone, plus the GCLID, the Meta click ID, IP address and user agent |
Wrap up
Getting conversion tracking right matters, especially once you're sending conversions to Google Ads, Meta Ads, and similar platforms.
In fact, Google states that proper, server-side conversion tracking results in an average 19% increase in conversions. Meta reports an average 23% increase in conversions on their platform.
With a tool like Converly, setting that up is straightforward. You just pick a trigger (a Forminator form being submitted), choose where the conversions should go, and you're done.
Converly is free to get started, and setup usually takes less than 10 minutes. Start your 14-day free trial today.
About the author

Aaron is the founder of Converly. With over 15 years of experience in digital marketing and SaaS, he's passionate about helping businesses track and optimise their ad conversions.