


Divi Forms conversion tracking: 3 ways to do it
Learn three different ways to set up conversion tracking for Divi, and how to work out which one is right for you.
Are you struggling to figure out which of your marketing campaigns are actually generating leads for your business?
If so, you're not alone. Setting up proper conversion tracking on forms built with Divi is weirdly difficult.
Tools like Google Analytics and Google Tag Manager have built-in ‘Form submitted’ events that many people try to use, but they don't work with Divi forms because they rely on the browser's default form submit event, and Divi uses AJAX to submit the form.
Fortunately, there are a couple of ways to get it set up properly, and in this article we'll show you them and help you understand which is best for your needs.
Method 1: Send a GA4 event via Google Tag Manager
Good for: Sending form submission events to Google Analytics 4, for free.
If all you want is to see Divi form submissions land in GA4 so you can track the number of conversions from each channel, then this is genuinely enough. Google Analytics doesn't need to know who submitted the form, only that a submission happened.
Divi's contact form module has no built-in Google Analytics integration, so the best free route is to use a Google Tag Manager recipe, which is essentially a set of pre-built assets that you upload into your Google Tag Manager account. We've built one for Divi that you can download for free below.
Step 1: Download the Divi Forms Conversion Tracking GTM Recipe
The first thing you need to do is go and download the Divi Forms GTM recipe from this page. It contains the following:
- A Custom HTML Tag that gets added to your site, watches each Divi contact form for its confirmation message, and passes an event called 'divi_form_submitted' to Google Tag Manager when a successful submission is detected. Unlike other WordPress form builders, Divi doesn't announce a successful submission with a named JavaScript event, and it shows its success and error notices in the same place, so the code checks it's looking at the success version of the message before treating it as a real submission.
- A Variable that captures the ID of the form that was submitted (which you can use to filter your triggers to only fire on certain forms if needed). Divi doesn't give its forms names, so the recipe assigns each form on the page a stable ID to tell them apart.
- A Trigger that fires when the 'divi_form_submitted' event is received, which you can use as the Trigger for any of your conversion Tags (i.e. Google Analytics 4 event, Google Ads Conversion, etc).
The listener only pushes the event and the form ID to the dataLayer, and nothing else. It doesn't touch the visitor's name, email, or any other field, so there's no personal data involved at this stage.
Step 2: Import the GTM recipe into your account
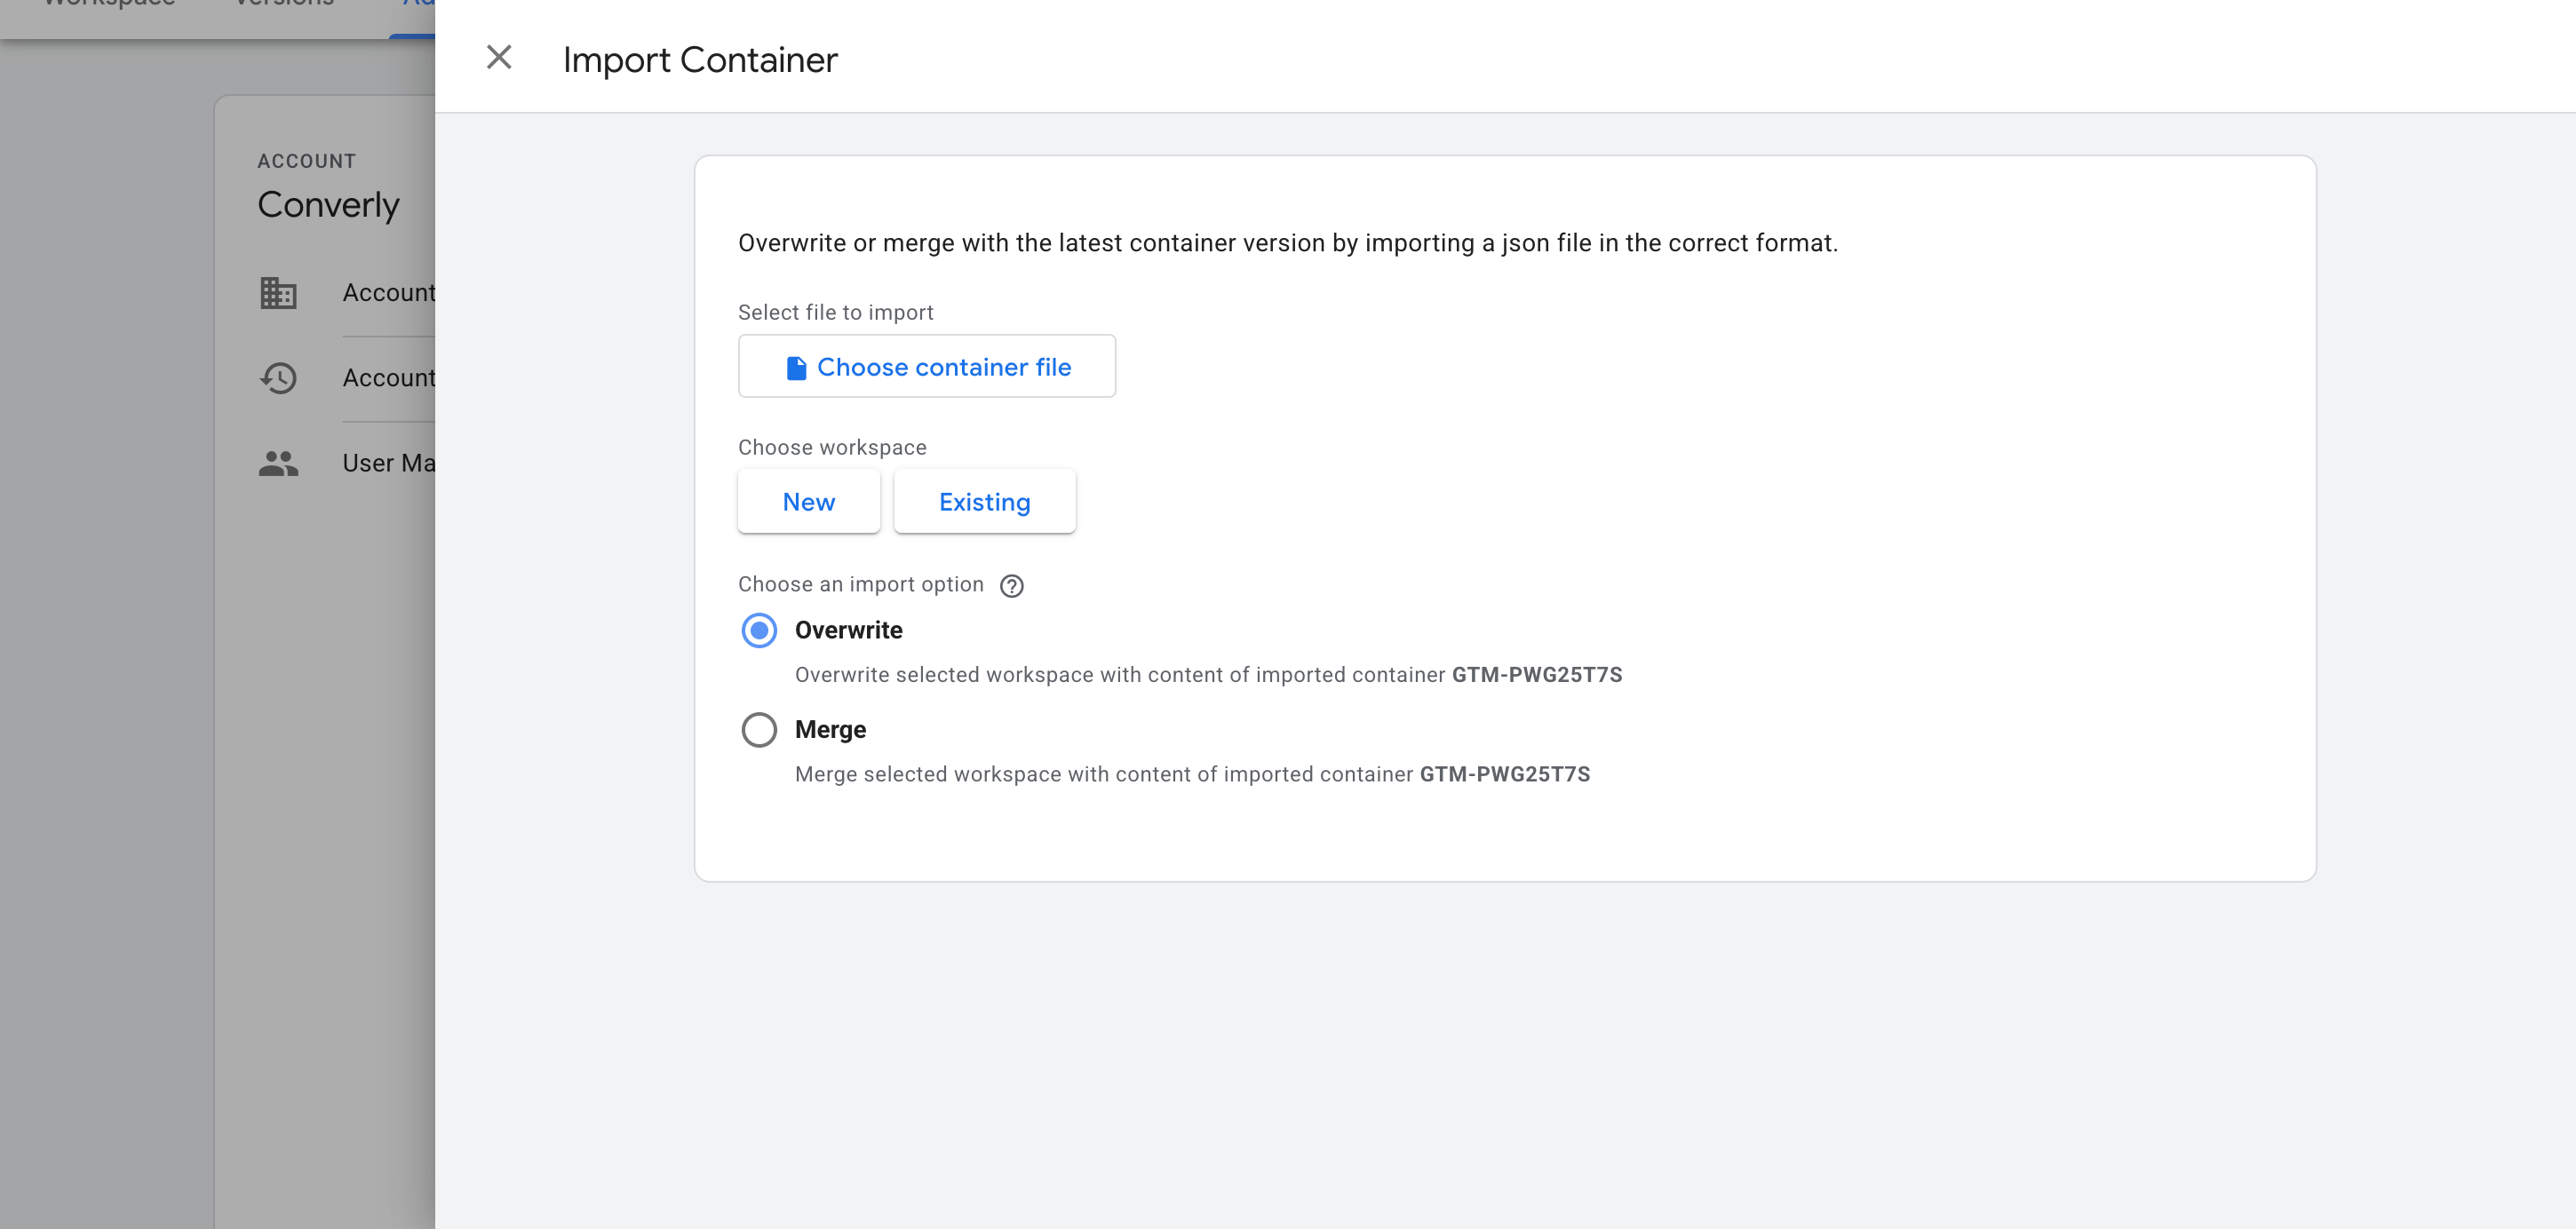
Once you've downloaded it from the page linked above, you then need to import it into your Google Tag Manager container. To do this, open your Google Tag Manager account, head to Admin, choose Import Container, select the downloaded file, and pick the Merge option (so it doesn't overwrite anything already in your container). The listener, variable and trigger are added for you automatically.
Step 3: Build a GA4 event tag
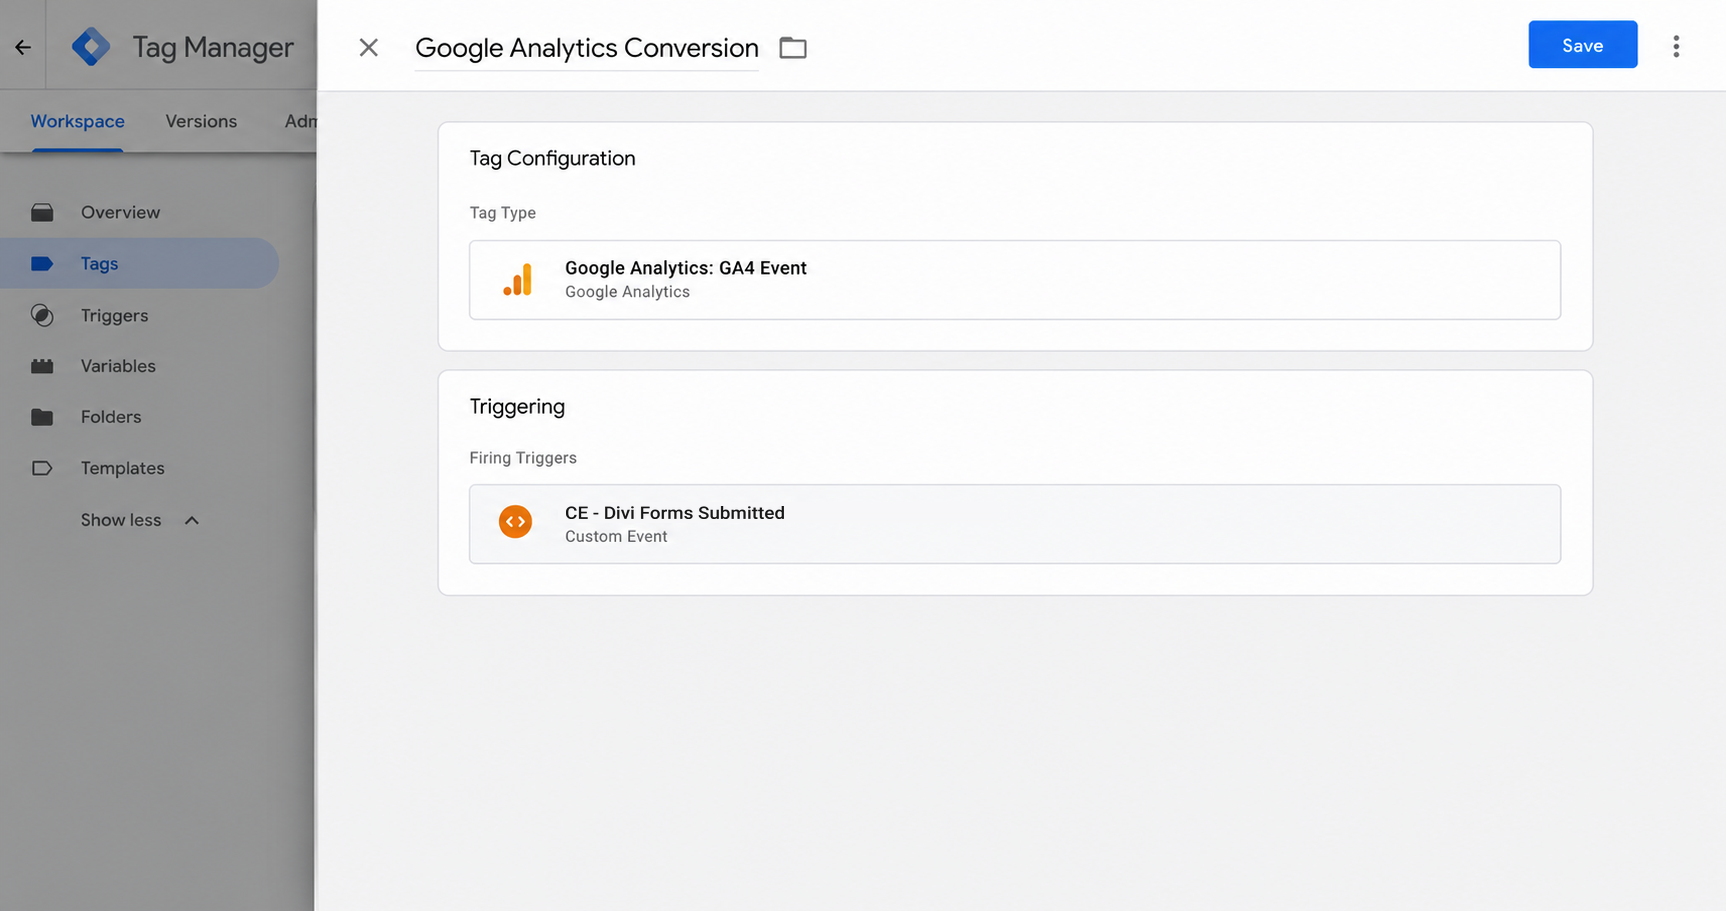
Now that the recipe is installed, you can use it as a Trigger for your conversion tags. To send a conversion to Google Analytics, create a GA4 event tag and set the Trigger to the one the recipe provides (called CE - Divi Forms Submitted).
Step 4: Test it, then mark it as a Key Event in GA4
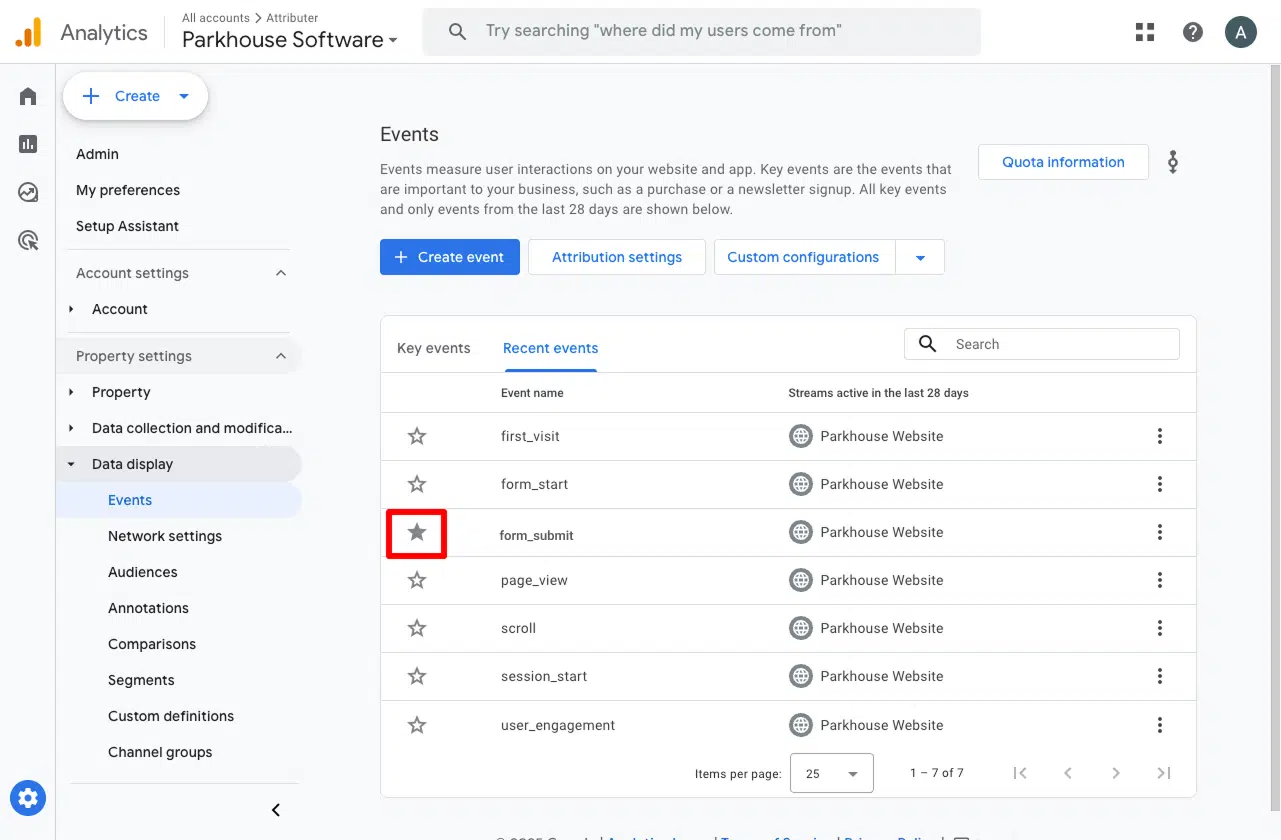
Submit a test entry on your Divi form, open GA4's Realtime report, and confirm the event shows up in the recent events list. Once it's arriving, go to Admin, then Events (or Key Events), find it, and toggle it on as a Key Event. That's what tells GA4 to treat it as a conversion in your acquisition and funnel reports, instead of leaving it sitting there as an ordinary event.
Pros and cons
Pros:
- It's free!
- It fires only on Divi's genuine success signal (the confirmation message that replaces the form after a real submission). So if the lead gets a captcha wrong or enters an invalid email and the submission gets rejected, no conversion event is fired.
- The recipe does the hard detection work for you. The listener, the trigger, and the variable arrive pre-built, so the only piece you're creating by hand is the GA4 event tag itself (which is the easiest part).
- You don't need to install anything beyond Google Tag Manager, which you likely already have running.
Cons:
- It's still a bit fiddly. The recipe saves you the hardest part, but you're still building the GA4 conversion tag yourself, and Google Tag Manager doesn't offer any support if something goes wrong.
- Every Divi form on your site pushes the same event. So someone submitting your Quote Request form gets the same conversion event sent as someone submitting your Contact Support form. It does send a Form ID as a variable with each event which means it is technically possible to differentiate them, but Google Tag Manager makes this pretty complicated to do.
- It runs in the visitor's browser, so ad blockers and privacy browsers like Safari can stop the event before it ever reaches GA4. Studies put the loss at around 30% of conversions.
- It only reaches Google Analytics. It does not send conversions to Google Ads, Meta Ads, or anywhere else, which is what Methods 2 and 3 below are for.
Method 2: Use Google Tag Manager for Enhanced Conversions
Good for: Sending Enhanced Conversions to Google Ads.
Just counting submissions (the way Method 1 does) is fine for Google Analytics, but it won't get you far in Google Ads.
That's because Google Ads wants to match a conversion back to a real person who clicked your ad, and to do that you need to send information like their name, email, and phone with every conversion (Google calls this Enhanced Conversions).
Here's how to capture that data and send it with Google Tag Manager.
Step 1: Set up a Custom HTML Tag with the form listening code
In GTM, create a new Custom HTML Tag, paste in the snippet below, and set it to fire on the All Pages trigger, with the tag firing option set to Once per event.
The above code does a bunch of things:
- Watches for Divi's real success message. Divi doesn't announce a submission through a named JavaScript event like other form builders do, so the code watches each form's container for the confirmation notice to appear, and checks that it's genuinely the success version of the message and not one of Divi's own error notices.
- Captures the visitor's details before Divi can delete them. Divi removes the entire form from the page as soon as a submission succeeds and replaces it with the success message, so the code reads the field values while the form is still there (right as someone clicks submit) and holds onto them until the success message confirms the submission actually went through.
- Identifies which field is which from its label, not just its name or type. Divi's email field is a plain text input rather than a dedicated email type, and its field names look like
et_pb_contact_name_0, so the code also reads the wording next to each field and uses whichever signal points most clearly to the email, phone, first name, and last name. - Skips sensitive fields. Passwords, card numbers, CVV fields, and similar sensitive fields are checked and dropped before the code ever stores or reads them.
- Sends the captured name, email and phone to the dataLayer, but only once the success message has confirmed the submission actually went through.
This snippet has been extensively tested and addresses a number of issues that other scripts on the internet do not, including:
Issue 1: By the time a script could safely say a submission succeeded, Divi has already deleted the form. Divi swaps the entire form out for its confirmation message as soon as a submission goes through, so a script that waits for that message and then tries to read the name, email, and phone off the form finds nothing there. This snippet gets around it by capturing those details while the form is still on the page, storing them until the success message shows, and then sending them to the dataLayer.
Issue 2: Divi's email field doesn't announce itself as an email field. Most scripts identify the email address by checking for an input with type="email", but Divi's contact form renders its email field as an ordinary text input, so that check comes back empty and Enhanced Conversions ends up with no email to match against. This snippet also reads the visible label next to each field, so it still finds the email even when the input type gives no hint.
Issue 3: A success message that mutates more than once can turn one lead into several conversions. If another plugin or widget on the page nudges the DOM near Divi's confirmation notice after it appears, a script that pushes to the dataLayer every time it sees that notice would count the same submission twice, or more. This snippet permanently marks each success message the first time it fires, so even if something triggers the watcher again, that submission is never counted a second time.
As you can probably tell from reading the above, this isn't a snippet we put together just for this article. It's ported from the same detection logic we use in our own conversion tracking software to track Divi form submissions and send them to ad platforms and analytics tools. We've tested it against a real Divi site, and it's the same logic that's been used to detect real form submissions from our customers, so you can use it with confidence.
Step 2: Create Data Layer Variables for the captured data
Before you can use the data the snippet above gives you, you need to tell Google Tag Manager to pull the lead's details out of the dataLayer (like the email, first name, last name, and phone) so they can be sent to Google Ads, Meta Ads, etc. A Data Layer Variable is what does that.
To set one up, go to the Variables section in GTM, click New under User-Defined Variables, choose Data Layer Variable as the type, and give it a name.
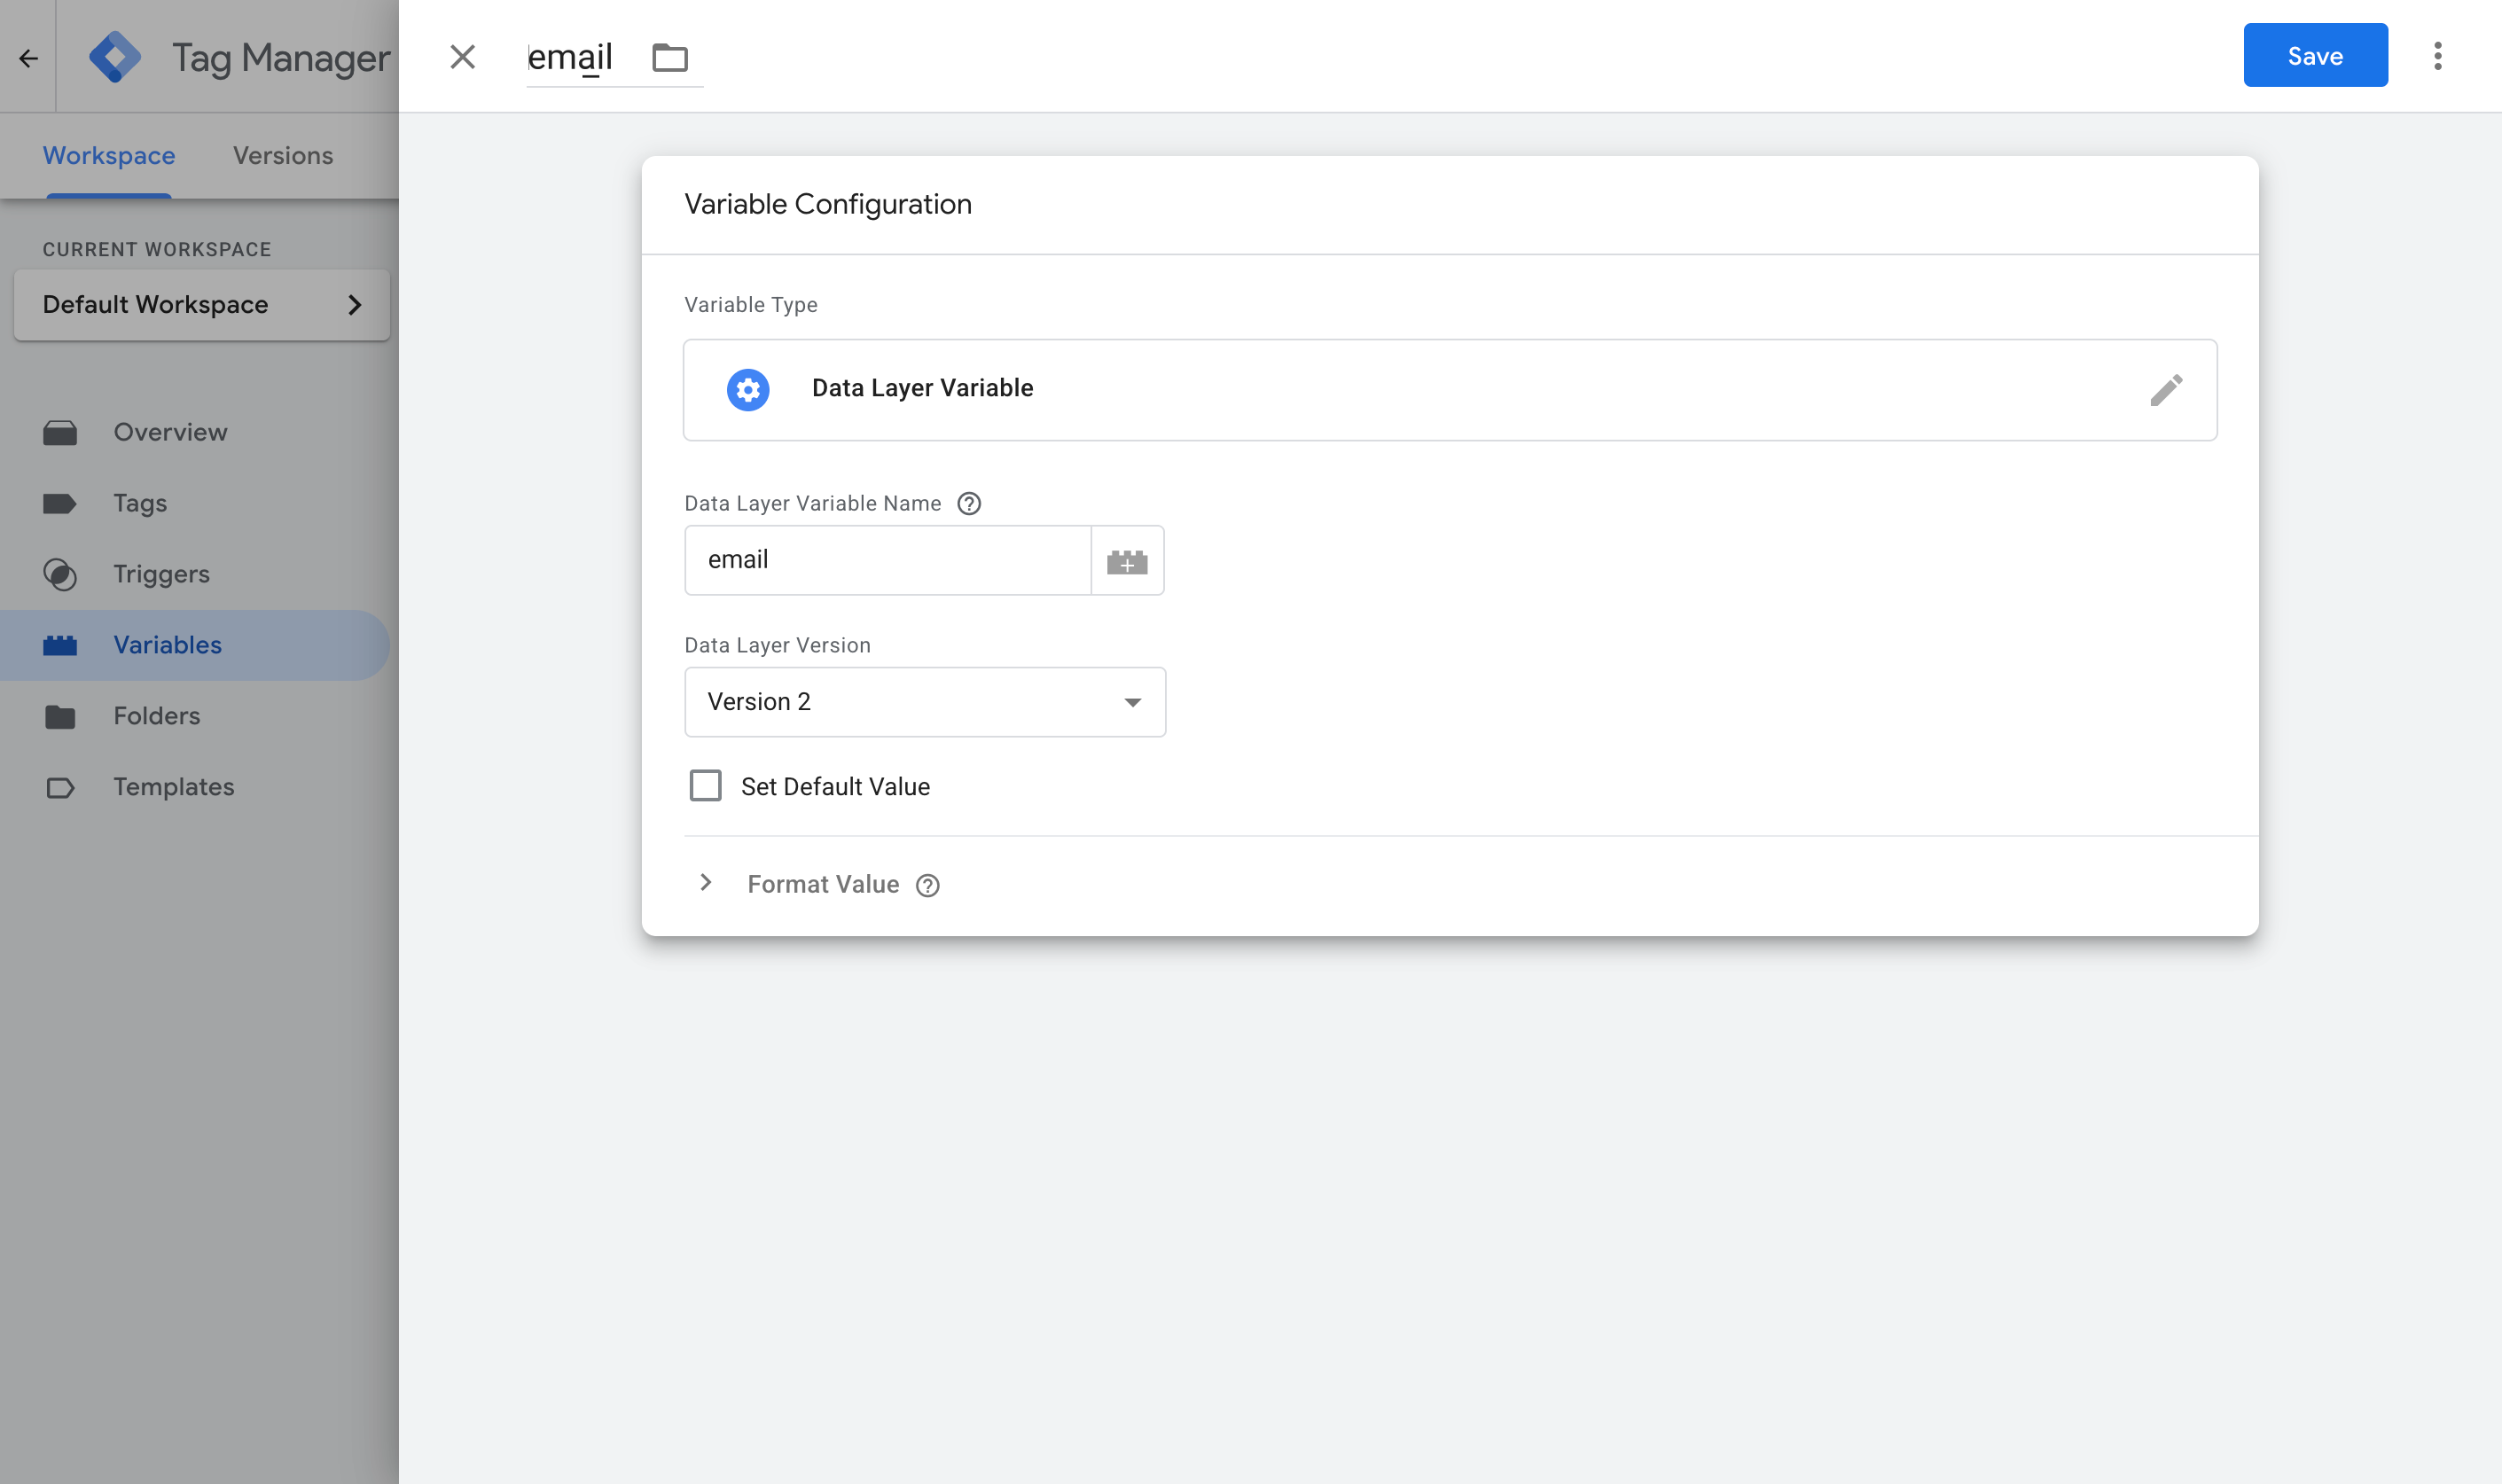
Here are the four you need.
Variable 1:
- Name: Email
- Variable Type: Data Layer Variable
- Data Layer Variable Name: email
Variable 2:
- Name: First Name
- Variable Type: Data Layer Variable
- Data Layer Variable Name: first_name
Variable 3:
- Name: Last Name
- Variable Type: Data Layer Variable
- Data Layer Variable Name: last_name
Variable 4:
- Name: Phone
- Variable Type: Data Layer Variable
- Data Layer Variable Name: phone
Step 3: Create a Custom Event trigger
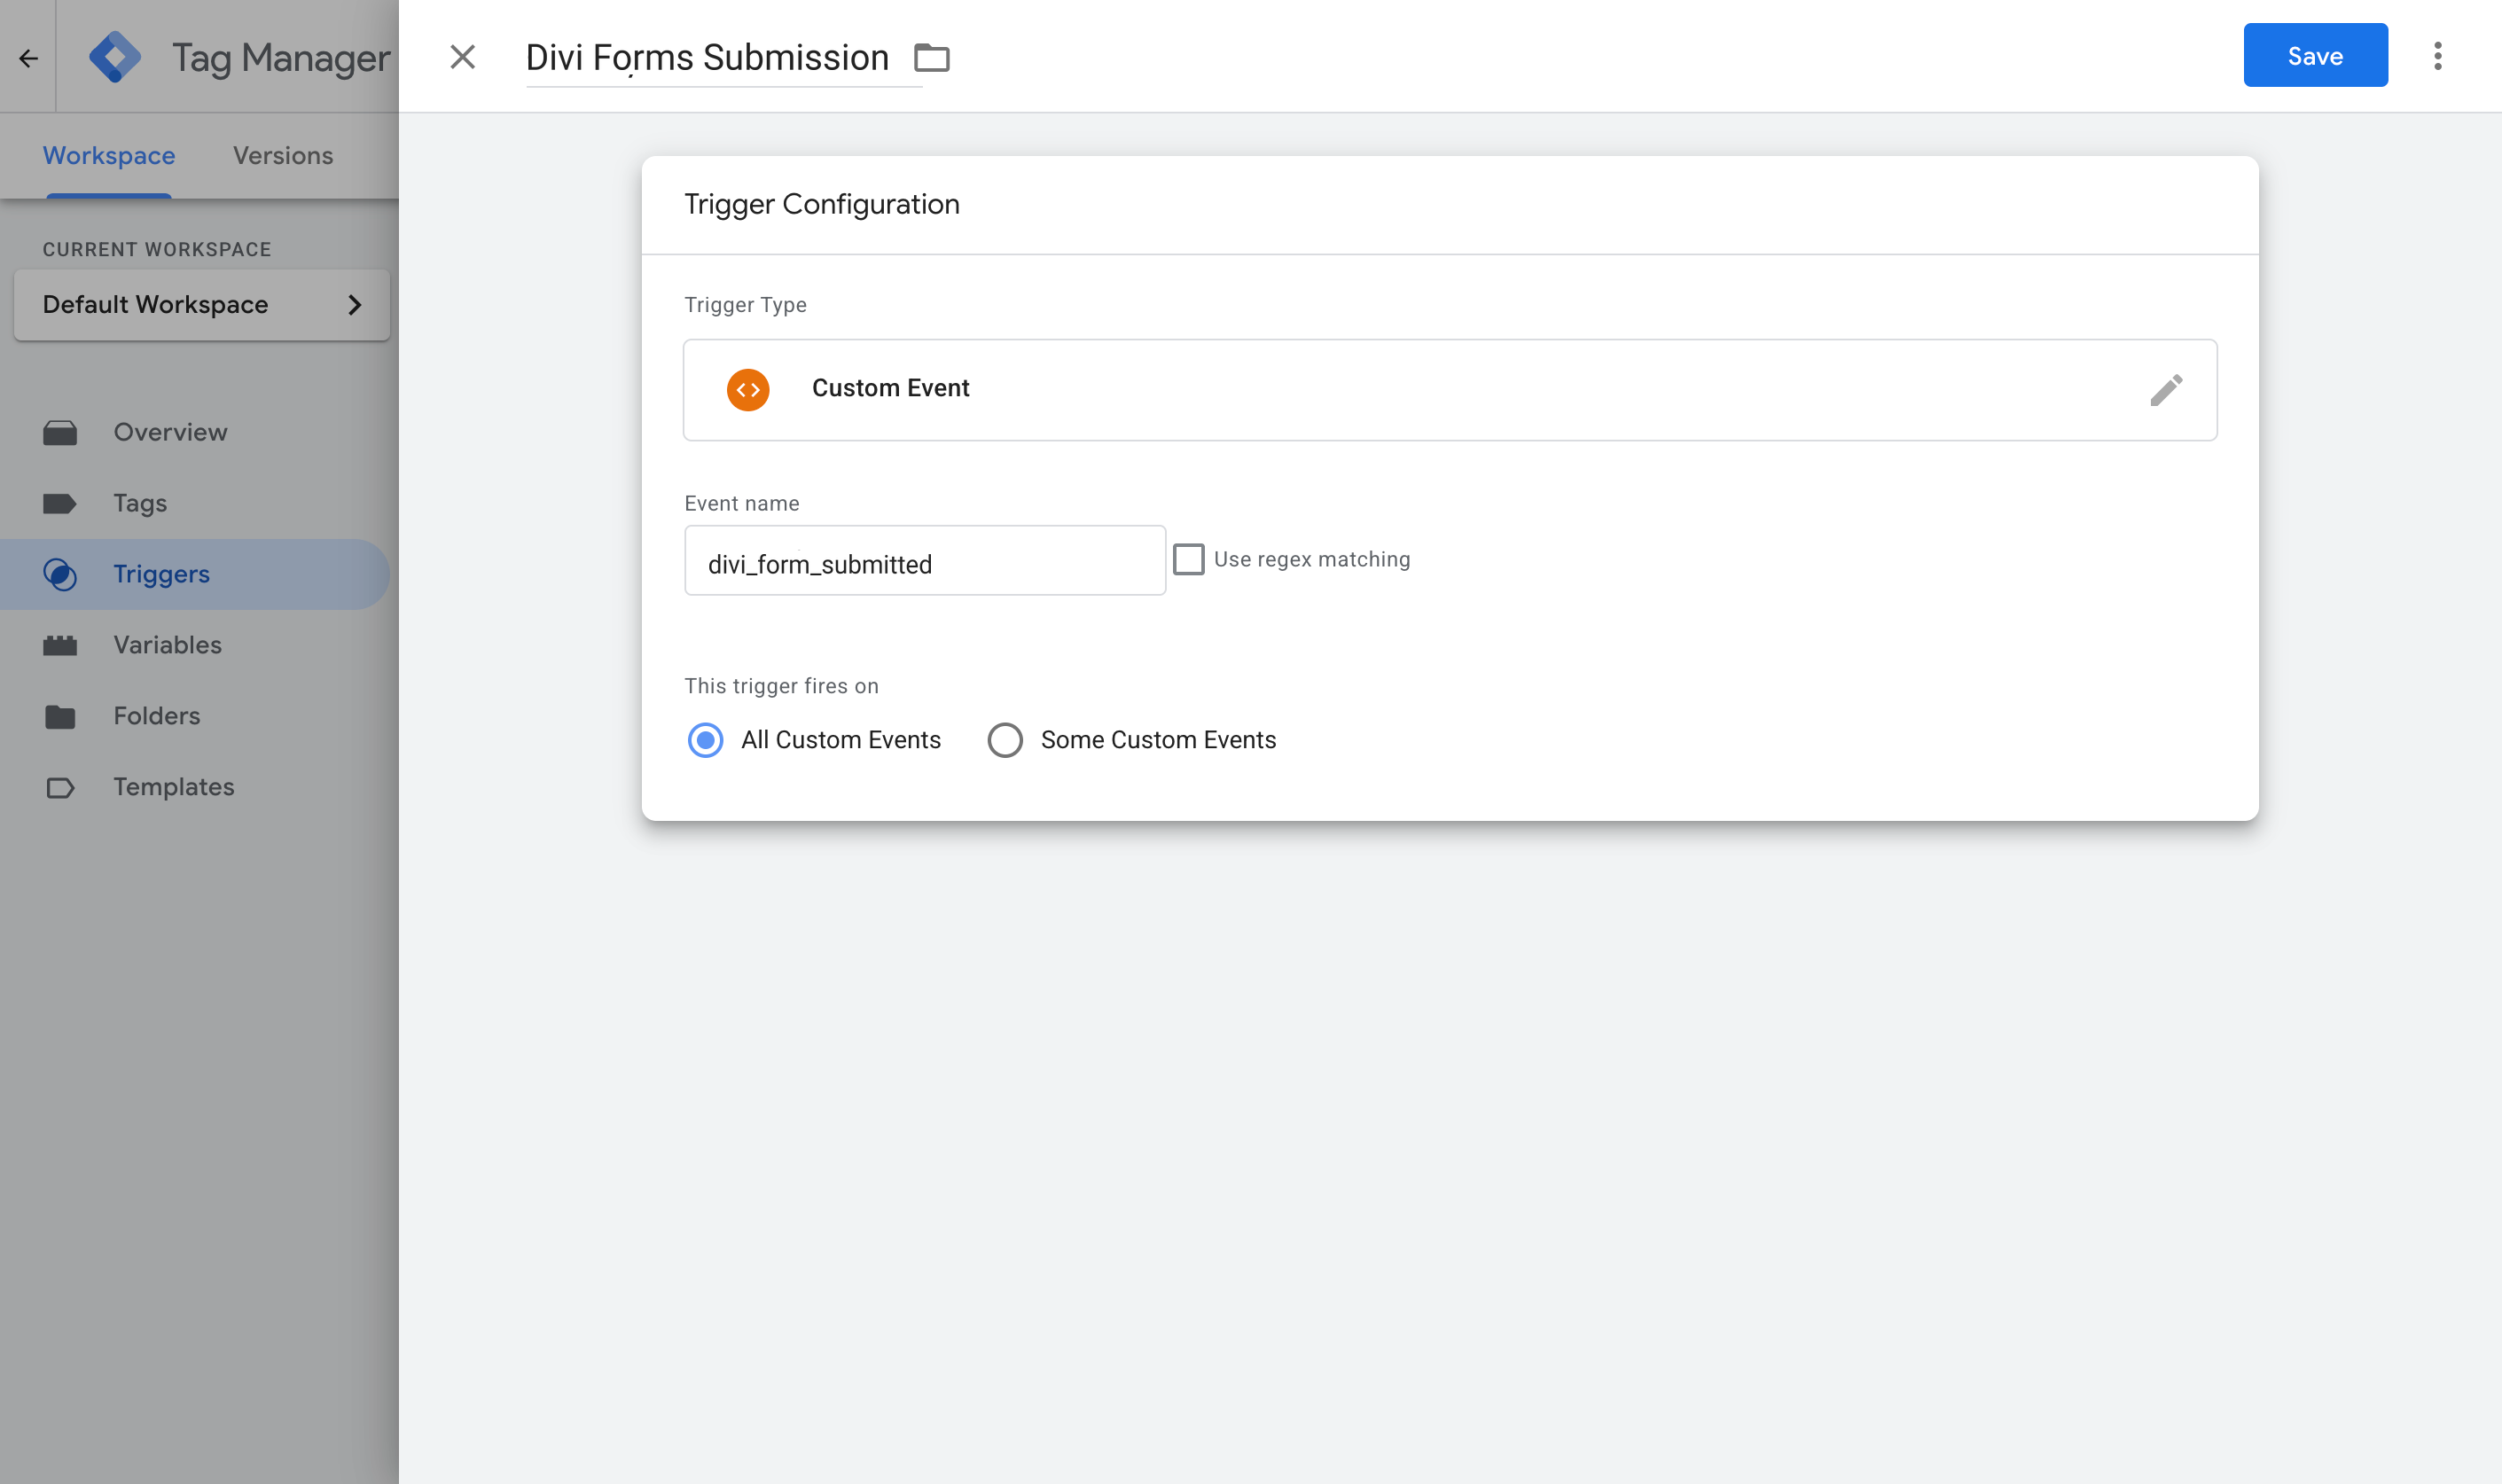
Now that you have set up the Variables to pull the data out of the dataLayer, you then need to tell Google Tag Manager when to use them. That is what a Trigger is for. It watches for the event the snippet pushes into the dataLayer when a Divi form is submitted successfully, and tells your conversion tags to fire when it arrives.
To set this up, navigate to the Triggers section, click New, choose the Custom Event type, and set the event name to divi_form_submitted. It has to match what the code pushes exactly.
Step 4: Turn on Enhanced Conversions in Google Ads
Before any of this can reach Google Ads, you actually need to tell Google Ads to accept it. To do that, head to your Google Ads account, go to Goals, then Conversions, then Settings, and turn on Enhanced Conversions.
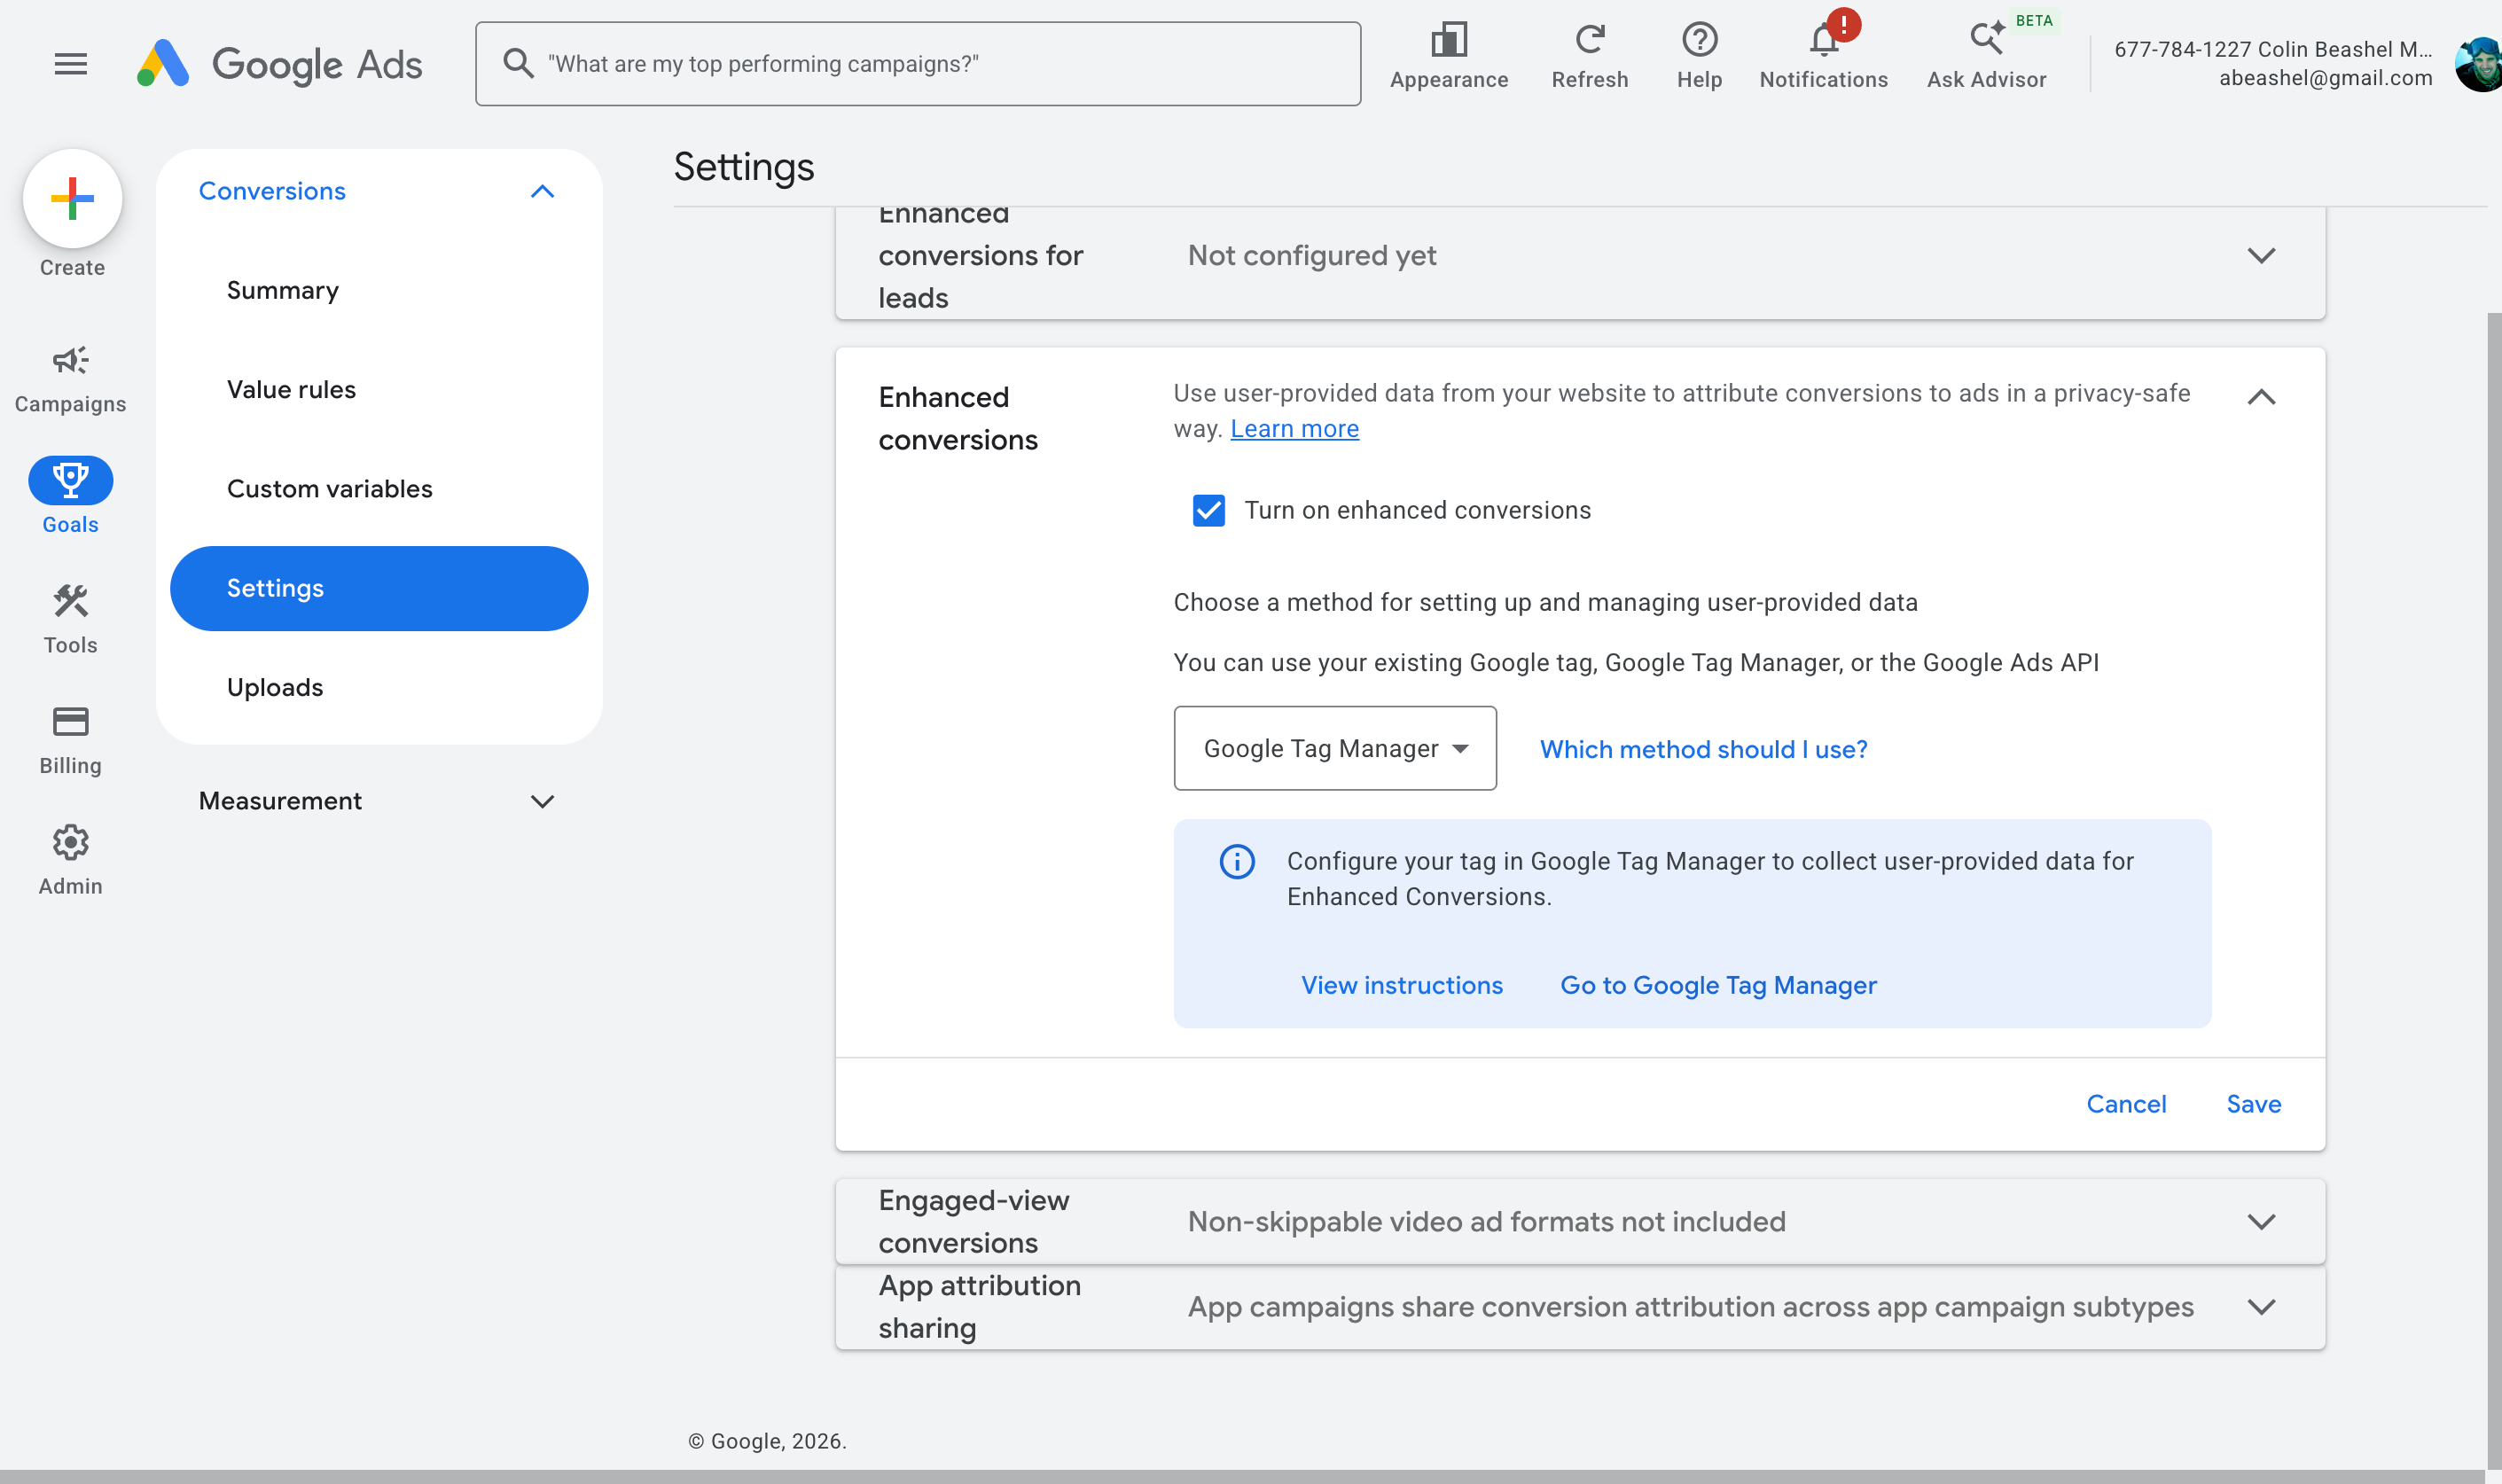
When it asks how you want to implement it, choose Google Tag Manager. This gives Google Ads permission to receive and use the customer data you are about to send.
Step 5: Create your Google Ads conversion tag and map the data
Now it's time to put the pieces together. Jump back into GTM, go to Tags, select New, choose Google Ads User Provided Data Event as the tag type, and map the variables from Step 2 to the fields it asks for.
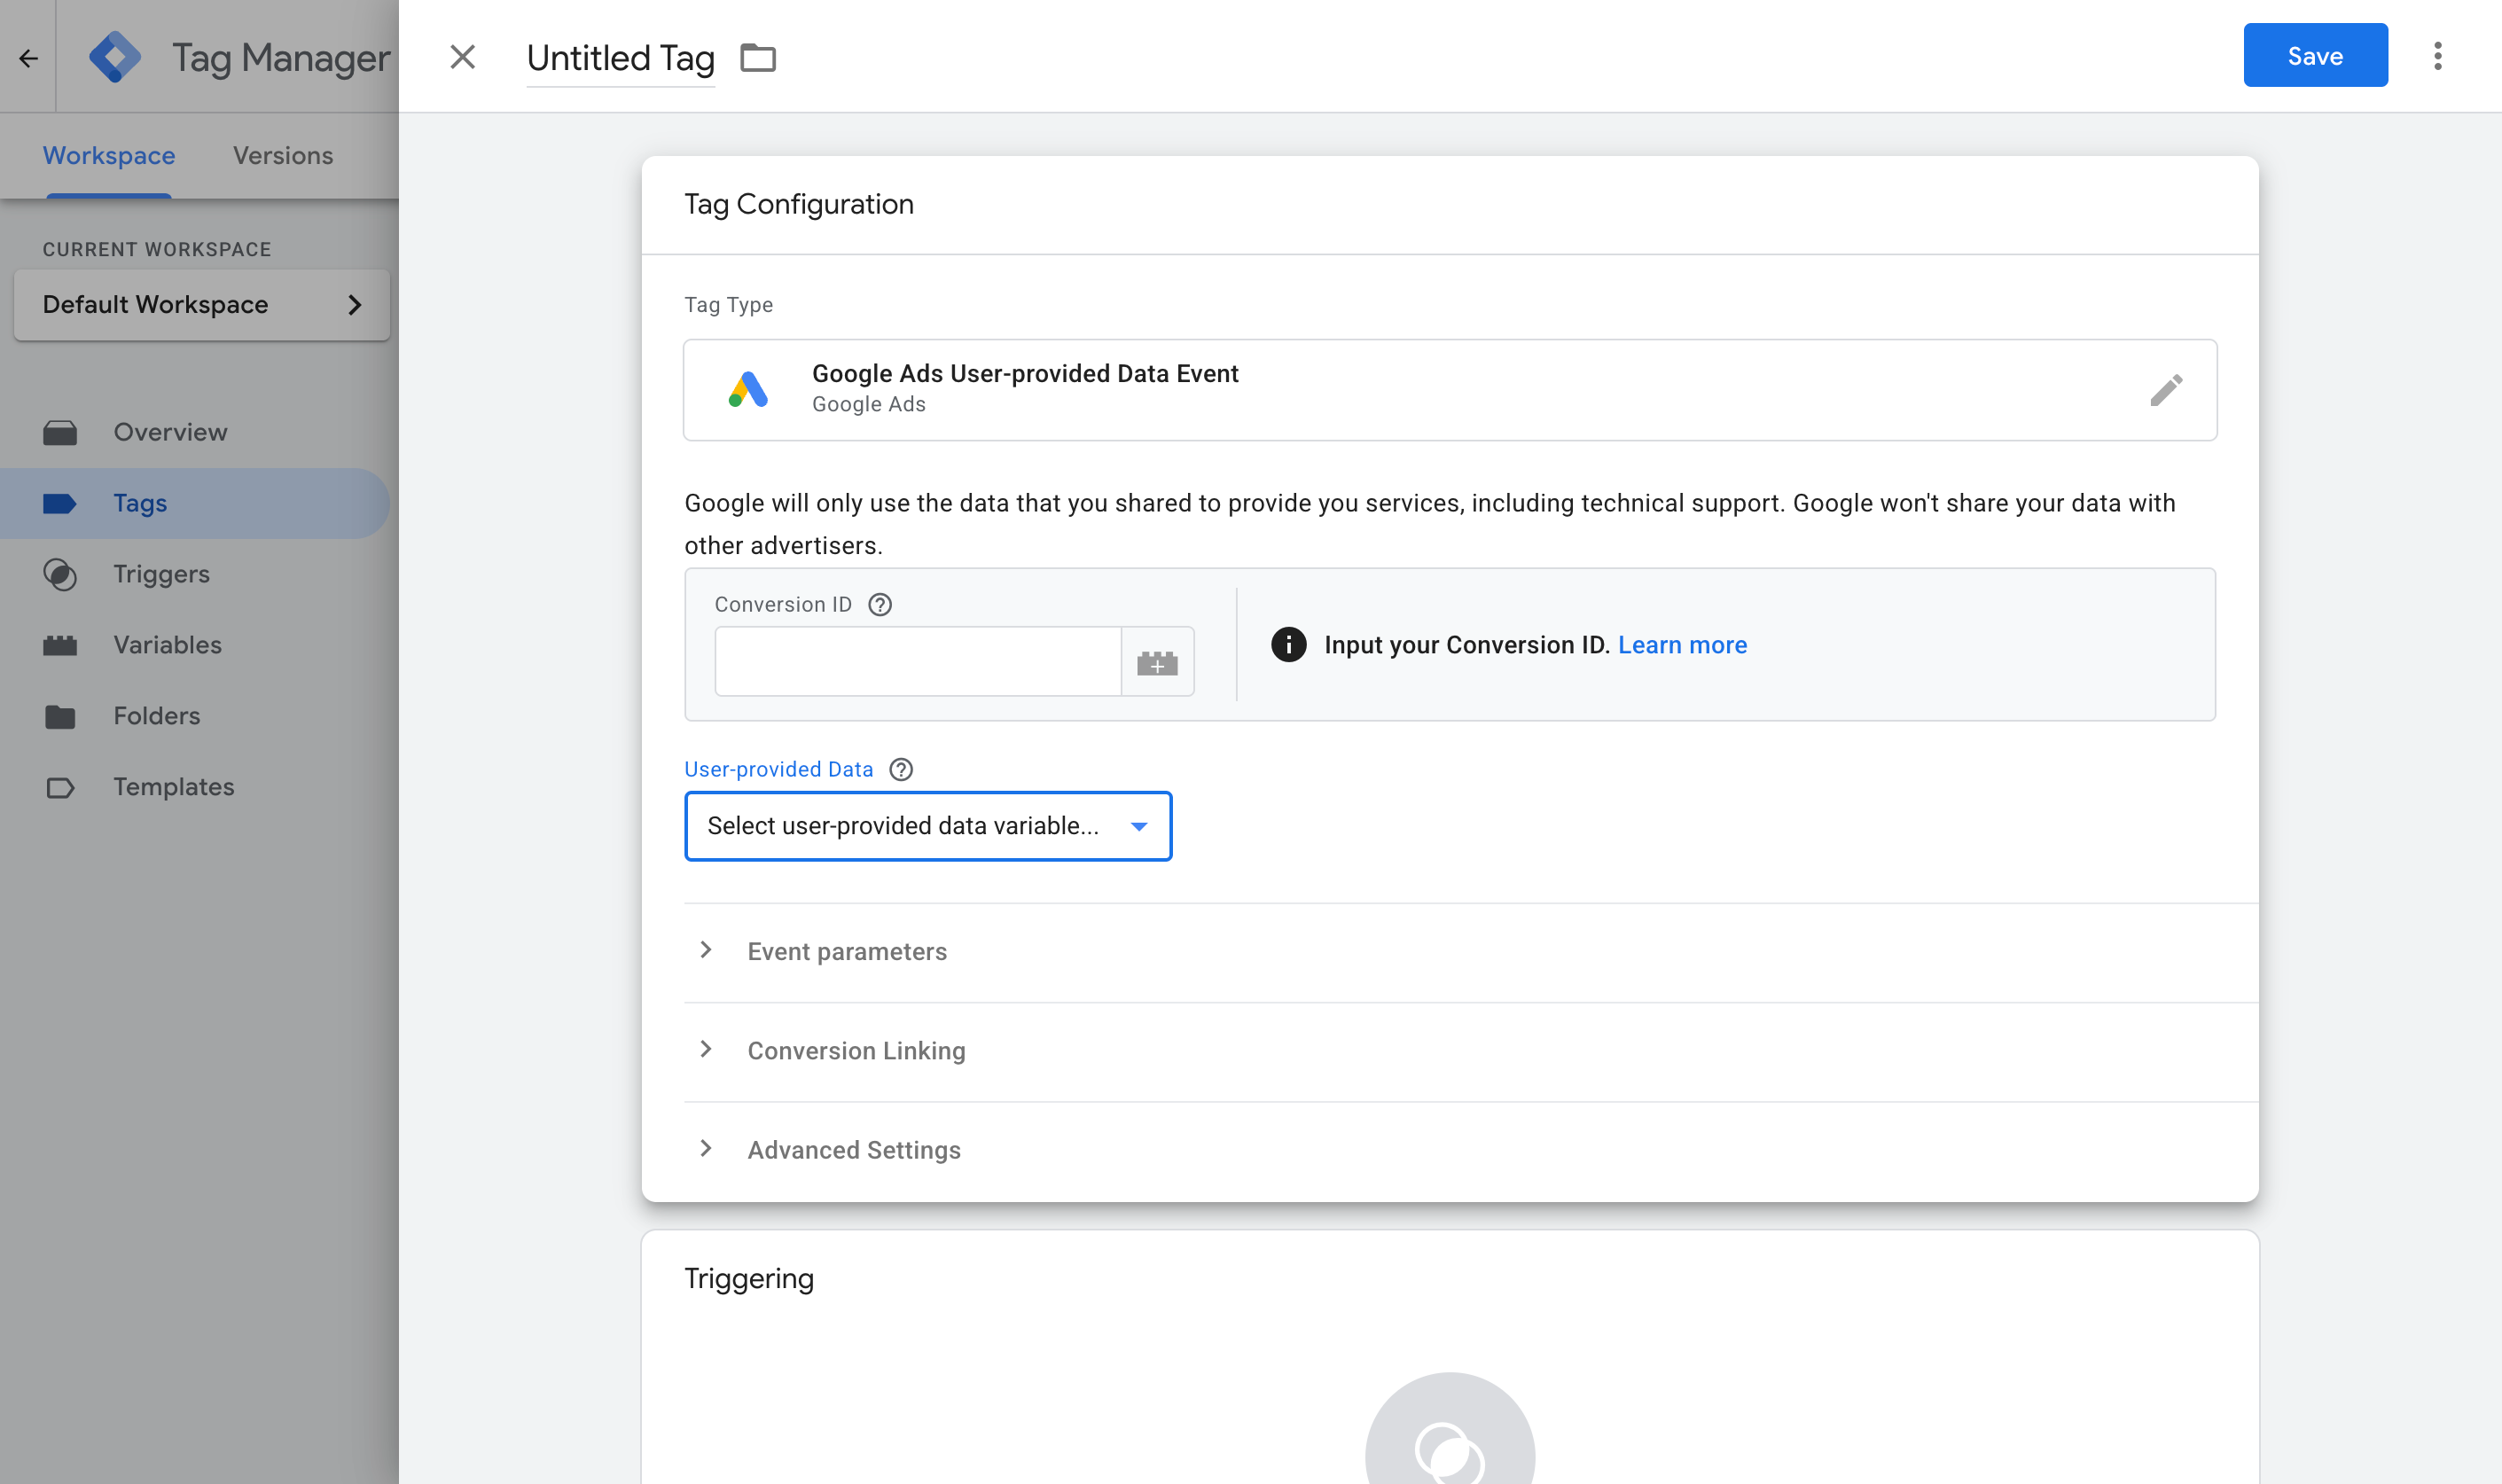
Then set it to fire on the Custom Event trigger you created in Step 3.
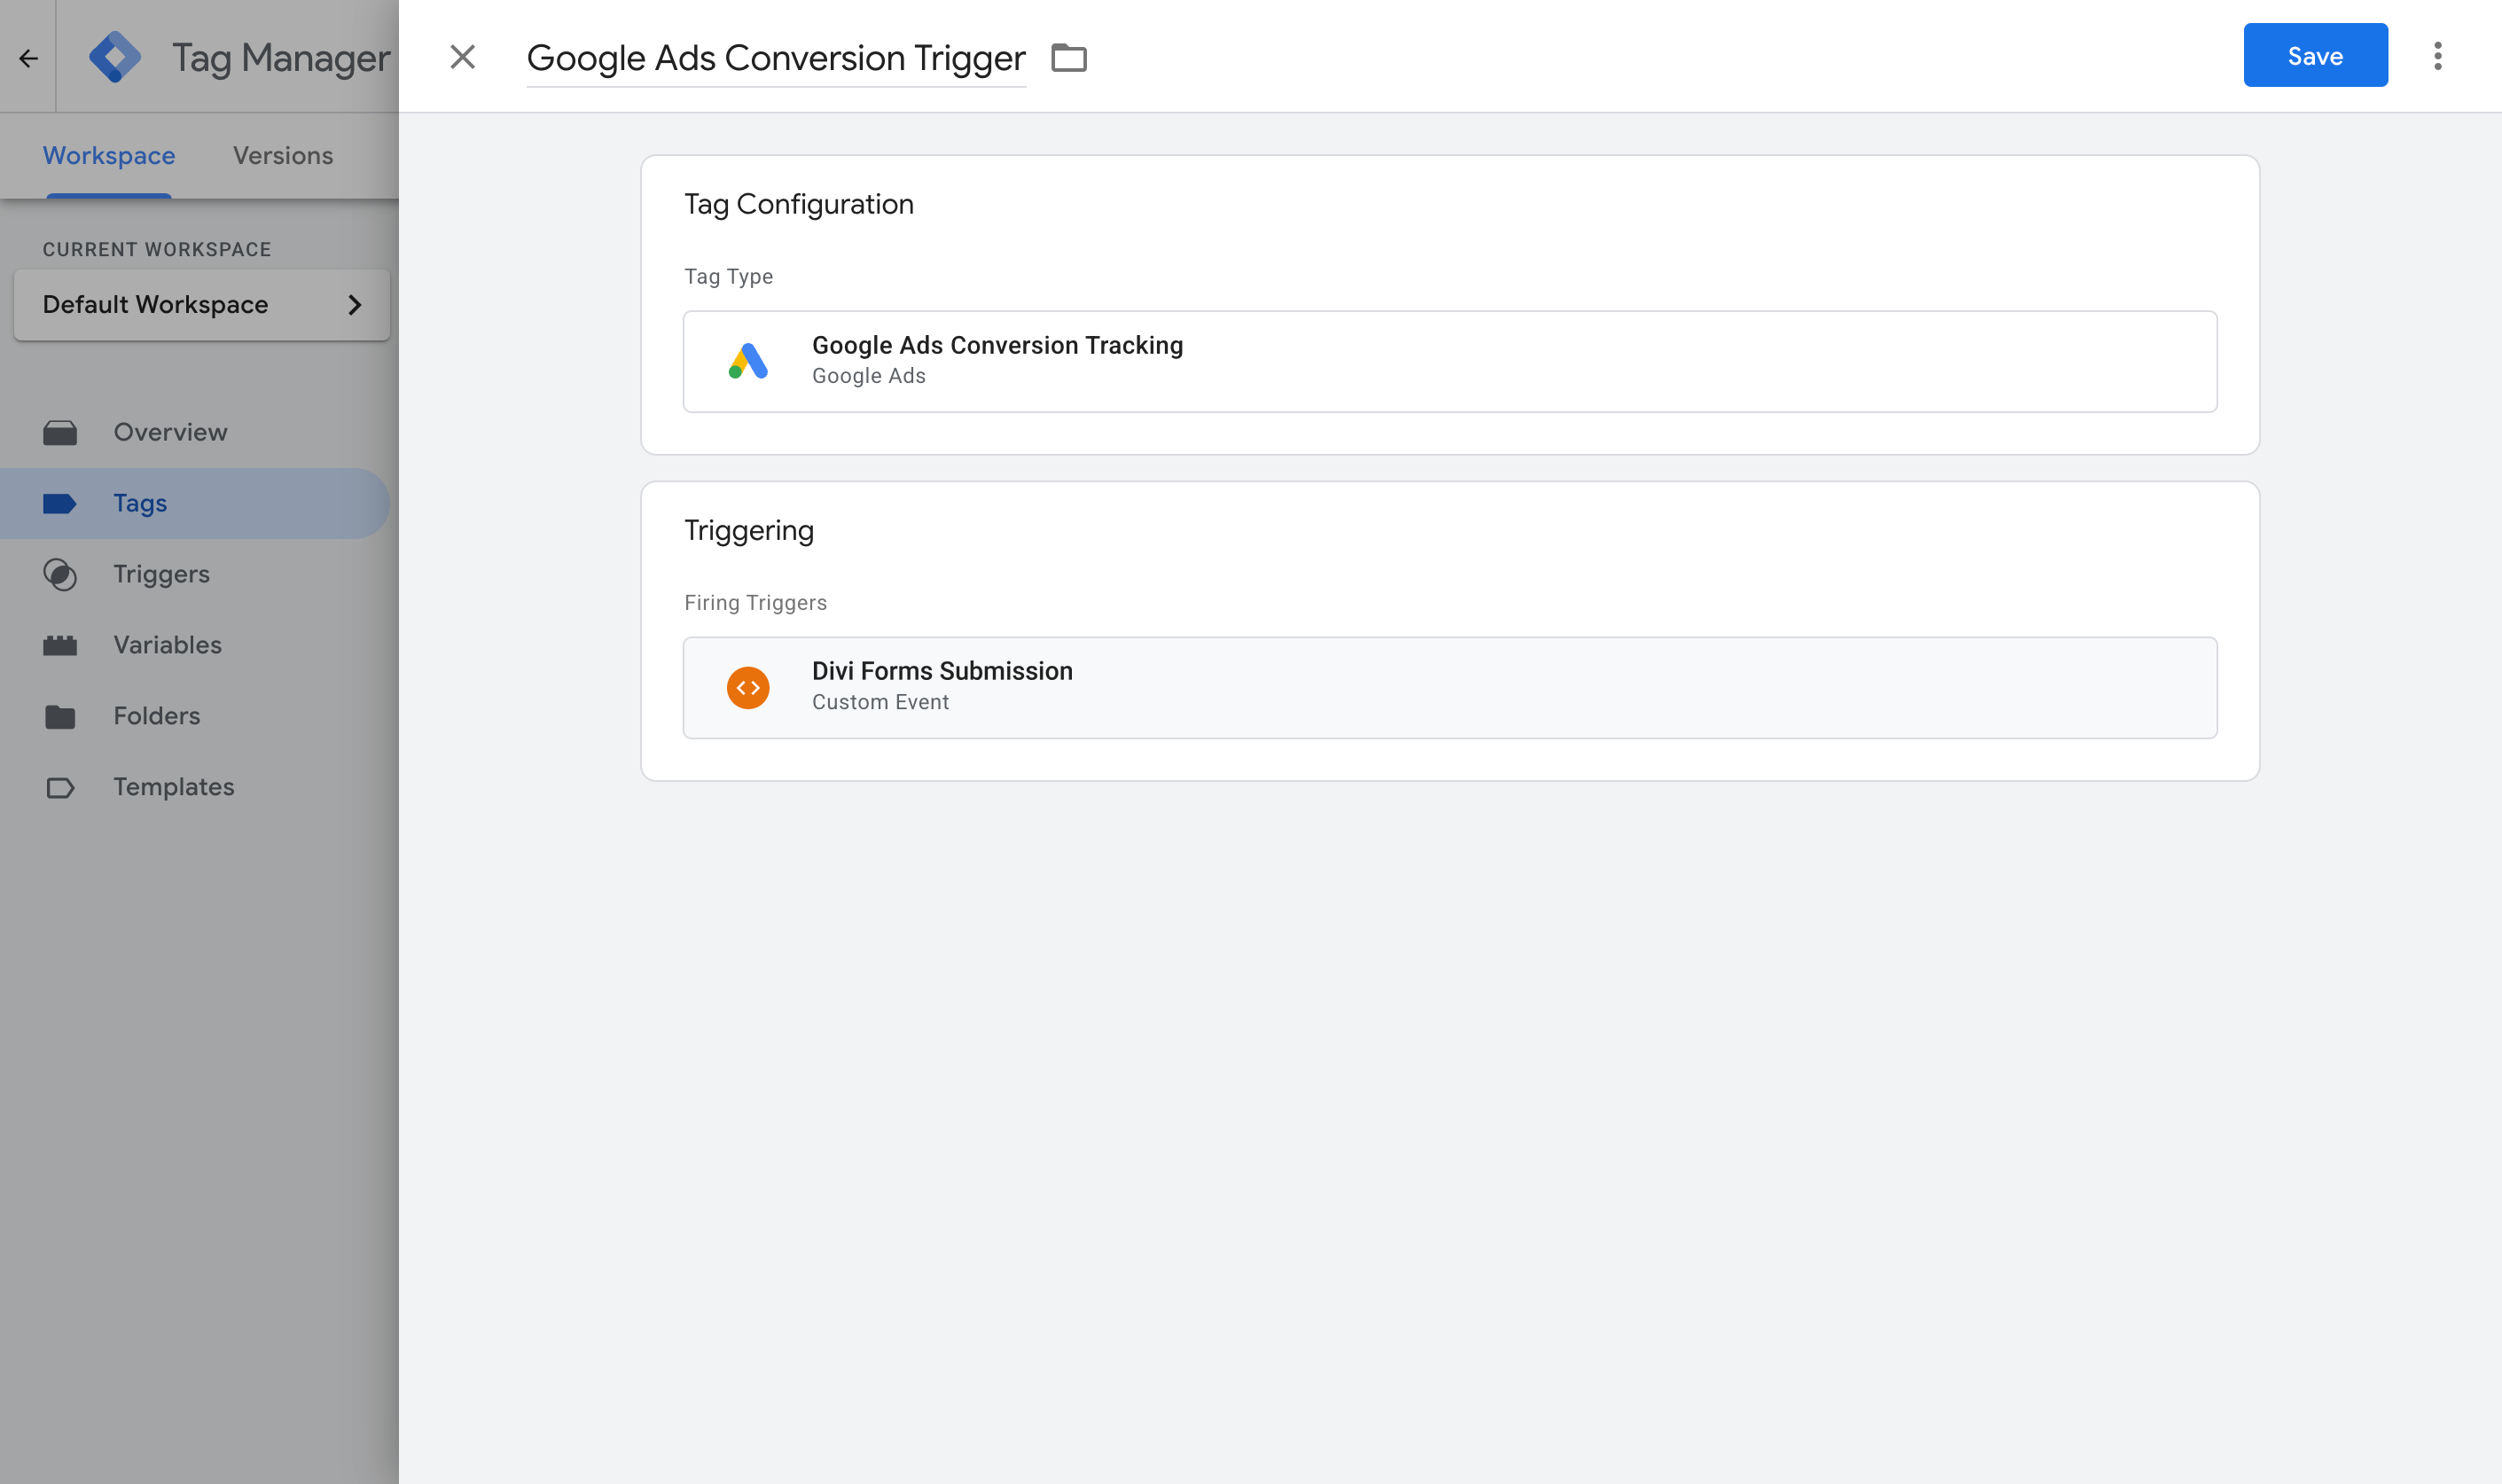
Once that's done, publish your GTM container. With some luck, you would have successfully set up a Tag to listen for Divi form submissions and send an event to the dataLayer, some Variables to pull the information out of the dataLayer, a Trigger to listen for the event, and another Tag that sends a conversion when the Trigger fires.
To check it's working, open GTM Preview mode, submit the Divi form on your site, and confirm the divi_form_submitted event arrives with the email and name filled in.
Pros and cons
Pros:
- It's free, and you may already have Google Tag Manager installed on your site, so that's a start.
- Unlike Method 1, this method captures the name, email, and phone and sends them to Google Ads (or wherever else you configure them to be sent). This is the minimum you need to enable Enhanced Conversions in Google Ads, and if you're sending the data elsewhere, then it will help with your match rate on platforms like Meta Ads & LinkedIn Ads (match rate is how many conversions can be mapped back to the original person who clicked the ad).
- It correctly distinguishes a successful submission from a rejected one, so you don't end up overcounting conversions when someone does something like miss a required field or enter their email in an invalid format (the two most common ways for a form submission to be rejected).
Cons:
- There are a lot of moving parts. Between the GTM tag, the Trigger, four Variables, the Google Ads settings, and the conversion Tag itself, there is plenty to get wrong, and if it doesn't work you don't get a nice error message saying ‘This is the part that is failing’.
- It still sends the conversion through the visitor's browser, so ad blockers and privacy browsers can stop it from firing. Expect to lose 30% or more of your conversions this way.
- It still misses the data Google values most. Sending the name, email, and phone are good, but millions of people have the same name and many people have multiple email addresses (which means the one they entered into your form may not be the same one they were logged in to Google with when they clicked your ad). Ideally you want to be capturing other data like the Google Click ID, as that can tie the conversion back to the original ad click with 100% accuracy, but this method doesn't do that.
That last point is the one that pushes a lot of people to Method 3.
Method 3: Use Converly
Best for: Sending proper, server-side conversions to Google Ads, Meta Ads, ChatGPT Ads, LinkedIn Ads, and more, without having to do complicated configuration in Google Tag Manager.
Converly is a dedicated conversion tracking tool, built to send server-side conversions to Google Ads, Meta Ads, LinkedIn Ads, and more, whenever a Divi form is submitted on your site.
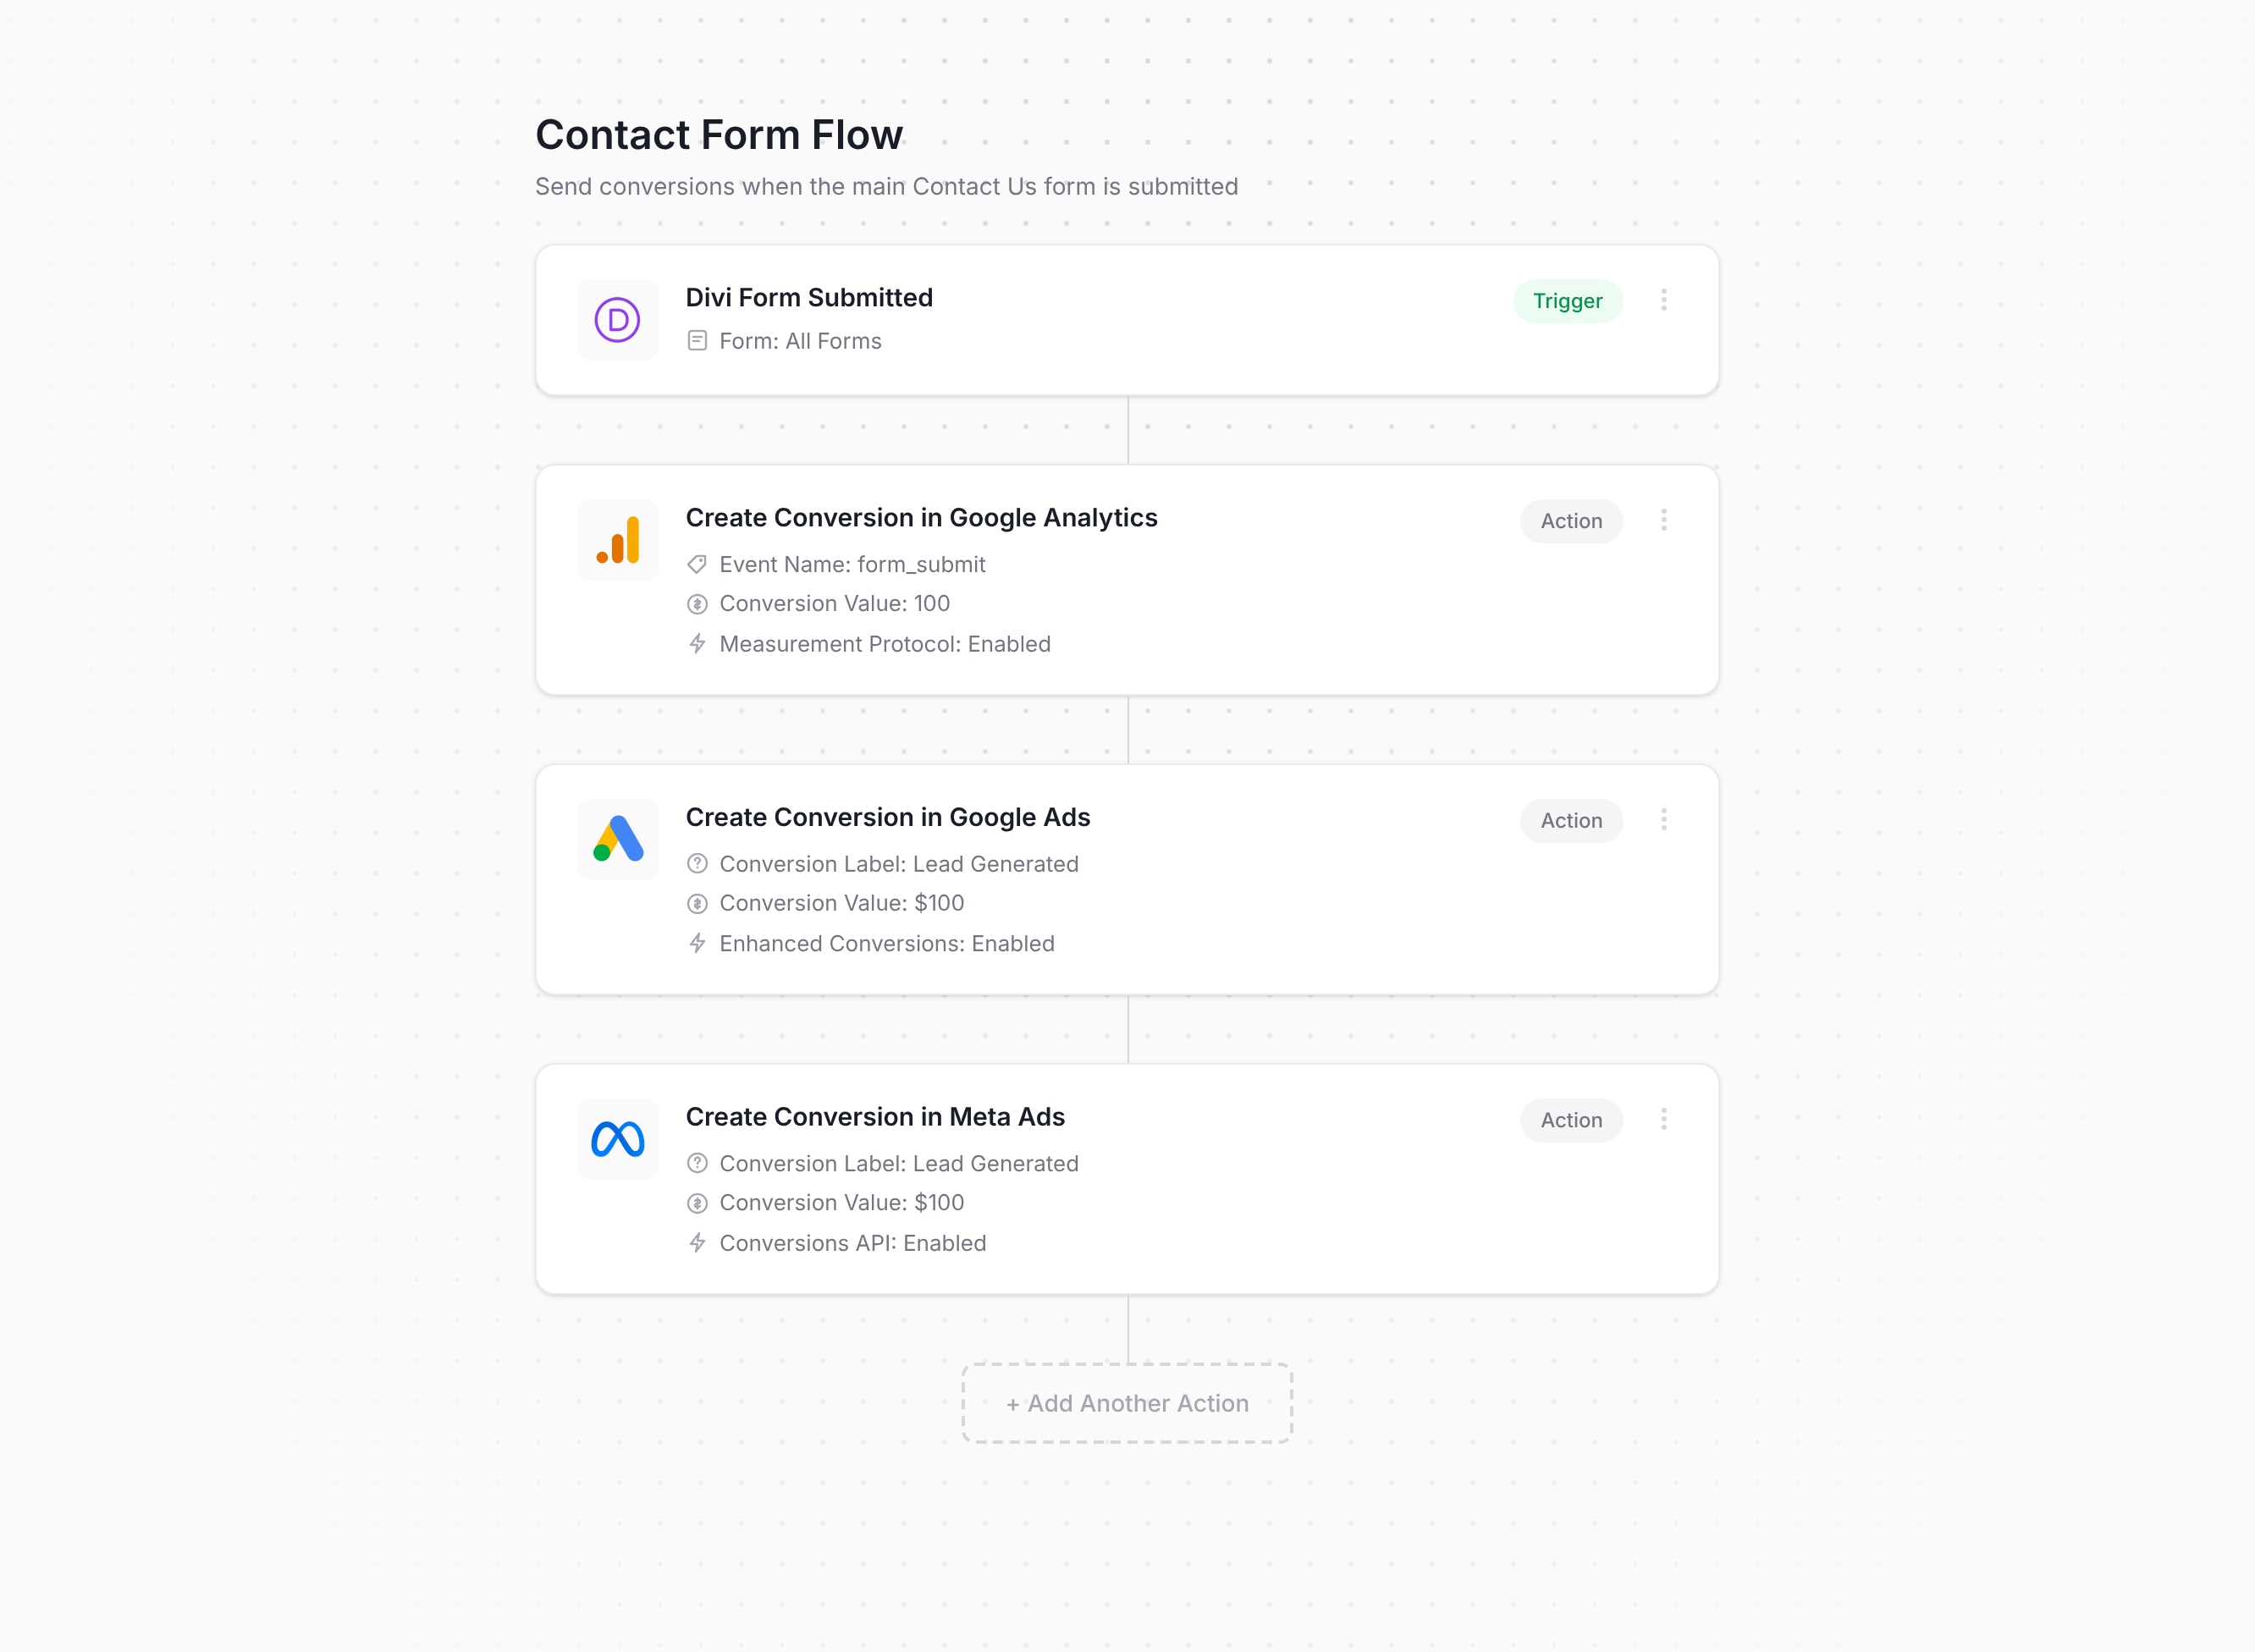
The screenshot above is basically the whole setup process. You simply choose a trigger (in this case a Divi form submission), add one or more actions (such as send a conversion to Google Ads or Meta Ads), and you're done. There's no code to write and nothing to wire together manually in Tag Manager.
Once that's configured, you put the snippet of code Converly gives you on your site and it takes care of everything else. It watches for Divi form submissions, extracts the name, email, and phone, and sends them to Converly's own servers when the form is successfully submitted. Those servers then forward it to Google Ads, Meta Ads, and any other destination you've connected, and because the forwarding happens on Converly's servers rather than in the browser, ad blockers and privacy browsers like Safari can't interfere (which means the ad platforms will have much more accurate conversion data to work with).
And if you're advertising on Google, Meta, ChatGPT, or similar platforms, here's the piece that actually moves the needle. On top of the name, email, and phone, Converly also captures the click IDs (i.e. GCLID, fbclid, etc), Meta's browser cookies, the visitor's IP address, and their user agent, then sends it all over with every conversion. Ad platforms weigh these signals heavily, so having all of them is what takes your match quality from mediocre to strong (Meta's Event Match Quality, for example, typically climbs from around 3 to somewhere in the 9 to 10 range).
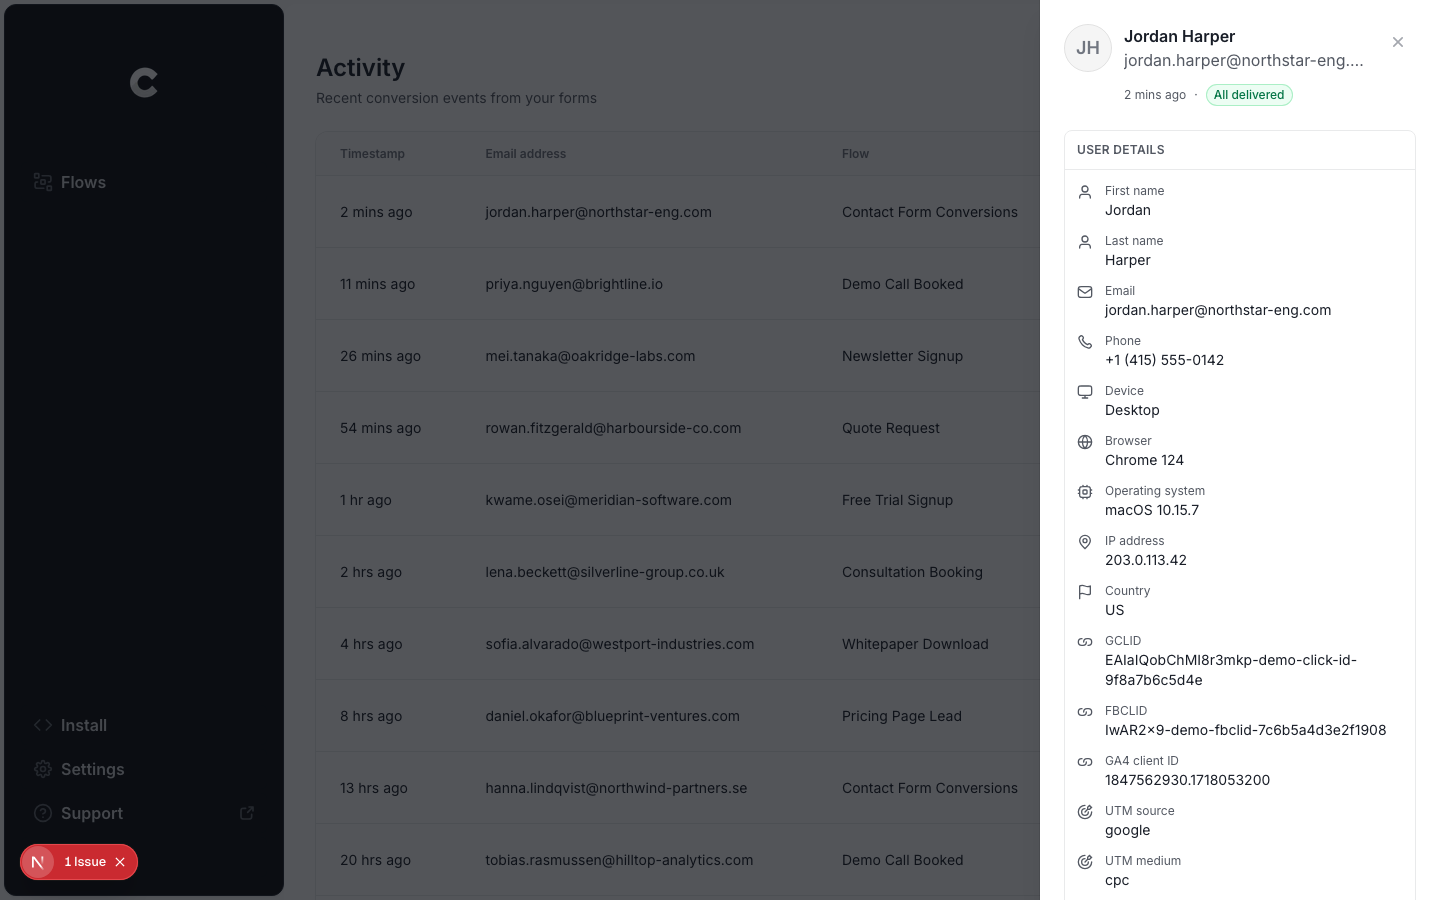
There's also a full conversion log built in, showing every lead who submitted a Divi form, exactly what data Converly captured, what got forwarded to each platform, and whether it arrived successfully.
Pros and cons
Pros:
- It's genuinely easy to set up. You pick your trigger and then pick your actions. No code to write or maintain, and no complex configuration.
- Captures the click IDs, cookies, IP, and user agent and sends them along with every conversion. This dramatically lifts match quality in the ad platform (in Meta for example, you'd typically go from an Event Match Quality score of 3 or 4 up to a 9 or 10 with Converly).
- Sends the conversion server-side, so ad blockers and privacy browsers don't stop them from reaching your ad platforms. You'll likely record 30% more conversions using Converly than using Google Tag Manager.
- Supports conditional logic, so you can send conversions when certain forms are completed on your site (for example, you could send a conversion when the Quote Request form is submitted, but not when the Contact Support form is submitted).
- Lets you log in to Google Ads, Meta Ads, and so on within the platform and just pick the conversion you want to fire. No hunting around for account IDs or conversion IDs.
- Gives you a full conversion log where you can see every lead that submitted your Divi forms, what data was captured, whether it made it to your ad platforms, and more.
- You get support from a team of experts who will happily help you get set up and troubleshoot issues. Good luck getting that kind of help from Google if you're using GTM.
Cons:
- It's a paid tool after the free trial. Plans start at $19 per month.
So which method should I use?
Here's how the three ways to track Divi Forms conversions compare.
| Method | Best for | Sends conversions to | Data sent |
|---|---|---|---|
| Method 1. GA4 event built in Google Tag Manager | Sending submissions to Google Analytics, if you're happy using the free GTM recipe and building the conversion tag yourself | Google Analytics 4 | The submission event only |
| Method 2. Enhanced Conversions through Google Tag Manager | Sending to Google Ads, if fiddly configuration doesn't put you off | Google Ads | Name, email and phone |
| Method 3. Converly | Sending to any ad platform, with the least setup work | Google Ads, Meta Ads, LinkedIn Ads, Microsoft Ads, ChatGPT Ads, GA4 and more | Name, email and phone, plus the GCLID, the Meta click ID, IP address, user agent and more. |
Wrap up
Conversion tracking doesn't get much attention, but it's actually a major factor in how well the rest of your advertising performs. Set it up properly, and Google and Meta's algorithms will learn what your ideal customer looks like and show your ads to more people like them. Set it up badly, and you'll keep spending money showing ads to people who were never going to convert.
In fact, both platforms have published figures on how much of a difference it actually makes. Google says businesses that move to proper server-side conversion tracking see conversions climb by around 19% on average, and Meta reports a 23% increase from doing the same.
Converly gives you proper server-side tracking without the hard parts. You just pick your trigger (a Divi form submission), decide which platforms should get the conversion, and that's the whole setup. And if you use an AI tool like Claude or ChatGPT, it's even easier. You just connect, tell it to ‘Set up Divi Forms conversion tracking,’ and it will do it all for you (it will connect via our MCP or CLI and handle the whole account setup for you).
Best of all, Converly is free to start with, and most people are up and running in under 10 minutes. Start your 14-day free trial today.
About the author

Aaron is the founder of Converly. With over 15 years of experience in digital marketing and SaaS, he's passionate about helping businesses track and optimise their ad conversions.