


Contact Form 7 Conversion Tracking: 3 ways to do it
Learn three different ways to set up conversion tracking for Contact Form 7, and how to work out which one is right for you.
Are you pouring money into various ad campaigns without really knowing which of those efforts are the ones actually turning into leads? If that sounds familiar, you are in good company.
When you cannot see which campaigns are producing real leads (rather than just clicks and page visits), your budget quietly keeps flowing toward the channels that are not delivering.
The fix is proper conversion tracking, so a conversion gets logged every time someone submits one of your Contact Form 7 forms, tied back to the campaign that actually brought them to your site.
The tricky part is that there is more than one way to pull this off, and which one suits you depends on your goal. If all you need is to see submissions inside Google Analytics, there is a fast, free path. But the moment you want those same conversions flowing into Google Ads, Meta Ads, and similar platforms, you need something sturdier, and that is exactly where a lot of DIY setups quietly come apart.
In this article, we'll walk through 3 different ways to set up conversion tracking in Contact Form 7 and help you figure out which one fits your situation. Conversion tracking is what we build for a living here at Converly, and Contact Form 7 has a few quirks of its own, so we'll call them out along the way so you know what to watch for.
Method 1: Use the free Contact Form 7 Google Analytics plugin
Good for: Sending form submission events to Google Analytics 4.
If your only goal is to see submissions land in GA4, track your conversion rate, and figure out which channels and pages are driving them, this is genuinely all you need. Google Analytics does not need to know who submitted the form. It just needs to know that a conversion happened.
Unlike some form plugins, Contact Form 7 does not ship its own official Google Analytics add-on, and it does not have premium license tiers that gate features behind a paywall. Instead, the go-to option is a free, open source plugin called Contact Form 7 Google Analytics, maintained by a developer in the WordPress community and available to install straight from the WordPress plugin directory.
The plugin works sitewide the moment you turn it on. There is no need to build a separate feed for every form the way some other tools require. It listens for four possible outcomes on every Contact Form 7 form on your site (invalid, spam, mail sent, and mail failed) and can send an event to Google Analytics for any or all of them. For conversion tracking purposes, the one you actually care about is "mail sent", since that is the only outcome that reflects a real, successful submission.
It plugs into whatever Google Analytics setup you already have running, whether that is the standard gtag.js snippet, Google Tag Manager, or another analytics plugin like MonsterInsights. Here's how to set it up.
Step 1: Install and activate the plugin
From your WordPress dashboard, go to Plugins, then Add New, search for "Contact Form 7 Google Analytics", and install and activate it. There is nothing to configure to get it running. It starts tracking as soon as it is active.

Step 2: Choose which events you want sent
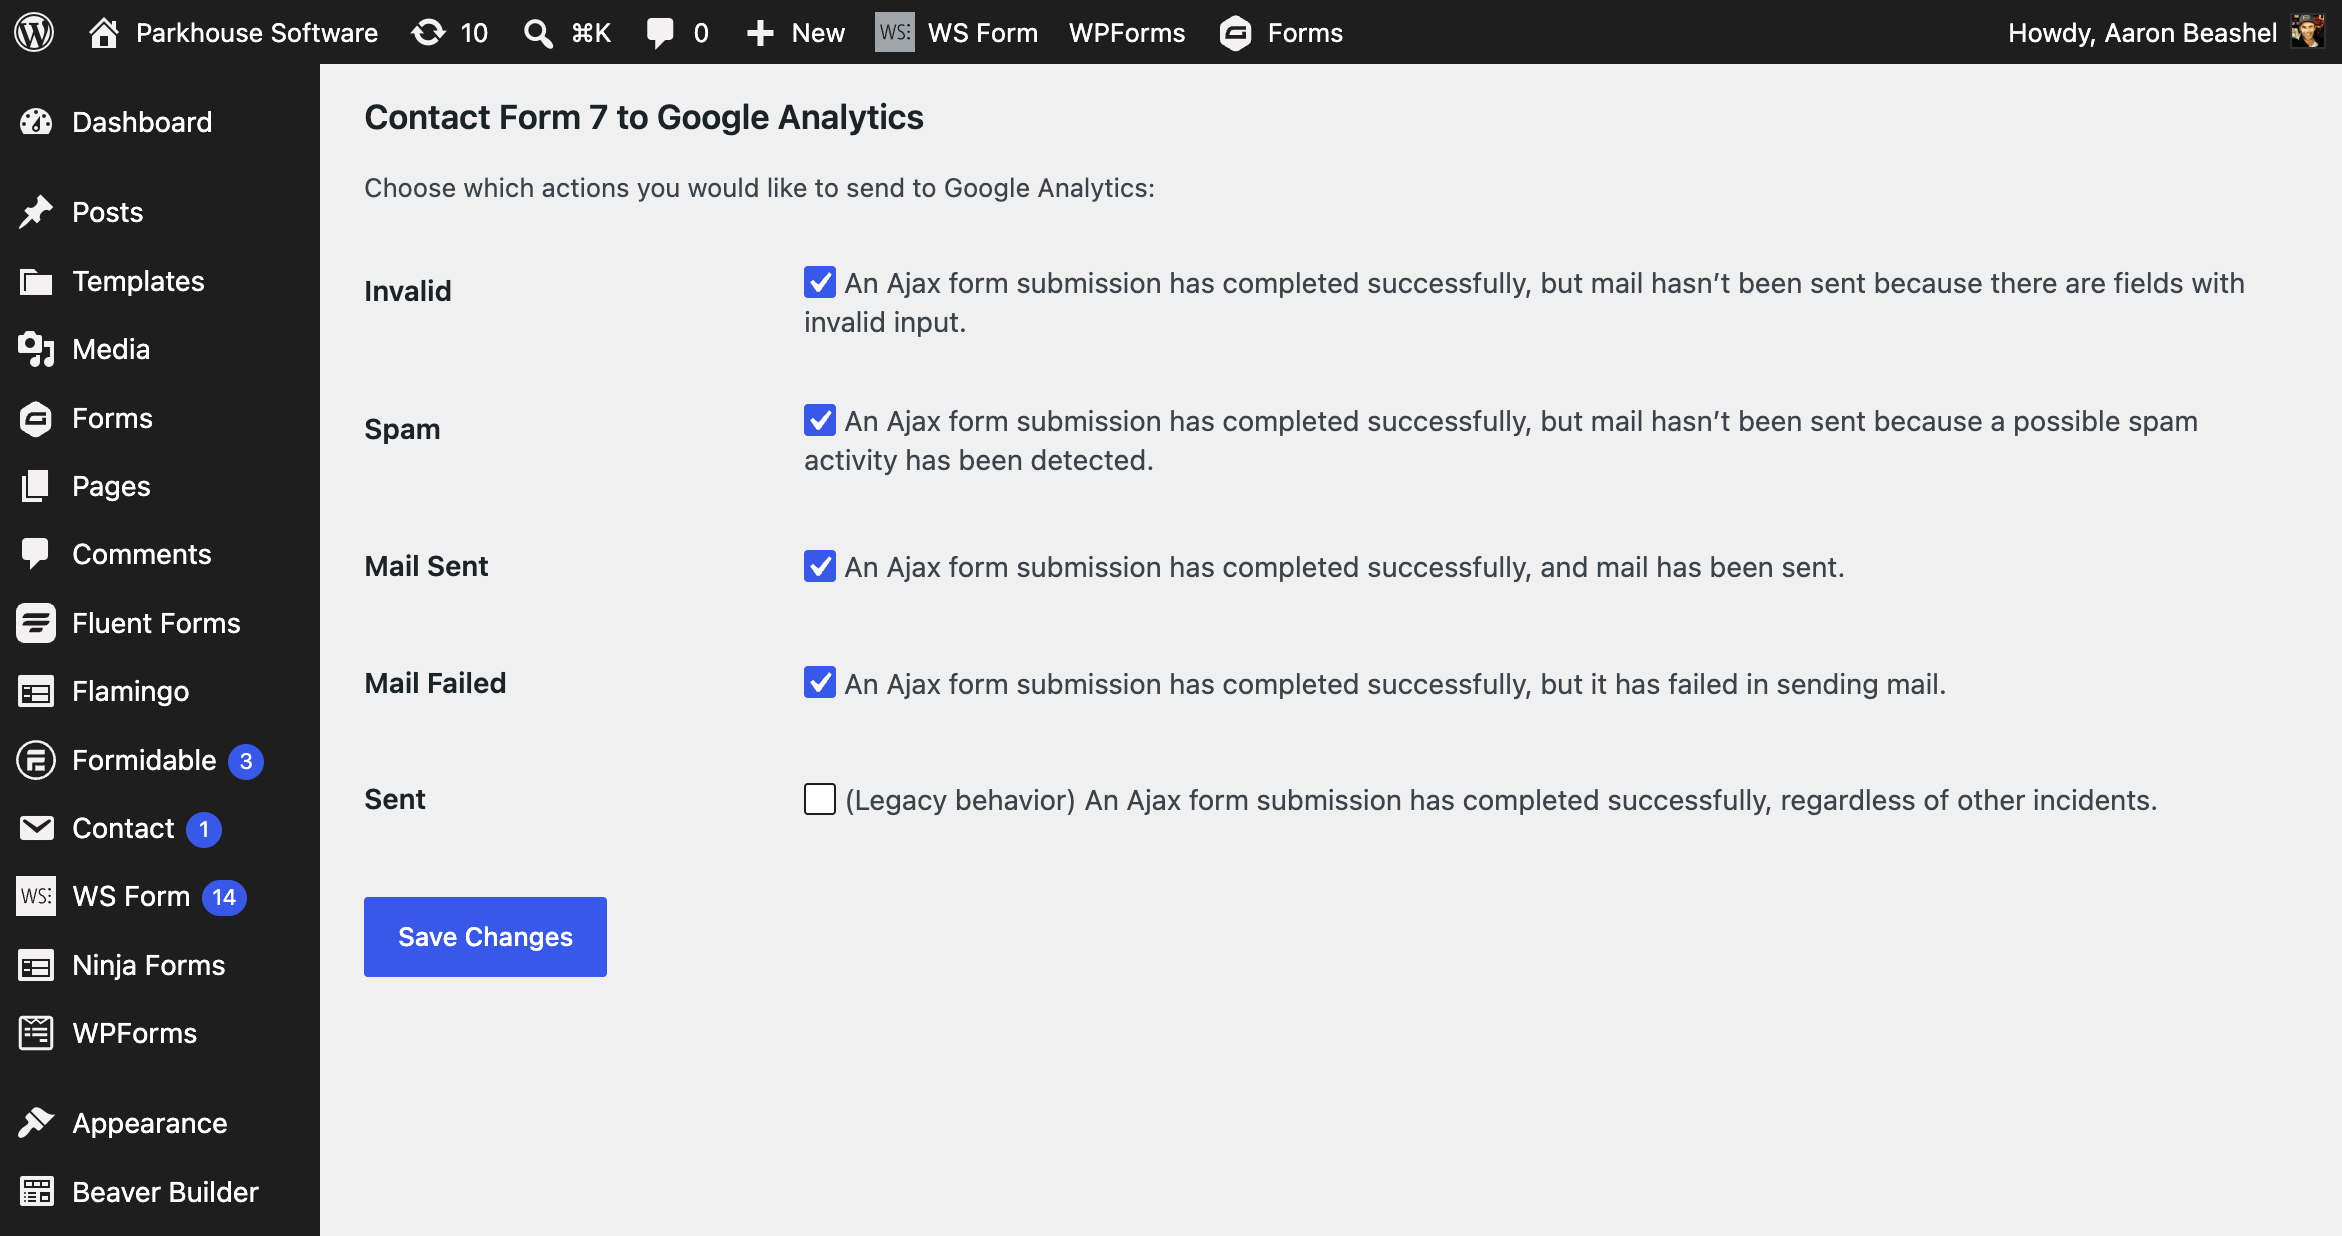
Open the plugin's settings and pick which of the four outcomes you want reported to Google Analytics. If you skip this step, it will send all of them by default. For clean conversion data, we would recommend enabling just "mail sent" (or "sent"), since the others reflect submissions that never actually succeeded.
Step 3: Make sure your Google Analytics connection is live
Because the plugin rides on top of your existing analytics setup, double-check that your gtag.js snippet, GA plugin, or Google Tag Manager container is actually installed and firing on the page.
Step 4: Test it, then mark it as a Key Event in GA4
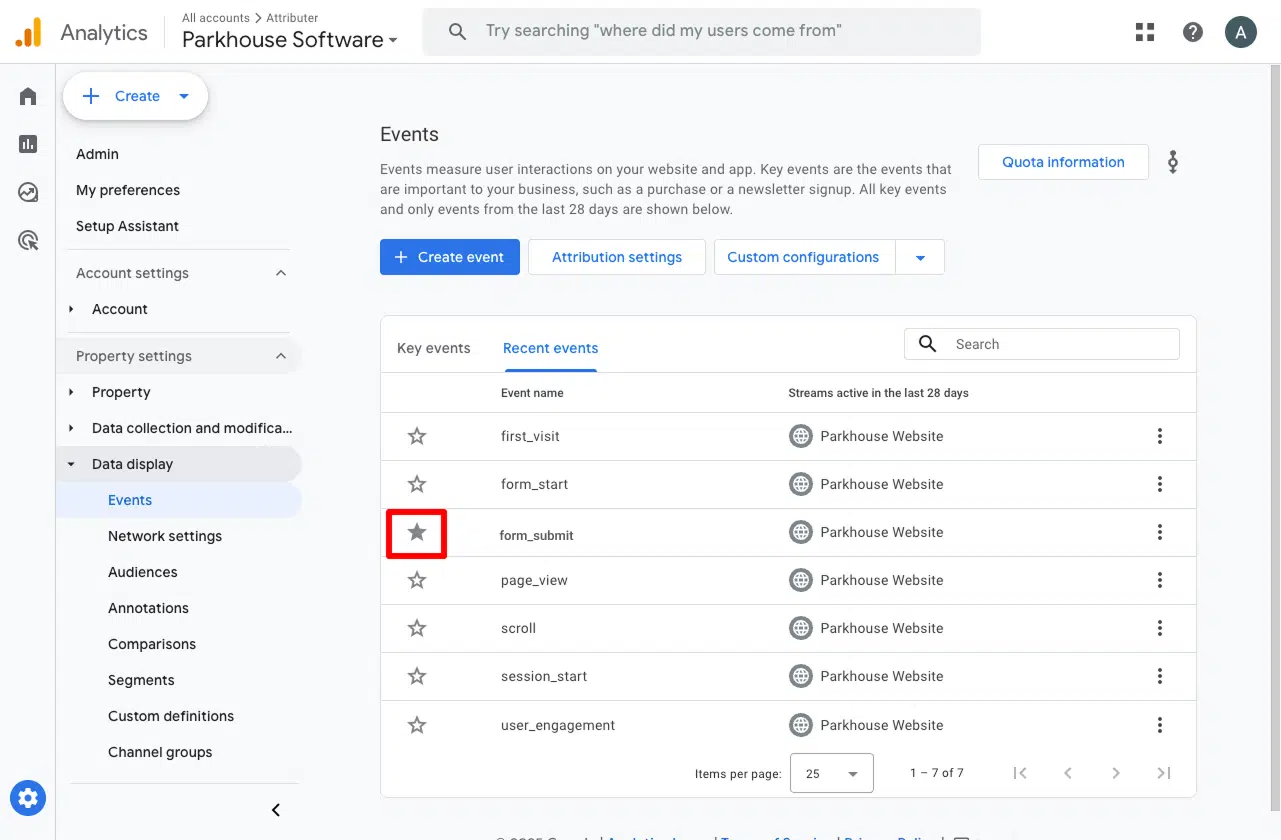
Submit a quick test entry on your form, then open GA4's Realtime report and look for an event called "Contact Form 7" with the action "sent" (or whichever label you chose) showing up in the recent events list. Once you can see it arriving, head to Admin, then Events (or Key Events) in GA4, find that event, and toggle it on as a Key Event. That tells GA4 to treat it as a conversion, so it appears in your acquisition and funnel reports instead of sitting there as an ordinary event.
Pros and cons
Pros:
- It is free forever. There is no premium tier to unlock and no license to buy, which is not something every form plugin's GA integration can say.
- It tracks every form on your site automatically the moment you activate it. No per-form feed setup required.
- It is lightweight and privacy-friendly. The only data it sends is the submission result and the form's name, nothing personal.
- It is open source, actively maintained, and works alongside popular GA plugins like MonsterInsights if you already use one.
Cons:
- It sends the event through your browser (via gtag.js or GTM), so ad blockers and privacy-focused browsers like Safari can prevent the conversion from ever reaching Google Analytics. There is no server-side option like some paid form plugins offer.
- It only talks to Google Analytics. It cannot push a conversion to Google Ads, Meta Ads, or anywhere else, so Methods 2 and 3 below are what you need if you are running paid ads.
- Since the same event category fires for every form on your site, you'll need to filter by the event label (the form's name) if you only want one specific form to count as a conversion.
- Getting a conversion from Google Analytics into Google Ads is technically possible, but it is a poor substitute for a real Google Ads conversion, since Ads needs far more matching data than Analytics collects (more on that below).
Method 2: Use Google Tag Manager
Good for: Sending Enhanced Conversions to Google Ads.
If you are spending money on Google Ads, simply counting submissions (as in Method 1) will not get you very far. Google Ads wants to match every conversion to the specific person who clicked your ad, and it can only do that when you send lead details (like their name, email, and phone number) with the conversion. Google calls this Enhanced Conversions.
That means a bare "a conversion happened" event is not enough for Google Ads. You need to capture the visitor's name and email when they submit the form, hash them with SHA-256 (as Google Ads requires), and pass them in.
Google Tag Manager is one way to build that, and here are the steps.
Step 1: Add a Custom HTML tag with a capture script
In GTM, create a new Custom HTML tag, paste in the snippet below, and set it to fire on 'All Pages'.
Here's what the snippet does:
- Detects form submissions the moment they succeed. Contact Form 7 submits in the background without reloading the page, so it never fires the browser's normal "form submitted" event. Instead, it fires its own success signal, called wpcf7mailsent, when the server accepts the submission. This code snippet listens for that success signal.
- Captures the name, email and phone as the visitor types. The code watches the form's fields and pulls out the email address, the phone number, and the person's name. Contact Form 7 gives its fields readable names like your-email and your-name, which helps, but the code does not rely on that alone. It also looks at the field's type (an email field, a phone field) and reads the visible label sitting next to it, so it still identifies the right fields on a form with unusual naming.
- Holds the details in a temporary spot until the form succeeds. Contact Form 7 clears the data from the form fields before it sends the success signal, so anything that tries to read the fields at that moment reads empty boxes. To get around it, the code quietly records each value as it is typed and holds it in a small holding area, labelled with that form's ID, ready for the moment it is needed.
- Sends the data once Contact Form 7 confirms success. The code waits for the wpcf7mailsent success signal, which Contact Form 7 fires only after it has run its own validation and spam checks and shown the "Thank you for your message. It has been sent." confirmation. When that signal arrives, the code takes the lead's details it stashed earlier and posts them to the dataLayer as a contact_form_7_submitted event, along with the form's ID. If the submission is rejected (maybe it was flagged as spam, or the visitor entered an invalid email), that success signal never comes, so nothing is sent. This means a failed or invalid submission can never be counted as a conversion.
Many other Contact Form 7 snippets you find online get critical details wrong. Here's why the above snippet is the best:
It fires on the correct event
A lot of snippets listen for the form's submit event, or for Contact Form 7's wpcf7submit event. Both of those can fire on a submission that then fails validation or gets flagged as spam. Fire your Google Ads conversion there and you start counting rejected form fills as leads, which quietly inflates your numbers and teaches Google to chase the wrong people. This listener waits for wpcf7mailsent, the event Contact Form 7 fires only after a genuine, server-confirmed success.
It captures the data that Contact Form 7 wipes
Contact Form 7 clears every field in the form before it fires its success event. So a snippet that tries to read the email and name at success time reads empty boxes and captures nothing. This listener gets around that by capturing each field's value as the visitor types, holding it safely, and reading from that held copy the moment the success event fires. That is the difference between a snippet that looks like it works and one that actually passes real names and emails through for Enhanced Conversions.
It handles the real-world edge cases
There are many real-world edge cases that most other snippets (which haven't been as rigorously tested) miss. This script handles the following scenarios out of the box
- Multiple Contact Form 7 forms on one page
- Forms that aren't loaded with the initial page load (maybe because they are in a popup that is only triggered on a button click, for example)
- Duplicate success events from caching or optimisation plugins, deduped so you count once.
- Sensitive fields like passwords, card numbers, CVV, one-time codes, SSN and PIN are dropped before anything reaches the data layer, so you don't run into any privacy concerns
It has been battle-tested
This is not a snippet we threw together for this article. It is a version of the code we run inside Converly (our dedicated conversion tracking tool) to detect Contact Form 7 submissions and capture the data. It has been through many rounds of iteration to handle the edge cases above, and it has been tested across customer sites, which probably makes it one of the most tested and best-developed snippets for capturing Contact Form 7 submissions anywhere on the internet.
Step 2: Create Data Layer Variables for the captured data
Before going further, it helps to understand what the dataLayer actually is, since every remaining step depends on it.
Picture the dataLayer as a messageboard sitting between your website and Google Tag Manager. Your site drops notes onto it (someone just submitted a form, and here is their email and name), and GTM watches for those notes as they arrive. It is essentially a running feed of everything your site chooses to tell GTM.
That is exactly what the Step 1 script does. The moment a form is submitted successfully, it drops a note called contact_form_7_submitted onto the dataLayer, carrying the email, first_name, and last_name values it just captured.
Here is the catch, though. GTM can see that note land, but it will not automatically pull the individual values out for you. You have to tell it which ones to grab, and that is exactly what a Data Layer Variable does.
To set this up, go to the Variables section in Google Tag Manager, click New under User-Defined Variables, choose Data Layer Variable as the type, and give it a name.
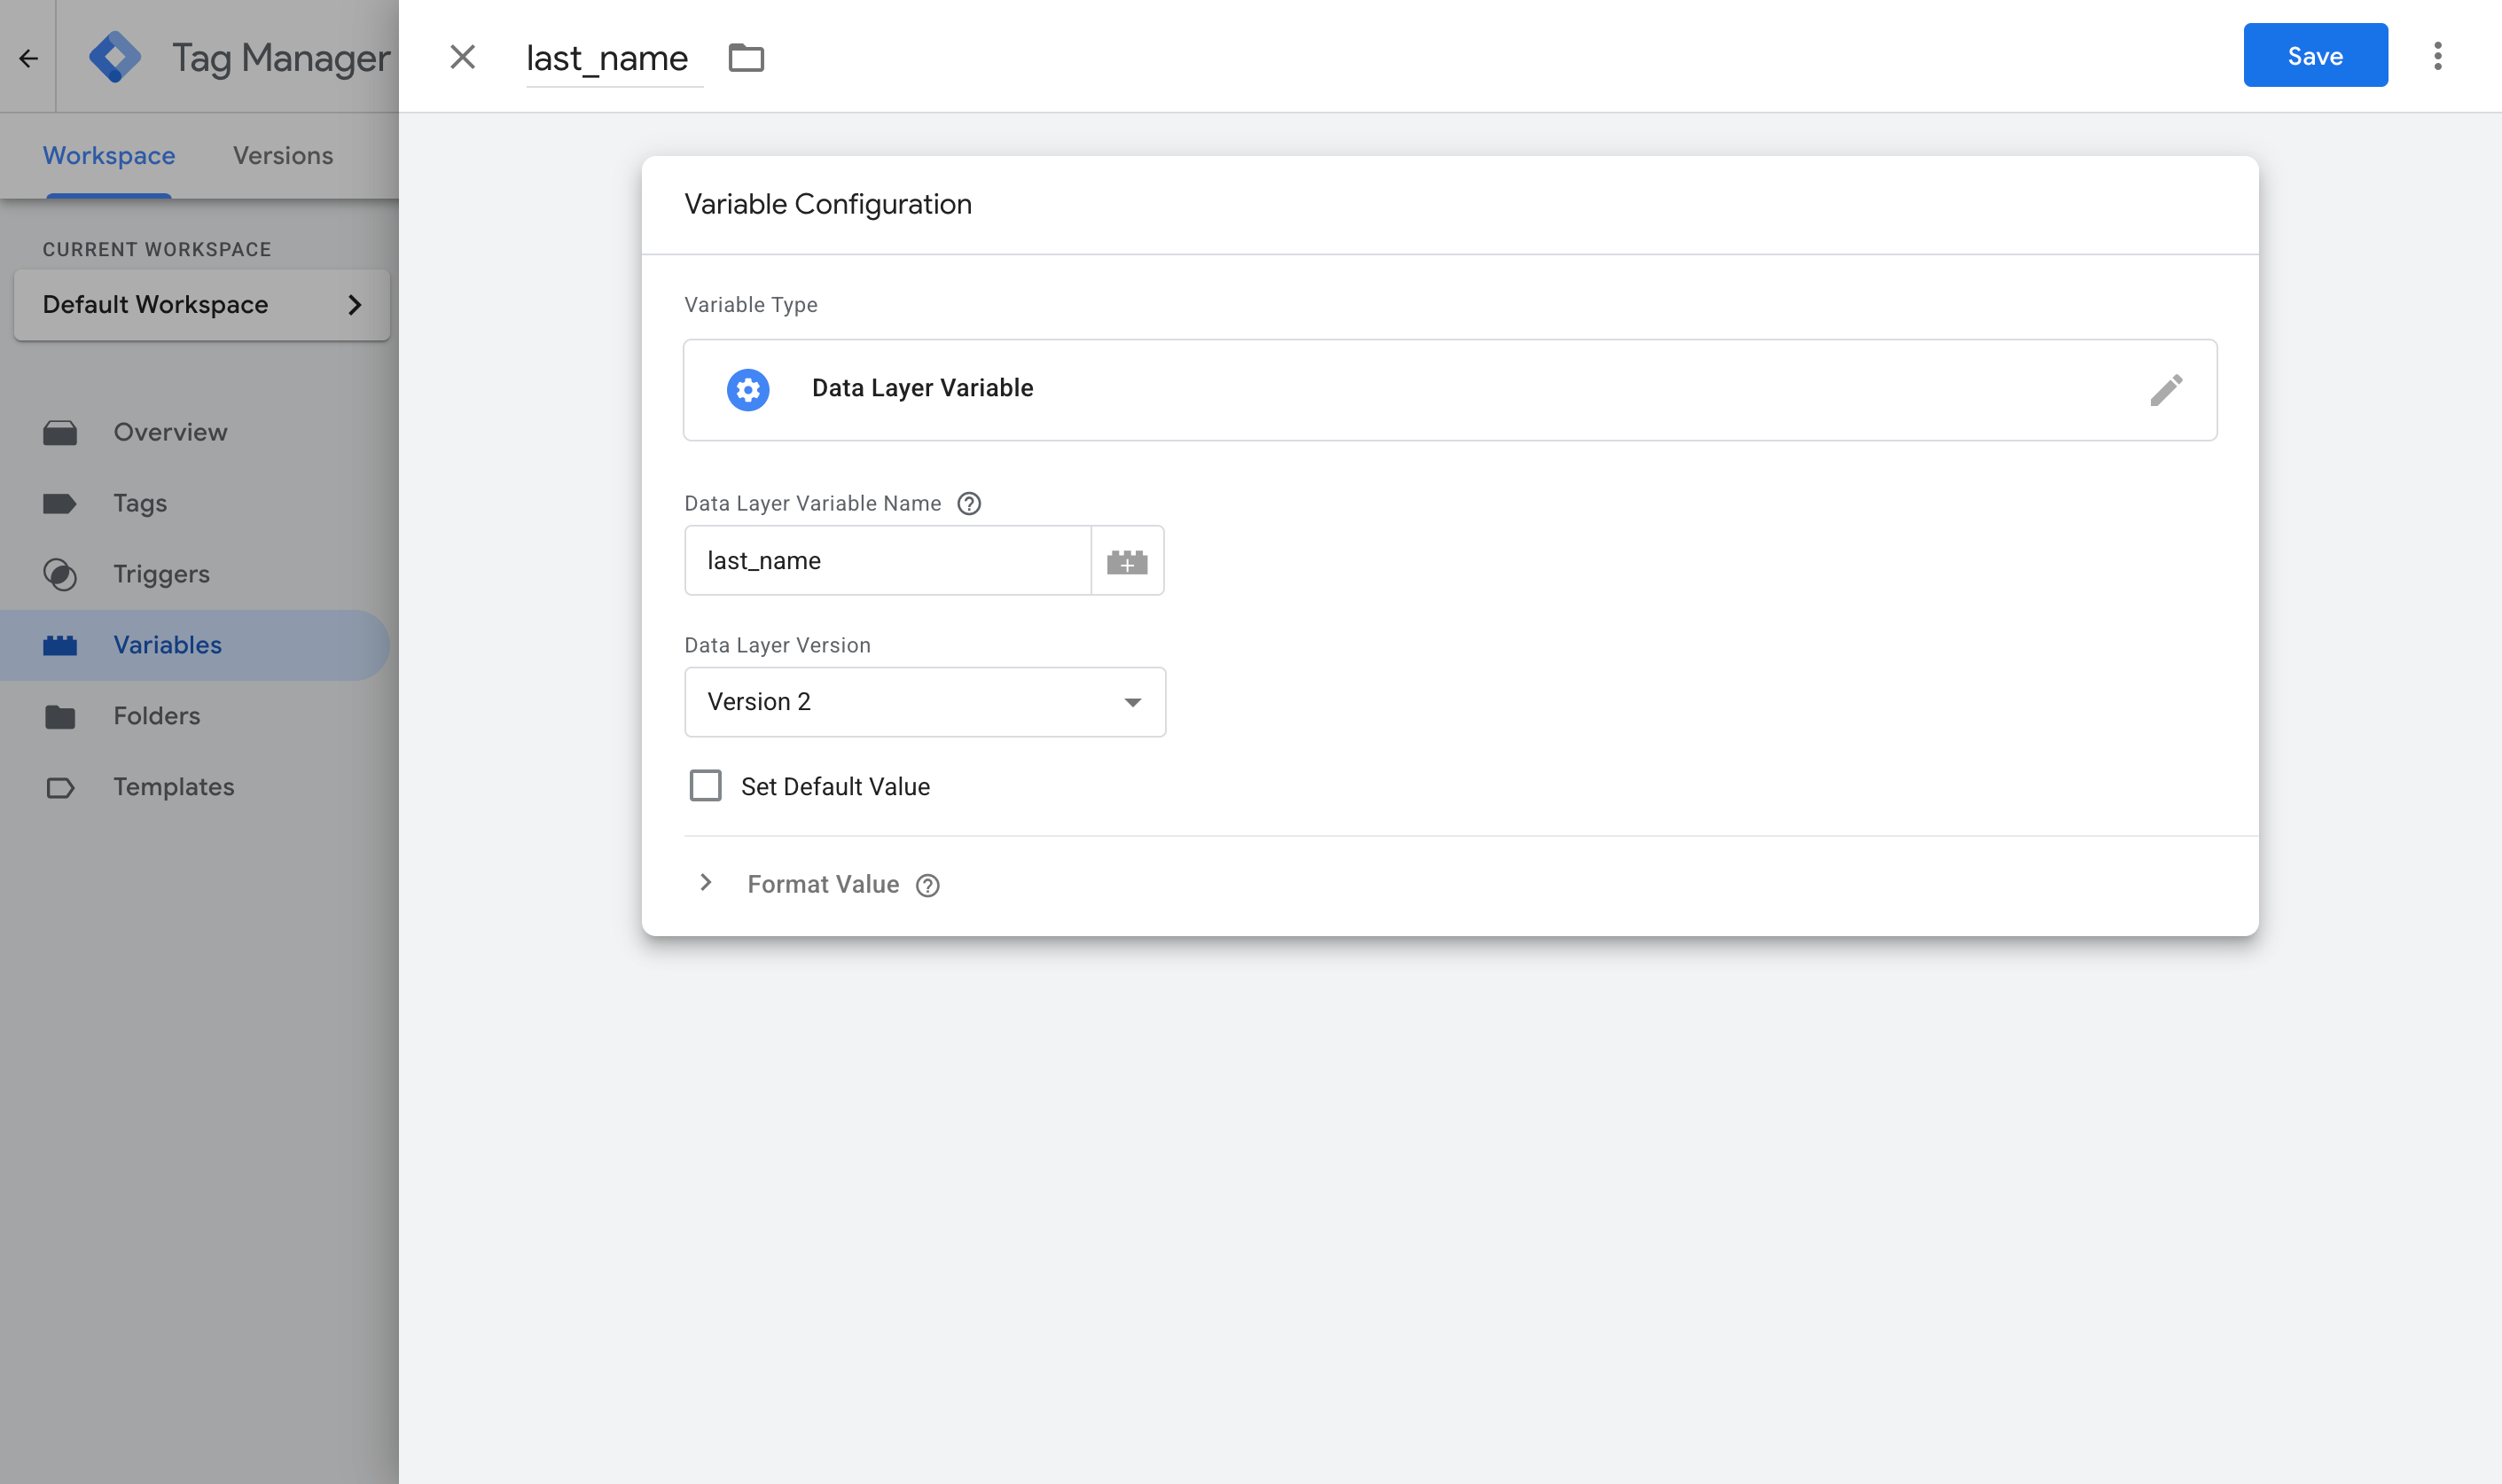
You'll need three of these in total.
Variable 1:
- Name: Email
- Variable Type: Data Layer Variable
- Data Layer Variable Name: email
Variable 2:
- Name: First Name
- Variable Type: Data Layer Variable
- Data Layer Variable Name: first_name
Variable 3:
- Name: Last Name
- Variable Type: Data Layer Variable
- Data Layer Variable Name: last_name
Step 3: Create a Custom Event trigger
Unfortunately, getting the event and the lead data into the dataLayer does not do anything on its own. GTM needs to be told to watch for it and treat it as the signal to fire your conversion tag. That signal is called a trigger.
To create it, head to the Triggers section in GTM, click New, choose the Custom Event type, and set the event name to contact_form_7_submitted, matching exactly what the script pushes. This is the trigger your Google Ads tag will fire on in the next step.
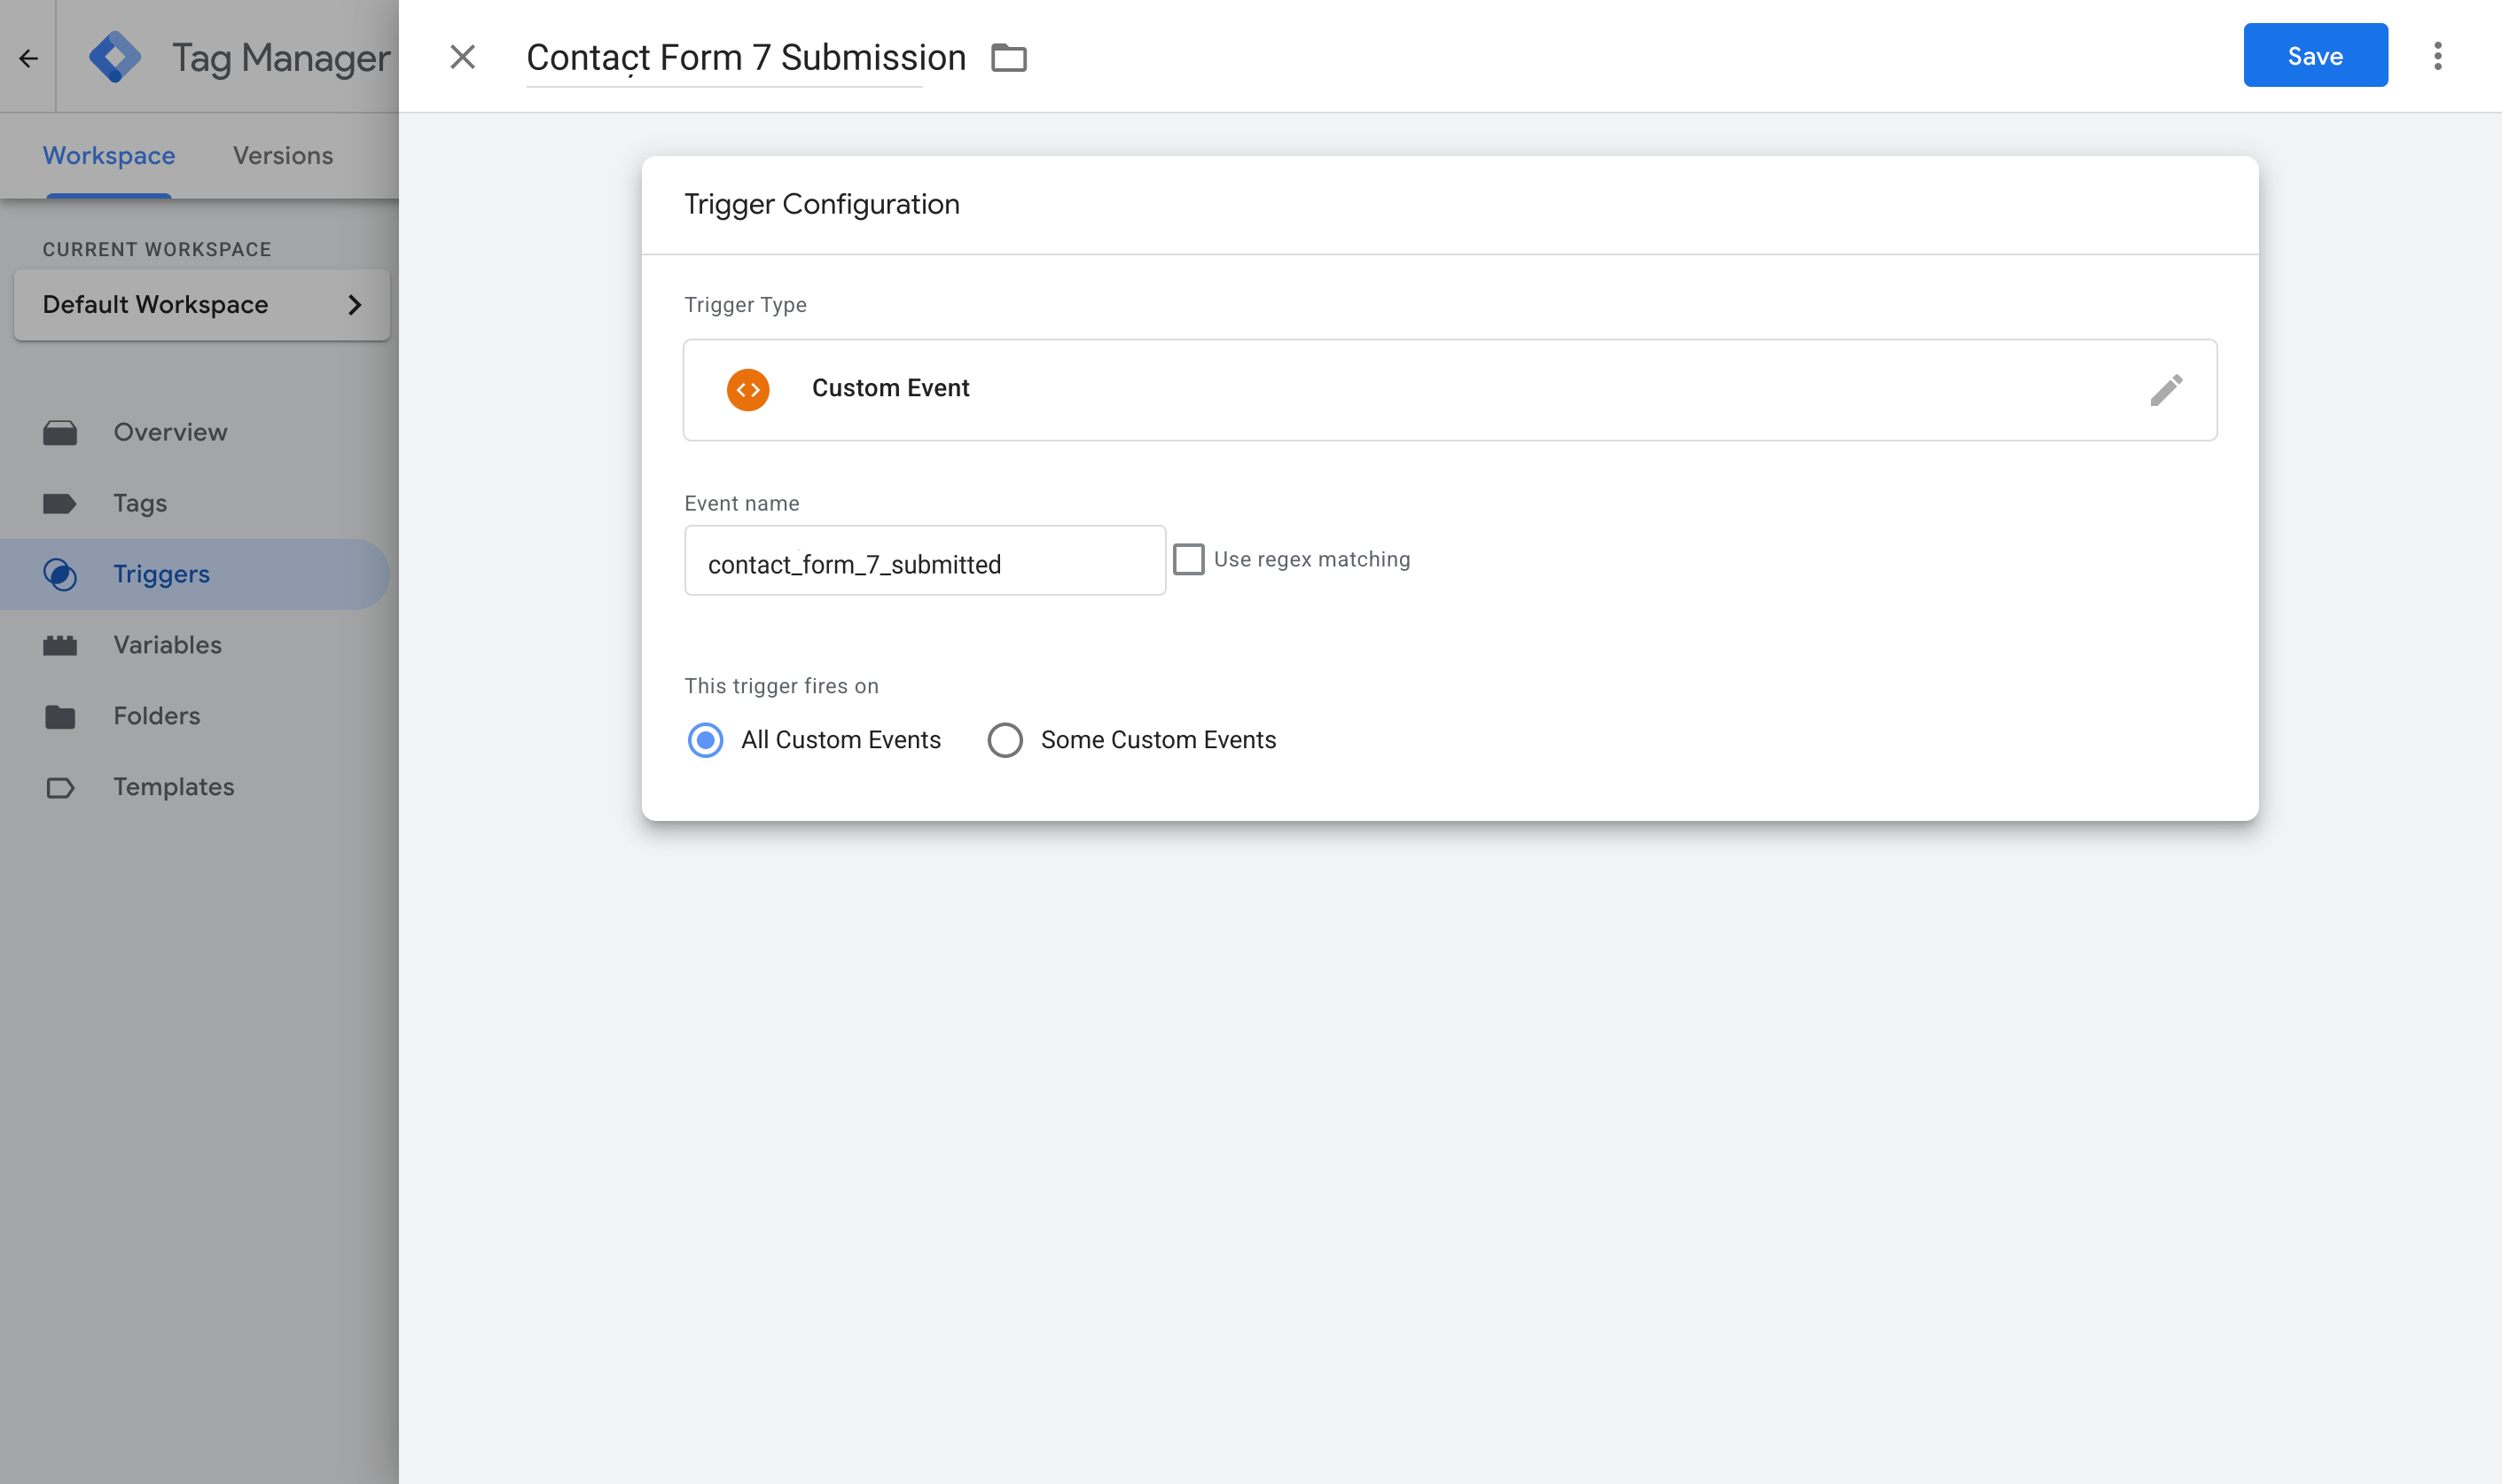
Step 4: Turn on Enhanced Conversions in Google Ads
Head over to your Google Ads account, then go to Goals, then Conversions, then Settings, and switch on Enhanced Conversions.
When it asks how you would like to implement it, choose Google Tag Manager. That grants Google Ads permission to receive and use the customer data you're about to send it.
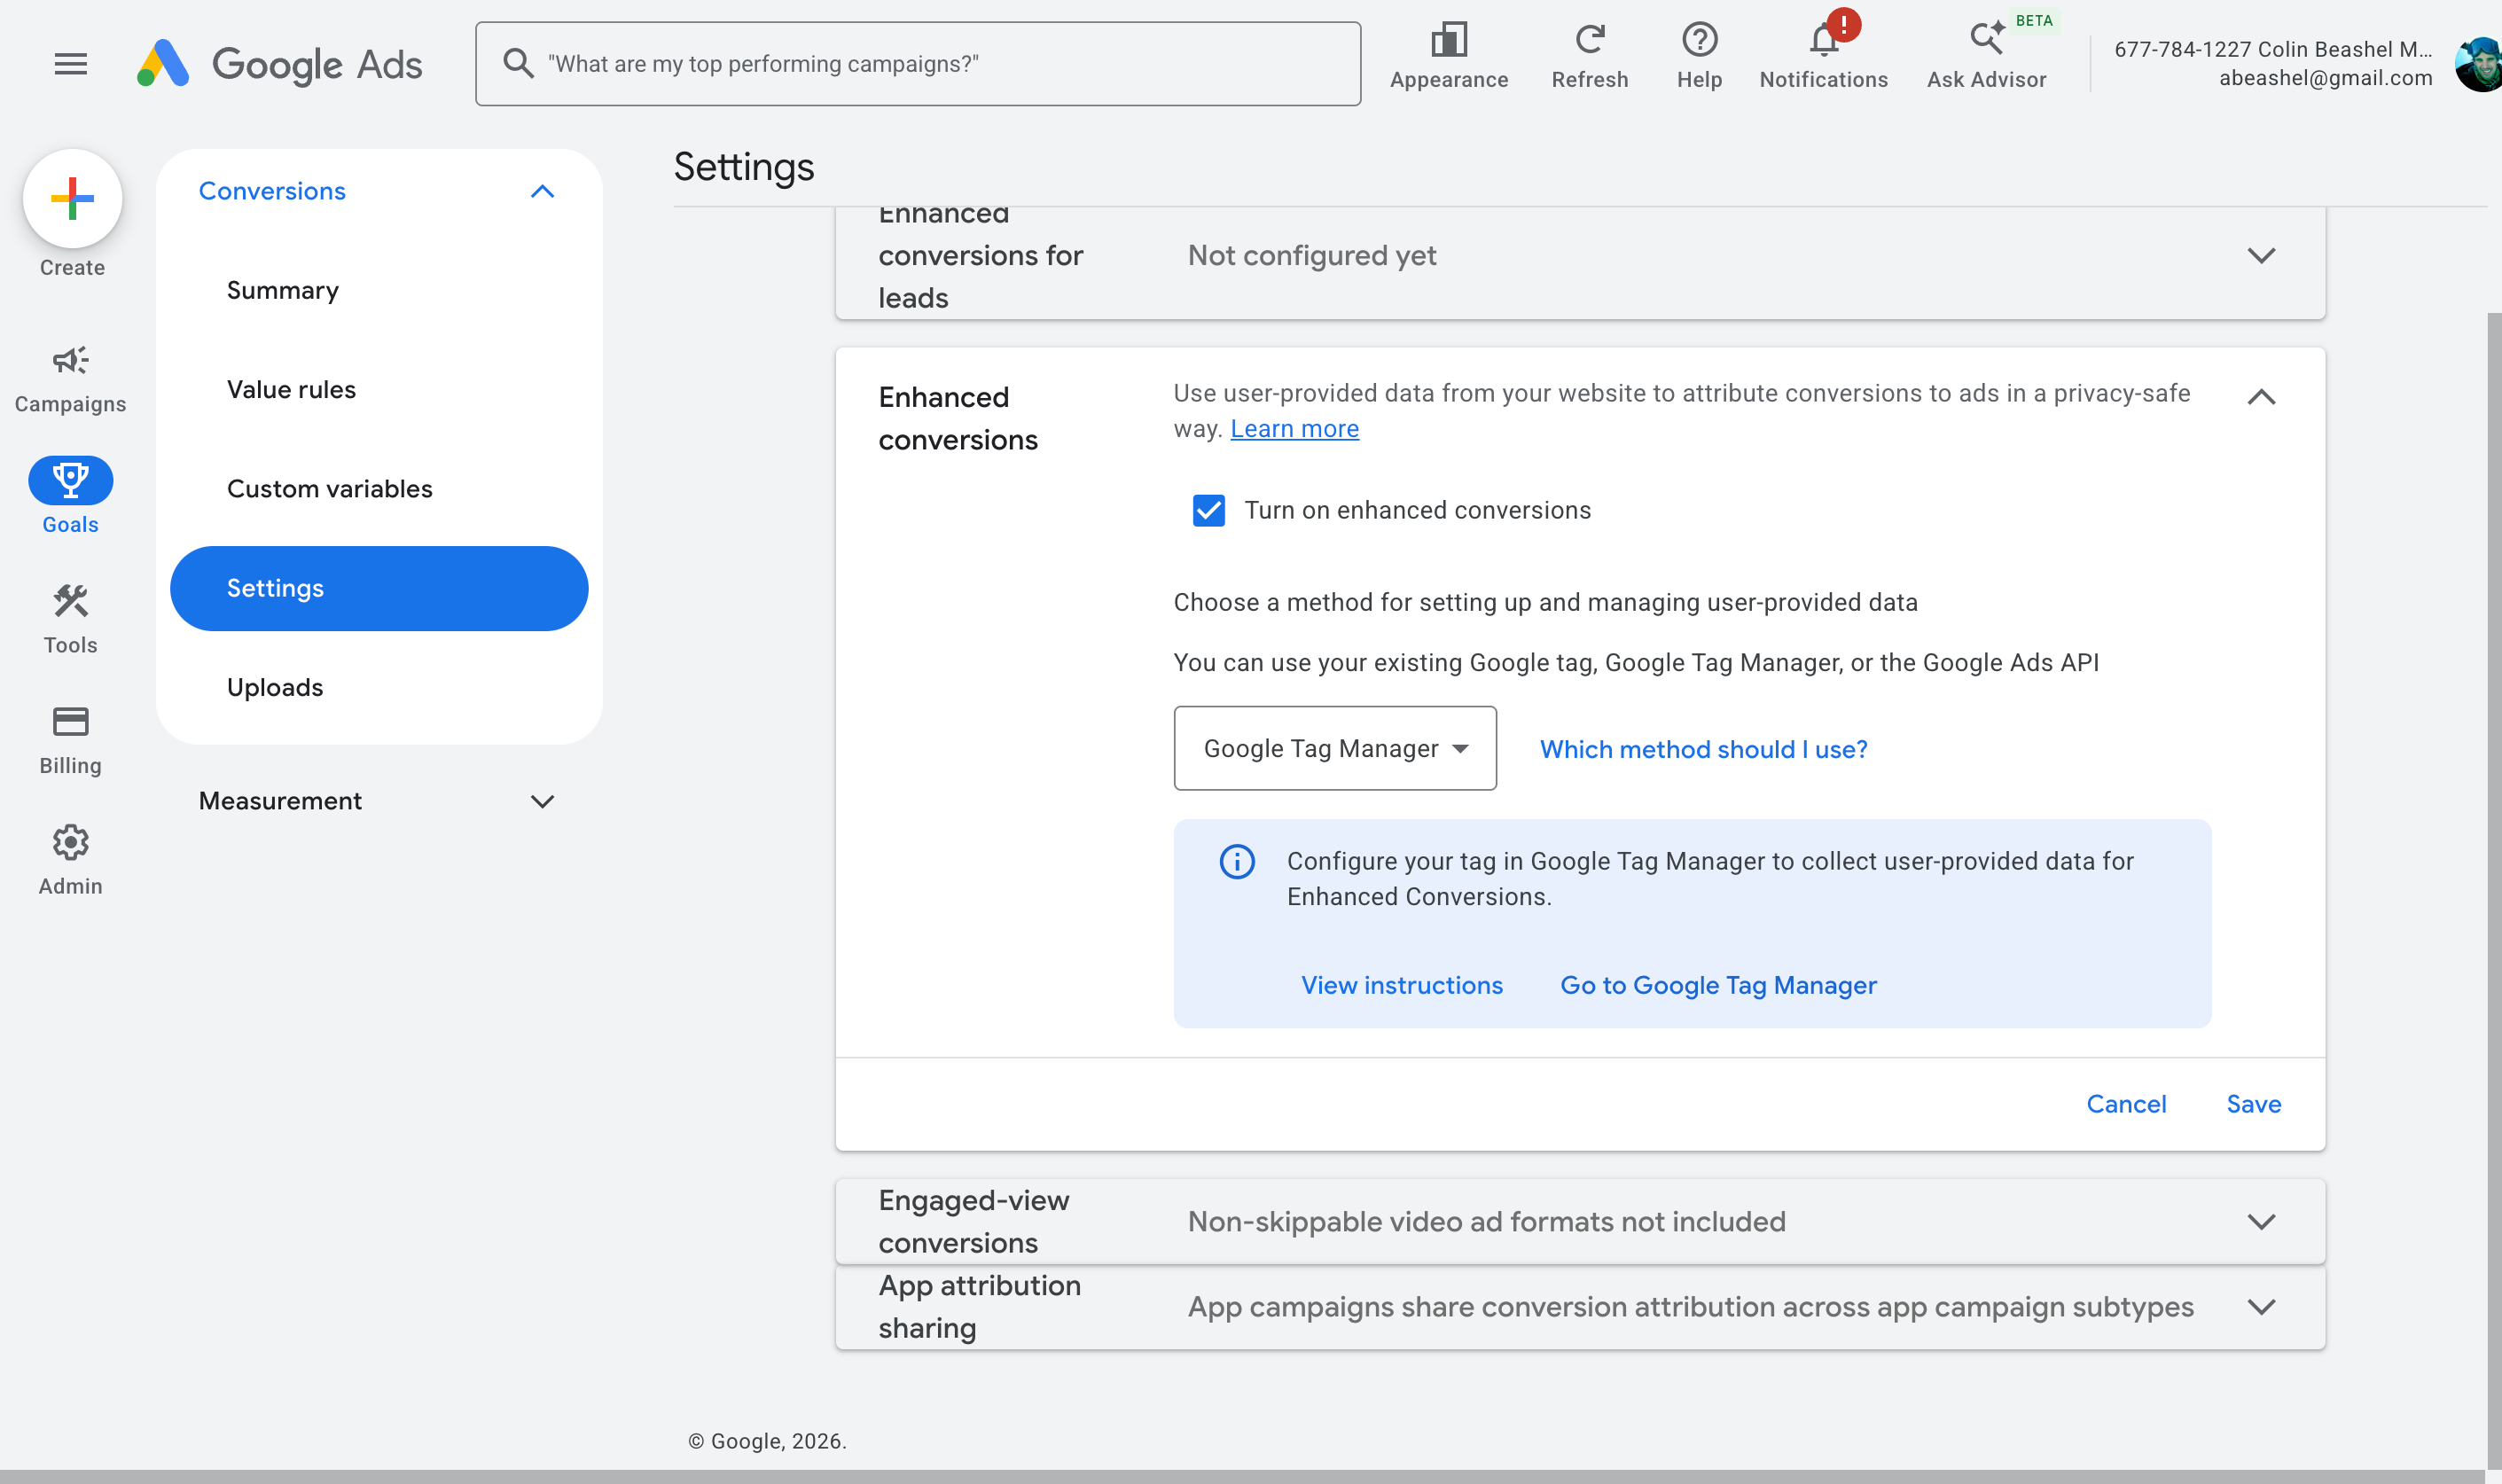
Step 5: Create your Google Ads conversion tag and map the data
Back in GTM, open the Tags section, click New, choose Google Ads User Provided Data Event as the tag type, and map the variables you built earlier to the fields it asks for (Email, Phone, and so on).
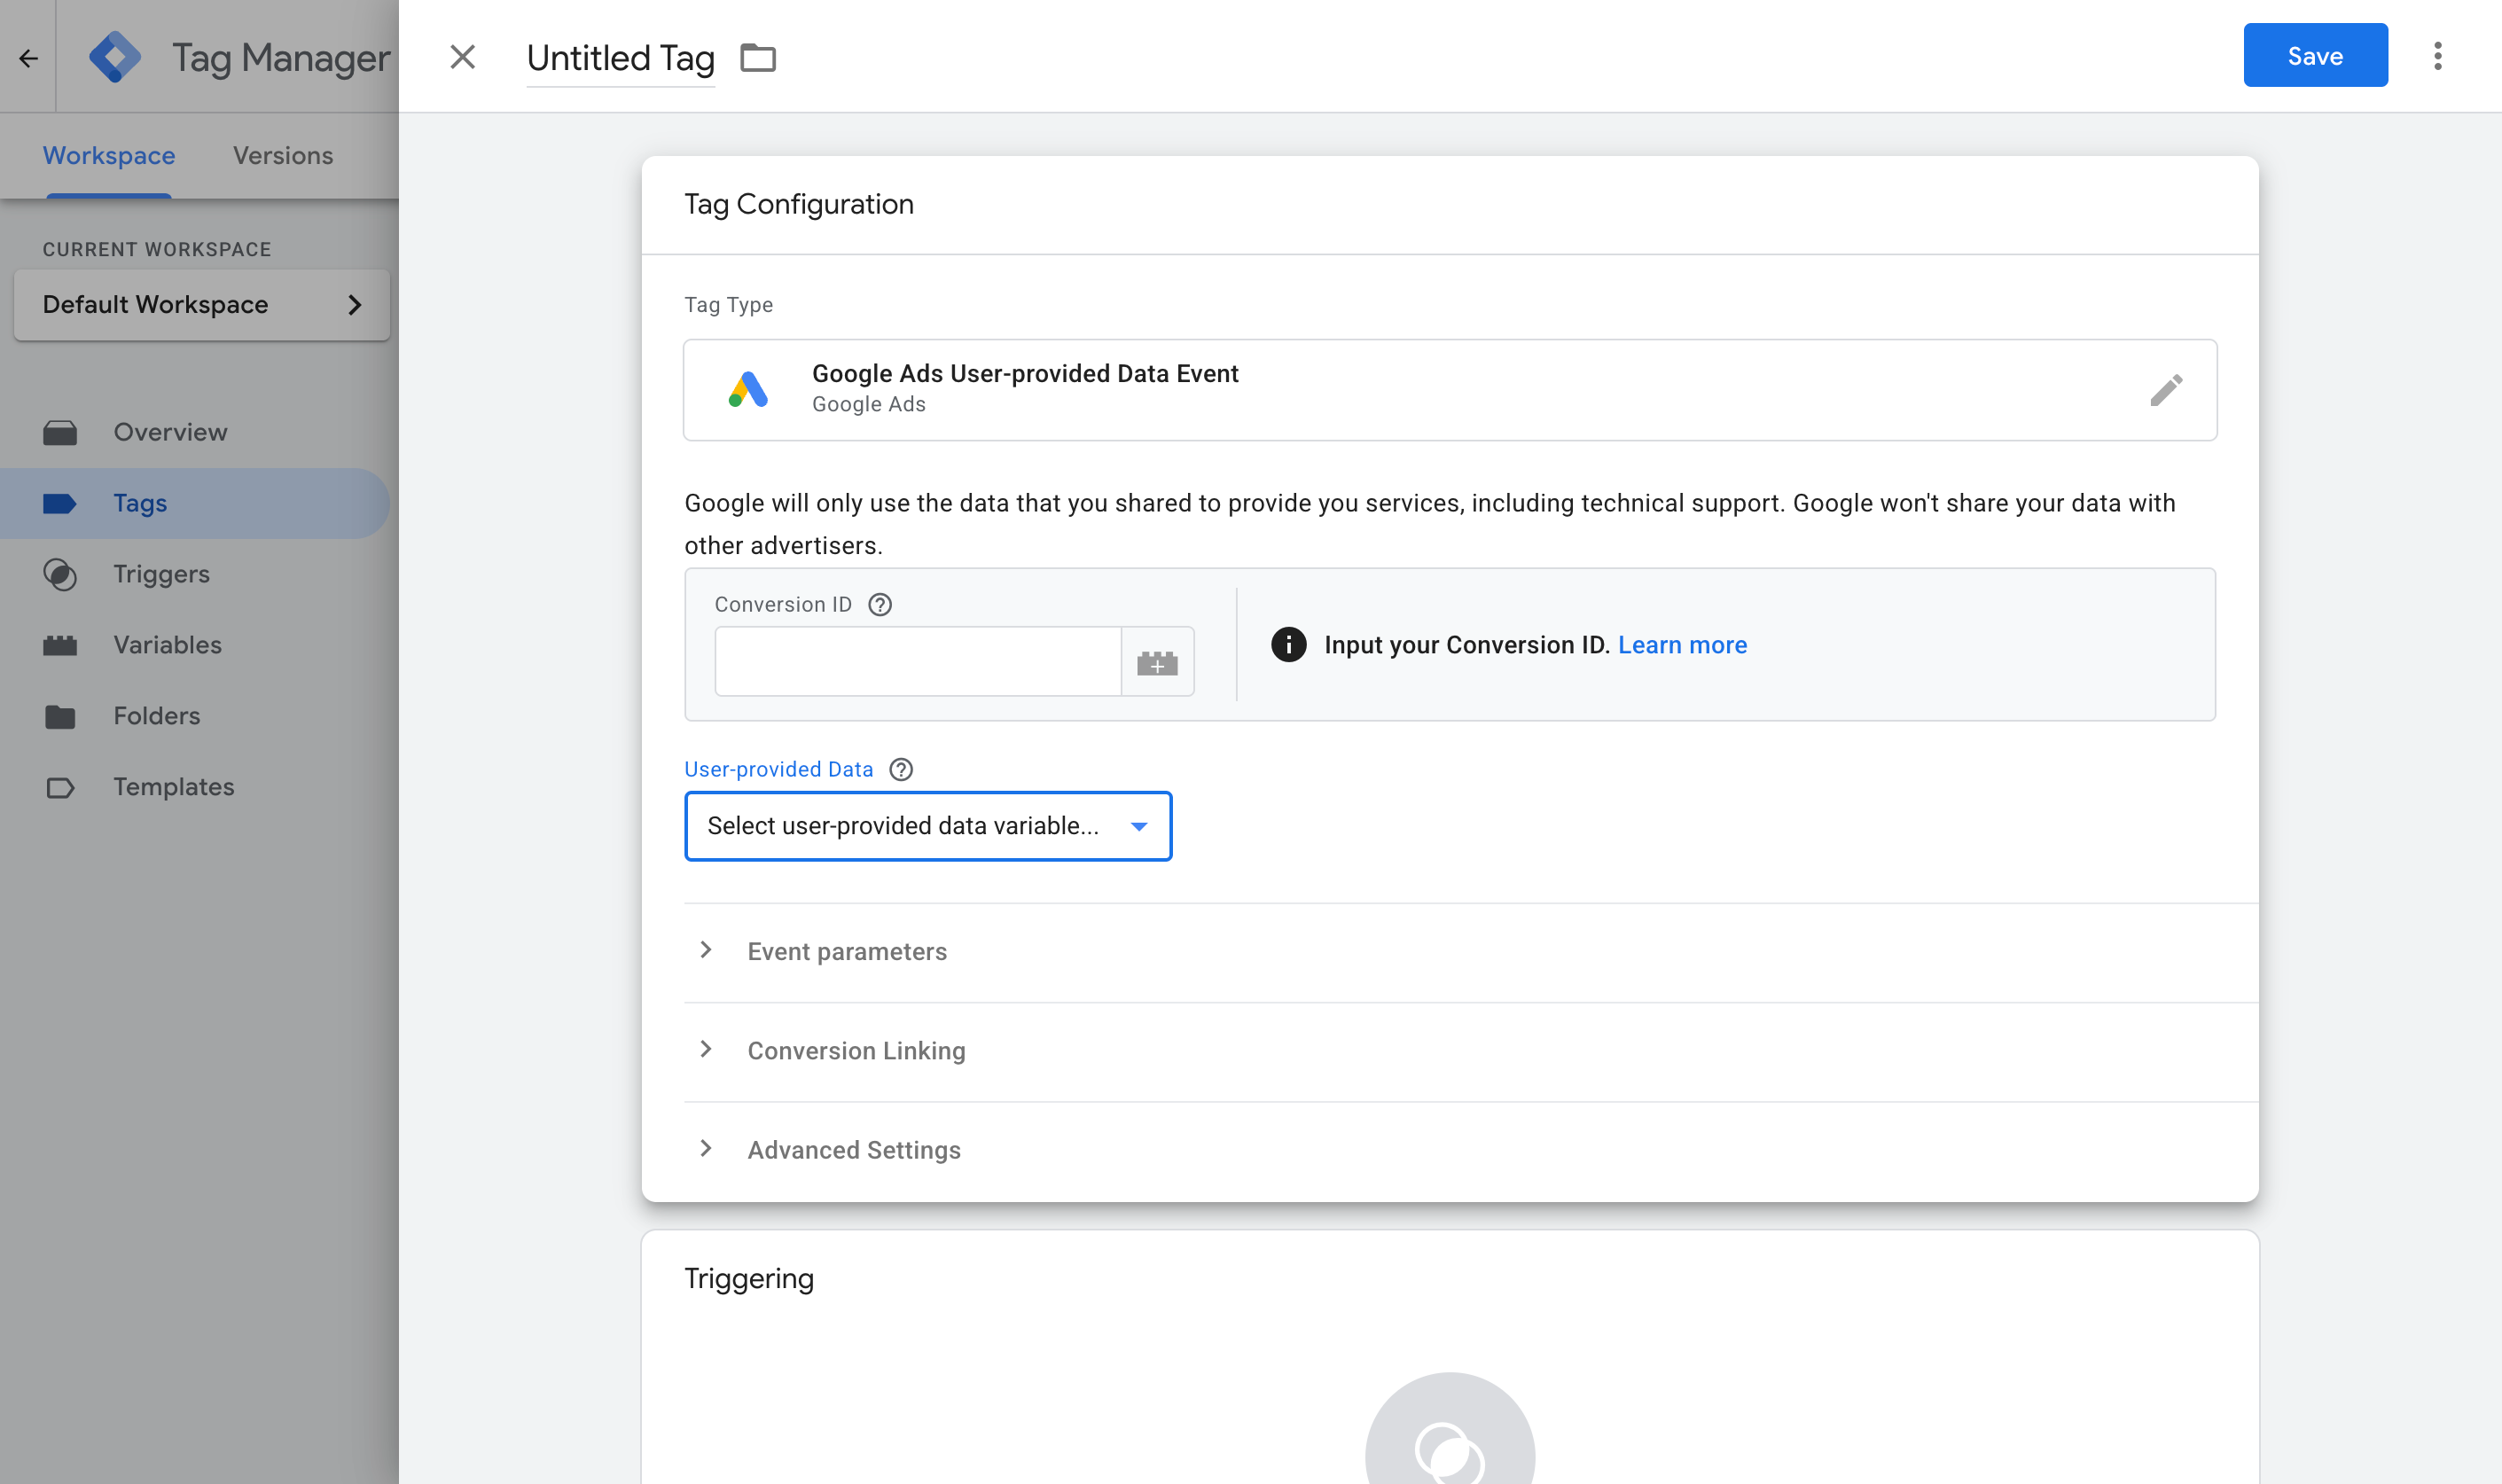
Then set it to fire on the Custom Event trigger you built in Step 3.
Once that's done, publish your GTM container. To check it is actually working, submit a test entry with GTM's Preview mode running and confirm the contact_form_7_submitted event shows up with the email and name filled in.
Pros and cons
Pros:
- It's free, and it uses Google Tag Manager, which you may already have installed.
- It captures the email and name, which is the minimum Google Ads Enhanced Conversions needs to start matching conversions back to ad clicks.
- Like Method 1, it only counts genuine, completed submissions, since it is tied to Contact Form 7's own success event rather than a click or a page load.
Cons:
- There are plenty of moving parts. Between the GTM tag, the trigger, the variables, the Google Ads settings, and the conversion tag itself, there is a lot that can be misconfigured, and a wrong mapping tends to fail quietly.
- You own and maintain it. A Contact Form 7 update, a renamed field, or an unusual field type can quietly break the capture, and you will not get an error, just an empty conversion.
- Sensitive data is a real risk if you go off script. Some tutorials show pushing every field in
event.detail.inputsinto the dataLayer at once. Do not do that, since the moment a file upload or another sensitive field lands there, any other script on the page can read it. (This is exactly why the snippet above only ever reads email and name.) - Forms that redirect to a separate thank you page rather than showing the confirmation inline can lose the conversion if the redirect fires before the dataLayer push has time to land.
- It still runs in the browser, so ad blockers and privacy-focused browsers can stop it from firing.
- Even set up perfectly, it misses the signals Google values most, since it only captures what is in the form, not click identifiers like the Google click ID (GCLID), the visitor's IP address, or their user agent. A browser cannot always see these on its own (it has no way to read its own visitor's IP address without asking a server), and they are exactly the signals that lift your Enhanced Conversions match quality. A dataLayer setup on its own cannot easily gather or send them.
That last point is what pushes a lot of people toward Method 3.
Method 3: Use Converly
Best for: Sending proper, server-side conversions to Google Ads, Meta Ads, LinkedIn Ads, GA4, and more, without wrestling with complicated Google Tag Manager configuration.
Converly is a dedicated conversion tracking tool built to make it simple to send proper, server-side conversions to Google Ads, Meta Ads, LinkedIn Ads, and more, every time someone submits a Contact Form 7 form on your site.
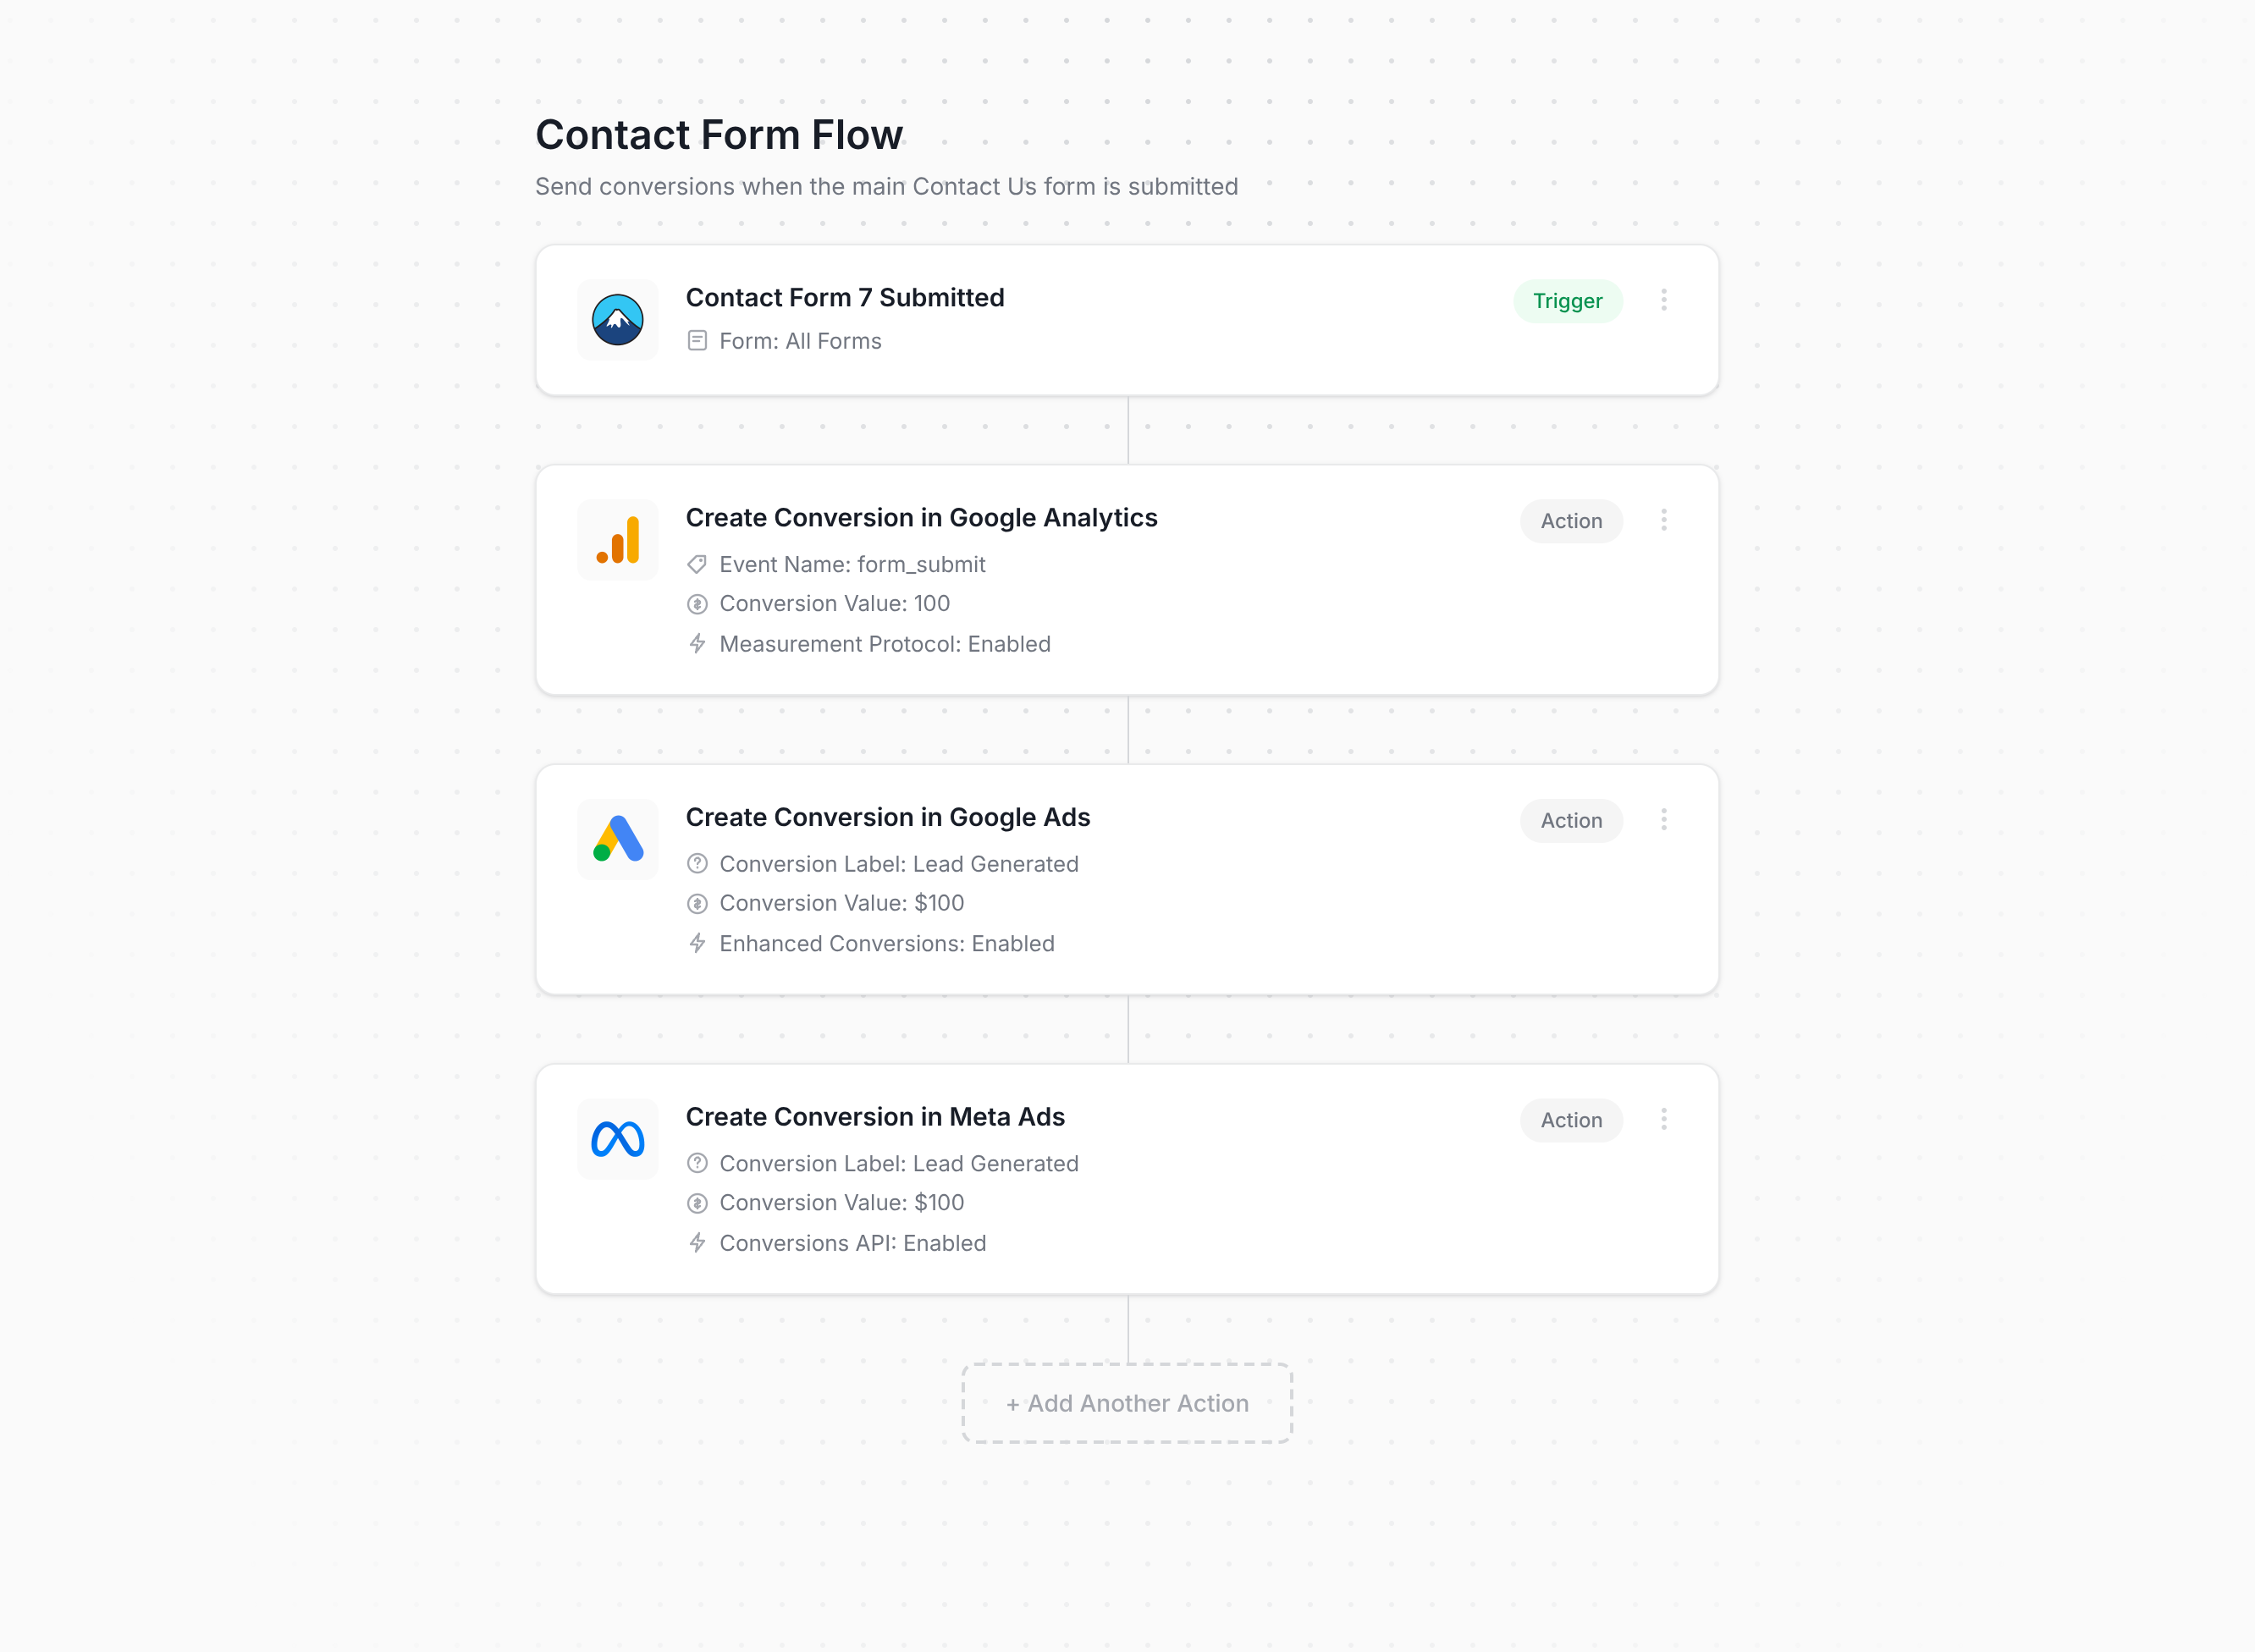
As you can see above, setting it up is genuinely simple. You choose a trigger (like a Contact Form 7 submission on your site) and then add one or more actions (send a conversion to Google Ads, send a conversion to Meta Ads, send an event to GA4, and so on). That's the entire setup. No custom code, and no wrangling Google Tag Manager triggers and variables.
You then install Converly on your website (by adding the code or installing the WordPress plugin), and it takes care of the rest. It listens for Contact Form 7 submissions, including ones that redirect to a thank you page, pulls out the name, email, and phone number, and sends it to Converly's own servers, which then relay it to Google Ads, Meta Ads, and beyond. Because that happens server-side, it cannot be blocked by ad blockers or privacy restrictions in browsers like Safari.
Here's the part that really matters if you're running paid campaigns. Alongside the name and email, Converly also captures the Google and Meta click IDs (GCLID and fbclid), Meta's browser cookies, the visitor's IP address, their user agent, and more, and sends all of it over to Google Ads, Meta Ads, and the rest with every conversion. These are precisely the signals Google and Meta reward, and having all of them is what takes your match quality from weak to strong (on Meta, that can take your Event Match Quality score from around 3 up to a 9 or 10).
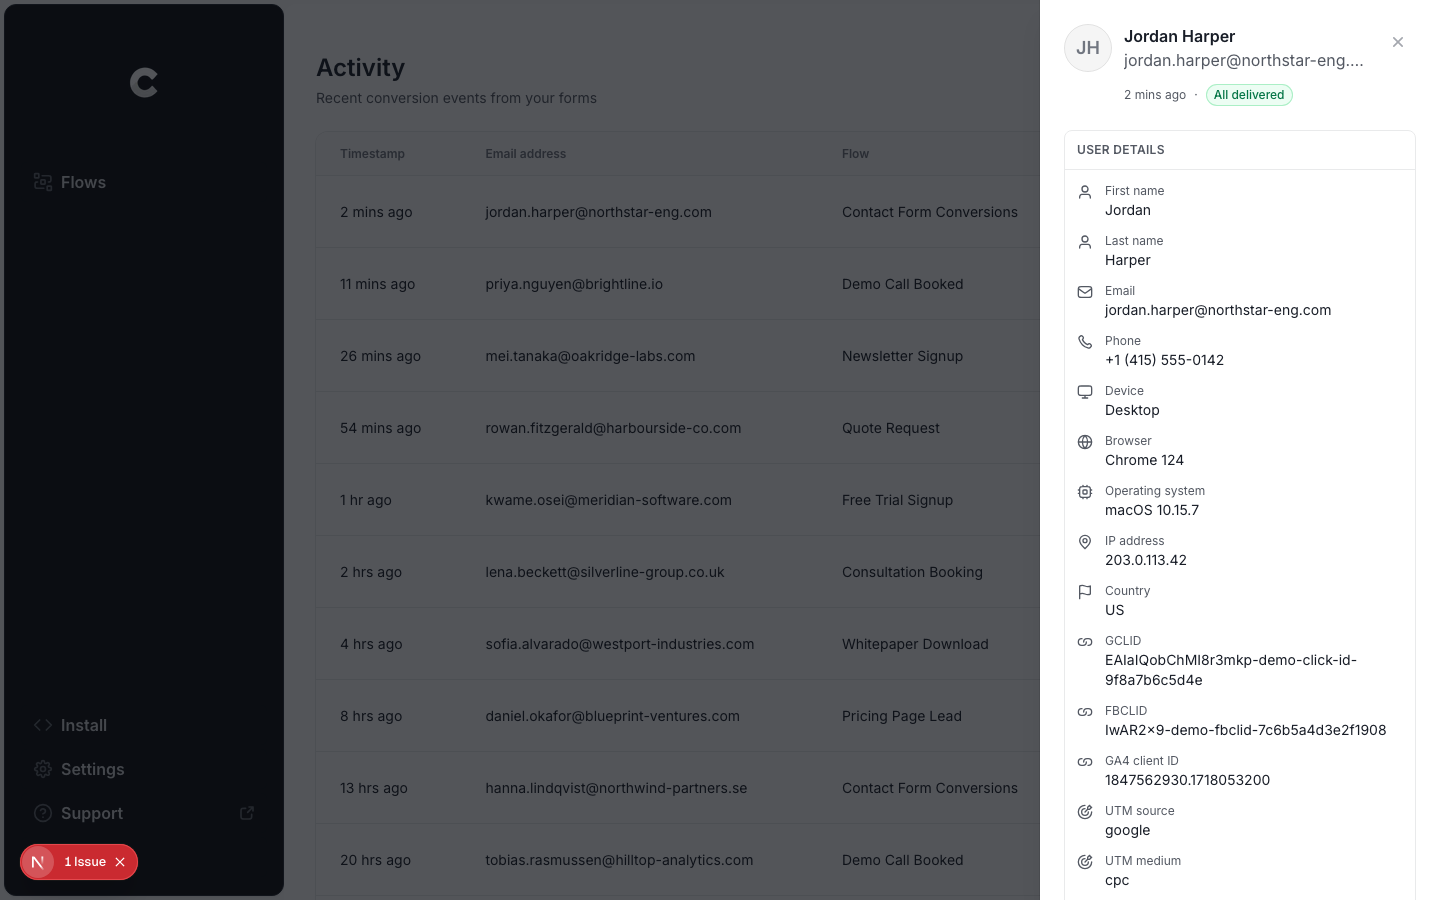
Converly also gives you a full Conversion Log where you can see every lead that came through Contact Form 7, exactly what data was captured, what was sent on to your ad platforms, and whether it was received successfully.
Pros and cons
Pros:
- Simple to set up. You just pick your trigger (like a Contact Form 7 submission) and then pick your actions (like sending a conversion to Google Ads). There's no custom code to be written, no pulling information from the dataLayer, etc.
- Handles Contact Form 7's quirks automatically, so nothing silently breaks when the plugin updates or you add a new form.
- Captures the click IDs, cookie IDs, IP address, and user agent and sends it to the ad platform, so it has a much better chance of matching the conversion back to the original ad click.
- Sends the conversion server-side, so ad blockers and privacy browsers cannot stop your conversions.
- Supports conditional logic, so you can fire different conversions for different forms on your site (say, only sending a conversion when your Quote Request form is submitted, and not your newsletter signup).
- You connect your Google Ads, Meta Ads, etc to Converly in 1 click and then simply pick the conversion you want to fire, with no digging around for account IDs or conversion IDs.
- Gives you a full conversion log showing every Contact Form 7 lead, what data was captured, and whether it made it to your ad platforms successfully.
- Comes with support from a team who will actually help you get set up and troubleshoot problems, something you will not get from Google if you're relying on GTM.
Cons:
- It's a paid tool once your free trial ends. Plans start at $19 per month, though most people make that back quickly, both in the time saved versus a manual setup and in the lower cost per lead that comes from having proper conversion data flowing into Google Ads and Meta Ads.
What not to do
We've covered the three best ways to track Contact Form 7 conversions and when each one makes sense, but it's just as useful to know which approaches to steer clear of, since some of the most common DIY methods quietly produce bad data. Here are the ones to avoid.
Tracking thank you page visits
This is the most common DIY approach we see, and the one we'd steer you away from the most. The idea is to redirect people to a dedicated thank you page after they submit, then count visits to that page as conversions. It sounds tidy, but there are a lot of ways it goes wrong in practice.
- It fires for people who never submitted anything. A thank you page is just a URL, and a URL can be reached without a person ever completing your form. People bookmark it, the browser history or autocomplete might accidentally send them there, get sent the link by a colleague, or find it indexed in Google. Your own team hits it while testing. Every one of those gets logged as a conversion, even though no form was ever submitted.
- It can double-count real submissions. Refresh the thank you page and you get a second conversion. Hit back and revisit it, or find it again later in your history, and you get more false conversions. A single lead can end up being counted multiple times, which inflates your numbers and feeds Google and Meta's smart bidding incorrect data to optimize against.
- It doesn't send the data the ad platforms actually need. When you track a page visit, you have no idea who actually submitted the form, so you cannot pass along the name, email, phone, GCLID, fbclid, and so on that Google Ads Enhanced Conversions or Meta's Conversions API need. That means even though you're technically sending conversions to these platforms, they're essentially useless because they don't carry the data the ad platforms need to match the conversion back to the original ad click.
The underlying problem is that a thank you page visit is a stand-in for a conversion, not the conversion itself. All three methods above fire on Contact Form 7's actual confirmed submission, so they stay tied to what genuinely happened.
Relying on GTM's built-in Form Submission trigger
When people first set up tracking in Google Tag Manager, the obvious move is to use its built-in Form Submission trigger, which listens for the browser's native ‘form submit’ event. On Contact Form 7, this causes more harm than good.
Contact Form 7 fires the browser's native ‘form submit’ event when the submit button is clicked, but if a required field is empty, an email address is malformed, or spam protection kicks in, the form submission is actually rejected. So when the visitor fixes the issue and submits again, that gets counted a second time. And if a spam bot submits your form 25 times, then you've got 25 conversions.
You need to use Contact Form 7's own wpcf7mailsent success event instead, which only fires once the form was successfully submitted, exactly like Converly does under the hood.
Using Google Analytics's automatic form tracking (Enhanced Measurement)
GA4 ships with a built-in Enhanced Measurement feature that claims to track form submissions automatically, with no setup required.
For Contact Form 7, this falls short in practice. Because Contact Form 7 submits via AJAX rather than a standard page load, it doesn't reliably pick up the form submit event. In fact, Enhanced Measurement has been widely reported to pick up a form_start event when someone begins filling out the form, but not the form_submit event that it should actually be grabbing. In other words, it can look like it's working but it's actually massively overcounting conversions, because it's counting when someone first interacts with the form, not if they actually submit it or not.
If you want actual form submissions recorded as conversions in GA4, use the plugin in Method 1 or use Converly.
Firing the conversion on the submit button click
Some setups we've come across fire the conversion when someone clicks the Submit button, usually with a click trigger in GTM pointed at the button itself. The problem is a click is not a submission. The visitor might have left a required field blank, mistyped their email, tripped spam protection, or hit any number of other snags. Every one of those clicks still counts as a conversion, even though the form submission was rejected. When they fix the error and click submit again, that's a second conversion for the same lead.
This is particularly bad if you're sending conversions to ad platforms like Google Ads or Meta Ads. If you send inflated conversion numbers back to Google Ads or Meta, then you're training their smart bidding to chase people who were never actually leads (which will result in fewer actual leads and a higher cost per lead because the platforms can't optimize your ad delivery).
So which method should I use?
Here's how the three ways to track Contact Form 7 conversions compare.
| Method | Best for | Sends conversions to | Data sent |
|---|---|---|---|
| Method 1. The free Contact Form 7 Google Analytics plugin | Sending submissions to Google Analytics | Google Analytics 4 | The submission event only |
| Method 2. Enhanced Conversions through Google Tag Manager | Sending to Google Ads, if fiddly configuration doesn't put you off | Google Ads | Name, email and phone |
| Method 3. Converly | Sending to any ad platform, with the least setup work | Google Ads, Meta Ads, LinkedIn Ads, ChatGPT Ads, GA4 and more | Name, email and phone, plus the GCLID, the Meta click ID, IP address and user agent |
Wrap up
Getting conversion tracking right is really important, particularly if you're sending conversions to Google Ads, Meta Ads, and the like.
In fact, Google states that advertisers who set up proper server-side conversion tracking get an average 19% increase in conversions. Meta says that they get an average 23% increase in conversions on their platform.
And with tools like Converly, it's super easy to do. You just pick a trigger (like when a Contact Form 7 form is submitted), choose where you want the conversions sent, and add one snippet to your site.
Best of all, Converly is free to get started, and setup usually takes less than 10 minutes. Start your 14-day free trial today.
About the author

Aaron is the founder of Converly. With over 15 years of experience in digital marketing and SaaS, he's passionate about helping businesses track and optimise their ad conversions.