


Acuity Scheduling Conversion Tracking: 2 ways to do it
Learn two different ways to set up conversion tracking for Acuity Scheduling bookings, and how to work out which one is right for you.
Are you running Google Ads, Meta Ads, etc to generate appointments for your business?
If so, getting proper conversion tracking set up is critical. It helps you understand what campaigns are working and which ones aren't, and it gives the ad platforms (Google, Meta, etc) the data they need to optimise your campaigns and get you better results.
But setting up proper conversion tracking in Acuity is harder than it looks. When you embed Acuity on your website, the scheduler loads inside an iFrame served from Acuity's own domain, which means all the standard ways of setting up conversion tracking (like using Google Tag Manager's built-in form submission trigger) don't work.
We build conversion tracking for a living here at Converly, so in this article we'll walk you through the two approaches that genuinely work with Acuity, show you what each one can and can't send to your ad platforms, and help you decide which is the best approach for you.
Method 1: Use Google Tag Manager
Good for: Sending an ‘Appointment Booked’ event to GA4 and other analytics tools
If all you need to do is send a conversion event to your chosen analytics tool (Google Analytics, Plausible, etc) whenever someone books an appointment through the Acuity scheduler on your site, Google Tag Manager will do it for free.
The problem is it's a bit difficult to set up because Acuity loads in an iFrame on your website, so Google Tag Manager can't actually see anything that happens in it.
Fortunately, Acuity Scheduling has an integration called ‘Custom Conversion Tracking’ that can help solve this (it's basically just a field you can paste some custom code into and it fires when an appointment is scheduled). You can use this feature to fire event from the iFrame to the main website, and then Google Tag Manager can receive the event and forward it on from there. t
Here's how to set it up.
Step 1: Paste the booking snippet into Acuity
In your Acuity account, go to Integrations, find Custom Conversion Tracking, click Set up, and paste in the code below.
Before you save, change https://www.example.com to your own website's address (just https:// and the domain, nothing after it). The snippet only talks to the address you put here, so if it's wrong, Acuity still runs the code but your page never hears about the booking.
Step 2: Add the listener to Google Tag Manager
The next step is to add the listener code to Google Tag Manager so it can receive the events that the code from step 1 fires.
In Google Tag Manager, create a new Custom HTML Tag, paste in the code below, and set it to fire on the All Pages trigger, with the tag firing option set to Once per event.
Step 3: Create Data Layer Variables for the booking details
The listener code you added in step 3 receives a whole bunch of information about the booking (sent by the code in step 1) and stores it in the dataLayer, but Google Tag Manager won't actually grab any of that information until you tell it to. That's what a Data Layer Variable does.
To set them up, go to Variables, click New under User-Defined Variables, choose Data Layer Variable as the type, and create these four:
DLV - Acuity Appointment ID, with the Data Layer Variable Nameappointment_idDLV - Acuity Type, with the Data Layer Variable Nameacuity_typeDLV - Acuity Appointment Type, with the Data Layer Variable Nameappointment_typeDLV - Acuity Price, with the Data Layer Variable Nameprice
These variables allow you to tell your different appointment types apart and pass the price of the booking through to your analytics tools as the conversion value.
Step 4: Create a Custom Event trigger
With the booking arriving in the dataLayer and variables set up to read the information that comes with it, the next step is telling Google Tag Manager what to do with it. That's the job of a Trigger. It essentially watches for the event to arrive in the dataLayer and then ‘triggers’ your conversion tags (for Google Analytics, Plausible, etc) to run.
To set this up, go to Triggers, click New, choose the Custom Event type, name it CE - Acuity Appointment Scheduled, and set the event name to acuity_appointment_scheduled (it has to match exactly).
One thing to decide here. Acuity runs the same conversion tracking code when someone buys a package, a gift certificate or a subscription, not just when they book an appointment. If you only want to count appointments, set the trigger to fire on Some Custom Events, where DLV - Acuity Type equals appointment.
Step 5: Build a GA4 event tag
The final step is build a conversion tag for wherever you want to send the data (Google Analytics, Plausible, etc).
Using GA4 as an example, create a GA4 event tag, give the event a name, and set its firing trigger to CE - Acuity Appointment Scheduled.(which is the name of the Trigger you created in step 4).
Step 6: Test it, then mark it as a Key Event in GA4
With everything wired up, the last thing you need to do is prove it works.
To do that, go to a page on your site that has the Acuity scheduler on it, book an appointment, then open GA4's Realtime report and check the event turns up in the recent events list. (You can cancel the test appointment in Acuity afterwards.)
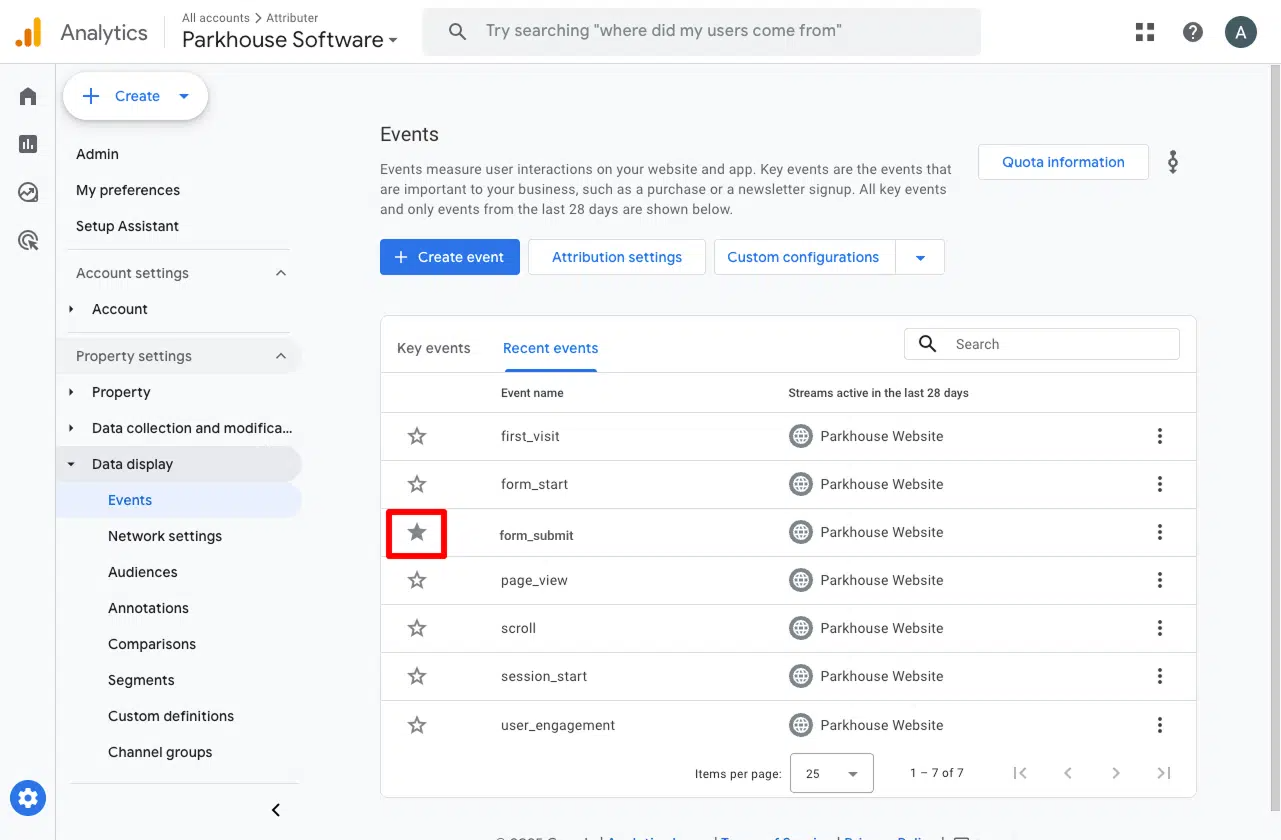
Once it's arriving, go to Admin, then Events, find the event in the list, and toggle it on as a Key Event. This is what tells GA4 to treat the event as a conversion in your acquisition and funnel reports, rather than leaving it sitting there as an ordinary event.
Pros and cons
Pros:
- It's free. Google Tag Manager costs nothing, and neither does the code we just gave you above :)
- It only fires once Acuity has confirmed the appointment was successful, not on some proxy for conversion (like clicking a button or visiting a thank you page)
- It carries the appointment type and price. This allows you to send different conversion events to your analytics tools for each appointment type, and/or send the real value of the appointment along with each conversion.
Cons:
- It doesn't send the name, email or phone of the person who booked. That's fine for analytics tools like GA4 because it doesn't accept them, but ad platforms like Google Ads and Meta Ads need those details to match a conversion back to a real person and the ad they clicked (and if it can't match the conversion, it doesn't get counted in your reports).
- It doesn't capture the click IDs either. The Google Click ID, Facebook Click ID, Microsoft Click ID, etc are what tie a conversion back to ad click with 100% certainty, and this method doesn't capture and send any of them.
- Every booking fires the same event. The appointment type comes along with it, but unless you build a separate trigger for each one, your Initial Consultation and your Follow Up Session land in the same total, and returning clients get counted as new leads.
- It only works on your own website. You can't put the main Google Tag Manager code on a hosted Acuity booking page, so it only works with scheduling widgets that you embed on your own site.
- It all happens in the visitor's browser, so ad blockers and privacy-focused browsers like Safari can stop the conversion from ever being recorded. Industry studies suggest you'll lose roughly 30% of conversions with this method.
- You get no support. The setup is a bit complicated and Google doesn't provide any support for Google Tag Manager, so if it doesn't work (or if it breaks later on) then you're on your own trying to fix it.
Method 2: Use Converly
Best for: Sending proper, server-side conversions to Google Ads, Meta Ads, ChatGPT Ads, LinkedIn Ads, and more, without having to do complicated configuration in Google Tag Manager.
Converly is a dedicated conversion tracking tool. It sends conversions to Google Ads, Meta Ads, LinkedIn Ads, GA4 and more every time someone books an appointment through Acuity Scheduling on your website.
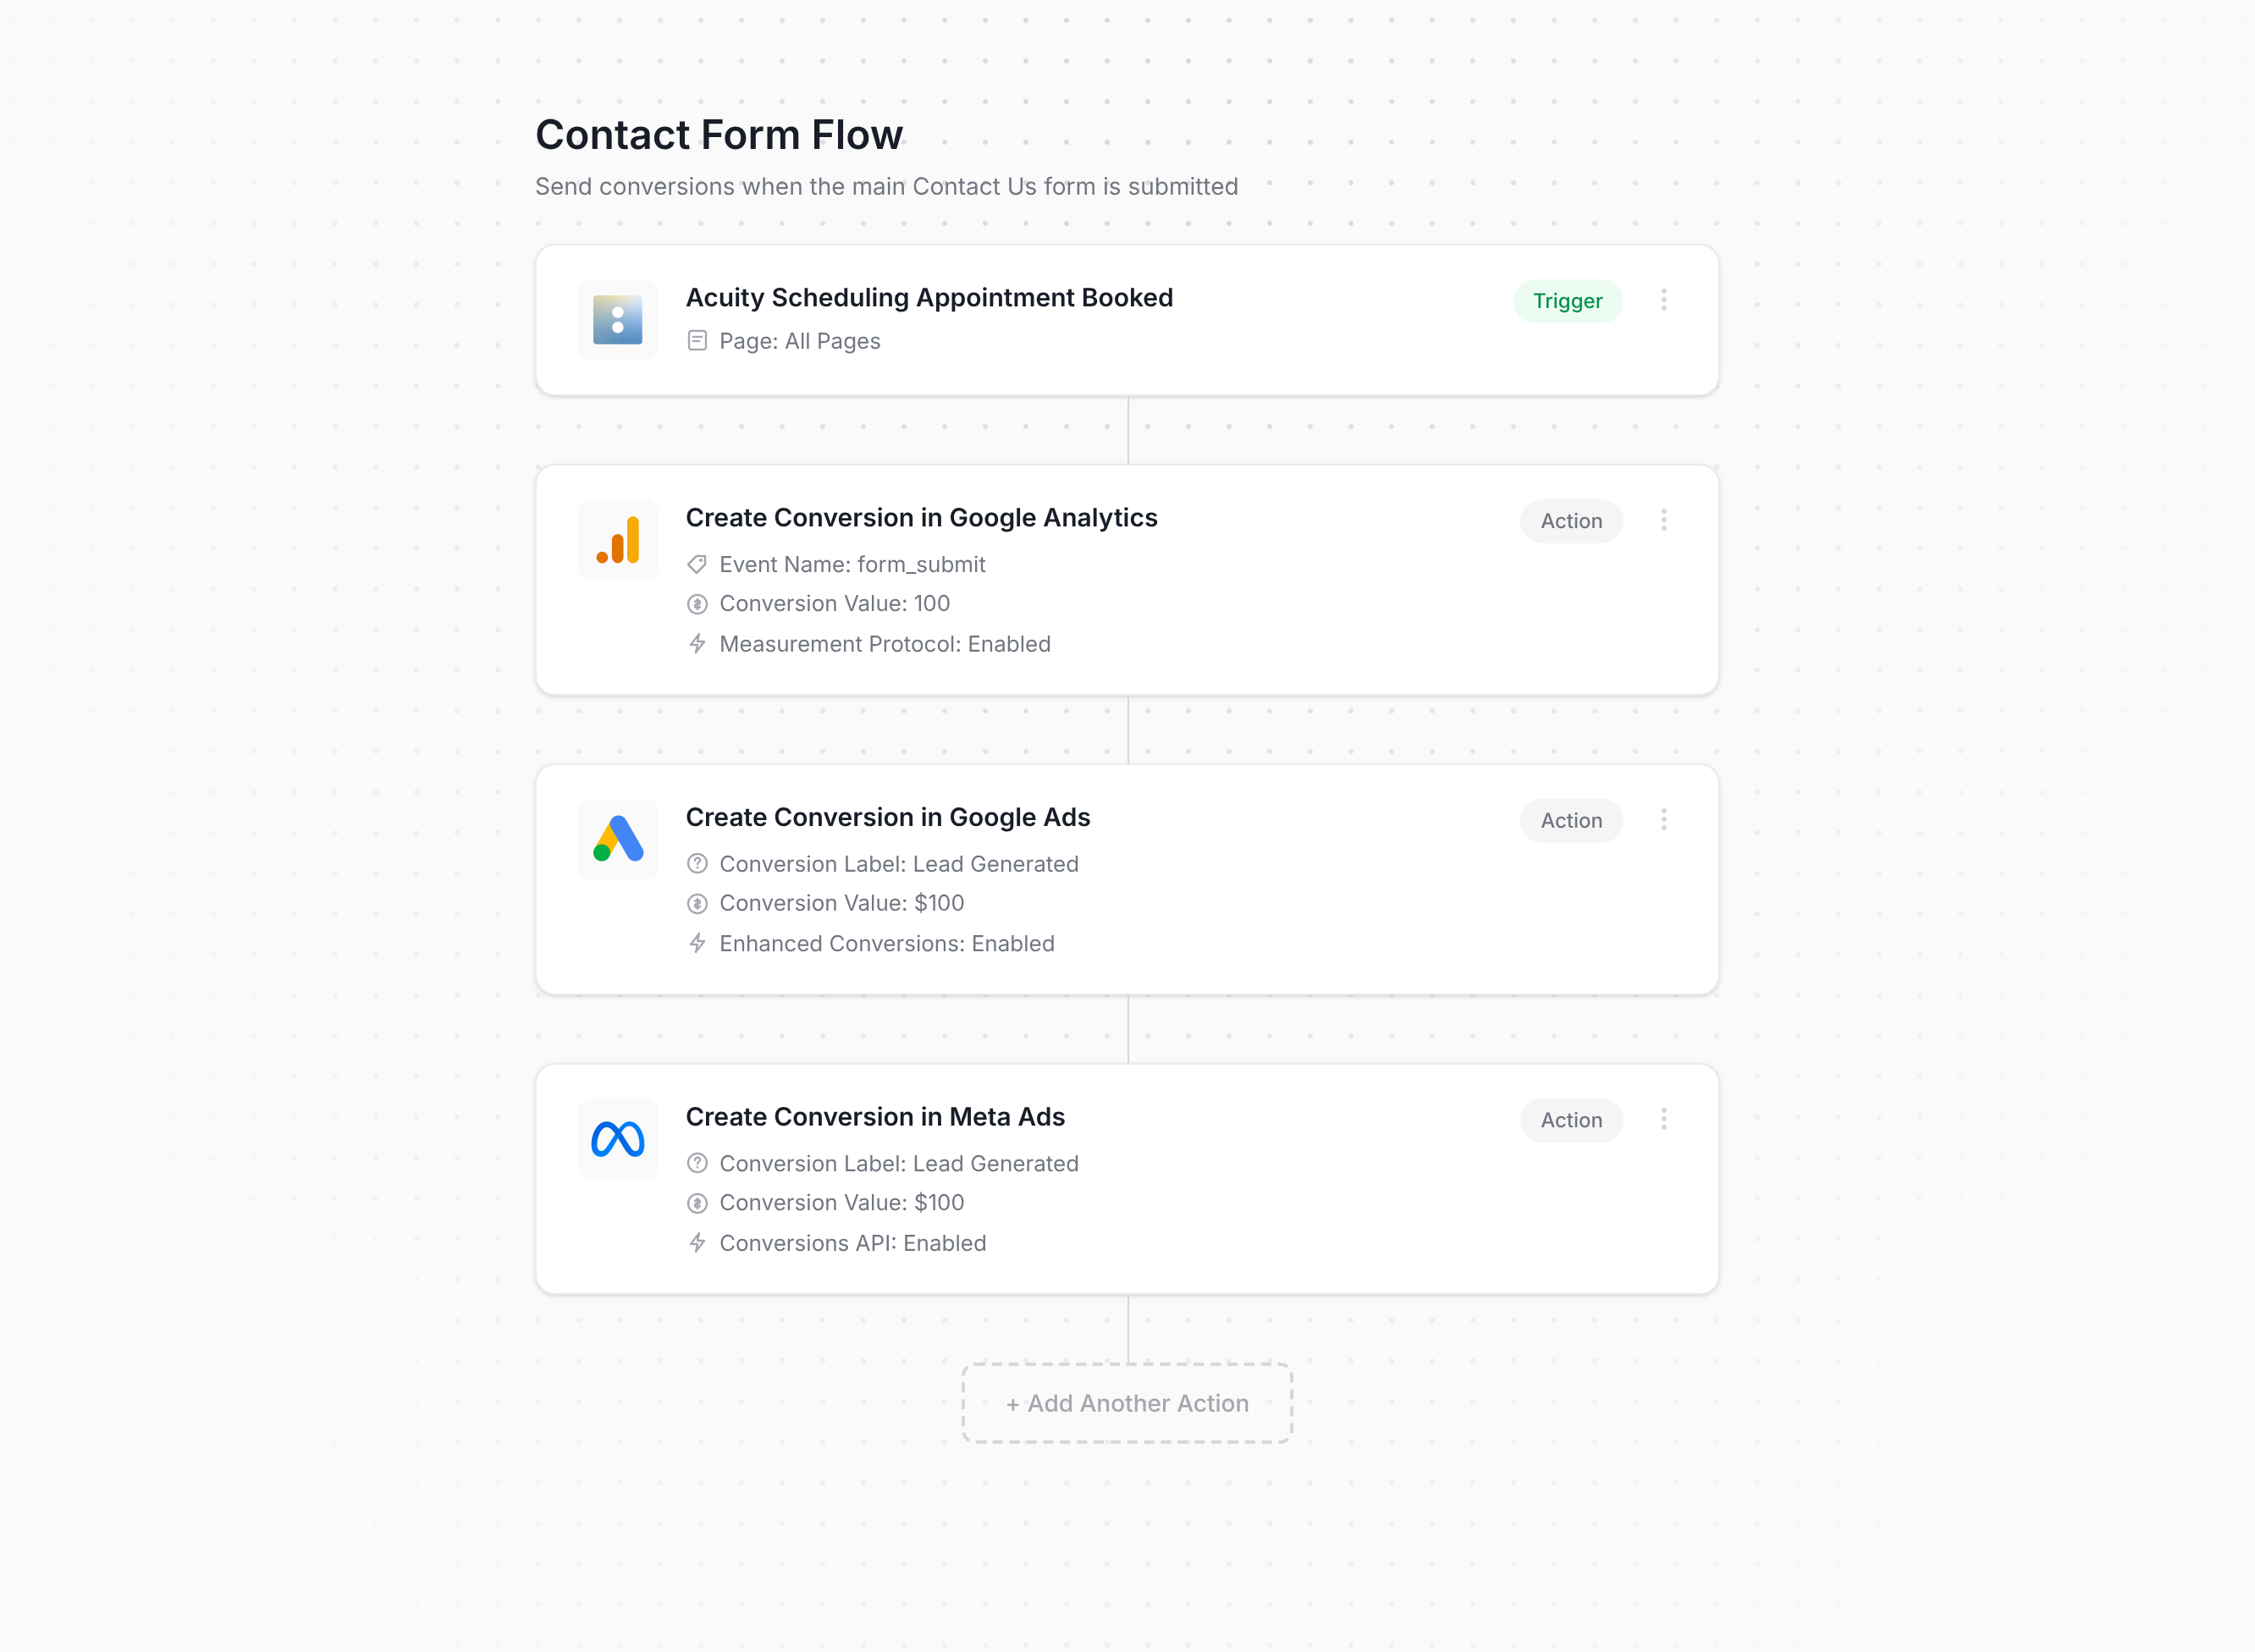
The screenshot above is basically the whole setup process. You simply choose a trigger (in this case, an appointment being booked in Acuity), add one or more actions (such as sending a conversion to Google Ads or Meta Ads), and you're done. There's no code to write and no complicated configuration.
Once set up, it watches for successful Acuity bookings, gets the name, email and phone number of the person who booked from the Acuity API, and sends it all to Converly's own servers. Our servers then pass the conversion on to Google Ads, Meta Ads and whatever other destinations you've connected (because this step runs on Converly's servers instead of in the visitor's browser, ad blockers and privacy browsers like Safari can't get in the way).
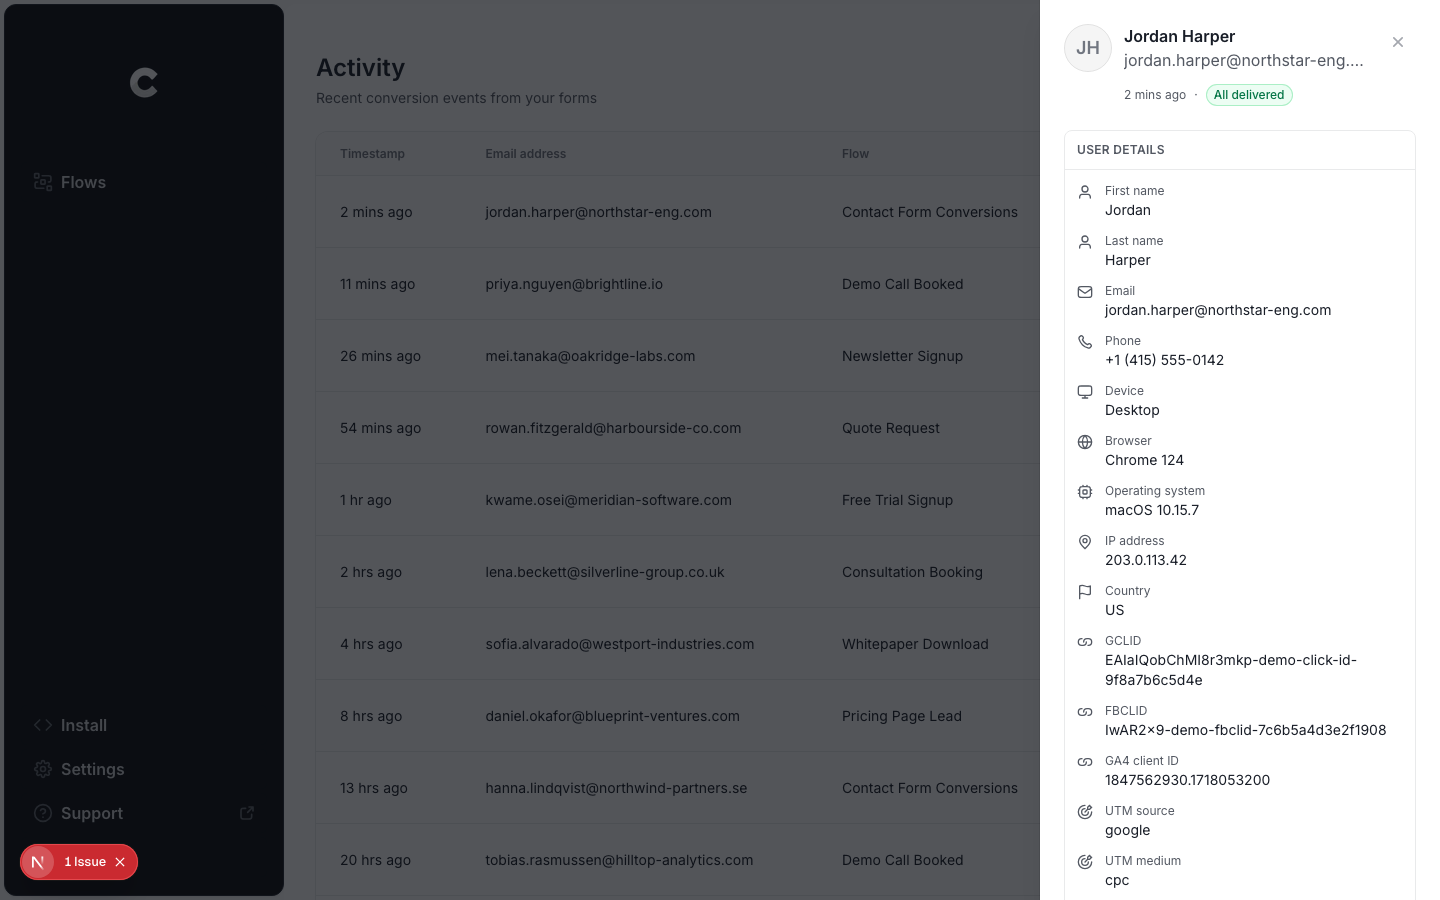
On top of that, it also captures the click IDs (i.e. GCLID, fbclid, etc), the browser cookies the ad platforms set, the visitor's IP address and their user agent, and sends them all over with each conversion.
There's also a full conversion log built in, showing everyone who booked through your Acuity Scheduling widget, exactly what data Converly captured, what got forwarded to each platform, and whether it made it through successfully.
Pros and cons
Pros:
- Setup is genuinely quick and easy. Pick a trigger, pick your actions, and you're done. There's no code to write or maintain and nothing complicated to configure.
- It's the only method here that sends the details of the person who booked. Converly fetches the name, email and phone number of the person who booked and sends it over to Google Ads, Meta Ads, etc with each conversion.
- Sends click IDs, cookies, IP address and user agent with every conversion, which combined with the name, email and phone, gives ad platforms all the data they need to match a conversion abck to a real person and the original ad they clicked.
- Sends conversions server-side, so ad blockers and privacy browsers can't get in the way. You can expect to get around 30% more recorded conversions than you'd get from a Google Tag Manager setup.
- Supports conditional logic, so you can easily choose which Acuity appointment types actually count as a conversion (like sending a conversion when someone books an Initial Consultation, but not a Follow Up Session).
- Sends a static value for each conversion (i.e. $50) or can be easily configured to get the exact price of each booking and send it on to Google Ads, Meta Ads, etc with each conversion.
- Lets you connect Google Ads, Meta Ads, etc directly inside Converly and just choose which conversion should fire. No hunting around for account IDs or conversion IDs.
- Comes with a dedicated MCP and CLI, so you can connect an AI tool like Claude or ChatGPT, tell it to 'Set up conversion tracking in Google Ads and Meta Ads when someone books an appointment in Acuity', and it will set the whole thing up for you.
- Includes a full conversion log showing everyone who booked through Acuity, what data was captured, whether it was successfully delivered, and more.
- Backed by a real support team (with 20+ years of experience in conversion tracking and analytics) who will help you get set up and fix any problems.
Cons:
- It costs money once the free trial is over. Plans start at $19 a month.
So which method should I use?
Here's how the two ways to track Acuity Scheduling conversions compare.
| Method | Best for | Sends conversions to | Data sent |
|---|---|---|---|
| Method 1. Google Tag Manager, using our free code | Sending bookings to analytics tools | Google Analytics 4, Plausible, etc. | The booking event only, with no name, email or phone |
| Method 2. Converly | Sending to any ad platform, with the least setup work | Google Ads, Meta Ads, LinkedIn Ads, ChatGPT Ads, GA4 and more | Name, email and phone, plus the GCLID, the Meta click ID, IP address and user agent |
Wrap up
Conversion tracking rarely gets much attention, but these days it's actually one of the biggest factors in how well your advertising performs.
If you set it up properly, the ad platforms finally get the data they need to learn what your ideal customer looks like, and they can go and show your ads to more people like them (which will ultimately get you more appointments at a lower cost).
It makes such a difference in fact, that Google and Meta have both published figures on it. Google says businesses that switch to proper server-side conversion tracking see their conversions rise by around 19% on average, and Meta reports a 23% lift from making the same move.
Converly gives you all the benefits of server-side tracking with none of the hard parts. You simply choose your trigger (someone booking an appointment in Acuity), pick which platforms should receive the conversions, and you're done.
You can get started for free (the trial doesn't need a credit card), and most people are fully up and running in well under 10 minutes. Start your 14-day free trial today.
About the author

Aaron is the founder of Converly. With over 15 years of experience in digital marketing and SaaS, he's passionate about helping businesses track and optimise their ad conversions.